French manicure is considered the most universal and widespread nail design technique among professionals and simple fashionistas. French has not lost its relevance for many seasons, being considered the best choice for stylish business women, teenage girls, creative individuals, athletes, etc.
But modern fashionistas are not used to standing still, so the classic French jacket is being replaced by the reverse one, which looks no less impressive and attractive. The main difference between the new variation of French manicure is the location of the contrast zone. In anti-french it is not at the end of the nail, but near the hole.
Every girl can do the reverse French, just follow the recommendations presented in our article.
How to do a reverse French manicure
The difference between the French jacket ends only in the location of the contrast zone. Otherwise, it is no different from the classic version.
To create such a design, both ordinary decorative varnish and gel coating are used. The shades for reverse French manicure are almost identical to French manicure.
Reverse French looks great on nails of any length. It looks especially advantageous on short nails, visually lengthening them and making the hands more graceful.
The procedure for performing a reverse French stitch:
- Give your nails the perfect shape using a nail file or other manicure tools
- treat your nails with nail polish remover. Thanks to this, they will be free from unpleasant oily shine, and the coating will last longer.
- Apply a base to your nails - varnishes in light or dark shades, depending on the chosen design.
- Paint the edge of the nail with a contrasting polish. To do this, use a stencil, sticker or brush.
As you can see, the procedure for applying reverse French is simple and easy to do at home.
New French nail designs 2021
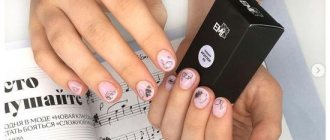
French manicure this year is not much different from previous years. Various variations of its execution have been added. Now it has become more neat, stylish and elegant. A minimal amount of decor is used along with it. Preference is given to simplicity and minimalism, hand-drawing.
French style goes well with rubbing, crystals, geometric design, and casting.
This is interesting: how to do a French manicure with gel polish.
Our editor's solo project
When did Kurt Russell's heroes stop being heroes? www.bunnycup.ru
The following fashionable ideas for French nails 2021 are especially popular
- Matte French manicure.
- Combination of a French manicure with a moon manicure.
- Geometric shapes for decorating the free edge of the nails.
- Combined design (French + plain coating or pattern).
- Gradient French manicure.
- French stripe.
Reverse French gel polish
Creating a reverse French coat with gel polish is practically no different from designing with decorative coatings. The only condition is the use of an LED lamp. This will allow you to dry the gel as much as possible and create an even design without flaws or drips.
It is necessary to dry the gel polish one at a time. First, apply a base coat to the surface of the nail, and after drying completely, draw a “smile”.
Reverse French with Negative Space
How to make a reverse French?
No matter what you use - gel, gel polish, regular polish, acrylic paint or foil - you need a steady hand and confident technique. You can draw a curved line in the nail hole using a rounded adhesive stencil. If you don’t have a stencil, you can use regular electrical tape or the rounded edge of an adhesive plaster. If you watched the previous videos in this article, you have already seen that with an experienced hand you can draw a smile line without any stencil - just draw it with a brush.
Try this master class using adhesive tape:
How to draw a smile line step by step:
Reverse French photo: tips and ideas for design
If the traditional French manicure is already somewhat boring and does not evoke due admiration, then a reverse French manicure can become the main highlight of your look. This is a great solution for office style, business meetings or get-togethers with friends. Only color schemes and decorative elements change.
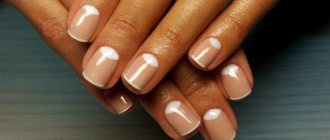
Classic French manicure
Many girls and women prefer the classic version of French manicure. It allows you to keep your nails looking great, regardless of the dress code at work or school. Minimal decorative elements are acceptable. See photos of new classic French nail designs in 2021.
Nail length for reverse French
The French manicure has gained the reputation of a universal technique, so many fashionistas perform it on their nails without taking into account the length and width of their fingers and hands. There is one caveat regarding the reverse French. It does not look good on short and thick fingers. This design visually shortens the nails, making the hands even wider and more voluminous.
On thin, graceful, long and middle fingers, anti-French, on the contrary, looks attractive and appropriate.
Popular nail shapes for reverse French
According to nail experts, there are 2 options for reverse French. This is a lunar manicure, which many consider to be a separate design technique, and a method of highlighting a hole using a narrow strip along the nail growth line, the so-called “smile”.
Both of these directions require ideal nail shape without chipping, splitting, non-standard lines and different nail lengths on all fingers. Give your nails classic shapes: oval, almond, soft square, pointed, etc. It is on them that the reverse jacket looks more stylish and attractive.
Avoid rectangular nails with a sharp “chopped” edge, beveled shape and other extravagant options.
Reverse French color combination
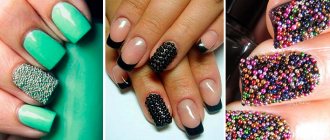
When choosing shades for a future manicure, fashionistas are divided into two camps. Some try to highlight their nails as much as possible, using bright, saturated colors with an abundance of sequins, microbeads, stamping, and patterns.
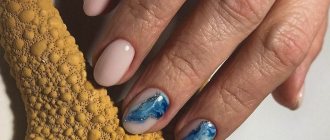
Others adhere to classic options, believing that a manicure should be in harmony with skin color. They choose pastel shades - beige, ivory, peach, cream, light pink and other delicate shades. These colors are closest to the natural color of a healthy nail.
For an office look, deep dark shades are suitable - plum, burgundy, rich blue. The combination of black and white, blue and white, etc. looks strict and stylish.
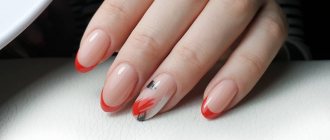
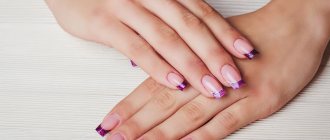
The combination of catchy shades is the choice of young girls. This reverse French jacket is saturated with red, yellow, green, orange colors and is decorated with numerous decorations, including stucco.
Reverse French style design examples
Let's look at a few examples of how a reverse French manicure is done.
Summer jacket "Watermelon"
Such a playful and cheerful design should really appeal to young girls. To make it, you need to buy varnishes in white, green, black and watermelon. You will also need a thin brush. We design our nails like this:
- Apply watermelon-colored polish in two layers to prepared and coated nails.
- Then with a thin brush we draw first a green and then a white stripe at the base of the nail plate.
- Now all that remains is to place black elongated dots, like seeds in a watermelon.
- We fix everything with a transparent finishing coat.
Black reverse french
This manicure is not difficult to do if you have a special metal tool for painting nails - dots. It is convenient for them to place large and small dots of the same size. In addition, you will need varnishes in black, peach, white and blue. We perform manicure on nails in this order:
- After preparing the nails, cover them with a colorless manicure base.
- Now we perform a two-layer coating of black varnish. Let it dry.
- Next, using dots, we draw large dots with peach polish in the shape of the nail plate. We complement the pattern with small white dots. We additionally decorate the nail plates on the ring fingers with a second row of large blue and small white dots.
- To seal the manicure, apply a clear top coat.
Refreshing manicure
For this nail design you will need yellow, turquoise, lilac and white varnishes, as well as stencils for a French manicure:
- First, we paint the nails covered with the base with colored varnishes. In this case, you can choose your own color for each nail plate. It is better to perform two layers of coating.
- Then, when the varnish dries, use a stencil and white varnish to highlight the tip of the nail and the hole area. After this, the stencils can be removed.
- When the polish is dry, apply a clear nail finish.
In the Manicurof salon you can choose the most fashionable inverted jacket, which our masters will bring to life on your hands. To make an appointment for a manicure and clarify the price, you just need to contact us at the phone number indicated on the website.
How to make a reverse French stitch yourself
Having looked at the reverse French options for the first time, many girls come to the conclusion that no one except a master will make such a design. However, a variety of inventions in the nail industry come to the rescue of simple fashionistas.
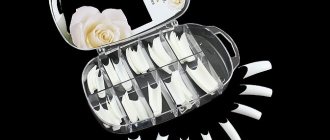
The most popular of them are applicators. They are presented in large quantities in stores and have a wide variety of shapes. The main purpose of this simple tool is to limit the space where you want to apply polish.
In addition, you can highlight the contrasting zone of the reverse manicure using thin brushes for painting. Don't try to create an elegant design with standard varnish brushes. They are too big and clumsy for such painstaking work.
Markers for manicure are a real find for creative girls. In appearance, they look like ordinary felt-tip pens, but they perform a completely different function - painting on nails.
Any woman, even those without artistic abilities, can use manicure markers. Such “painting pens” are filled with regular varnish, which can be applied to gel polish.
Patterns made with markers quickly lose their appearance, so always seal your manicure with a finishing polish.
If you are tired of the classic French manicure, but the office or business dress code does not allow you to do something more extravagant and catchy, then the reverse French manicure will help you out. A slight shift in the contrast zone transforms a boring design into an attractive and elegant nail art.
Is it possible to make anti-french at home?
Due to the growing popularity of anti-French nail art, it is not always possible to quickly sign up for a procedure with a professional, because... Many people think that making such an interesting design on their nails, especially on their own, is not an easy task, so they prefer to entrust their nails to masters. But in reality, everything is much simpler; if you stock up on patience, the necessary materials, detailed instructions and inspiration, then a good result is guaranteed.
What is anti-french?
Anti-French manicure comes in two types: classic and multi-layer. Before you decide to get anti-french nails done, decide which type is most suitable for you, because... Application techniques are different and should not be mixed.
- Classic anti-french is a single-layer or two-layer varnish coating technique. As a result, you are left with either a completely unpainted hole on your nails or one painted in one layer.
- Multilayer anti-french is different in that several layers are applied to the nail at once, but each time the coverage area changes, so you get one color at the base of the nail and another in the center of the nail plate.
We make anti-french ourselves
To make anti-French nails at home, you will need detailed instructions that will describe each step step by step. Here she is:
Instruction No. 1 - classic reverse French
This method of applying varnish using the anti-French manicure technique is the simplest and is suitable for those who are just starting to master this type of nail design.
- Remove old nail polish, degrease the surface, and clean it from dirt.
- Carefully glue a sticker strip to the base of the nail, near the cuticle.
- Apply the varnish you prefer to the rest of the plate.
- After the first layer of varnish has completely dried, remove the sticker strip from the base.
- Cover the entire nail with protective enamel.
In this case, you have a reverse jacket with an unpainted smile line.
Instruction No. 2 - multi-layer reverse French manicure
This version of the reverse French is more complex, but if you do everything carefully and correctly, the result will be excellent.
- Clean the nails and degrease their surface.
- Apply the first layer of varnish to the entire plate.
- Place a sticker strip on the base of the nail.
- We cover the rest of the nail with varnish of a different color.
- Wait for it to dry completely and carefully remove the sticker strip.
Instruction No. 3 - anti-french without sticker strip
This technique is suitable for those who have already become proficient and can do without special sticker strips.
- As in the first two options, you first need to completely clean the nails of dirt and grease.
- Then apply varnish to the entire surface of the nail.
- Wait for the first layer to dry completely and choose a different color polish to highlight the center of the nail.
- Dip the brush into the new varnish and wait until the excess varnish drips off. When there is only one drop left on the tip of the brush, you need to carefully place the brush in the middle of the nail, about 1-2 millimeters above the base, and, without lifting the brush from the surface, stretch the drop with the brush to the tip.
- If you don’t quite understand how to do this, then watch the video instructions that show each step.
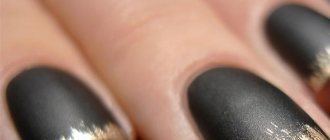
Instruction No. 4 - reverse French using foil
This lunar anti-french is made not only with varnish, but also with special foil.
- Clean the surface of the nail from dirt.
- Cover the nail with a base protectant.
- Apply special glue to the base of the plate.
- Glue gold or silver foil onto this glue.
- Wait until it dries and tear off the foil with a sharp movement at the edge of the nail. You will have foil imprinted on this place and you will get a golden or silver nail.
- Cover the nail with a varnish of a different color, retreating 3-4 millimeters from the cuticle, creating a smile line at the cuticle.
- Wait until dry.
In all cases, the final stage of the reverse French manicure should be to cover the nails with a protective layer of varnish so that the manicure lasts for a week. If you want to keep this design even longer, then it is better to do reverse French with gel polish, but for this you will need other basic products and additional equipment.