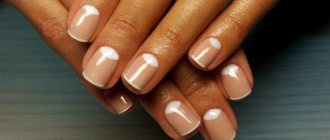
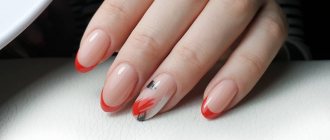
French or French manicure has been the most popular type of nail design for 100 years. The technique deliberately introduced by Hollywood makeup artists captivates women and, importantly, attracts the gaze of men as a compromise between aesthetics and naturalness. French gel polish (shellac) is the best nail art option for everyday life: a long-lasting coating that blends seamlessly with any wardrobe. And NeoNail products are a guarantee that the coating will look flawless throughout the entire wear period.
French manicure with gel polish: a modern interpretation of the classic nail art
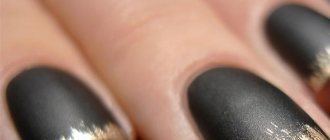
There was no chance for gel polish to remain unclaimed. The coating can withstand significant loads and prevents breakage of the nail plate itself. And if you consider that manufacturers are constantly adding to the existing variety of colors, it becomes obvious that the peak of demand has not yet passed. And it is the durability of the coating that largely determines the choice of nail art with gel polish: not every woman can afford to wear bright painting or an abundance of rhinestones for 20 days. The appearance and availability of gel polishes brought the fashion for coating using the French manicure technique to a new level: a white free edge against the background of imitation of a natural nail bed - a slightly embellished naturalness, appropriate in any situation.
Acrylic brushes
These brushes are designed to sculpt and top a new nail. It is important that they have sufficient absorbency to retain enough monomer to create a formulation of the required material consistency. For this reason, it is preferable to choose them from natural pile, which absorbs and retains liquid well.
Most often these are round brushes, as this is necessary in order for an even drop of material to form. Although sometimes flat instruments can be used. The pile must be chosen fairly hard for the same reason as with gel extensions. In addition, it is important that such a brush has a thin tip, which is convenient for applying powder to the smile line. However, some craftsmen buy an additional brush for a French coat.
Classic French gel polish: necessary materials and tools
One of the advantages of gel polish is the ability to do it yourself and not spend money on a manicurist. Even French, which is considered a rather complex technique, can be done independently if you know the techniques and have the necessary set of tools.
Required:
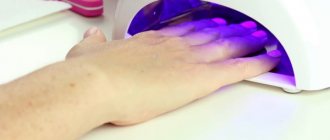
- Ultraviolet or LED lamp. High power is not necessary: any NeoNail lamp is suitable for gel polish. Only the polymerization time will depend on the type of light wave.
- Base coat from a series of gel polishes. NeoNail collections provide freedom of choice: rubber composition is suitable for “capricious” nails, and Exstra for thin nails. Both formulas are self-leveling and guarantee good durability.
- Top gel is the final layer that provides not only a bright shine, but also protection from abrasion and scratches. Masters can endlessly argue about tastes, proving the benefits of a composition with or without a sticky layer, so NeoNail took care of both. All possible finishing coating options are available: with a dispersion layer and TOP DRY, ultra-glossy compositions and a soft velvety “satin” gloss that gives the surface, crystal-transparent and tinted with micro-sparkles - the choice is only up to the master.
- Camouflage (nude or natural pink) gel polish for the nail bed area and white for the free edge. Beginners can choose the French version without camouflage, leaving only a transparent base on the nail bed. This will eliminate common mistakes when applying color along the cuticle line. Unfortunately, this method is only suitable for long nail beds that do not require full color coverage. In order to cover the natural smile line with a short nail bed, dense covering colors are needed. In the NeoNail collections, you should pay attention to the romantic pink tone “Caramel nude” No. 5140, shimmering with cold highlights “Silky Nude” No. 4676 and the classic peach “Natural Beauty” No. 3192. All three options fit perfectly without “bald spots” and will not cause any trouble even for a novice master.
- Primer is a primer that degreases the nail plate and enhances the adhesion of keratin flakes to artificial turf. This composition prevents detachments and ensures durability of the material.
- Cleaner is a liquid for removing the sticky layer. Adhesive secretions are a feature of the entire gel system: when working with gel polish using the French technique, the same product will be used to wash out the smile line. To simplify the work, you should prepare a small glass for the cleaner in advance.
- Non-woven wipes for removing the sticky layer. You can use thin, damp hygienic ones. The composition with which they were initially impregnated will not interfere with the work.
- A hard brush for washing out the smile line. A small “petal” is ideal.
- Cuticle oil. This composition will not only tighten the skin and make its contour more tidy, but will also have a beneficial effect on the growth of nails under the coating and their condition after removal. The NeoNail collection of manicure oils will pleasantly surprise you with a variety of delicate, unobtrusive scents.
There are also few auxiliary tools needed for the work: a file for processing the free edge and giving the required shape and a buffer sander for preparing the surface of the plate for coating.
French gel polish: current color range 2021
The color palette of gel polishes is so wide that it can be difficult to make a choice in favor of any shade. In addition, in 2021 there are no special prohibitions on the color scheme for a French jacket. You can experiment endlessly, creating a new, unusual design. But in general, we note that lovers of universal manicure should pay attention to the nude range: white, beige, sand, milky color and others like that. Pastel colors are also popular. Among them are delicate pink, lilac, blue, yellow, green and other shades. They combine very well with each other. Therefore, they are very often used in the same nail design.
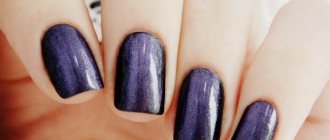
As for dark, deep shades, burgundy, emerald, dark blue, purple and other colors look very beautiful on nails. They look self-sufficient and rarely require additional decoration. Red and black colors are also popular among modern fashionistas. Moreover, they are used not only to create an evening manicure, but also in everyday life.
In the process of decorating your nails with gel polish, you must immediately decide on the main color. It is he who will fill the main part of the nail plate. After this, it is important to choose the right shade for your smile line. Please note that it does not have to be the same on all nails. In 2021, nail artists are increasingly decorating the smile line with different shades.
Technique for performing French manicure with gel polish
To perform a French manicure with gel polish, the master will need 50-80 minutes. But this is subject to the condition that the coating is not done on your own nails. When working independently, time is inevitably lost when the layer on one hand is dried in the lamp, so it’s worth putting everything aside in advance and ensuring yourself peace. The work will consist of three stages: the first of them is preparation.
Having organized the workplace and prepared the materials listed above, you can begin to work:
- file the free edge and give the nails the desired shape;
- we process the cuticle in any way without maceration, since steaming will reduce the durability of the coating;
- grind the plate with a 100/180 grid buff;
- remove all dirt with a napkin soaked in cleaner.
At this stage, you need to make sure that the nails are perfectly clean: there are no traces of the used compounds left on the surface, there are no hairs from cotton pads that are often used to remove polish, and the free edge is absolutely uniform.
The second stage is coating:
- A primer is applied to the prepared plate and its end;
- when applying base gel polish, the end of the nail is sealed;
- the base gel, as a rule, polymerizes for 2 minutes in a UV lamp or 30 seconds in an LED device, but this point must be clarified in detail on the packaging of the specific material;
- The camouflage composition selected in advance is applied carefully so as not to touch the cuticle and side ridges, and is baked in layers.
The camouflage may have to be applied in 2 layers: the main thing is that the coating lays perfectly evenly. After baking these layers, the dispersion is removed: this way the white gel polish will not be stained by adhesive secretions and will leak less on the smile line. After removing the sticky layer with a napkin moistened with cleaner, we prepare a brush and white gel polish for painting the French pattern. White quality is half the battle. Specially designed to highlight the free edge, French White 5055 will lay down perfectly from the first layer and cover the end well.
Making a flawless smile line “French White” No. 5055 from NeoNail is not as difficult as it seems:
- Apply white gel polish to the edge of the nail;
- carefully seal the end;
- We wet the petal brush in the cleaner and, squeezing it on a clean napkin, “move” the gel polish from the center of the smile line to the corners.
It is worth dwelling on this process in more detail: it is the main one in the procedure. A “dramatic” smile with high corners is in fashion. Place the tip of the petal brush at the center of the smile line, marking the required depth. Then we smoothly draw a line to the nail ridges and the brush itself will do everything: the cleaner will erase the excess white gel and form a “chiseled” edge. Having obtained the desired result, we polymerize.
This procedure should be performed on each finger separately: by quickly baking the gel polish you can prevent the line from running down. After completing the French coat, the sticky layer must be removed: this will reveal any defects that can be corrected immediately.
If the coating is satisfactory, you can apply top gel. It evens out the surface and gives the entire manicure a glossy shine. A drop of oil on the cuticle at the last stage will be the finishing point.
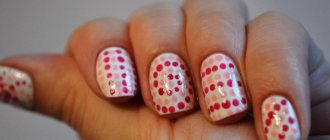
How to use gel paint
For work use:
- brushes (thin, flat or fan, depending on what design is intended);
- dots - another tool for drawing dots and patterns with gel paint on nails;
- a palette for mixing colors, it can be easily replaced with a piece of foil or thick polyethylene;
- ultraviolet lamp for polymerization;
- buffer or polisher for removing gloss from the nail plate.
- degreasing agent;
- base for gel polish;
- finishing coat (top).
The principle of operation is similar to the technique of applying shellac. Only with paint it is easy to draw patterns, taking your time and drawing every detail. Use gel paint on the natural nail and on the extended one. After the manicure, be sure to dry it under the rays of a special lamp.
How to dilute gel paint
If the product has dried out, even around the edges, then you should not try to revive it, it is better to throw it away. Such material is no longer suitable for work; it has lost its properties.
You can only dilute the paint if you want to get a less saturated color. To do this, use a transparent gel or 1-2 drops of acrylic monomer.
How to apply gel paint on nails
When working with paint, you can experiment with the design in every possible way. This can be patterns and lines, as well as painting a large area of the nail plate, for example, a French manicure.
Use the product as follows:
- First, use a base product, which must be polymerized using a UV lamp.
- Next, a colored layer is laid down (it can be one or several), they also need to be dried each.
- Now the design itself: apply a little product to a thin brush and carry out the intended design. You can correct the pattern with an orange stick or another clean brush.
- Polymerize.
- If the product forms a sticky layer, remove it with a cotton pad and an alcohol solution.
- Next, the entire pattern is secured with a top coat.
How to dry gel paint on nails
Dry paint designs on nails using a UV or LED lamp.
Each layer is held under the rays of the lamp, with the hand positioned horizontally. In a UV lamp, the polymerization time is 1–2 minutes, in an LED lamp – 1 minute.
It is worth paying attention to the manufacturers' recommendations; drying time may vary for each product.
Important! The master needs to find out the power of his lamp. If the coating does not last long when worn and becomes deformed, it means that it has not dried out, so it is time for the existing device to change the heating elements.
Do I need to coat the gel paint with a top coat?
Securing with a topcoat depends on the nail design made with gel paints:
- Convex lines and patterns are usually not covered with a top coat; it is used before making a three-dimensional design.
- With the “velvet sand” technique, the paint is sprinkled with acrylic powder and only then sent for polymerization. No topcoat is used.
- After hardening, flat designs and French manicures are best secured with a top coat to extend the life of the manicure.
How to remove gel paint from nails
Paint, unlike gel polish, is not susceptible to solvents. But this does not mean that it is not removable, because it is used together with shellac products.
First, the finishing coating is cut off. Afterwards you should use a remover - this is a special solvent for shellac. With its help, they wrap the nail plate, which is kept for 5 minutes, and if the top was not filed off, for 15 minutes. The surface must be degreased after removal.
But most often craftsmen remove paint by filing:
- file with abrasiveness 100/180 grit;
- using a machine, use ceramic or hard-fused cylindrical cutters.
French stencil: “Pros” and “Cons”
An alternative way to create a smile line is the stencil technique: before applying white color, a frame is glued to the nail, which is removed before polymerization. Those considering this technique should know:
- Fastening the stencils evenly, symmetrically and at the same distance from the free edge is not as easy as it seems. With the time spent trying, you can learn how to draw a line manually.
- After removing the stencil, the line rarely remains flawless; adjustments will definitely be required.
- The sticky layer of the stencil often remains on the coating; if it is not removed, the top gel will lie unevenly and sloppily. Additional surface cleaning also takes time.
- The curve of all stencils in the set is the same, and the thumb and pinky nail require a unique line that takes into account the width of the plate.
Experienced professionals make the perfect smile line in a matter of seconds: it’s worth making the effort to master this skill and no longer think about auxiliary devices. Moreover, the latter rarely live up to expectations.
How to make a French jacket with a stencil?
If this is your first time making French stencils, then this is what you need! With their help, you can easily apply even the most intricate designs.
Stencils are not only semicircular for the classic French jacket, but also with lace, wavy and oblique patterns. They are made from paper, vinyl film and even metal or plastic.
Vinyl stencils are easy to use. They fit tightly to the plate of the nail and allow you to draw an even pattern.
The technology of painting with a stencil is simple. After you have applied the base color to your nail, wait until the polish dries completely.
- Then carefully peel the stencil off the plate and stick it on the nail, stepping back a few millimeters from the edge of the nail.
- Press the stencil firmly with an orange stick.
- Using a brush, gently apply the polish to the tip of your nail and let it dry.
- Peel off the strips and apply topcoat.
Types of French and new elements in the most popular coating
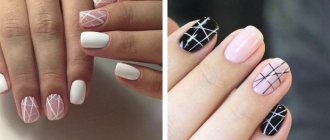
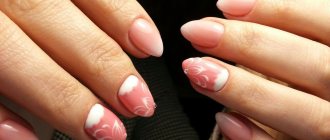
The French classic is a pink nail bed and a white free edge. But to some, this decision may seem overly conservative. Small tricks will add novelty and a touch of originality to the classics:
- French “Beverly” involves smoothing out the contrast of flesh and white with a translucent coating. Pearl or slightly shiny gel polishes or topcoats with the addition of glitter pigment are used. The same technique masks imperfections of both surfaces and lines.
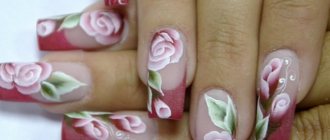
- Decorative French does not limit the choice of color. The free edge can be not only monochromatic, but also gradient or covered with a pattern.
- A geometric jacket is made with a dovetail-shaped smile line. The corner is drawn quickly with straight lines and looks very unusual.
- Asymmetrical French - an arch with one high “tendril”. As a rule, the outer side of the nail is made higher.
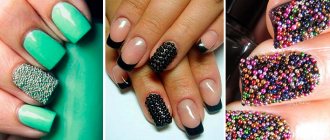
- A French jacket with a smile line is an excellent disguise. By placing rhinestones or shaped sparkles along the line, you can hide blemishes and decorate the coating. Additional fixation with finishing gel is required.
A French jacket from NeoNail will please the owner for 2-3 weeks. Then the coating must be removed correctly and carefully. How to do this, the training materials on the pages of our website will tell you. If these conditions are met, the legs will not suffer, and will delight you with good length and shape.
What are stencils for?
To draw a beautiful, neat line with a brush and white varnish at home without stencils, you will have to practice quite a lot. Therefore, to make the task easier, stencils were invented. And they come in two types: for applying patterns and “smile” shapes to nails and for obtaining beautiful designs on them. In addition, using ready-made strips at home significantly reduces the time and money spent on trips to the salon.
How can you replace stencils?
You can try to do without special stencils: cut a strip of adhesive tape or electrical tape into strips 2-3 cm long to wrap around your finger. Stick to the nail plate at the desired level and apply the polish with bold strokes! To avoid troubles such as peeled off varnish, the tape must be glued to some flat surface a couple of times so that a minimum of glue remains on it. You can also cut out homemade templates from paper and attach them to your nails using water.