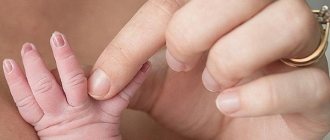
What is airbrush
The pigment is applied using an airbrush. This tool ensures uniform application of dye, which is supplied under air pressure and creates a fine spray.
Airbrush on nails is sometimes called aerial painting, it is characterized by the perfection of lines and transitions, allows you to create graphic elements, use artistic decoration in various styles with the effect of volume and a rough surface. This manicure takes less time compared to the classic technique.
Airbrush tools
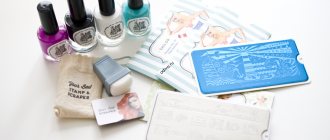
The airbrush for nails itself is accompanied by the necessary kit for work, which includes:
- special airbrush paints,
- stencils;
- training tips;
- tweezers.
Airbrush tools are sold in specialized stores; it is better to purchase from trusted manufacturers so as not to harm the equipment with low-quality components and paints. The kit includes special paints, stencils, cleaners and a compressor. Tools are sold separately or in sets for nail art. The price of components is almost equal to the price of the tool itself. In online stores, you can select a product in a catalog where there is a description of the characteristics and advantages.
Stencils
Stencils are designed to create a given design using simple-action nail airbrushes. But, even when using templates, each drawing is carefully planned to make a quality painting:
- paints are selected and mixed;
- the flow (quantity) of the supplied dye is adjusted;
- the distance from which the paint will be applied is thought through.
Stencils are created from film, which can be transparent or translucent. They are very elastic, which makes them convenient for use with nails of different shapes. Stencils are made using high-precision cutting of the pattern, so the designs are created clearly and the use of a stencil template is not visible.
- What benefits are provided to disabled people of group 2?
- Infiltration - what is it? Treatment of inflammatory, postoperative or post-injection infiltrate
- Pickled cucumbers with citric acid
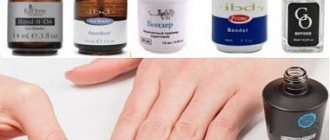
Airbrush paints
Special paints are used for painting with this tool. Airbrush nails are created with dyes that have a different consistency. If you use regular varnishes and dilute them with solvents, you can break the equipment. Acrylic airbrush paints are often included with the tool. If you want more colors than the standard set, then it is better to buy paint from a well-known manufacturer, for example, Fluo, Premium. It’s easy to order kits in online stores and specialized salons for nail technicians.
Compressor
For convenient work, it is important to choose the appropriate compressor that is suitable for your instrument. Device requirements:
- maximum quiet operation;
- light weight;
- performance.
Without this important detail, your airbrush will be useless. You need to approach the choice of compressor responsibly. Productivity, which characterizes the volume of air passed through the device per unit of time, is the most important requirement.
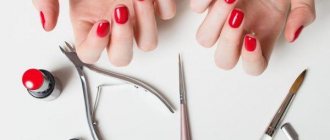
Materials for airbrush nails
The work uses an airbrush and a compressor that supplies air. Other tools and materials:
In airbrush technology, special coloring compounds and stencils are used for applying ornaments.
Paints and varnishes for artistic painting
The airbrush works with acrylic water-based paints that have high pigmentation and a light structure. Such compositions are distinguished by high-quality adhesion to the surface of the nail plate, ensure durability of the manicure, and pass through the nozzles of the device.
There are the following types of airbrush paints for nails:
A pipette is used to collect the pigment; 2-3 drops are enough to treat nails on one hand.
Airbrush stencils
For precise pigment coating, templates are used:
Special stencils for airbrushing on nails allow you to create original compositions.
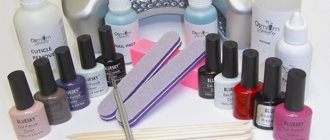
Ready-made sets
Experienced craftsmen prefer to independently select materials for their work, taking into account professional experience; for beginners, ready-made kits will be the optimal solution. There are several types of kits:
- The basic set includes an airbrush, compressor and hose.
- The improved kit contains a stand, pipette, and cleaner. The contents of kits from different manufacturers may vary.
- The complete set includes all the tools, paints and stencils.
The cost of the kit ranges from 3,500 to 30,000 rubles.
Cleaning your airbrush when changing colors
When changing the color in the airbrush paint container, you can pour the remaining paint into a temporary container (for example, a cup); it may still be needed when painting. Never pour paint diluted with solvent into a container with undiluted paint, this will cause it to dry out quickly.
So that you don’t mind throwing away the paint, dilute it in a small amount (enough for a specific design, with experience you will learn to determine the right amount).
After draining the paint, pour a small amount of solvent into the container - if the paints are diluted with a solvent, water or alcohol - if the paints are water-based. You can close the nozzle cap with your finger, press the trigger and pull it slightly towards you, so air will enter through the channel into the paint container and mix it with the solvent.
We blow a small amount of solvent through the airbrush by pressing the trigger and pour the remaining solvent onto a rag and use it to wipe the container from any remaining paint, and the airbrush if there is any paint left on its body. Then pour the solvent again, blow it out, pour it onto a rag and wipe it.
In most cases, when changing paint in an airbrush, this cleaning procedure is sufficient. You can safely fill the airbrush with a different color and continue painting.
If you are not sure of the cleanliness of the container, you can additionally blow out some more solvent.
Airbrush and its types
An airbrush is a gun connected to a compressor using a hose. The device has the following elements:
- paint section;
- channel for the entry of pigment;
- air nozzle;
- control lever;
- a needle that controls the nozzle opening.
The material supply channel is closed with a needle. The dye and air mix when the lever is pressed, and a thin layer of pigment is sprayed onto the surface of the nail.
There are two types of airbrush for nails:
- Simple. Only the supply of pigment is controlled. Effective in working with templates, creating three-dimensional drawings and graphics.
- Double action. It is possible to regulate the air flow. This allows you to draw small details. The device can change the level of clarity of lines and their thickness.
Models may have different material nozzle volumes.
When choosing a device, important criteria are needle stroke and spray accuracy.
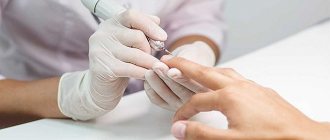
Working with an airbrush
First, the device must be assembled by connecting the hose and nail airbrush compressor. It is important to follow a number of rules:
After this, you can work on applying the design to the nail.
How to clean the nail machine
The airbrush should be washed after each use, when changing the dye. A cleaning station is designed for this, into which about 1.5 cm of water or solvent is poured. After screwing on the cap, the upper filter is inserted and connected to the nozzle cleaning hole. To remove any remaining pigment, press the trigger. The steps are repeated after adding a small amount of water to the dye tank.
The technicians thoroughly clean the device at the end of the working day:
- Blow out the remaining pigment.
- Wipe the walls of the tank.
- A special cleaner is poured into the tank. Point the nozzle at the napkin and press the trigger.
- Repeat step 3, but when pressing the trigger, close the nozzle with your finger. This allows you to wash away pigment residues from hard-to-reach places.
- The cleaner is drained and the residue is blown out with air. If necessary, repeat the steps.
- The air nozzle is removed, the trigger is pulled back to move the needle. Clean the walls with a cotton swab.
To clean a clogged joint between the nozzles, you need to unscrew the tip, treat the dirty area with a brush and dry it with a stream of air.
comparison table
Beginners often have a question about how to choose an airbrush for nails. It is recommended to give preference to trusted manufacturers:
- Iwata;
- Hansa;
- Evolution;
- Sparmax;
- Jas;
- AirNails;
- Fengda;
- Tagore;
- Wester.
Which airbrush is best to choose for nails depends on professional experience and required characteristics. The table shows a comparison of popular models.
| Model | Tank volume (ml) | Adjustment | Nozzle diameter (mm) | Cost, rub.) |
| Iwata NEO CN | 2 and 5 | Double independent | 0,35 | From 4200 to 4800 |
| Jas 1116 | 2 | Double independent | 0,2 | From 1500 to 2000 |
| Wester FPS 20 | 60 | Single | 0,35 | From 1700 to 2445 |
| Fengda BD 130K | 7 | Independent double | 0,3 | From 2000 to 2440 |
Inexpensive equipment suitable for beginners and occasional home use. When working with low-quality models, dye spraying may be inaccurate or wasteful; the result of the work depends on the choice of device. When purchasing a compressor, important criteria are the noise level during operation and the volume of air passed through.
Airbrush for nails is
Airbrushing is called artistic painting. In the art of nail art, designs with this style of execution are distinguished primarily by smooth color transitions. At the same time, the gradient is preserved, which cannot be achieved by other methods of classical application of dyes to nails. It is also worth paying attention to how and why baths are made to strengthen nails with sea salt.
An airbrush makes the application process much easier. It allows you to achieve various effects in a matter of seconds, and with the use of stencils, you can apply designs to your nails. As a result, it is possible to obtain an original design that can be changed even every day.
Performs manipulation using a special apparatus consisting of:
- Spray gun;
- Compressor;
- Connecting hose.
At the same time, you will need stencils, special paints (ordinary varnishes are not suitable for such purposes), as well as additional decorations. Naturally, the nail is first prepared - a hygienic manicure is carried out, a base is applied, and so on.
Working with an airbrush is carried out at the penultimate stage, when all that remains is to apply the finishing coat.
But in what case liquid glitter is used for nails and how good it looks on nails, you can see here.
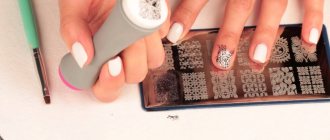
How to airbrush nails
To avoid making mistakes and get a quality manicure, you need to take special courses. A general step-by-step description of how to use the nail airbrush and template:
When spraying the dye, the nozzle is moved away or brought closer to the nail plate to change the contrast of the pattern. When the pigment is applied by experienced craftsmen, the dye is applied to the nail in a dry layer.
Gradient on nails
The gradient technique involves a transition from one color to another. Using an airbrush, you can create unusual combinations of shades, complementing your nail design with graphics or decorative elements. The device allows you to accurately control each layer.
Airbrush ombre
The technique consists of smoothly lightening the ends by several tones within the same color range. An airbrush allows you to create such a design in a short time.
French airbrush on nails
Craftsmen use various techniques when creating a French jacket. 2 options for nail design in airbrushing deserve attention:
- The gradient is used for the main design, and the high contrast tips are painted on for a fixed effect. The technique is suitable even for short nails.
- An unusual play of shades can be created using sticky stripes and gradients.
The technique allows you to experiment with different shades, creating bold combinations and transitions.
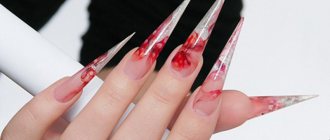
Airbrush drawings
The airbrush is used in contrasting nail art, allowing you to combine a dark base with light patterns and vice versa. Using airbrush stencils on your nails, you can create a design of any complexity.
Knowing how to paint with an airbrush, you can master various application techniques and learn how to create unusual effects.
How to use
Using an airbrush usually does not cause problems. The machine is easy to operate and many people master it within a few days after the first use when working with the same stencils or ombre style.
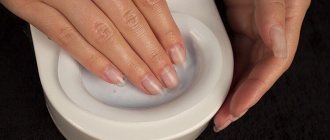
Preparation consists of:
- Hygienic manicure, including trimming, polishing, using a cuticle cutter, and shaping nails.
- Applying the base;
- Applying a colored base (it will look ugly on transparent airbrushing).
- Dry each layer separately until completely dry. If you use biogel, shellac or other similar materials, you must use a drying lamp before applying the pattern.
Next, the drawing is applied directly with an airbrush. It can be performed in several ways, which can be combined with each other, creating unusual compositions. Upon completion, the base is applied. But you can see how to use it as a nail stamping in this video.
Video on how to use an airbrush:
Using stencils
Application using stencils is one of the simplest. Often, special templates are attached to the airbrush apparatus, according to which you can apply a ready-made design to the nail. Many people say that the classic versions of stencils for the device are usually somewhat of the same type and not particularly “fun”, but this is a small problem that can be solved quite simply - purchase stencils for painting nails separately.
To apply the pattern, a stencil is applied to the previously prepared nail so that it covers the entire surface of the plate. After this, the holes that form the pattern are painted over with an airbrush so that there are no gaps. Next, the template is removed and the skin is cleaned of paint.
Airbrush paint is acrylic based and therefore simply washes off. But doing this without disturbing the design can sometimes be difficult, and therefore you need to be careful.
You may also be interested in information about how to strengthen nails with biogel at home.
Working with drawings
Drawings are a design created by oneself without any aids. Requires some skill and experience working with an airbrush. You should also take into account that your drawings may require the purchase of a more expensive unit, where you can control the level of paint supply, line thickness, and so on.
By adjusting the device to a certain power, you can easily create original patterns - from thematic designs to abstraction. Additionally, you can use acrylic powder, all kinds of rhinestones and other decorative ingredients. In general, everything depends on experience, skill and your own imagination.
Ombre design
Ombre is a term that is familiar to us in hairdressing. Indicates a transition from darker to lighter. It is very important that the color boundaries are not tracked during the process. Approximately the same conditions apply in nail art for this style. With an airbrush, achieving this effect is not difficult. Actually, this is the first thing that is easy to learn when working with the device.
Before application, it is worth adjusting the paint supply and intensity of application. Ideally, testing is best done on tips.
How much it costs to strengthen nails with acrylic powder and why such a procedure is carried out can be read here.
Useful tips
It is better to entrust airbrushing on nails to a professional master in a salon; if you do it yourself at home, the quality of the work will not allow you to wear a manicure for a long time.
Recommendations:
Before applying a drawing, it is important to think through the entire composition in advance; this will reduce work time and avoid mistakes.
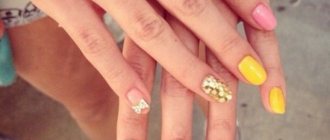
Design ideas using airbrush technique - photos, videos
From the photographs and videos presented, you can get ideas for using them in manicure or pedicure.