What is cat's eye
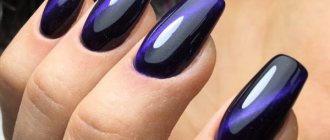
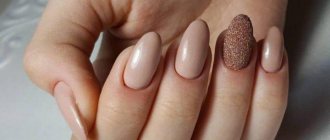
Gel polish with this name externally imitates a cat's eye stone or chrysoberyl. Its feature is a long flare of light that moves across the surface at different viewing angles.
Outwardly, it resembles a cat’s eye, hence the name of both the stone and the effect in nail design. The highlight is also the most saturated in color compared to the rest of the nail.
Previously, one leading color was clearly visible in the coating. A light strip was drawn with a magnet along the entire length or width of the nail. In modern versions of gel polish, we see a combination of several color shades, which, when processed with a magnet, give a chameleon effect.
Also, cat eye gel polish received an additional definition - 3D - due to the volume that can be obtained with its help in manicure.
The possibilities of applying patterns and designs using magnets have expanded significantly. If earlier it was just a long strip of light shimmering with light, now with the help of several magnets of different shapes and sizes you can draw waves, spheres, flowers, stars, graphics.
Features of "Cat's Eye" nail design
In nature, the digital stone is found; after processing, it acquires an unusually transparent depth, which is pierced in the center by a vertical ray of light, which does not change its location regardless of the angle of view of the stone.
This feature makes this mineral very similar to a cat's eye. The nail design of the same name is designed to replicate this effect.
To create such an impressive nail design, you will need special gel polish and a magnet. Gel polish contains metal particles that move towards it under the influence of a magnet.
The magnet is briefly brought to the newly painted nail and grains of metal, succumbing to physical law, move in its direction, creating the necessary image.
Initially, the basic design for Cat's Eye nails was limited to just a strip of light that could be "rotated" in any direction at will by moving a magnet. Now you can buy magnets with a wide variety of patterns, from waves and zigzags to stars and hearts. Any of them can be viewed separately in the store.
The line of gel-based varnishes “Cat's Eye” with mother-of-pearl amazes with the variety and richness of colors. This depth of color is achieved due to the concentrated content of the dye in the varnish, which also makes it more dense and resistant to abrasion, allowing you to keep your nails in excellent condition for up to one month.
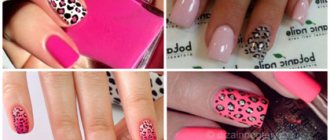
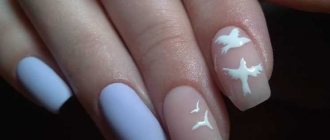
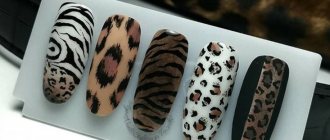
Choose a manicure color with cat eye polish, preferably dark shades. This will allow you to fully reveal the beauty of stylish nail design. Neutral tones are subtle and will show this effect only slightly. A matte finish in the same style will look interesting on the nails, as well as a combination of a “cat’s eye” on some with patterns on other nail plates.
According to the operating rules, the magnet must be stored separately from the gel polish to avoid the magnet losing its properties. So it’s better to keep it on another shelf or in different cosmetic bags.
The best monochromatic cat eye manicure ideas
Author:
Manicure
auto RU
Types of gel polishes with volume effect
Volume is achieved through deep colored highlights on a dark base. Experiments with magnets make it possible to place flickering strips horizontally, vertically, diagonally, and draw patterns and spheres.
3D gel polish is characterized by depth and saturation of highlights, which give it a three-dimensional effect. They can be created either due to a perfectly smooth, self-leveling surface, or due to inclusions of shiny particles that refract light at different angles and create the necessary volume. The most popular version of 3D gel polish is cat eye. It comes in one or two shades of highlights.
The 3d effect can also be achieved using other textures:
- Cat eye gel polish
- Cat eye pigments
- Cat eye gel polish with chameleon effect. Can only be applied to a black substrate to achieve the desired effect;
- Top with cat eye effect. It can be applied to any color substrate;
- Classic gel polish with a 3D effect of pronounced highlights.
Review of magnetic gel polishes with cat eye effect:
Rating – review of magnetic gel polishes with volume effect
Colored cat eye manicure
We will pay special attention to magnetic gel polishes. All of them contain a chic highlight to match the chosen color. For example, in the spring-summer 2021 season, delicate shimmers in shades of pink, blue, mint, orange, and turquoise will be popular. And gold, silver and deep colors are ideal for the cold season. Almost all dark magnetic gel polishes have good density, which makes these “cats” shiny! Various design and application options are welcome - they do not have to be used on a substrate.
Cat eye pigments for a 3D effect
A voluminous effect can be achieved even without the presence of a special varnish, but only with the help of “cat’s eye” pigment.
This allows you to diversify designs with existing shades of gel polish or gel paint, giving them additional volume using a metal pigment formed into a highlight with a magnet.
To do this, you can mix the pigment with a base, top, regular gel polish, gel paint, and use it as a 3D gel polish on a dark base. Some artists apply loose cat eye pigment to a layer of gel polish, mix it here with a thin brush, and then paint highlights with a magnet. This mixing of materials on the surface of the nail saves time and makes it possible to proportionally place different pigments in different areas of the surface of the plate. We combine several options for highlights in one nail design.
Matte cat eye manicure
A cool design is achieved when glitter and matte top are combined. The colors for covering nails are chosen completely different - depending on the time of year and wishes. For example, a black matte manicure and a silver “cat” will create a luminous, stylish design together. Or try a matte design with a glittery magnetic varnish droplet.
Magnets for cat eye effect
Depending on the magnet you choose, you can get different options for highlights in your nail design. The larger the area of the tool, the wider the grapple band. Thin magnets produce thin, neat stripes.
Depending on the shape, you can also select different versions of this tool. Usually the set comes with a medium-sized rectangular magnet, 3 cm in length. Round makes it possible to draw streamlined patterns, waves, spheres and semicircles. If your kit already contains several options for 3D cat eye polish, be sure to purchase magnet options of different shapes and sizes. They are as follows:
- Rectangular;
- Round;
- Magnetic point pen;
- Magnetic pen with 3-5 dots in a row at the end;
- Magnetic pen with balls at the end (for drawing flowers).
Life hacks from experienced craftsmen: you don’t have to buy magnets, but use those that you have in everyday life. Options:
- You can get magnets from old headphones;
- Remove them from the refrigerator and remove the stickers, leaving only the base for ease of use;
- A double magnet can be made by placing two round or small rectangular magnets on a pusher or any flat metal tool. Then you can move them or move them apart at different distances from each other, changing the pattern of the 3D varnish;
- Use the intercom key;
- Small round magnets-balls from a children's construction set, placed in a row, make it possible to draw thin stripes along the entire perimeter of the nail, or a “snake” pattern;
- A pen from a children's magnetic drawing board is used to create fine lines and monograms.
You can also get new effects in nail design by combining several round, ball or rectangular magnets, from 2 to 4. For example, rectangular ones are attached to each other with “adhesive” sides, joint to joint, or at right angles, if there are 4 pieces, and make it possible to draw stars with a different number of edges. If the magnets are small, “plant” them on a metal base to free your hands.
If you only have two thin small magnets, you can connect them together by attaching tips on the leg on different sides. The leg becomes a handle for this wider magnet and gives a wider flare.
Base for cat eye gel polishes
Gel polish with a volumetric effect can have a transparent, colored or translucent base, to which metallic colored particles are added. It is recommended to apply a dark undercoat for a deeper and richer effect. In some brands, the color base is so dense that no backing is required. For translucent or transparent options, it is better to use classic black or another dark shade that matches the palette of glitter varnish.
In professional lines, you can immediately purchase a ready-made set with a black base varnish, a 3D cat eye base layer and a transparent top. 1 or several different types of magnets are added to the same set, depending on the price.
Without a black backing, the three-dimensional effect will be almost invisible. In the case of a top coat, a volumetric highlight is created even on a light-colored substrate. This material can be used with any background color, the desired highlight will be obtained in any case.
Brands of gel polishes with volume effect
- Klio Professional cat eye – has a dense texture and applies well. In versions with a dark base, it does not require a substrate.
- Born Pretty Cat Eye Gel – has a liquid base, but is very magnetic. In light, translucent colors, a black base is required.
- TNL offers a wide range of magnetic varnishes. Walnut, emerald and lilac tones look very impressive.
- Pole is a translucent magnetic varnish with a dense texture and a wide range of colors. Requires a black backing to achieve a 3D highlight effect.
- Fox is a magnetic varnish on a transparent backing. One bottle combines glitter of several shades, which gives an even more “cosmic” glare effect.
- Rio Profi – varnishes on a transparent base with two-color magnetic pigments. Translucent.
- Bluesky - economical options for gel polish with a voluminous effect. Wide range of colors. Requires additional black backing.
In almost every professional series of gel polishes you can find options with a cat eye effect. Follow the coating instructions as some brands may vary slightly.
How to apply cat eye gel polish
- Prepare your nails for applying varnish, do a trim or hardware manicure;
- Degrease the surfaces of the nail plates and cover them with a self-leveling base. Dry in a lamp;
- Apply black gel polish in one layer as a base, dry in a lamp;
- Apply cat eye gel polish and use a magnet to draw highlights or patterns;
- When the drawing is ready, dry it in a lamp;
- Cover your nails with a top coat with or without a sticky layer, dry it in a lamp and remove the dispersion if necessary.
If the first time you don’t get the cat-eye effect or pattern you want, you can even out the varnish with a brush and try again before it polymerizes in the lamp.
Technique for creating a “cat” effect on nails
It’s not difficult to create a “cat’s eye” effect on your nails at home; it can be done on both natural and extended nails. Cat's eye looks good on short and long nails. It has proven itself quite well as a pedicure.
Manicure with cat eye effect
During the procedure, a certain sequence and accuracy should be followed . Regardless of which polish you choose: regular or gel polish, the application procedure is standard.
The preparatory stage, the main task of which is to prepare your hands for a manicure , consists of removing old varnish, creating a shape, processing cuticles, degreasing and polishing. After these procedures, you are ready to create beauty on your nails.
Basic Steps
- Apply a base - a pre-selected varnish of dark shades and dry it.
- Then apply a layer of magnetic varnish and immediately hold the magnet at a distance of 2-3 mm from the nail for 10-15 seconds . By changing the angle, you can influence the final drawing.
To prevent the polish from drying before the magnet is brought to the nail, you need to treat each nail separately and sequentially.
Gel polish , in this situation, has its own peculiarity - it is necessary to fix each applied layer in a lamp.
The process of creating a cat eye manicure
- First, a base coat , which should be dried in a UV or LED lamp.
- A base of dark varnish is placed on the base coat , which is also polymerized under a special lamp. If you want to create a delicate and transparent manicure, you should skip this step.
- Then each nail is individually coated with a layer of magnetic varnish . You must first hold the magnet over the coating of magnetic varnish and only then polymerize it. For best results, treat and immediately dry each nail separately.
- The finished manicure is fixed with a top coat in an ultraviolet or LED lamp, and finally the sticky layer is removed
Some tips
Special magnet
- You should only use special magnets or pens.
- Before use the bottle of varnish must be shaken so that the settled metal particles are evenly mixed with the varnish.
- In the absence of dark varnish, you can cover the nail with two layers of magnetic varnish as a base layer, only the first layer needs to be dried without using a magnet.
- You can use a glossy or matte sealer. This will give you the opportunity to create a new image and experiment.
For the secrets and detailed process of creating a cat-eye manicure, watch the video tutorial: