What is sand for nails called?
Sand for nails is called velvet, since the coating with this material is fleecy and feels like the fabric of the same name. The idea of creation belongs to Ekaterina Miroshnichenko, who proposed grinding acrylic to very small particles. Therefore, the main component is specially ground powder, and it is complemented by viscose fibers. The resulting powder visually resembles shiny velvet dust.
Depending on the size of the granules, the powder is divided into:
- flock is the smallest particles;
- medium size - most often used by masters in nail art;
- large in the form of multifaceted particles, used to decorate holiday manicures.
What is the difference between acrylic powder and velvet sand?
Both of these materials are polymer powder. Only their composition is different. In addition to acrylic powder of a special coarser grind, the composition includes microparticles and fibers that add velvety to the material.
Although the products are identical, acrylic powder lasts longer than sand, but does not look as voluminous on the nails. But judging by the reviews of the girls, this manicure solution is very durable and convenient in everyday life.
To create a sand manicure, you can use acrylic powder. To get a sparkling design, you can add glitter of different sizes to it.
The velvet product itself is a patented material and its cost is significantly higher than that of acrylic powder. Each girl decides for herself which product to choose from these two.
Acrylic powder or velvet sand: which is better to choose?
Acrylic powder was initially used only for artificial nail extensions; its composition is identical to velvet sand. Essentially, these are two polymer powders that differ in structure. The sand grains of the velvet coating are larger, thanks to which the sand pattern on the nails looks three-dimensional and very expressive.
Taking into account that velvet sand can be replaced with acrylic powder in case of shortage, we can conclude that this is practically the same thing.
Often sparkles, various decorations and rhinestones are added to the sand.
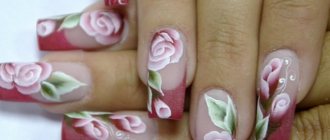
In combination with painting or casting, the manicure turns out voluminous, but looks neat and impressive.
It combines well with rhinestones and still looks more impressive on a matte finish, on which gel paint adheres better than on a glossy one.
Acrylic powder is more wear-resistant and will last longer than sand. It is mainly used in patterns that imitate a knitted sweater.
Technology of applying velvet sand to nails
Creating a manicure with powder is very simple. If you carefully study all the details, then even a beginner can do this design on your nails.
First you need to decide on the application technology. There are several types of sand nail art:
- covering all nails;
- drawing lace patterns or monograms;
- image of abstract lines and geometric shapes on the nail plate;
- velvet jacket
Important! When working with this product, you can even use regular varnish.
How to use sand for nail design
At first, there were special means for fixing velvet sand on nails. But the craftsmen have quite successfully learned to apply it to a wet layer of shellac, gel paint or regular varnish.
- Nails are pre-prepared and filed to the desired shape.
- Then apply varnish or shellac once, which is thoroughly dried.
- The next layer is immediately sprinkled with the product on top.
- Next, dry the volumetric coating thoroughly.
How to apply sand to gel polish
Velvet manicure with gel polish has increased wear resistance and a long service life. The creation of such a design is distinguished by its drying technology: an ultraviolet lamp is required for its polymerization.
- First, the nails are prepared, the cuticle is removed, the desired shape is formed, and the gloss is cut off from the surface with a buff.
- Next, apply the first layer, which is dried under a lamp for 1–2 minutes.
- Then cover the nail plate a second time, sprinkling it with velvet particles.
- Next, drying the volumetric manicure with shellac under ultraviolet rays should take 5–6 minutes.
Sand patterns on nails
It’s quite easy to create voluminous patterns on your nails using a velvet solution. You should use gel paint with a sticky layer as a basis, since it is very difficult to draw lines with shellac, especially for beginners, because it spreads.
- First, it is important to thoroughly dry the base coat.
- Then, using a brush and paint, apply the pattern.
- Afterwards they are sprinkled with the product. If desired, you can press on the surface, but then the volume will be less noticeable.
- The pattern should be dried thoroughly, only then carefully remove the excess with a brush.
Is it necessary to topcoat velvet sand?
Velvet manicure is never secured with a top coat. Firstly, this is not necessary - grains of sand and fibers stick tightly to the previous layer of varnish. Secondly, due to the finishing coating, the surface will lose its hairiness.
Applying sand patterns to gel polish, photo of velvet manicure
When creating a nail design with sand on gel polish, you should decide in advance on which fingers the velvet pattern will be located.
Technique for making velvet designs:
- Pre-prepared nail plates are coated with primer. Then a thin base layer is applied and dried in a lamp.
- The selected shade of colored varnish is applied in 2 layers, polymerizing each layer separately.
- The manicure is secured with a top coat and dried.
- Using a thin brush and gel paint, apply the desired pattern.
- The applied drawing is generously sprinkled with powder, after which the fingers are placed in a lamp to dry.
- Excess sand is brushed off with a wide manicure brush.
Sand manicure ideas
Today, nail design with sand is certainly relevant. Therefore, you should clearly familiarize yourself with the trendy options for volumetric manicure, so that you can decorate your hands in a fashionable and modern way.
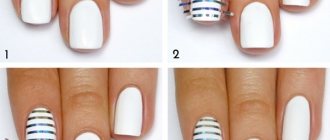
French with sand
Even a classic white jacket can be made fashionable and stylish if it is diluted with a matching velvet covering. For example, one nail plate can be completely sprinkled, and on the other a voluminous floral motif can be made, as in the photo below:
This nail design, like colored French sand, looks gentle and unusual. Some craftsmen succinctly add a floral motif, rhinestones or sparkles.
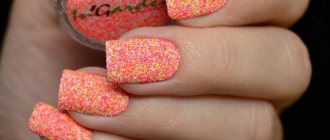
Red nails with sprinkles
It is possible to dampen the aggressiveness of a red manicure using sprinkles. The velvet coating is applied either to all nail plates, or only to a few. This scarlet design looks feminine, gentle and elegant.
Matte manicure with sand
The matte finish can be elegantly decorated with sprinkles. In this case, several techniques are used: covering the nail completely, applying three-dimensional patterns and geometric shapes. With proper alternation, this combined approach allows you to create a harmonious manicure.
Manicure with colored sand
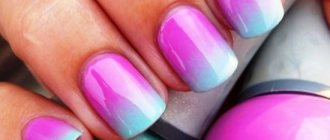
Sand manicure can be done in any color scheme. And some girls cover each nail plate with different shades of velvet. This design looks bright, stylish and playful.
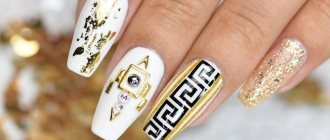
Manicure with golden sand
To add luxury, craftsmen use voluminous gold plating. To prevent glitter from being too noticeable to others, sand for nails is combined with calm shades. But for a festive manicure, you can completely cover your nail plates with gold. This simple solution will suit any evening outfit.
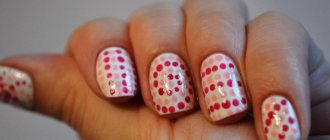
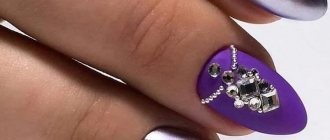
Manicure with sand and rhinestones
A festive manicure with sprinkles on your nails can be decorated with rhinestones. But you should not place them on the surface in large quantities: it is enough to highlight the hole with pebbles in an arc or triangle. This option will be very harmonious.
Professional set for velvet manicure
This kit contains the following materials:
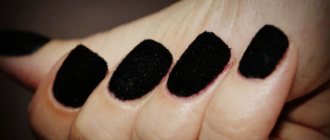
- Flock or velvet sand
is a material that is applied to the nail plate. It looks like a large number of fibers of different lengths (wool, silk, viscose, cotton, acrylic, polyamide, etc.). One set contains 7 different colors. - A brush that has voluminous and long bristles
, which makes working with flock much more convenient. This brush is also used to clean the hopper or stand, as they can become very dirty during operation. - Metal stand.
It is used for more convenient work when creating nail designs, making the manicure much neater. - Flockider
is the main tool for performing velvet manicure. Thanks to its use, a unique velvet coating of the nail plate will be created. This device produces an electric field that affects the lint particles, which acquire the desired polarity. Thanks to this, the pile fits more tightly to the nail. The flocider must be used according to the instructions supplied with it.
In beauty salons, experienced manicurists create such an unusual design using a flocider and the process goes as follows:
- First, powder is poured into a special hopper of the device.
- Varnish or gel is applied to the prepared nail plate (the cuticle is removed and the nails are given the desired shape). To make your manicure more vibrant, it is recommended to use colored varnishes.
- A finger is placed under the metal stand and the device itself is turned on, placing it directly above the surface of the nail, and a key is constantly pressed. During this procedure, some particles of material will end up on the stand, but this is normal.
- Now you need to dry the nail under a UV lamp or just wait a few minutes until the coating is completely dry.
- In order for the velvet manicure to last as long as possible, it is not recommended to wet your hands for several hours after visiting the salon.
- To prevent dust from getting into your eyes and causing irritation, you should wear a special mask. This rule applies to masters; the client can simply turn away.
You can easily create such an original and stylish manicure at home; you just need to purchase high-quality materials. The main thing is to strictly adhere to the following instructions:
- First, a simple manicure is done - the cuticle is processed, the nails are trimmed and filed.
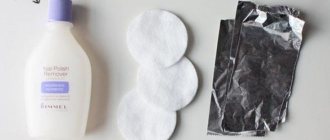
- A clean swab is moistened in a small amount of acetone and each nail is treated - degreasing is carried out.
- The flock is laid out on a sheet of paper and lightly thinned out using an orange stick. During this procedure, you need to remove all the lumps, otherwise the design will be ugly.
- Varnish of any shade is applied to the nail plate in one layer.
- You need to wait a couple of minutes until the varnish layer is completely dry.
- Then the varnish is applied again and, before it has time to dry, a layer of flock is applied. To do this, you need to dip your finger in the material and with patting, light movements, the flock is evenly distributed over the entire nail plate.
- The designs on the nails look very interesting and unusual - they are applied with varnish or acrylic paint, after which only the design is covered with flock on top.
- Using a brush, remove all excess fibers.
It must be remembered that velvet manicure does not require additional sealing with transparent varnish.
Benefits of velvet manicure
- This is an ideal choice for girls who want to attract everyone's attention.
- Focal particles can be used both to completely cover the nail plate and to create various patterns.
- This coating is completely unique and has no analogues today.
- A salon velvet manicure maintains its ideal appearance for 20 days, and sometimes more, depending on what the girl is doing.
- Creating such an original design will not take more than half an hour and does not require the acquisition of any special skills, so you can do it at home yourself.
Disadvantages of velvet manicure
- Today, this nail design is a novelty, so in salons it will have a fairly high cost (approximately 800-1000 rubles and more).
- A velvet manicure done yourself can last only a couple of days.
If it is not possible to visit beauty salons or use flock, then you can take a special varnish, after applying which the nail plate becomes like a soft velvet fabric.
This type of polish has an interesting texture and does not make the nail color too bright. By choosing even a blue shade, the manicure will not look vulgar or tasteless. It is very easy to use this varnish, since it is practically no different from a simple one. On the prepared nail plate you need to apply 2 layers of velvet varnish and a fixer. To make a brighter manicure, you can experiment a little - apply a design with velvet varnish of a different shade or with sparkles.
When it’s winter outside, and the Christmas holidays are visible ahead, thoughts increasingly arise in our heads about how we will decorate our home. And girls, among other things, are looking for ways to transfer elements of the holidays to themselves. And those who want to have a manicure for all seasons will like our article even more!
More than once we have heard fashionistas say that they don’t want glitter, colors, yes, but not glitter. Varnishes are steamed to give them a matte finish, or even become matte. The use of manicure sand has become a new breath in nail art.
Manicure sand
– special powder of various colors. Sand varnish is distinguished by the size of the grains. For example, a very fine grind can give your nails the appearance of velor, while a coarse grind can give your fingers a shade of granulated sugar.
Varnish with additives is a little thicker than usual, but differs only in the structure of the coating. It is convenient to apply, it does not tend to creep onto the cuticle during coating, and besides, one layer of varnish is almost always enough, in rare cases - two if you want to give your nails a more voluminous look.