List of stages
Professional training in hardware manicure involves a systematic approach that can be outlined in technology and passed on to students for practical use. The classic scheme, accepted by most masters, comes down to the following steps:
- Removing old coating;
- Shape sawdust;
- Creation and opening of a pocket under the cuticle;
- Raising the “skirt”;
- Cleaning the pterygium and lateral sinuses;
- Cuticle cut.
We will analyze each stage separately with the intricacies of working in a specific area of the nail.
What is hardware manicure, features of its implementation
Removing old coating
Removing the old coating includes three stages of work: cutting off the length, removing the color coating and base, correcting unevenness and material residues.
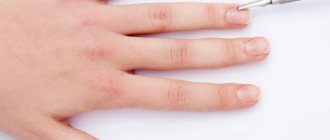
Length removal
It is performed with a metal carbide or ceramic cutter with a blue notch. It is placed perpendicular to the free edge and by moving from one side to the other the length is removed to the desired length. From corner to corner. Left-handers work in reverse mode, and right-handers work in forward mode. A left-hander takes the length from the right to the left corner, and a right-hander takes the opposite direction.
It is necessary to work with the nose or protruding part of the cutter at a speed of 20,000 - 30,000 per minute. We do not allow the cutter to tilt so that it does not hit or bounce.
Low speeds are used in extreme cases, only when there is a burning sensation.
Possible causes of burning:
- Blunt cutter . It does not clean, but irons the material, releasing heat at high speeds;
- Bent nozzle . It is uncentered and vibrates, taps and gives additional heat. It is necessary to change it, and you can work at high speeds without slowing down;
- Vibration of the device handle, faulty handle . Solution - you can slow down;
- Sawed nail plate . The solution is to slow down and work with less pressure;
- Sensitive nail plate. The solution is to leave a small amount of base on the surface.
When removing the coating, the entire surface of the nail can be divided into three zones:
- Central part and free edge;
- Cuticle area and left side wall (right - for left-handers);
- Right side wall (left - for left-handers).
The third zone is the most inconvenient. To process it, it is necessary to rotate the client’s hand 180 degrees.
Removing color coating and base
In the central part the material is thickest, and at the cuticle and side walls it is half as much. Therefore, when removing, it is necessary to focus not only on the direction of movement of the nozzle, but also on the pressure. In the central part the pressure is stronger, and at the cuticle and side walls it is weaker. Also, if there are bumps and smudges near the side walls, the pressure in these areas will be stronger.
It is recommended to work with long arching movements in the first zone. The resistance stroke of the cutter removes a thick layer of material, and with a smoothing direction, in the direction of rotation of the cutter, a thin layer of material is removed. This technique is convenient for processing thin areas of the coating to avoid cuts and damage.
Correction of irregularities, detachments and removal of material residues
Immediately you need to pay attention to the presence of detachments. It is recommended to remove them completely. Detachments can be removed with a diamond cutter or a regular nail file.
Detachment of the coating can be located on the free edge, in the cuticle area or at the side walls.
- If it is on the free edge, remove it with light smoothing movements until the area disappears.
- If the detachment is near the side wall, then it is better to remove it with a nozzle in the direction of rotation, as if the hand is “following” the cutter. This is a safe technique that removes a very thin layer of material.
- If the detachment is on the central part or at the cuticle, then it is best to remove it with transverse smoothing movements. For right-handed people, move to the right. Left-handers - to the left, without resistance from the cutter.
Now you need to look at the profile and end of the nail, assess the condition of the arch. If there are bumps or hills, we smooth them out with a milling cutter using smooth arched movements.
Hardware manicure - answering frequently asked questions
What do you need to do a manicure?
The very first thing is the desire to give beauty to women's nails. This requires not only knowledge, but also appropriate attributes.
Equipment and tools
Minimum set for manicure
A good purchase for a newly minted master will be a starter set that includes:
- Manicure scissors.
- A set of glass or ceramic files.
- Metal tweezers.
- Polishing buff.
- Tweezers for clamping.
- Forms for modeling.
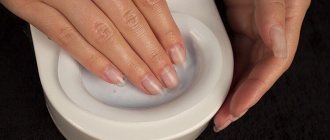
- Bath for steaming hands.
- Dust removal brush.
- Orange stick.
- Pusher.
- Brushes for painting.
- Containers for sterilization.
- Ultraviolet lamp. It is necessary for gel extensions or quick drying of thick varnish.
This is a list of tools without which a manicure cannot be done, but for professionals it is much longer.
Materials
Materials for manicure
To carry out a regular manicure procedure, you will need to use not only tools, but also purchase special cosmetics:
- Cotton buds.
- Nail polish remover.
- Cuticle softening oils.
- Varnish, gel polish, shellac.
- Tips.
- Base coat.
- Primer.
- Hand cream.
- Disinfectant solution.
- Finish coating.
- Degreaser.
- Acrylic paints.
- Decorations.
After such preparation, clients will appreciate the professional approach of the new master and will be able to relax during the procedure.
Cuticle separation and pocket creation
You can open the pocket under the cuticle in different ways:
- Pusher;
- Orange stick;
- Safe cutter Oney Clean;
- Other cutters with a sharp tip, for example: flame, bullet, bud, lentil.
If the cuticle does not move:
- The first reason may be that the master is not pushing it, but a dry, attached pterygium.
- The second reason is cuts in the nail plate, deep scratches. The pusher can rest against such a scratch or cut and not move. To avoid damage to the nail plate in such cases, the pusher must be placed at a minimum angle and moved with gentle sliding movements.
- Another reason is eponychium gluing, when the inner part of the cuticle grows to the nail plate, and when trying to move it away, it gives the client unpleasant sensations. In this case, it is necessary not to rest against the skin, but to go under the problem area with the sharp part of the tool, for example, a hatchet or an orange stick.
The most common problems when opening the cuticle and creating a pocket:
- Eponychium gluing;
- Skin damage and cuts when moving the cuticle;
- Hangnails in the sinus areas;
- Accumulation of debris under the cuticle.
The cause of all these problems is the incorrect positioning and movements of the pusher. It cannot be placed flat. The optimal permissible angle is 45 degrees.
If the glues cannot be separated with a pusher, you must use an orange stick, a sharp pusher or a hatchet on the other side of the double-sided pusher.
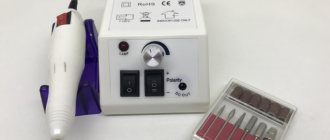
Milling cutters for the device: types, purpose, how to choose and use in manicure and pedicure
What a beginner manicurist should know
How to learn how to do manicure professionally? The answer is simple - sign up for specialized courses. The main thing is not to get confused in the huge stream of “author’s programs”, unique schemes and schools and focus your attention on a really worthwhile teacher who presents information in simple and accessible language (but we will talk about this in more detail a little later). Let's clarify what priority things should be considered in such training:
- large theoretical part. As a rule, it is important and necessary for beginners to understand all the intricacies of the technology for proper correction and care of natural and artificial nails. This is simply impossible without a comprehensive introductory theory with elements of biology. These lessons examine the structure of the nail plates, the causes of possible defects and ways to solve them (for example, leveling the manicure);
- availability of extensive practice. Without work experience, but even with a diploma, you will not be able to win the favor of either the employer or potential clients. It is worth proving your skills in practice, and this can only be done by honing your skills in classes at school. Choose courses that provide models for manicure - this is the only way you will reach the top in your professional field, you will be able to analyze your mistakes and avoid them in the future. If your courses do not have a practical part of elaboration, then ask your closest friends to act as this very model, and their reward will be your gratitude and a wonderful, fresh, original manicure;
- Before dealing with employment issues, you should do manicures for people you know and don’t know at least 7-10 times.
Photo: @beauty_kitchen_kyiv
So how to become a professional in your business and win the appreciation of clients? ProstoNail specialists have collected several important nuances that a novice maestro should familiarize himself with:
- you must have an understanding of skin types and the criteria for their distinction, and also understand in detail how the nail plate is structured and what elements it consists of;
- techniques for modeling natural and artificial nails is another important issue that requires consideration, careful study and, of course, elaboration;
- Possession of advanced communication skills to establish contact and receive feedback even with the most reticent clients;
- a true manicurist uses his knowledge and skills at the right moment, depending on the type of client in front of him and what kind of hands he has. His manicure kung fu contains techniques from classical, European, hardware and even spa manicure. He is also fluent in nail extension techniques;
- track manicure trends, pay attention to seasonality and use themed designs for the occasion. Thus, advanced training in New Year's decor will be a profitable investment before the Christmas holidays, while in the summer you can learn the intricacies of a wedding manicure;
- It is important to beautifully and competently arrange your workplace. Let important little things, such as a pusher or nail files, always be at your fingertips, and let the workspace itself not be cluttered. This will create a welcoming, comfortable atmosphere for the client and once again convince him of your professionalism;
- constantly improve. Don’t think that the standard “trio”: manicure-removal-gel coating is enough to be competitive. Learn about new techniques and technologies, purchase various varnishes with a non-standard finish and, of course, do not skimp on decor if your clients love it.
Photo: @beauty_kitchen_kyiv
Well, now you probably know what a novice manicurist who craves stable profits, comfortable work and demand in the nail service industry needs.
Lifting the “skirt” from the cuticle
To lift the “skirt”, a diamond attachment with a sharp nose and a flat main part is best suited. For example, a bullet, a lentil, a cylinder with a red notch.
To raise the skirt, it is necessary to work at speeds of 5,000 and above, depending on the condition of the client’s skin. The rougher the skin, the higher the speed.
Using a cutter, using pushing and smoothing movements, the raised cuticle is turned upward with a skirt or visor, and raised at an angle of 90 degrees.
When opening the sinus, you can help yourself with your other hand, slightly pulling the skin down or to the side from the nail. You cannot pull the skin diagonally from the sinus, so as not to tear this thin transitional rectangular area.
Cleaning the pterygium and lateral sinuses
The nail can be divided into three treatment zones: central, lateral sinuses and along the lateral ridges.
- First we go through the central part with the nose of the cutter.
- Then, using smooth smoothing movements, we move from the center to the sinuses. It is important not to pull the skin on the sinus areas and make sure there are no adhesions in the pockets.
- The final stage is cleaning out the pterygium in the lateral sinuses. It is performed with the sharp part of a cutter with a narrow nose downward and slightly to the side, along the line of the side roller. Only the nose of the cutter works so that the belly does not form cuts. At this stage, it is important to remove all the pterygium without sawing through the growing points.
Top 7 models of devices for manicure and pedicure: select and evaluate
How to learn to do a manicure: the most common mistakes
Unfortunately, when performing a manicure yourself, you may do some manipulations incorrectly. After 1-2 procedures, nothing bad will happen, however, if you regularly repeat mistakes, the condition of your nails will begin to noticeably deteriorate.
- Excessive polishing of nails. Yes, after diligent polishing, the nail plate looks great. However, it is worth remembering that this procedure can be performed no more than 1-2 times a month. Otherwise, you will gradually thin your nails: it will not be noticeable on the outside, but after 10-12 months you will experience brittleness, delamination and fragility of the nail plate.
- Constant length cutting using scissors. It is believed that it is enough to stop cutting your nails to get rid of their splitting. The fact is that with scissors you damage the edge of the nail and unnaturally bend the plate itself. That is why it is recommended to cut down the growing length rather than trim it.
- Cutting off rough skin on the periungual fold. Ideally, these areas of the fingers should be sanded with a file and then nourished with cream or oil. Otherwise, after such an independent manicure, the roller may begin to dry out, become rough and crack.