What is stretching?
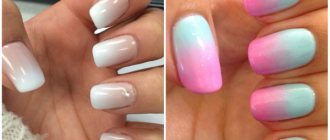
Stretching on nails implies a smooth flow of one shade into another; two or more colors that are close or contrasting in tone can be used simultaneously. Most often, ombre is directed from the grown part of the nail down. This technique is widely used in manicure, both in a discreet version and with the use of bright futuristic colors, sparkles and rhinestones.
Pros of manicure-stretching
You may be interested in:Essential oil for nails: composition, application, effectiveness, reviews
In addition to the trendy and unusual look, this manicure option, such as stretching on nails, has a number of other advantages:
- This technique is performed with a brush, which is always available, no special tools are required.
- When applying the coating step by step, the skin around the nail plate does not get dirty. A gradient made with a sponge does not provide such a smooth transition, in addition, during application it is almost impossible not to stain the periungual ridges, and when removing varnish stains, there is a risk of ruining the manicure.
- The transition, made using the stretching technique, provides a smooth finish. While using a sponge leaves a slight roughness on the nails.
- Stretching is very easy to do using gel polish. Thanks to its long-lasting coating, your manicure will please your eyes for weeks.
Ombre with a sponge
In addition to the brush, you can use a special sponge. It has a fine structure that allows for smooth color stretching. Several layers of a light shade are first applied to its surface. Movements should be smooth.
For a bright gradient, it is recommended to apply 2-3 layers of a contrasting shade. We fix the decor on the nails with a finishing coat.
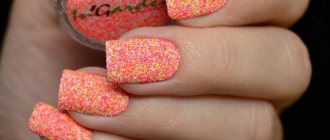
Stretching manicure with glitter allows you to create an unusual design. This decor can be chosen for a daily or evening look. In the first case, he combines a pastel palette of shades and a discreet color of glitter.
To create the second option, choose bright colors that highlight the individual characteristics of their owner. Brilliant decor can be made in the same color scheme or, on the contrary, stand out from the general background.
Color combinations
To create a successful manicure with stretch marks on the nails (photos are presented in the article), experts advise familiarizing yourself with the combination of colors:
You may be interested in:How to draw monograms on nails: step-by-step instructions, tips, photos
Types of stretch marks
Despite the fact that horizontal stretching is more popular, a vertical gradient or design for all nails looks no less harmonious.
Vertical stretching on nails with gel polish implies a vertical transition of colors. To do this, apply a light base and dry it in a lamp. Then part of the nail is painted with a darker gel polish, and the transition is stretched with a thin brush, making the border blurry. Typically, 2 or 3 thin coats are applied to achieve best results.
Horizontal extensions look best on short or medium length nails. Gel polish is applied in horizontal stripes and stretched towards the root of the nail plate. Beginners are advised to start with two colors that are similar in tone.
Stretching all over your nails is a gradual transition from dark to light color, finger by finger. For example, the little finger is painted in the lightest possible tone, and the thumb in a dark tone, or vice versa.
Nail design 2021 stretch
In the new season, stylists present a variety of interpretations of beautiful transitions, using not only color palettes, but also beautiful decor. A stylish gradient can act as both a basis and perform a decorative function throughout the entire design. At the same time, fashionable ombre remains a universal solution for nail plates of any length and shape. Manicure 2021 stretching is presented in three current methods of execution. Let's find out them:
- Horizontal direction
. The border between the transition of shades often runs horizontally. This option looks especially good on long and narrow nail plates, since it does not visually add extra volume.
- Vertically
. A vertical gradient is also considered a stylish solution. This method is successful for short and wide nails, as it visually stretches the plates and gives the handles overall grace.
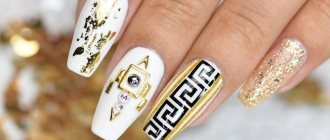
- Geometry
. The most original and very attractive design is considered to be one with a clear transition boundary. Often such ideas are presented in the form of geometric diamonds in gradient colors, both in the same palette and in contrasting shades.
Stretching manicure for short nails
Natural length remains trendy. This choice always emphasizes neatness and is suitable for active girls. Short nails are considered especially relevant for business women who are forced to maintain restraint and brevity in their combinations. New manicures for 2021 stretch are presented in light and delicate colors that make small nail plates neat. A fashionable solution would be not only a color transition, but also an ensemble with sparkles. And in this case, it is better to place the glitter at the root. A Feng Shui pattern on one finger will also be a stylish addition.
Stretching manicure for long nails
For girls who can boast of beautiful long nails, the choice of interesting and stylish ideas is more extensive. Here you can use laconic and light combinations of shades or make a brighter and richer design. In addition, a beautiful long-length stretch manicure looks impressive with applied and expressive decor, for example, rhinestones and stones, cast patterns, drawings. The current form is considered to be a soft square and pointe shoes. However, if you like the streamlined almond look, then the fashion design is not categorical when choosing a nail finish.
Manicure-stretching on sharp nails
In a separate show, stylists present ideas for sharp nail shapes. Here the masters emphasize the popularity of transitions from a light root to a dark edge. This option visually lengthens the nail plates and accentuates the pointed contour. In this case, the gradient can be done both on all, but also on individually selected fingers. A contrasting triangular French stripe will be a stylish addition. A color-stretching manicure also looks impressive in an ensemble with glitter or rubbing. In the latter case, stylists suggest using holographic or pearl pigment.
General recommendations
You may be interested in:Do I need to remove the sticky layer from the base: useful tips
Of course, every nail technician has his own ways of stretching nail polish, but there are a few general recommendations that can help create a smooth and harmonious color transition.
Among them:
Gradient with a sponge - the first method
To create this manicure you need a small sponge and varnish in 2 shades. After the nail plate has been prepared - filed and degreased - apply a base coat, which is dried in a lamp for 2 minutes. To add brightness, you can cover it with a layer of white gel polish and dry it again in the lamp.
Next, several shades of varnish of different colors are applied to the foil or cardboard, the borders are smoothed with a toothpick. A sponge is dipped in these colors and an imprint is made on the nail. It must be pressed firmly against the nail plate. The procedure is repeated 3-4 times. This will add brightness to the manicure.
Immediately after application, without waiting for it to dry, apply the finishing sealer. If colors are applied with a sponge rather than a sponge, the surface becomes rough. The finishing top will help smooth it out. Dry in a lamp for 3 minutes. After this, you need to clean the skin around the nail with a cotton pad or swab dipped in nail polish remover. The procedure ends with treating the cuticle with moisturizing oil.
Technique for stretching with gel polish
How to stretch your nails:
- The nail is given the desired shape, the cuticle is trimmed or pushed back with a stick.
- Using a buff, the glossy layer is removed from the nail plate.
- Use a dry brush to brush away any remaining dust and disinfect the nail.
- Then the surface is coated with primer and allowed to dry for a couple of seconds.
- The next step is applying the base layer and drying it in a lamp.
- One color is applied to one half of the nail, and another color is applied to the other half. Then, with a few movements of the brush along the joint, the border is blurred and the layer is dried in a lamp.
- Depending on the color intensity, up to 6 layers may be required.
- Finally, cover the nails with a finishing topcoat and dry in a lamp. If necessary, remove the sticky layer.
Manicure with gel polish
If you want to extend the pleasure of a manicure with stretching, turn to gel polishes for help. They have a super ability to create beautiful and lasting designs.
To stretch with gel polish, you do not have to use a sponge as is the case with conventional products - here the main role is played by the brush, which creates a smooth transition between shades.
- The preparatory stage is the same as in any manicure - giving the nails the same shape, trimming the cuticle and removing the gloss from the surface to create a matte finish.
- Next, the plates are degreased with a dehydrator, which is applied to a lint-free cloth.
- The next step is to apply primer and air dry it.
- Then comes the turn of the base coat - it should be dried in a lamp for 1 minute.
- Now the fun part begins - creating the gradient itself. To do this, apply pink gel polish to half of the nail.
- From the middle to the tip of the nail, place 2 participants of the ombre effect - in the photo it is a blue polish that combines amazingly with pink.
- Arm yourself with a zero brush and create vertical strokes from left to right. At this stage you will need all your concentration and accuracy, because the smooth transition of colors depends on this. When this work is done, dry the result under the lamp for 2 minutes.
- Then you need to repeat the creation of the gradient once again from applying varnishes to shading the borders with a brush.
- The final touch is to coat the nails with top coat and dry for 2 minutes.
This is the beauty the end result should be. Thanks to the use of gel polishes, the manicure will not lose its shine and excellent appearance for several weeks. If you wish, you can make a horizontal or diagonal gradient using a similar technology, changing the arrangement of colors and the direction of brush movements.
Technique for using regular varnish
Unlike gel polish, the color extension on nails with regular polish is durable. However, it is better for novice masters to learn how to stretch in this way; if it fails, you can always erase it and not waste the base and top.
Technique:
- A base is applied to the nails and dried thoroughly.
- Then the desired colors are applied horizontally or vertically close to each other.
- Before the varnish begins to dry, with a flat brush, using gentle movements, they begin to blur the boundary between the colors; the varnish itself will spread and create a smooth transition.
- After drying, the design is secured with a colorless coating.
How to do it yourself
There are several ways to make a unique design at home. Depending on the desired result, you can choose the most suitable one for your case.
Sponge
Any manicure begins with nail treatment. The plate must be smooth, without obvious flaws or defects. Next comes a layer of base coat. Don't forget to degrease the nail plate so that the base fits perfectly.
Choose 2 shades of varnish and apply them to the foil. Using a toothpick, mix the colors a little together at the border. Next, take a sponge. It can be either regular or manicure. Dip the sponge into the prepared gradient on the foil. To prevent the polish from bubbling on your nails, make a preliminary impression on foil or paper. Next, gently apply the sponge to your nail. Your gradient will be imprinted on it. After this, you just need to cover the design with topcoat.
Flat brush
This option is ideal for a vertical gradient. A flat brush will do a great job of stretching the color vertically, without leaving any particularly noticeable streaks. Before manipulating your nail, practice on plain paper. This will allow you to make more confident and smooth movements when you work on the nail.
Fan
The brush has sparse bristles, spread out like a fan. Due to this arrangement, it is very convenient to create a gradient, since the desired blur area is immediately captured. You can also create a corner ombre using the same method.
Step-by-step instructions consist of several points.
- We do a regular manicure, preparing the nail for further manipulation. This can be either a trimmed or hardware version.
- Apply primer and let dry.
- Apply the base and wait until it dries completely. If you do a manicure with shellac, then dry it in a lamp.
- Apply the color (the one that will be at the base) and dry it.
- Paint the upper part with the second shade.
- We arm ourselves with a brush and draw it several times along the border of the colors.
- If the gradient turns out to be faint, then repeat steps four to six.
- We apply a top protective coating and dry it in a lamp.
Fine
This option is suitable for skilled craftsmen, especially if they work with regular varnish. It hardens quite quickly, and you need to act without delay. The technique is simple and complex at the same time. Two colors are applied to the nail, and then a blur is applied with a thin brush.
Using powder
Here you will need a fan brush and powder of various shades. We apply the base coat, but do not dry completely. We put powder on a fan brush (you can buy it in specialized stores). Using light tapping movements, shake the powder onto the nail. Next, select a different color and repeat the manipulation only over another area of the nail. Since small particles of one and the other color will still fall on the border, you will get a smooth transition.
Next, apply a thick layer of protective varnish (or top coat for shellac). This will prevent fraying and extend the life of the manicure.
Glitter stretching technique
The glitter design on nails is perfect for a special event or party. Stretching in this case implies a gradual decrease in concentration in one direction or another.
Technique:
- The free edge of the nail is given the desired shape, and the cuticle is removed.
- The glossy layer is cut off with a buffer, the nail plate is degreased and a primer is applied.
- Next, cover the nail with a base coat and dry it. Apply the background color and dry again.
- The tip of the nail or its base is sprinkled with dry glitter and the glitter is gradually stretched with a brush, reducing the concentration. If liquid varnish with glitter is used, it is also applied in a thin strip and washed with a brush in the desired direction.
- The final stage is applying topcoat and drying.
Manicure technique with stretching
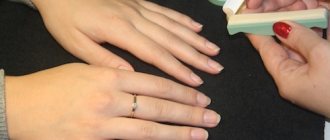
The first thing to do is to carefully remove the cuticle and polish the nail plate to remove the glossy coating. This will improve the durability of the varnish. Apply the base and dry.
To make an ombre, you need to have a sponge or a piece of foam sponge. To do this, several colors are applied to the palette, mixed using a toothpick, then soaked with a sponge and transferred to the nail plate. The surrounding skin may become dirty, so the rollers must be wiped off. Next, it is dried under a lamp and covered with a finishing coating or decorated.
Important! When using a sponge, choose a fine-pored variety.
Another method involves using a special brush. With its help, colors are stretched in the desired directions. With a brush you can create a perfect vertical stretch. Apply in stripes and draw with a brush several times to blend the tones, then dry and finish with a topcoat.
Japanese stretch on nails
The use of Japanese substances before a gradient manicure increases the duration of wearing varnish. A special paste and polishing powder consists of natural ingredients, seals and strengthens the strength of the nail plate. After applying care products, make an ombre with colored varnishes.
Stretching with glitter on gel polish: photo
Glitter stretch marks are applied to gel polish at the end of the cosmetic procedure. It is necessary to choose the color of the shiny elements so that it is in harmony with the main varnish. Silver or gold look perfect with a light base. Dark ones are suitable for clear varnish. To make a stretch on your nails with glitter, you need to use shiny elements in a liquid or dry state.
Technique:
- Varnish with liquid glitter is used to paint the surface in one layer.
- After drying, another layer is applied, not just at the hole itself, but slightly moving it down towards the edge. And so they continue until, moving down, until the edge of the nail plate becomes the desired density.
A large number of shiny components does not make the coating durable, so after some time it is necessary to carry out corrections or apply a new design. Elements of different shapes and sizes are used simultaneously.
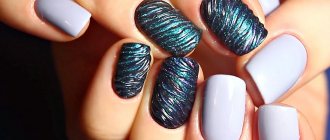
Glitter in the form of broken glass looks impressive. They are placed over the entire surface or the darker part is painted with them.
Stretching with glitter with rubbing
An ombre is done in two colors, then covered with a top coat to remove stickiness. A rub of a darker tone is applied to the dark side towards the light tone. Use a brush to drive in the material, going slightly into the lighter part.
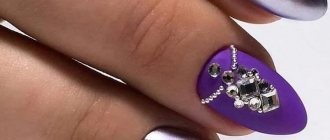
Nail design stretch marks with rhinestones: photo
Stretch nail designs with sparkles can be decorated with rhinestones. Using glue, they are placed on a dried finished surface or applied to a damp glossy coating and dried.
The number of rhinestones may vary depending on the idea, but you should not use a lot of them, since the gradient is a bright style. Rhinestones look beautiful with a vertical ombre.
French stretch with glitter and color
Performing French stretching is always interesting and festive. A manicure of this style is suitable for women of any age, and also looks fashionable at all times of the year. On the finished gradient manicure, draw a stripe in white. Looks beautiful on oval or square plates.
Important! If you are using dry glitter, you can dip your brush in clear varnish and dip it into the glitter. When changing shades, clean the brush with acetone.
Shellac stretch: photo
Shellac differs in pigment saturation and is easy to apply. When used for stretching, it is necessary to combine 2-3 colors of varnish of exclusively the same quality. Do not use simultaneously with others, as different densities can complicate application and ruin the manicure.
Lunar manicure stretching
In this design, ombre is done only in the lower part. The dark part should be closer to the edge. The hole should remain transparent.
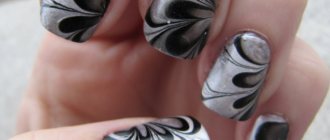
Geometric stretch on nails
To perform gradient geometry, white varnish and other tones are required. Using a thin brush, geometric patterns are drawn, while light tones are gradually diluted with darker ones, moving towards the edge.
To reduce the likelihood of the varnish spreading, it must be applied in a thin layer. After finishing painting, dry it.
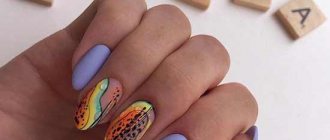
Nail stretch design
By performing ombre, you can create an interesting design where several colors will be mixed and create interesting color compositions. To do this you need:
- apply a base color, for example red;
- then apply dots of white varnish on the dried surface, a dot of yellow and black in the middle;
- Use a dry, thin brush to smoothly brush across the surface, combining all the tones.
Dry under a lamp. You can use different shades. Flower petals or butterfly wings can be made with a thin brush using a mixture of tones.
Stretching options
Nail design can be done in a variety of variations, it all depends on the imagination of the artist and the client. Below are the most popular options for stretching nails.
Pastel colors. Ideal for a light and romantic look. This manicure does not stand out and at the same time serves as an addition to accessories and clothing. In addition, hands in such a frame look feminine and well-groomed.
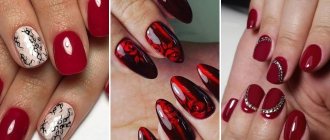
Contrasting gamma. Stretching, made in bright and contrasting colors, is an excellent solution for young girls and eccentric people. This nail art is suitable for an evening and holiday look, but you should carefully select accessories so as not to overload your hands.
Muted colors involve the use of dark or dull shades. The nails look discreet, suitable for a daily look.
Black and white. This is a classic of the genre and goes well with both business and any other style. Combinations of black or white with nude, pink, beige, ocher and brown are acceptable.
Stretch out the pleasure
Stretch marks with gel polishes became popular more than a year ago, but despite this they still surprise many ladies. Stretching is the technique of dragging shades so that the result is a gradient. The difficulty of this nail design is that the transition is smooth and neat, while small strokes of the brush should not be noticeable. Another feature of this type of design is that not all gel polishes can be used for its implementation. Therefore, when choosing them you need to be very careful.
https://youtu.be/https://www.youtube.com/watch?v=2iFvP_VNUIo