Features of manicure
Poppy is an unusual and very beautiful flower. Their thin stems and airy petals look defenseless and attract the eye.
In nature, poppies are red or yellow. Some symbolize tender love. Others are youth and beauty.
Manicure with poppies is most popular in the spring and summer. But some color schemes can perfectly complement a winter look.
For nail design, you can choose any shades, focusing on your own preferences and associations.
The classic version is red poppies with green stems on a white background. Blue, black, peach and purple flowers look unusual.
Color combinations
It is important not only to beautifully and accurately draw poppies on your nails, but also to choose the right combination of shades. Depending on the colors you choose, you will get either a gentle and romantic manicure, or a bright and spectacular one that will emphasize the passion and sensuality of your nature.
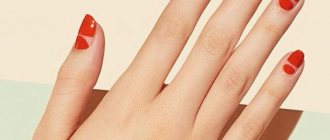
- The combination of red poppies and white background is classic. On a white background, poppies will look even brighter and more beautiful. This option is perfect for a summer manicure or for a romantic style.
- In combination with nude or pastel shades, you will get a sophisticated and elegant manicure option. This design is suitable for fans of such a fashion trend as naturalness. This color combination looks good with any style, and if you decorate it with small rhinestones, you will get a wonderful, sophisticated evening manicure.
- Against a pink background, red poppies look very feminine and gentle. Therefore, this option is suitable for romantic natures.
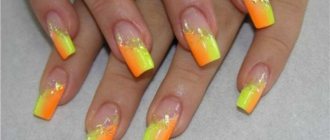
- If you like bright color combinations and want to emphasize your originality, you can use yellow as a background. Such a bright manicure is not suitable for a formal business style, but it can be chosen as a summer nail design. This design is suitable for energetic girls.
- If you want to create the image of a mysterious and passionate beauty, then make red poppies on a black background. The result is a very impressive manicure, which is suitable for special occasions. And with the addition of rhinestones, the design will look luxurious.
A manicure with poppies is a great option for adding bright accents to your look. Additionally, you can draw a stem, leaves or monograms to make the design look aesthetically pleasing.
Execution technique
For a manicure with poppies you need to prepare the following tools:
- a thin brush is a brush made of synthetic bristles with a narrow tip, it is used to create contours, edges and shadows, etc.;
- flat brush - a brush with an even distribution of bristles (you can use it to mix colors, fill contours and create large designs);
- dots – a tool with a needle tip, it is used to create lines, dots, patterns;
- primer;
- base coat;
- gel polish of any color you like;
- final colorless coating (matte or glossy);
- gel or acrylic varnishes for painting poppies.
Professionals advise using gel paint for floral designs. It makes it easier to create an elegant picture.
First you need to shape your nails, process the cuticles, and polish the surface. In untrained hands, any design looks cheap and dirty. It is better to prepare for a manicure several days in advance, take baths, apply cream.
After this, you need to apply the base, the main tone of the varnish, dry completely under a lamp, and degrease. Painting is done on a dry surface.
Simple drawing
Step-by-step instructions for performing a manicure with poppies:
- Dip a flat brush into red varnish on one side and black on the other. There should be little black (a fifth of the tip), it is needed only for the middle.
- Place the brush on the surface and draw the first pair of petals; the shape can be slightly changed.
- Paint the next pair of petals, lighten them by dipping the red tip of the brush into white varnish.
- Draw a green core using a thin brush, marking the black stamens.
- Draw the stems of the flowers using a dots or thin brush, as well as the leaves. For the leaves you will need two shades of green varnish, one lighter for filling, the second darker for the outline and veins.
You don’t have to draw the centers and leaves; only the flower silhouette will remain.
Poppies on nails: step-by-step instructions
1
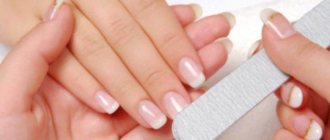
First, prepare your nails for applying polish. To do this, do a home manicure: file your nails and give them the desired shape (an oval, almond-shaped or “soft square” shape is best for depicting flowers). Nails should not be too long. Be sure to treat the cuticle with a special softening agent - remover: this will allow you to easily push it back with an orange stick or trim it with sharp tweezers. For detailed instructions on how to perform a manicure at home, watch our video.
2
Apply base coat to your nails. Do not skip this step - it is the base that will prevent the polish from being absorbed into the nail plate, will protect the manicure from chipping and will extend its life.
© makeup.ru
3
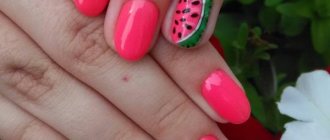
We used yellow as the base. Paint your nails with polish first in one layer, wait until dry and repeat. A two-layer coating will be denser and more uniform, without gaps. Against a yellow background, red poppies will look like flowers in the sun - very summery!
© makeup.ru
4
Start drawing! Take the red polish and draw a wavy line closer to the free edge of the nail. Paint the resulting arbitrary shape from the inside. Don’t worry if the wave petals turn out to be different - this way the design will look more natural and therefore more impressive. Repeat the pattern on all fingers. In this case, you can “play” with the design: place a poppy somewhere on the tip of the nail, somewhere at the base or on the side.
© makeup.ru
5
Take white or milky varnish and mark the central part of the flower. To get the desired result, place a small drop in the middle of the area painted in red, or slightly to the side - closer to the edge of the nail. Repeat on all fingers.
© makeup.ru
© makeup.ru
6
The next step is the black core. Use a thin brush so that the varnish lays evenly, without smudges.
© makeup.ru
© makeup.ru
7
The final step is topcoat. It will add a beautiful shine and ensure durability of the manicure. Apply it to dried varnish.
© makeup.ru
© makeup.ru
Manicure is ready!
© makeup.ru
Return to contents
Poppies in Chinese painting
Chinese painting is a brush stroke painting technique. The drawings are voluminous and lush.
To design nails with poppies, use flat and round brushes of the smallest sizes with smooth bristles.
The main types of brush strokes in Chinese painting:
- smooth surface – drawn smoothly without lifting the brush from the surface;
- openwork - created by moving the pile up and down;
- semi-openwork - drawing loops;
- feather strokes - drawn with a stroke of the brush;
- wave - created by swirling movements without tearing off the pile.
Before creating a drawing, you need to practice on paper.
How to draw poppies
Chinese painting is ideal for long nails.
Red poppies using this technique look good against a black background.
Main stages of implementation:
- Cover the prepared nails with the main tone of gel polish.
- Draw the petals in red using feather or semi-openwork strokes. Mix red varnish with brown and draw petals at the base of the center to create volume. Can be mixed with white.
- Draw poppy leaves. It is best to use feather strokes.
- Using a thin brush, draw the details - stamens, veins on the leaves.
- Let the varnish dry, cover with finishing varnish, and dry under a lamp.
In Chinese painting, the paint must dry well at each stage of work so that the design does not smudge. If the brush becomes fluffy, it needs to be moistened in water.
How to do a manicure with poppies at home?
Drawing poppies on your nails is not that difficult, you just need to purchase the right tools and choose a style. Before you start, scroll through the carousel of photos, pictures, and watch training videos. It’s not difficult to create this manicure at home; you just need to decide on the color scheme. First, the nails are covered with a clear varnish, a base. Next, you need to apply a layer of the main color - it is desirable that it be of a thick consistency; you can choose any shade (preferably light or pastel colors).
The most advantageous background for red poppies is white; it allows you to emphasize the beauty of the manicure and create contrast. If you like a more conservative style, opt for clear varnish. The next stage: applying a stylized drawing. This is not difficult to do: using a thin brush, you need to paint about 5 petals with red varnish or paint. In order not to make mistakes and to do everything beautifully, it is better to have a sketch (photo) before your eyes.
The free part of the nail that remains clean can be decorated with poppy buds that have not opened. After the petals have polymerized, start drawing the central part of the poppy, which is painted with black varnish or gel paint. Tool: dots or orange stick. Use green paint or gel to paint oblong-shaped stems and leaves. You can complement the picture with white varnish: paint white dots on the core and veins on the petals.
Don't forget to secure the manicure - be sure to cover the design with a top coat. The style of drawing poppies can be very different, the main thing is to choose your ideal drawing. You can create an interesting shading effect: outline the petals, depict the buds from a variety of angles.
Poppies and French
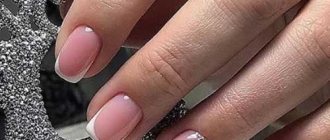
French visually lengthens short nails and makes hands more neat, so it always looks expensive and noble. Poppies will make it brighter and more unusual.
Usually, only one nail on the ring finger is decorated with a poppy (another option: the designs on the middle and ring fingers complement each other).
First, make a classic French jacket. You will need white, beige or pink varnish.
Execution steps:
- Apply a thin layer of the main nude tone of varnish to the nails prepared for work, dry, and reapply. Instead of varnish, you can use a camouflage base, which will give the nail plate a beautiful natural tone. The base is applied in a thin layer so that it does not bubble.
- Paint a “smile” with white varnish. Often a fan brush is used to create a French look. If you don’t have experience and time for training, it’s better to use stencils. They are glued onto a dry nail and painted over with varnish along the upper contour. You need to apply the “smile” in two layers, drying each one. The remaining glue from the stencil is removed with a cleaner.
- Draw poppies. First draw the red petals, then the black centers, stems and leaves.
Manicure with sliders
Sliders are water-based stickers. With their help, anyone can quickly create a drawing. Today in stores you can find stickers for every taste, including those with the image of a poppy.
Instructions for working with sliders:
- Cut the sticker to the shape of the nail plate. If you need a photo design, make the width 1.5 - 2 mm smaller than the nail.
- Apply base and gel polish to your nails and dry under a lamp.
- Place the sticker on a cloth dampened with water and remove the bottom layer.
- Transfer the sticker to the nail plate, carefully smooth it out so that it does not tear. File your nail to remove excess slider parts.
- Cover with a colorless fixative and dry under a lamp.
Using the same sliders you can create a different design every time. Apply a design to one nail or all 10, cover the plate completely or partially, and you can also combine several images.
Other manicure ideas
There are many options for nail designs with poppies.
The easiest ideas to implement:
- Black outline . On any background, draw only a black outline of the flower with a thin brush.
- Half a flower . Divide the nail plate in half and draw a thin line along it, drawing only half of the petals on one side.
- Modeling . This is a difficult technique that requires training, but this option looks very beautiful.
To create a unique nail design you need to give free rein to your imagination. Abstract drawings, unusual colors, and shadow work will turn a modest poppy flower into a work of art.
Step-by-step instruction
Nail designs with poppies can be done at home, and it will look beautiful and impressive. You can place flowers at the base of the nail plate or at the tip of the nail - this is one of the easiest options. You paint several petals with red color, and highlight the middle with black varnish. There are slightly more complex options, but the flower looks very impressive and beautiful.
- Apply base coat to your nails. Then make a solid background with varnish of the desired shade.
- Draw 4-5 red petals. You can make several accents of a lighter shade to make the petals look more impressive and voluminous.
- Using dots, paint the middle with black varnish.
- Using a thin brush and green varnish, paint a thin stem and smooth oblong leaves.
- Using a toothpick and white polish, make small white dots on the core.
- Paint the veins on the petals with black or white varnish.
- Apply top coat over the design.
You can paint several flowers on all nails or focus on one or a couple of fingers. And on the rest, apply a simple monochromatic coating - you’ll get a stylish manicure option.