The idea of decorating nail plates came to us from ancient times. Even the queens of Ancient Egypt loved to paint their nails. For example, Nefertiti preferred bright red shades, and Cleopatra added golden sand to purple. The paints, naturally, were of plant origin. Henna was used to obtain orange and red shades. Today, the number of ways to decorate nails is surprising, but still fashionistas more often choose stamping - applying a pattern with a stamp. This way you can get original drawings in a short time. The low cost of working materials and a wide variety of patterns make the method even more popular.
Features of nail care
In the middle of the 20th century, nail salons were not as common as they are now. Mostly manicures and pedicures were done at home. Moreover, the cost of salon services could not be called very affordable. Several years ago, methods of strengthening and extending nails using acrylic and gel appeared. And their prices today are also not low. Depending on the location (city, town, center, outskirts) and the skill of the specialist, the cost of services ranges from 400 to 1500 rubles.
Proper care
In this regard, doing your own nails is becoming increasingly popular. If you master hardware manicure (devices can be purchased for as little as 2,000 rubles), then always having well-groomed nails will not be a problem. And by learning the stamping technique, you can get a high-quality salon design. What is stamping and how to do it correctly at home is not difficult to master.
What is stamping: how to do it correctly
Sugaring at home: how to do the bikini area correctly
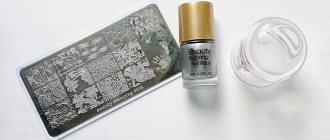
A stamp is a stamp that has a smooth surface and is made of rubber or silicone. With its help, the selected design from the plate is transferred to the nail. The plate is usually metal with engraved patterns. One can contain up to 10 different pictures. Dimensions and depth may vary.
Note! There is no limit to the variety of patterns. Depending on the shades of the varnish filling the recesses, the base on the nail plate, even with one pattern, you can get many variations.
To remove excess varnish from the surface of the filled plate, you will need a tool such as a scraper. This is a thin scraper.
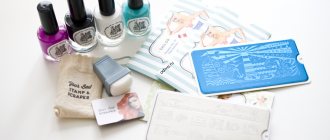
In addition to this, for self-stamping you will need:
- regular base coat and finish;
- varnish for the main background;
- colored varnish for the selected pattern (it must be different from the main one, otherwise the pattern will not be visible);
- nail polish remover, only without oil components.
Note! You also need to have paper or non-woven napkins and lint-free cotton pads on hand.
All this can be purchased in a set (especially for beginners) or purchased separately.
Step by step guide to stamping
Decorating nail art is a fun activity. To get a neat manicure, you need to know how to stamp your nails correctly. In the technique under consideration, there are several types of pattern transfer to the nail plate. Each of them has its own characteristics.
Stamping nail art
How to do a manicure with gel polish
To begin with, it is worth mastering the simplest type, considering the question of how to apply stamping using special varnishes. The first step is preparing the fixtures. The plate (disc) and scraper are wiped with nail polish remover containing acetone. The same is done with the stamp if it is rubber. Silicone ones are cleaned with tape.
Then the skin on the fingers around the nails is treated with a protective composition. After waiting for the product to dry, they begin to perform step-by-step stamping:
- nails are covered with a top base;
- select the design you like on the disk and cover it with varnish of the desired shade;
- use a scraper to remove residues from the surface so that the varnish is only in the stencil recesses;
- the design is transferred from the disk to the stamp using rolling movements;
- Immediately imprinted on the nail;
- to prevent the print from fading, it is secured with a layer of transparent varnish;
- Carefully remove the protective film from the skin with tweezers.
Important! All actions from applying the dye to the stencil to transferring the print to the nail must be quick - stamping varnishes harden almost instantly. If you hesitate, not the entire drawing will be printed.
Transferring the print from the plate to the nail
In addition to varnish, pigments in the form of powder (sparkles, flakes) are used in the process. They are used for stamping by rubbing. Nail design is performed in the same way as in the above algorithm, only powder pigment is first applied to the stamp using a sponge. Then the selected design is varnished on the disk and stamped.
There is a second option, which is used on gel polish. In this case, the sequence of actions is as follows:
- the nail is covered with shellac;
- A paper or plastic stencil is attached to the sticky silicone stamp;
- apply powder on top;
- Carefully remove the stencil with tweezers and transfer the resulting pattern to the nail.
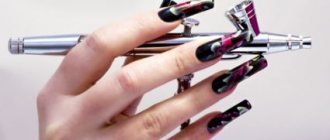
The rub is often used by manicurists when creating stamping tips. First, the design is transferred to the artificial nail using the technique described above. Then use a brush to rub in the powder dye.
Reverse stamping
There are several more options for nail decoration. Among them, reverse stamping attracted the attention of fashionistas. It is slightly different from classic nail art. The print is not immediately transferred to the nails; stickers are created first.
To get a multi-colored picture, in the process they use any varnishes of various shades. Coloring is done with a special tool - dops.
Reverse stamping samples
The algorithm below will tell you how to do reverse stamping:
- transferring the selected pattern from the disk to the stamp is done as usual in nail art;
- Place a drop of varnish of the desired color on a palette (sheet of foil or paper) with a brush;
- dip dop into it and use it to transfer paint to the drawing;
- if different colors are implied, the same is done with other shades;
- when the varnishes are completely dry, the design is secured with a top coat;
- The finished sticker is separated from the stamp with tweezers;
- cover the nail with topcoat and, without allowing it to dry, place the sticker;
- straighten the pattern with your fingers, moving from the cuticle towards the free edge, then to the sides;
- The excess sticker is cut off and the edges are filled with an orange stick.
All that remains is to cover the nail with top varnish, applying it in a thick layer. It will straighten the sticker a little, making the drawing clearer.
Stained glass technique is similar to the reverse method. In this case, they do not create a sticker, but paint with multi-colored paints the print that has already been transferred from the disk to the nails.
How to do stamping on nails
How to do planks at home for weight loss
In order to create the perfect design over time, you must first learn how to do stamping step by step. At the preparatory stage, you need to degrease the nail plates as much as possible, since stamping must be applied to a dry nail. This is the only way to achieve optimal adhesion of the base coat to the nail plate. To do this, just wash your hands (especially your nails) with soap and dry well.
Important! At least a day before the procedure, you should not use oil-based cuticle care products.
Next, apply a base coat to a clean and dry nail surface. After drying, the base varnish is applied. This layer must be dried especially thoroughly, otherwise there is a high probability of the applied pattern being smeared. The base layer will stick to the surface of the stamp and damage the design.
Further manipulations are carried out on a plate with pictures.
Note! A new stamp always has a protective film. It must be removed before starting work.
The varnish for filling into the recesses of the pattern should be somewhat thick. In any case, it should keep its shape when turned over. If the disk and varnish are ready, then the recesses of the pattern are filled, and excess varnish is removed from the surface of the plate with a sharp scraper (the scraper should be held at an angle of 45°). By turning the stamp over onto the working surface, the quality of filling the pattern is checked.
Proper technique is important
Next is the most crucial moment - transferring the design to the nail. To do this, the stamp is pressed onto the selected location of the nail plate. In this case, it is worth pressing several times with force on the areas near the side ridges of the nail. Given the speed at which the varnish hardens, everything needs to be done quickly.
It happens that the varnish gets on the skin, but this is not a big deal. It can be removed with a cotton swab. There is also a special liquid (liquid tape), which is applied along the perimeter of the nail plate, hardens and removed with a strip.
After this, you need to immediately clean the plate and stamp with acetone or other nail polish remover. During this time, the design dries and the nail can be covered with a fixing layer. Don't press the brush too hard. Excessive movements can ruin the drawing. The strokes should be light, almost not touching the nail.
What is the procedure?
At first glance, applying a manicure using the stamping technique seems to be something complicated and incomprehensible, but the situation will no longer be so hopeless after just a few attempts. To do this, it is important to properly prepare your nails and strictly follow the recommendations on how to do stamping step by step. First of all, it is necessary to properly treat the cuticle and slightly correct the shape of the nail. Only after this should you begin the procedure itself.
- Apply a special product that protects the cuticle from varnish.
- Apply base. Let it dry.
- Select a picture on the disk, remove the special protective film, if used for the first time, apply varnish to the pre-selected picture
- Use a scraper to remove excess nail polish.
- Press the stamp onto the image with a special rolling motion, making sure that the design is copied.
- Press the stamp with the resulting design onto your nail; this must be done once, otherwise the image will come out blurry.
- Wipe the scraper, disk and stamp with a special nail polish remover. Repeat this procedure with all other nails.
- After transferring the images, you need to secure them with a top coat and then remove the cuticle protector.
Editor's choice: Oval nail design: fashionable color palette and popular execution techniques
How to do reverse stamping on nails correctly
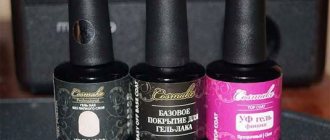
Stamping varnish
Reverse stamping is done to get a brighter and more colorful picture. You can paint the pattern directly in the form and then transfer it to the nail. The result in this case depends only on the accuracy of the movements, which comes with experience.
Note! It is much more interesting and difficult to create such a design with gel polish. This requires accuracy and attention.
For such coverage you will have to follow the following procedure:
- A manicure is done in any way: the nails are given the desired shape, the nail plates themselves are degreased.
- The nail is covered with a base, then with a colored gel. If the gel polish has a sticky layer, then after coating it is not removed so that the adhesion of the varnish and the nail is stronger.
- The desired pattern is selected from the disk, filled with some contrasting gel polish and transferred to the stamp. Already on the surface of the signet, a design is painted with colored gels.
- If desired, you can add glitter to the designs or do stamping by rubbing. Just first you need to lightly buff it for better adhesion. Excess should be removed with a brush.
- Next, the finished coloring needs to be covered with topcoat and dried in an ultraviolet lamp for about 20 seconds. Then the design is carefully removed from the stamp with tweezers and placed on the nail plate.
- If the design is laid out as it should and there are no defects, the entire nail is covered with topcoat and dried in a UV lamp for 2 minutes.
This method can be used to decorate all nails or just some. Any combination is acceptable, just be careful about the density of the gel, then the pattern will not be smeared and will be bright.
Common mistakes
In the process of applying a manicure, most women make certain mistakes, even without initially suspecting it. Here is a list of the most common ones.
- Failure to remove the special protective film from the disc, which makes it absolutely impossible to apply varnish to the engraved image itself.
- Using nail polish remover with various oils that prevent image transfer.
- The transfer of the image onto the nails is too slow, during which the polish has time to dry.
- A fairly quick transfer of a drawing when the image has not had time to be completely copied.
- Using varnish that is too thick and dries instantly.
Editor's choice: Shell nail design: necessary materials and how to decorate your nails
In order to avoid mistakes, as well as learn how to quickly do a manicure with stamping, you can watch the videos posted in this article.
Stamping nail art with acrylic paints
Stamping nail art
There are some differences in the stamping technique if the design is made with gel and acrylic paints. They mainly concern preparatory aspects.
Of course, first the drawing itself and its color scheme and base shade are selected. Based on this, suitable acrylic paints are selected for the job. Their shades can be chosen in contrast or based on varieties of the same color. Classic lovers often choose a combination of black and white, white and gold, red and black. Also in favor is the black and silver design. To create the pattern itself you will need a special acrylic varnish. The gel is completely unsuitable for this purpose. It spreads and smears.
Next, the inventory is prepared. These are plates with drawings, a scraper and a stamp. All of them are treated with acetone, thoroughly cleaning the working surfaces.
Note! When working with acrylic paints, as with gel, a UV lamp is required. Auxiliary materials required include napkins, cotton swabs, wooden sticks and liquid to remove the sticky layer.
When your nails are ready for design, you can start working. First of all, a base layer is applied to the nail plate. After thoroughly sealing the end of the nail (running gel over it), dry it in a lamp (2 minutes). If the gel is liquid, you need to repeat coating and drying. Then a clear top coat is applied to the nail. It can be used with glitter (glitter). At this point, preparation for nail-art stamping is completed and you can proceed directly to the process of creating a drawing.
Next, the selected pattern is filled with acrylic stamping paints and the excess is removed with the precise movement of a scraper. Then the stamp is pressed against the plate, and the design appears on its surface. Subsequently, the pattern is carefully rolled onto the selected area of the nail plate. At this stage, you can safely remove the pattern you don’t like or that has been damaged. The gel coating will not be damaged, you will only have to redo the acrylic pattern.
The finished acrylic pattern is air dried and coated with gel. This layer also needs to be dried in a UV lamp (2 minutes). Then the final - finishing - layer is applied.
Color stamping. Possible combinations
When performing a manicure using this technology, it is recommended to use contrasting combinations of base and varnish colors to apply the image, which will make the design clearer. One of the most popular manicure options is the use of a light base and dark varnish for the image. Experienced specialists can offer the fair sex an original multi-color composition.
With white varnish, designs in blue, red and black tones will be combined much more effectively. However, this combination of colors is suitable only for those women who have a perfectly even nail shape.
A beige base is a good option for representatives of the fair half of humanity who work in an office where there is a dress code. The color will fit perfectly with white, black, blue and emerald shades.
The steel varnish base looks very modern and stylish. It will combine very effectively with purple, blue and even pink varnish for drawings.
Pink base varnish will be perfectly complemented by designs in white, turquoise and brown shades, and red - by blue, white and black.
Advice from manicurists
There will be mistakes at first
Experts advise how to do stamping correctly, based on personal experience:
- Before applying the pattern, you should definitely wait until the base coat has completely dried.
- The condition of the scraper should be carefully monitored. Even small nicks can ruin the whole job. It's better to have a few new tools in stock.
- For each nail, the entire procedure (except for washing hands) is repeated again.
- Rectangular drawings should be placed along the smile line.
- To print the pattern, it is better to use thickened varnishes.
- Thickened varnish must be diluted to the desired consistency.
- Liquid varnish will thicken if you leave the bottle open for a while.
- It is recommended to fill in the recesses of the drawing in several strokes. This will allow the varnish to dry longer and allow you to make adjustments.
- The top coat should be applied in a thin layer and in one stroke.
- Varnishes should be shaken before each use. This will help the pigment to distribute evenly.
- After creating the design, you should not use caustic detergents for 24 hours, and it is better to generally limit interaction with water.
Of course, there will be mistakes at first, but you shouldn’t despair and give up experimenting. Over time, stamping will get better and better. After all, there is such scope for flight of fancy and there is no need to depend on the work schedule of a salon specialist. We are pleased with the wide variety of working materials. And, in the end, it is very economical!
Step-by-step nail design using stamping technique
Before we start decorating our nails, we traditionally carry out procedures for preparing the handles. Don't forget to get rid of cuticles and shape your nails into the desired shape.
We cover the nails with a base coat and a layer of varnish of the main color. We dry the varnish thoroughly so that when applying the design it does not spread and spoil all our work.
Now we take the stamping varnish and apply it to the image we need on a metal plate. With a fairly quick and confident movement of the hand, we remove excess varnish from the disc using a scraper.
We press the stamping stamp against the image on the plate. If the design is large and does not fit on the center of the stamp, you need to make several rolling movements to ensure that the entire pattern is imprinted. Here it is advisable to inspect the stamp and evaluate the quality of the design remaining on it in order to avoid possible errors. If necessary, it is better to repeat the procedure.
Now we need to transfer our decor to the nail plate. To do this, press the silicone stamp firmly against the nail and again make several rolling movements if the ornament is quite extensive.
It is advisable to perform manipulations to transfer the design to the stamp and from it to the nail quite quickly and with confident movements. Avoid letting the polish dry out, otherwise the resulting manicure will disappoint you with its errors. If the polish dries very quickly, you can use acetone-based nail polish remover. Moisten the stamping plate generously with it before applying colored varnish. This will extend the drying time.
After transferring the ornament, let the drawing dry. As a rule, this happens quite quickly, since the pattern is applied to the nail in a thin layer. Finally, we cover the nails with a finishing layer and enjoy the result.