Svetlana Markova
Beauty is like a precious stone: the simpler it is, the more precious it is!
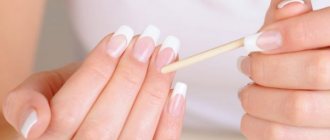
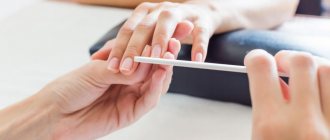
A beautiful manicure is a real art. To create a masterpiece on your nails, you need to know a few secrets and secret techniques. Just one awkward movement can ruin the design by painting the cuticle or periungual areas of the skin. This defect can be easily removed with a cotton swab soaked in acetone-containing nail polish remover. But to save time, nerves and get the perfect design, it is better to secure these areas in advance. It is useful to know what experienced professionals apply around the nail when painting their nails.
Video: how Skin Defender works using stamping as an example
Skin Defender is a miracle product for a new generation of manicures. It is actively used in professional beauty salons and helps create a chic nail design without any extra effort. When creating original decor using the ombre technique, water manicure, stamping, you don’t have to rack your brains about how to do everything neatly. There is no point in using tape anymore, which is irritating and doesn’t stick tightly to your finger. You don’t have to experiment with various products, ointments, creams, creating original decor. Watch the video to learn what to apply around the nail when stamping:
Found an error in the text? Select it, press Ctrl + Enter and we will fix everything!
There is a varnish that is applied around the nail and removed with a film, called liquid tape.
.
So, in this article we will talk about how to make liquid tape for manicure with your own hands, replacing it with regular PVA
. A short informative video instruction - you won’t even have time to get bored.
Well, for this you need an empty bottle of nail polish. You can clean an already used bottle with acetone, or you can buy a ready-made empty one in a specialized store.
PVA glue
, consisting of
polyvinyl acetate
(if this is important to you), that is, this is ordinary
PVA
sold in the stationery store around the corner, which will need to be poured into an empty varnish bottle, filling about three-quarters to leave room for the brush.
If desired, you can mark the bottles with a marker so as not to confuse the glue with nail polish. That's all the instructions, and if you are interested in how good this composition is in practice, then read on.
How can I replace liquid tape? Are there any analogues?
Many people wonder how to replace liquid tape. If we don’t have manicure tape in our house, and you critically need it now, then don’t panic, because in your house you will definitely find something that can easily replace it.
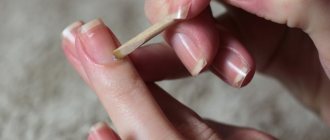
PVA glue is a very convenient and also safe product that you will most likely find in your home. Especially if you have small children. Dip the glue bottle and brush into the glue bottle and carefully apply a thin layer of glue around the nail, as you would if it were liquid manicure tape.
IMPORTANT TO KNOW: Strengthening nails with biogel - step-by-step instructions
When the glue is completely dry, you will notice that a kind of film has formed in its place. Only then can you start doing your manicure. When finished, carefully remove the film with the remaining polish and enjoy your beautiful nails.
How to use liquid manicure tape
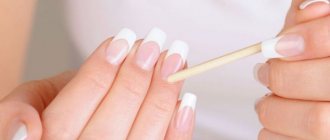
Apply the adhesive as you would regular liquid tape, as close to your nails as possible without touching them. Cover the skin approximately half to one centimeter around the nails, depending on the intended design and how easy the process promises to be. The process can take quite a long time and requires concentration.
Now, you need to let the applied composition dry, and if you are not one of the patient people, then to speed up the process, use a hair dryer. You will know that the glue has dried when it becomes almost transparent and invisible on the skin.
In short, I simply apply a few colors of polish to a sponge and transfer them onto my nails, creating a smooth gradient between the colors.
After that, all that remains is to remove the applied tape from your fingers, adjust the manicure (with a brush or cotton swab moistened with remover), and secure the resulting design with a top coat.
There is an opinion that a graceful gait turns a woman into a queen. Also, a woman’s appearance tells how noble and educated she is.
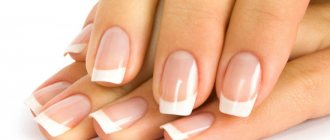
Well-groomed hands, discreet, pleasant makeup, flawless manicure, as well as well- groomed magnificent nails emphasize the beauty of a woman.
.
The perfect manicure can be done at home; it is only important to follow a few rules that will help keep your hands clean and tidy.
What is liquid manicure tape?
Externally, liquid nail tape looks like a jar of liquid. If you don't look at the inscription on this jar, you might think that this is an ordinary varnish, but this is not the case at all. This is a liquid that has the consistency of nail polish and is designed to be applied around the cuticle.
After this application, it turns into a film. After the liquid has dried and turned into a film, you can begin applying the main nail polish. The tape protects the delicate skin of your hands from nail polish, which in turn allows your manicure to look more aesthetically pleasing.
IMPORTANT TO KNOW: Beige manicure with glitter: photo examples of how to do it at home
The tape contains only beneficial ingredients without harmful dyes, so it does not cause peeling or irritation.
The cuticle requires protection
Often even the most spectacular manicure can be ruined by a small but very significant detail.
, – ugly stains remaining after such procedures. In order to be able to safely show off women’s fingers, you need to know what is used around the nail during a manicure.
The skin around the nail should be well-groomed.
There are very simple methods that our mothers used to use in their youth. However, the most modern devices are not only easier to use, but also more gentle.
They bring hydration and nutrition to the skin around the nail and cuticle. This effect on the skin is much healthier than, for example, glue with a chemical composition, when the areas most dangerous for contamination are smeared.
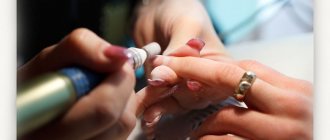
Manicure correction with “RIO Profi”
Thanks to all the specialists who are partial to female beauty and try to please the fairer sex with unusual new products, more and more interesting ideas for manicure are appearing
.
How to use RIO Profi liquid tape.
For example, a unique device is liquid tape. It is necessary for those who love designer unusual patterns on nails and who are not afraid of experiments.
especially indispensable when it is decided to:
- stamping;
- water manicure;
- gradient;
- stencil;
- French;
- drawing holes.
All these types of manicure require not only skill, but also great care, because such original nails always attract the eyes of others.
.
The skin around the nails should remain in excellent condition. And all the excess varnish will remain on a specially prepared tape.
The time usually spent on the lengthy and often labor-intensive task of removing excess will be reduced to a minimum.
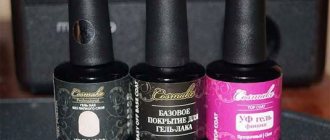
The convenient product “RIO Profi” appeared on store shelves not so long ago, but anyone who follows new products in the field of manicure has already managed to understand and appreciate all the benefits of this corrector.
Moreover, it does not matter what means are used:
- colorless varnish;
- colored varnish;
- varnishes for creating various patterns;
- gels.
Now it’s time to calmly start working on your nails with RIO Profi, without worrying that streaks and marks will remain.
What makes this product stand out is:
- natural ingredients, environmentally friendly. The main ingredient here is rubber;
- manufacturers decided not to add any dyes to the product in order to save people from all kinds of allergic reactions;
- due to its composition, the product does not have a special odor;
- the absence of fragrances and essential oils makes the product cheaper, and therefore accessible to many;
- ease of use;
- The tape dries quickly - within a few minutes, so it will be especially useful for specialists in manicure salons.
Using liquid tape is a pleasure, you don’t even have to learn. You just need to:
- Before the general procedure, apply the corrector to the areas of the side rollers along the contour of the cuticle; a thin layer protects just as well;
- wait until the liquid tape dries. In the bottle it is pink in color, but gradually dries out and becomes more transparent;
- Please note that the fingers with the applied liquid should not touch each other, otherwise they will stick together.
Now you can proceed directly to the manicure, and even if the varnish remains outside the nails, the corrector will take care of any mistake.
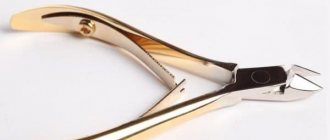
After the procedure, the tape is very easily removed with tweezers.
You just need to grab the edge, but after the nail polish has dried on your nails.
Protective liquid EL Corazon
The abundance of EL Corazon products is impressive. It specializes in nail products, so if a problem arises and you need to decide what to apply around the nail during a manicure, you need to consult the company’s catalog.
Application of EL Corazon.
When developing products, specialists use various natural products
, which have a very beneficial effect on both nails and cuticles and the skin around them: all kinds of natural oils, often in combination, honey, lavender, almonds, passion fruit, plant and algae extracts, vitamins.
The products from this company, which are applied around the nail during manicure, have several types, and how they differ - they are smeared with blue or pink liquid.
They are also distinguishable by smell, but these two products give an excellent effect. Both products moisturize the skin and have a softening effect.
and after 30 seconds they turn into a thin transparent film.
Skin Defender protects cuticles and ridges
Another product designed to provide protection around the nail during a manicure, which will solve the problem of stained skin when problem areas are smeared, is Skin Defender.
Thanks to this substance, any type of manicure, despite the level of complexity, will become a joyful event, as it will be neat and therefore effective.
The action of the product is based on the fact that, having a special chemical composition, it instantly hardens, turning into a film,
while protecting the skin from possible contamination with varnish.
The product dries very quickly: after 30 seconds you can begin the next procedure.
The total volume of the bottle is designed to treat up to 500 fingers on average.
Skin Defender is very easy to remove at the end of all manipulations with the nail plate.
Why is it that often when asked what to apply around the nail during a manicure, experts advise Skin Defender, it will be easy to prove.
Benefits of Skin Defender:
- only natural rubber is involved in its production;
- does not contain a pungent odor, but only the natural aroma of neroli essential oil, which adds excellent effectiveness to the product in terms of bactericidal, antiseptic and hemostatic;
- can be preserved for a long time after the first use, without drying out or forming lumps due to the use of a soil shaker;
- does not create foam when moving;
- The design of the bottle is designed in such a way that you can dip a brush intended for nails of any diameter into the wide neck. It closes hermetically, which prevents air from getting inside.
Liquid Palisade from Kiesque
Liquid latex is what they smear around the nail during a manicure, increasingly using such a safe product, and now without worrying that the cuticles, as well as the skin near the nails, will not be preserved. They will look well-groomed.
Latex is universal in that now, after a long process of removing residues, there is no varnish at all.
Essentially, any liquid latex is a substance with a liquid consistency
with varying degrees of density. It contains no substances that poison the body. Manicure is now available of any complexity, and any technique will leave only pleasant impressions, since there will be no flaws after the work.
It is important to know!
In order for the product to maximize its positive effect, it should be applied very close to the nail plate.
Its drying time is usually from 30 seconds to 3 minutes. When you can proceed to the next stage of manicure, it will become clear: latex will create a protective barrier in the form of a thin, but very strong film.
After decorating the nails, the liquid tape is removed using tweezers or a standard orange stick.
Many people pay attention to the pungent odor that the product emits, but this is due to the presence of ammonia in the composition, so it is better to be careful and keep the bottle away from your face during use.
The product has such chemical properties that after using it, the lid must be screwed tightly so that it does not evaporate or dry out. It comes off the skin with absolutely no problems.
Interesting to know!
Liquid latex is useful not only if you need to choose what to apply around the nail during a manicure, but also when you need to leave free zones on the nails.
You just need to apply the product to these areas, wait for it to dry and continue working.
What is liquid tape for manicure used for?
Manicure film is needed to protect the cuticle and side rollers from paint coatings during the design process. The rough component found in any polymer can cause damage to delicate and sensitive skin. Use it when performing the next technique, which involves getting material on your fingers. It is better to cover the areas close to the plate with a protective film, thereby protecting the delicate epidermis and making it easier to remove excess dye from the skin.
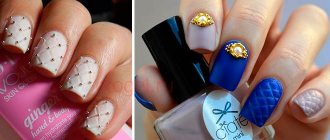
The tape serves as an auxiliary material for design in the following directions:
- gradient;
- marble pattern;
- any airbrush work;
- a technique that involves direct contact of the skin with varnish.
The largest selection can be found at Planet Nails. This is the largest online store with a sales area located in Moscow. In the shopping complex you can find a variety of planet nails bottles with liquid tape, various devices for manicure, decorative material for design and other new products from the nail industry.
PVA glue for creating film
It so happened that there is no universal remedy, and it is not possible to go to a specialized store for it. But this won’t scare women. Looking around, they will definitely find a way out by using some means.
PVA glue can help you create the perfect manicure.
There is no doubt that PVA glue is exactly what is smeared around the nail during manicure,
because it leaves a protective film on the skin.
Some dilute it with water, others use it ready-made.
Note!
It often forms too thick a protective film, which takes quite a long time to dry.
By diluting with water, you can achieve the opposite effect: the composition will turn out to be liquid, and you won’t be able to get the glue to harden; you will have to apply another protective layer and wait for it to dry again.
To keep your hands clean after working with glue during manicure, you need to apply the substance around the nail with a brush.
, but they can also be smeared with a cotton swab, whichever is more convenient for someone.
Remove the film in such a way as not to damage your work: with tweezers or by moistening an orange stick in water.
But still, more acceptable means that do not harm the skin, when there is a choice of what to smear around the nail during a manicure, is Vaseline or a rich cream.
They need to be applied in a thick layer, but this does not always bring the desired result, since the cream or Vaseline is not fixed and can wear off,
Therefore, marks may still remain on the skin, and you will have to deal with them.
The oil is also used for nail care, carefully treating the skin around the nails. But how it doesn’t really help with manicures with different types of complexity - unsightly stains can still remain around the nail, even if they are applied very carefully.
Important to remember!
The remaining varnish, in any case, must be removed, otherwise it will be impossible to impress others, which is what women so strive for.
And even beautifully processed nails, an amazing original pattern, successful combinations of shades will not help if traces of varnish remain on the skin.
Therefore, when preparing for such an important procedure as a manicure, a protective agent must be present, along with all other important devices.
If you would like to learn how to use FIRE STAR liquid tape, watch the following video:
The following video will show how PVA glue can replace liquid tape:
This video reviews popular liquid tapes for the perfect manicure:
Until recently, PVA glue
used primarily for gluing paper. But resourceful women are always looking for unusual uses for ordinary things. This time, a new beauty trend has become ordinary PVA glue, which overseas and our beauties use for... manicure! We suggest you take on board two tips on how to use this inexpensive remedy to your advantage.
The most popular product is Skin Defender
The most popular nail tape is Skin Defender, which is made from natural rubber. This product has very good reviews, and it has already been appreciated by many women.
This product is sold with a convenient brush, which makes it easier to apply the tape to the periungual plate. The external product resembles a pinkish liquid that reliably protects the cuticle from staining. In addition, this liquid protects the skin of the hands from bacteria and has an antiseptic effect.
Moreover, the adhesive tape from this brand prevents the growth of dead cuticles. After applying the liquid tape to the skin of the hands, it, like all conventional products, turns into a film, which, upon completion of the manicure, is easily removed with tweezers or any other means.
If you do not have the opportunity to purchase this product in cosmetic stores, then do not despair. You can easily make liquid tape yourself at home using available materials. This way you will spend much less money and will be 100% confident in the components included in the product.
IMPORTANT TO KNOW: Nail care tips: professional tools, strengtheners and hot manicure
Below you will find information that will help you make liquid concealer with your own hands. Remember that the product must be applied as close to the cuticle as possible, and you should begin applying your base polish only after the film has completely dried.
If you don't follow these rules, the tape may move and your manicure will look ugly.
Manicure glue
- PVA glue can be used as a base for glitter polish. Many people love to have such a beautiful manicure, but it can be very problematic to wipe off the glitter later. Apply PVA to your nails, let them dry, then apply a festive polish on top. If you need to remove it, just pick up the polish with the edge of your nail and remove it along with the film.
Advantages of this method: Non-toxic— this glue is water-based, it is harmless to nails, skin and respiratory tract, and also has a slight characteristic odor. It won't make your nails peel or break. Cost-effective - this product is quite inexpensive. To prepare the product you will need regular glue, an empty nail polish bottle and 2 tsp. water. Disadvantages: this manicure is short-lived.
- It's no secret that it can be difficult to remove nail polish from your skin without damaging your manicure. Apply PVA glue around the nail, especially on the cuticle, like in the picture, then paint your nails. If the varnish goes beyond the edges, after drying the glue with the remaining varnish can be easily removed.
You can watch the video in more detail:
We hope that this information will be useful to you and you will use PVA glue not only for the purposes usual for most, but also for...
Before coating with paints and varnishes, the wood is sanded and primed. This will give greater adhesion to the base coat and wood, and the finishing cost will be reduced by 40%. You can buy a ready-made primer for wood or make it from available and inexpensive adhesives. We will tell you how to make a PVA primer for wood at home in this article. We will also consider what disadvantages and advantages a homemade coating has.
The basis of a homemade primer is PVA glue, which is an aqueous emulsion of polyvinyl acetate. PVA is used for gluing various materials from wood and cardboard. When applied to the surface, the glue dries and forms a dense film. When making a primer, the glue is diluted with water, so the film on the treated surface is thin. When applied thickly, the adhesive primer is poorly absorbed and forms a thick, uneven film, which over time easily peels off along with the paint. A PVA-based primer has advantages that are inherent in ready-made professional products:
- Adhesion increases.
- The wood receives additional protection from water.
- The paint goes on smoother.
- The consumption of decorating composition is reduced.
- The primer composition has a low cost.
Despite the many advantages, the homemade composition has disadvantages. Therefore, it is recommended to use homemade products based on PVA only in cases of savings. Disadvantages stand out:
- The primer does not penetrate deep enough into the wood and improves the structure by only 0.2%. If we talk about other materials that do not have the hygroscopic properties of wood, then PVA coating is ineffective.
- Does not have antiseptic properties. Wood is afraid of mold and mildew, and PVA will not be able to resist the proliferation of microorganisms.
- Over time, the glue changes its color, turns yellow, and if you cover the wood with light paint or varnish, the appearance of the finish will be ruined.
- The coating is resistant to steam and water. It is not recommended to use for covering walls, floors and ceilings in damp rooms and baths.
Some disadvantages can be avoided if you know the intricacies of the work. We will talk about this below. But most of the disadvantages are difficult to correct, so the PVA priming method is economical, but not always effective. The funds that were saved during the repair will be used to correct the defects. Therefore, it is necessary to weigh the pros and cons several times. In most cases, it is more profitable to immediately use a professional wood primer. For those who like to save money, here is a table where we will reveal in detail the secret to solving some problems:
Priming with PVA is suitable for painting wood with inexpensive dark-colored paints. Over time, yellow spots appear on light colors; the paint will have to be removed and the wood re-treated. It is not recommended to use primer under varnishes at all. In this case, various impregnations are used that do not harm the appearance and will not spoil the natural pattern of the wood.
The effectiveness of the primer depends on two factors: application technique and proper preparation of the product. Below we will consider each factor in more detail.
Mix and apply
A primer for wood for painting is prepared from the following components: glue (sold in any construction stores, average price from 60 rubles for 0.9 liters) and warm water (40-45 degrees). The adhesive composition is suitable for construction or carpentry work. The price is lower for the first option. You will also need an empty plastic container, a small bucket and a spatula for stirring. Below is a table of prices for various glue manufacturers:
| Manufacturer and name | Peculiarities | Price |
| “Super PVA” moment | Quick-drying, viscous. | 145 rub. for 250 g. |
| “Carpenter” moment | Moisture resistant, viscous. Doesn't mix well with water. | 190 rub. for 250 g. |
| White House “PVA universal” | Construction, easy to install. | 60 rub. for 900 g |
| White House “PVA super” | Waterproof, viscous, suitable for all surfaces. | 75 rub. for 900 g |
| Expert “PVA carpentry glue” | Waterproof, viscous, contains antiseptic additives. | 116 rub. for 900 g |
| Expert “Universal PVA Glue” | Easily diluted with water and applied to any surface. | 83 rub. for 900 g |
| Text “Universal joiner! | Moisture resistant, quick drying. | 90 rub. for 900 g |
You should not buy the advertised Moment or Titan. When choosing, you don’t need to pay attention to the manufacturer, since an inexpensive option from White House or Expert is suitable for the primer composition. Essentially the composition of the emulsion is the same. A waterproof composition will be more difficult to dilute with water, so for quick woodworking it is better to use classic PVA glue. But waterproof gives the wood additional waterproofing and protective properties, like an acrylic primer. Diluted in small portions. It is not recommended to prepare a large amount of adhesive primer at once, since the mixture left loses its quality characteristics.
It is more profitable to purchase glue for preparing primers in volumes of 0.9 liters or more, since the price for small packages is higher. If you need to treat a small surface, then 250 g is enough, so there will be no unused residues.
Preparation
You can make a primer with your own hands using the following ratio: 1 part PVA - 2 parts water. But the ratio depends on the viscosity of the glue. After mixing, the DIY wood primer is checked for thickness using a test application. A small amount is applied to the wood, the mark should remain whitish, but not too dense. When drying, the film should not peel off from the wood. If the composition turns out to be thick, add a little more water. An antiseptic or a small amount of lime or crushed chalk is added to the finished mixture. Lime and chalk are sifted so that there are no large inclusions during application.
Water is poured into the glue in small portions, the composition is stirred all the time. If, on the contrary, you pour glue into water, it will be more difficult to mix the primer.
The finished primer will be well absorbed into the wood and applied evenly using a brush or roller. But before application, the wooden surface is sanded and leveled. If there are cracks or chips, the wood is puttied using special compounds.
Application
Instructions for applying PVA glue primer to a wooden surface consist of the following steps:
- The wood is being prepared. To do this, the surface is ground and leveled. The accuracy of further work will depend on the quality of preparation.
- Using a brush, hard-to-reach places are treated: corners, baseboards, places behind radiators and pipes.
- The remaining surface of the wood is covered with a roller or a wider brush. The first layer should dry within 1-2 hours.
- The wood is inspected for the presence of “fringe”. If the surface has lost its evenness, it is sanded again using the finest caliber sandpaper. It is more convenient to carry out sanding by placing a piece of paper on a small block.
- A second coat of primer is applied. Just like the first time, hard-to-reach areas are coated first, then the main surface.
- The treated surface must dry (for 24 hours), after which the paint and varnish coating is applied.
The finishing is considered complete after complete drying.
It is possible to use PVA glue as a base for a primer on wood, but the result is not always positive. If the primer is not diluted correctly, then over time the finish will peel off from the wood and the repair work will have to be done all over again. Under light paints and varnishes, the PVA emulsion turns yellow and the appearance of the wood deteriorates. Therefore, it is recommended to use professional primers for finishing, which are available in every hardware store and the price for them is not off the charts.
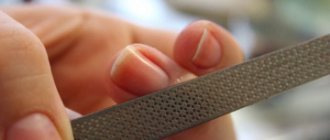
Protective tape for manicure
Probably, both those who do their own manicure at home and those who are experienced manicurists have encountered unpleasant problems when their fingers and nails are accidentally damaged by a nail file, or varnish gets on them, from where it is very difficult to remove. Some people have gotten used to using, for example, a medical adhesive plaster. But this is very inconvenient, since removing it can damage your nails, and a sticky residue will remain. Today, the best way to protect your fingers is with a special tape, also sometimes called a “finger bandage.” This amazingly simple but effective device is used by professional nail technicians.
What are the advantages of using protective tape for fingers and how to choose a quality material, we will find out further. Why is protective tape for fingers used when performing a manicure? The main purpose of the protective tape is to prevent damage to the nails and skin of the fingers with a nail file, scissors and other manicure tools, as well as accidental contact of varnish and other products on the master’s fingers. A protective bandage for fingers is preferred by experienced masters who are forced to very often deal with various manicure tools. To avoid damaging your own manicure or getting hurt, the glued tape can often be seen on the three fingers that are most used by the master. Also, such a tape can be used not only in a salon, but also at home. Advantages of using protective tape for fingers: • firmly fixed on the fingers, elastic, fits tightly to the skin, does not slip or curl; • easy to apply and remove, leaves no sticky residue; • is an excellent alternative to latex gloves, which cause sweaty hands; • does not affect the sensitivity of the skin of the fingers, which is very important for manicurists; • compact and lightweight; • has a pleasant soft coating; • it is possible to choose ribbons of different sizes, widths and colors; • affordable price. This seemingly simple accessory can become an indispensable attribute not only of nail service, but also of everyday life. How to use protective tape for fingers Using protective tape for manicure is easy and simple. You need to wrap your finger with tape (adhesive base to the skin) several times, applying light pressure, cut off the tape and press its edge, which will allow it to be firmly fixed. That's all. Just a few movements, a minimum of effort - and you're done! What you need to consider to choose a high-quality protective tape for manicure When choosing a protective tape, you need to pay attention to the fact that the outer material is soft and pleasant to the touch. Try to stretch it a little - a high-quality tape should be elastic. Of course, the bandage must be firmly fixed and, if necessary, easily removed. Choose the color of the product according to your preferences. It is best to trust trusted manufacturers who specialize in the manufacture of such products. We present products from exactly these manufacturers.