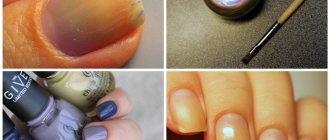
How to properly remove gel polish around a nail
Chic design is a full-fledged art, the creation of which requires certain knowledge, skills and abilities. After all, an accidental mistake can ruin the entire nail design, only partially touching the cuticle or skin around the nail.
The use of any acetone-containing substances has a detrimental effect on the skin and the body as a whole, and the use of auxiliary tools (an orange or cotton swab) can ruin a manicure that has not yet hardened.
Before you start creating a design, you should study some of the nuances of how to remove gel polish from the skin around the nail or how to protect the skin with special methods.
Ways to keep the skin around the nail clean
There are several secret techniques with which the manicure is attractive and the skin around the nail is clean and unharmed.
Some of them:
- Using Vaseline.
- Using PVA glue.
- Applying rich cream.
- Use of special means.
In addition to the above methods of protection, there is one more method - gluing tape. But in the case of water manicure, this product will not be effective at all, since upon contact with water, the tape loses its adhesive properties, as a result of which it simply peels off and the varnish gets on the skin.
How to prevent polish from getting on the skin around the nail
Manicure design requires a subtle approach to applying varnish and designs, so you can warn yourself in advance against unprofessionalism. To prevent the gel from sticking to the skin and having to rub it for several minutes, you can go the other way. To do this, use protective measures by applying gel and cream formulations:
- Vaseline;
- fat cream;
- special cosmetics.
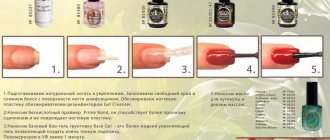
Some go further and use PVA glue. Professionals advise purchasing a liquid mixture called “defender,” which translates to “defender.” This product consists of natural rubber. This sticky consistency is applied around the nail plate before painting with gel. When the defender dries, a manicure design is performed. Next, remove it from the nail in the form of a gel film, carefully prying it off with tweezers. It is impossible to do without it if you plan to make a complex design - gradient, stamping, creative painting. In the case of cream and Vaseline, everything is simple, they are applied before coating the varnish, then the product is removed with a cotton swab with all the imperfections.
Advice! Choose a defender from the popular brands RIO Profi, El Corazon, Barlet. The product is usually pink, but recently other shades have appeared on sale.
Vaseline as a skin protectant
In order to create a protective barrier for the skin around the nail, you can apply Vaseline.
Gently lubricate the cuticle and the area near the nail.
We make sure that the product does not get on the nail, and if this happens, carefully wipe the nail plate with a cotton swab, since the oiliness of the Vaseline can affect the quality of your manicure.
Thanks to its special structure, Vaseline envelops the skin, thereby preventing the penetration of varnish into the layers of the epidermis.
How to keep the skin around your nails clean?
Masters advise using several of the following secrets in the process of decorating nail plates:
- Apply Vaseline to the periungual skin.
- Use PVA glue.
- Before starting work, treat the skin around the nails with a rich cream.
- Use special means.
Cleaning the cuticle
It is recommended to apply any of the above products immediately before starting the artistic part of the work. If you apply Vaseline or glue while treating your nails with a buff or file, small shavings will clog the skin and cuticles, forcing the nail technician to clean the area. When applying petroleum jelly, greasy cream or PVA glue to the periungual surface, you must be careful to ensure that the product does not get on the nails. If a greasy composition gets on the plate, you must immediately remove the product by carefully wiping the surface with clean cotton pads.
Girls who create their own manicure at home note the ease of using PVA glue. It is applied a few minutes before the start of nail art. Apply a small layer of PVA to the periungual surface and wait for it to dry. The glue forms a thin film on the skin, which is easily removed in warm water. After waiting for the adhesive protection to dry, you can begin decorating the plates with gel polish.
Using an orange stick
Note that when performing an Ombre style manicure, it is recommended to use special products to remove excess gel polish after drying under a lamp. Since this technology involves painting the nails and part of the adjacent skin.
From the professional products that professionals use in salons, it is recommended to choose those that have protective properties. Emollient components not only make it easier to remove the sticky layer of gel polish, but also soften the skin and cuticles.
Applying PVA glue
An interesting property of PVA glue
The most unusual method of protecting the cuticle is ordinary resin.
Take a medium-sized brush and carefully apply it to the finger ridges around the nail (we act extremely carefully so that the glue does not get on the nail itself).
When exposed to air, PVA forms a film that adheres tightly to the skin, thereby repelling varnish particles. Any coloring material that gets on the film can be easily removed using a cotton swab dipped in water.
This method is perfect for manicure at home, because it is quite simple and does not require additional costs.
Fat cream as a method of protection
The classic and most common option for preventing nail polish from seeping under the cuticle is to use regular hand cream. The main feature of this product is its maximum fat content, thanks to which the cream creates an invisible film that keeps the skin unharmed.
The conditions for applying the cream are similar to using Vaseline:
- Carefully, without getting it on the nail surface, apply a protective layer.
- After the procedure, remove the cream using a cotton swab.
As you can see, when creating a manicure, removing excess polish will not cause you much trouble.
Remember that this method is not suitable for applying an Ombre style manicure, since this design involves extensive coloring of not only the nail plate, but also the skin around it. Particles of varnish can penetrate the upper layers of the skin, so special compositions are often used to perform Ombre manicure.
How to remove gel polish without foil using special wipes
For those who have neither the strength nor the desire to bother with cotton pads and foil, special napkins soaked in a solution for removing gel polish are available for sale. They are simple and easy to use, but they tend to dry out the nail plate, making it more brittle.
Preparation for using a cosmetic product looks the same as in the previous method. That is, you must cut off most of the covering and treat the cuticle with cream, after which an envelope with a napkin inside is put on each finger. The exposure time is indicated on the packaging or in the instructions for use. As a rule, it is 15 minutes. Remove the remaining varnish with a stick.
Use of special protective equipment
Today, there is a fairly large range of special products that help make the process of protecting the cuticle as easy as possible. These components have proven themselves well among professionals.
Priorities of special protective materials:
- The main component of this product is natural rubber, without the admixture of harmful chemicals.
- It has a pleasant pink color and a delicious aroma. Thanks to the special composition of essential oils, it has a positive effect on the skin of the hands.
- It dries quickly, which is a huge plus when used by professionals.
- The bottle is compact and easily fits into a small cosmetic bag.
- A convenient brush makes it easy to apply to the skin, avoiding getting it on the nail.
- It can be stored for a long time and has low consumption.
Now, to apply a neat manicure, you don’t have to peel off the gel polish that gets on the cuticle, just apply a specially designed protection product and enjoy a delightful manicure.
Tools to help us
If it so happens that you missed the procedure for protecting your cuticle, then we will have to resort to using the following tools:
- Orange stick.
- Toothpick and cotton swab.
- Small flat brush.
Such methods are less relevant, since careless movement of an orange or cotton swab can damage an already created manicure, and the cotton wool will leave some lint on the surface of the undried varnish.
Using a pointed stick
A special orange wood stick can be found in any professional store. More often it is used to work with cuticles, but in a situation with dried varnish it will also be appropriate.
- First, wet the edge in nail polish remover and shake off the excess.
- Gently rub over areas of the skin, collecting spilled Shellac, and wipe on a napkin.
- We repeat the procedure, periodically moistening the orange stick in a special liquid until the excess varnish is completely eliminated.
Using a cotton swab
The easiest way is to use a regular cotton swab.
- Soak it in nail polish remover and gently wipe the skin.
- But this method will not be able to reach hard-to-reach places, since the cotton swab is quite large. Here an ordinary toothpick and a small piece of cotton wool will come to our aid.
- We wrap the toothpick, moisten it in liquid and similarly wipe the areas close to the nail plate.
- We work extremely carefully so as not to smear the wet Shellac.
- After eliminating the excess, we continue the manicure procedure.
Brush - assistant
In this case, any small brush will do. It can be a brush for artistic painting or an ordinary brush for used nail polish (be sure to wash it).
The principle of removing varnish is quite simple.
- Wet the brush in nail polish remover.
- Using gentle touches, we cleanse the skin where there is excess Shellac.
Try it, choose the most convenient ways to protect gel polish from running, and your manicure will be neat and well-groomed.
Tools for removing gel polish yourself
You can remove gel polish at home with a removing liquid - either regular or specially created for working with the coating. In a familiar liquid, the presence of acetone is inevitable, since the gel cannot be removed without it. And what else can you use? Of course, it is better to use branded products.
To work you will need:
- Cotton pads are cut in half and divided in half.
- Fat cream.
- Food foil, cut into small pieces (you can use chocolate or candy wrappers).
- Orange or plastic sticks.
- Cuticle oil.
- Sanding file.
Step-by-step guide to action:
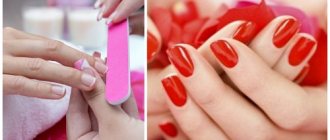
- Preparing the nail plate at home involves treating it with a sanding file to remove shine (shellac is not required for a manicure).
- When solving the problem of how to remove gel polish from nails, it is very important to wash your fingers in warm soapy water and cover the skin around the nail with a rich cream. This will protect the dermis from the aggression of the coating removal solution.
- Moisten a cotton pad with nail polish remover and apply it to the plates one by one. The cotton wool is secured around the fingers with foil.
- A special liquid melts the gel sticky layer after 10 minutes. The usual composition with acetone will extend this phase by another 7 minutes.
- To speed up the process, lightly massage the plate. And then the coating can be easily removed along with a cotton pad. However, more often than not, an orange stick is required to remove the layer. It happens that the manipulation aimed at how to remove gel polish at home should be repeated (when the coating is applied too generously).
- The nail plate becomes shiny after working with a sanding file.
- At the end of the process, the skin is treated with cuticle oil.
It is considered a mistake to remove the gel using the usual acetone, as well as using only the mechanical method - this leads to injury to the surface of the nail.
Manicurists advise removing gel polish first on the fingers of one hand, and then on the other. A hand free from the procedure may be needed, for example, to massage the nail plates.
You can use the new coating at home immediately after removing the old one.
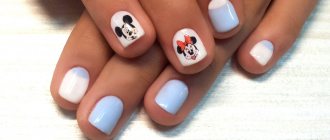
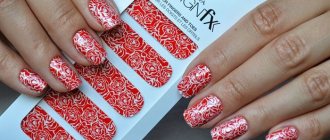
Photo of nail polish coating
Even more photos at the link: Gel polish photo.