New materials for nail services appear today with such frequency that even a true professional sometimes finds it difficult to keep track of all the new products. A beginner can get completely confused.
Single-phase gel for nail extensions has already become quite popular and has acquired an enviable number of fans both among certified specialists and among those who are taking their first steps in understanding the intricacies of this beautiful art. Our article will help you understand all the intricacies of the technology for those who decide to learn how to use single-phase gel for nail extensions, what kind of material it is and what are the features of working with it.
Why is the gel called single-phase?
To find the answer to this question, let's consider the main stages of technology. The extension is carried out in three stages:
- Applying a base coat responsible for adhesion to the surface of the natural nail.
- Shape modeling.
- Coating with a fixing layer that prevents rapid wear of the material and is responsible for the gloss (or for the velvety surface if the design involves a matte texture).
A three-phase system involves the use of three different products, each of which performs a different function. But when it comes to single-phase coating, only one material is needed. What it is? Single-phase gel for nail extensions, of course. He is able to solve all three problems.
How to apply single-phase gel polish correctly?
The use of single-phase products differs from the classic version of manicure only in the number of actions. The step-by-step technique for applying single-phase gel polish includes the following steps:
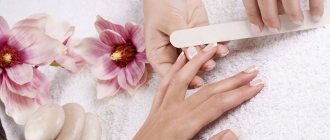
- Treat the nail - you need to remove the previous coating, decide on the shape and length of the nail and polish it.
- Apply a nail degreasing agent that provides improved adhesion to the surface.
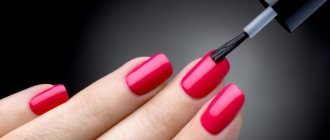
- Carefully paint over the nail plate - single-phase gel polish is applied according to the standard pattern, starting from a point in the middle of the nail.
- Remove any remaining product that has escaped from the nail - orange sticks are perfect for this purpose.
- Dry the surface in a UV lamp (2 minutes) or LED lamp (1 minute).
- Apply a second layer of gel polish and dry it.
This completes the work - using single-phase gel polish is really very simple, and it saves a lot of time. After the procedure, it is recommended to use a special cuticle oil, which will help soften and soothe the skin.
Material advantages
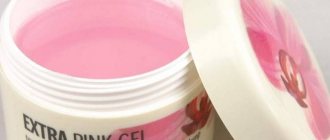
Often, a single-phase gel becomes the choice of beginners. This is the right decision, because you will have to spend money on just one jar to start getting better at extensions.
Another advantage is the consistency of the material. Compared to three-phase products, it is quite liquid, but not flowing. The gel is convenient to apply and distribute.
Many girls who have tried this type of material claim that it is very obedient, can be easily crimped and can be easily filed. This means that this gel is also suitable for complex arched shapes, such as a pipe.
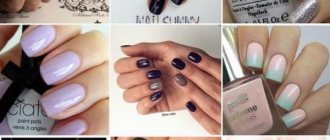
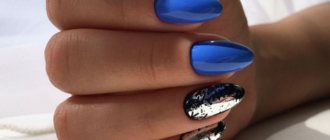
For many who decided to find out what it is - single-phase gel for nail extensions, the discovery was the huge selection of colors. Manufacturers offer not only classic white, pink and transparent gels, but also a whole palette of camouflages, as well as luxurious opal options, gels with shimmer and sparkles, and luminescent materials. In the palettes of many brands you can easily find gel of any color.
It’s not difficult to understand how to use single-phase gel for nail extensions. If you have experience working with three-phase materials, you will probably enjoy the process. But even if this is your first attempt, you can count on a good result.
However, you should not be deceived and wait for a miracle. Working with any materials for gel manicure has many nuances. If you have the desire and opportunity to take a training course, be sure to do so. Well, if this is not possible (or you even consider nail extensions as a hobby), get ready for hard work. Follow our advice, perform each operation carefully, train and study - then everything will definitely work out.
Why choose single-phase gel polish?
The three-phase ones that have been familiar for a long time require more skills, a special lamp and other elements. It is quite difficult to make a coating with such varnish at home. As for single-phase gel polish, it includes all the necessary components for a beautiful manicure and does not require additional coating of the nail with a base and final top coat.
It’s worth choosing single-phase gel polish for manicure for a number of reasons:
- you can learn how to use single-phase gel polish without attending special courses and there will be no need to visit a nail salon;
- significantly less time spent, since only 2 layers of the main color are applied;
- saving money, because for a high-quality manicure you only need one product;
- the gel coating layer is not very thick, which makes it more sophisticated;
- The application density is small, which allows the nail plate to breathe and the nail itself does not deteriorate.
Interesting! One 10 gram jar of single-phase gel polish is enough for approximately 35 manicures.
For many girls who learn how to apply single-phase gel polish, it becomes indispensable. After all, after this they can always do a bright and lasting manicure themselves with a minimum of money and time.
But this miracle remedy also has its drawbacks:
the fact that it is applied without the last top coat does not make it possible to complement the manicure with various decorative elements that are glued to it;
the thin layer of coating often undergoes cracks or other damage before conventional three-phase gel polish, which does not lose its appearance until the nail grows out.
Although, if you do a manicure yourself, then these points are not very important, since you can always change something and not worry about the time of making an appointment with the master. The main thing before this is to carefully study photos and videos of how to apply single-phase gel polish at home in order to really make beautiful nails.
Necessary tools and aids
Apply the single-phase gel using a flat brush with a rounded end made of synthetic bristles. Natural is not suitable for these purposes. When choosing a brush, place it on the nail of your little finger and press lightly: it should not go into the side rollers.
To dry gels, it is best to use hybrid lamps with a power of at least 36 watts.
You can’t do without forms, lint-free napkins and a cleaner. The most important tool after a brush, perhaps, can be considered a file with an abrasiveness of 100\180 grit. Some craftsmen use a machine with a suitable cutter for sawing, but this requires considerable skill.
Manicure technique using single-phase gel polish
You can prepare your nails for design using any available method - perform a hardware, combined or trim manicure. To achieve the best result, the chosen technique must necessarily include the following processing steps:
- Cleaning the nail plate of previous polish.
- Cuticle removal.
- Softening the skin around the nail after removing the cuticle.
- Leveling the length and giving shape to the nails.
- Removing shine with a buff.
- Degreasing with a primer or its equivalent.
Nail degreaser
After degreasing, you cannot touch the nail plate with your fingers without gloves, otherwise the procedure will have to be repeated. When the nail is prepared for design, you can apply single-phase gel polish in several layers.
Layer one
Carefully apply the varnish, distributing it evenly over the entire plate. Dry in an LED lamp for 30 seconds or in an ultraviolet lamp for 2 minutes.
Masters recommend simultaneous application of single-phase gel polish on four fingers of one hand - from the index to the little finger and on the thumb of the other hand, and only then dry it. This technique will speed up the procedure and guarantee reliable fixation of the coating.
Applying the first layer
You should not decorate all five fingers on one hand at once, since the thumb will lie in the lamp at an angle and the varnish on it will not dry.
Layer two
In order to increase the color intensity of the first layer and hide any gaps, a second coat is applied on top of it. This time drying in an ultraviolet lamp lasts 2 minutes, and in an LED lamp for 1 minute.
It is not recommended to apply a third layer, since there will be a clear thickening of the nail plate, the surface of the nail will not be able to breathe, and the coating itself will last less than we would like.
You can learn more about the technique of applying One step gel polish in the following video.
Preparing the nail plate
If the material comes into contact with the pterygium, cuticle or skin, detachments cannot be avoided. Therefore, the preparatory stage is extremely important. There are no special recommendations when working with single-phase gel: do your manicure in the same way as you would before working with any other material.
Thoroughly clean the nail from the pterygium, move it back, cut and polish the cuticle with a ball-shaped cutter, and treat the areas adjacent to the side ridges. File the ends with a file with an abrasiveness of 180 grit. Polish the surface of the nail plates with a buff, carefully remove dust, wipe the nails with a lint-free cloth soaked in a special cleaner.
Experts do not recommend using pharmaceutical products with alcohol. This component is quite aggressive: it can dry out the skin or react with materials, which will complicate the work and ruin the result.
Primer: why you need it, which one to choose, how to use it
Some masters consider this stage optional. But if there are no obstacles (for example, allergies), it is better to use a primer. It acts like double-sided tape, reliably adhering the material to the surface of the nail.
The primer also solves other problems: eliminates excess moisture, prevents the development of infections, degreases, and slightly dries the surface.
There are so-called acidic and acid-free products. In fact, both contain acids, but in the second their content is lower. This option is suitable for treating nails before applying polish.
And before applying single-phase extension gel, nails must be coated with an acid primer. It is important that the material does not come into contact with the skin. The product dries in air, it does not need a lamp. You can begin further stages of coating in a minute. But if more than half an hour has passed since applying the primer, the procedure must be repeated. Therefore, there is no point in covering all 10 nails before starting work.
Single-phase gel polish: characteristics, what it is
Single-phase gel polish is a three-in-one color polymerizing coating, that is, used without a base and top. Such products have several characteristics that three-phase and two-phase liquids do not have:
- Good adhesion. Single-phase nail polishes adhere tightly to the surface of the nails, so no base is applied underneath them.
- The ability to protect the plate from pigment penetration. This quality also allows them to be applied to “bare” nails.
- Durability. This property eliminates the need to use a topcoat.
- Bright shine. The quality also makes applying topcoat unnecessary.
Single-phase gel polish is a product whose usage algorithm is similar to regular varnish. But, unlike the latter, it is dried in a lamp, so the design is worn for up to 2-2.5 weeks.
Single-phase shellac comes in different colors. After applying to the nails and drying, it always has a glossy surface.
Review of popular products
Which single-phase gel for nail extension is better? There is no definite answer to this question; each master has his own favorites. But we can highlight several products, the reviews of which are the most numerous.
- RuNail can be called one of the most popular. Available in several shades, it files and presses well, and is well suited for beginners. Course teachers often choose this material: nail extensions with RuNail single-phase gel are discussed step by step during training. It is suitable for professionals with a lot of traffic, and for those who only do their own nails. Low cost is one of the advantages of the product. A jar of 15 grams will cost on average 250-300 rubles.
- Formula Profi is a brand loved by many craftsmen. For a jar of single-phase gel “A-Profi” you will have to pay about 450 rubles. Once polymerized, the gel turns into a very durable monolith. It is easy to file and does not create a large amount of flying dust.
- UV Lina is a product that many craftsmen who are passionate about shopping on Chinese sites have become familiar with. The cost of one jar weighing 15 g is only about 100 rubles. Reviews about this product are extremely contradictory. Some claim that the single-phase gel for nail extension “Lina” copes with the tasks perfectly. But there are also those who warn potential buyers against the terrible smell, poor packaging, and allergic reactions.
- Cosmoprofi gel is available in several shades. It is loved by manicurists due to its comfortable consistency of medium viscosity, average price (350 rubles / 15 g), and good wearability.
- Irisk single-phase gels are praised by many for their lack of odor and large palette of shades. But in reviews, some note a runny texture, due to which the material tends to flow. Not everyone is happy that the time stated by the manufacturer is not enough for polymerization.
Advantages of single-phase gel polishes
It is no exaggeration to say that single-phase gel polish has become a real salvation for those who like to get good results and not spend too much time on it. The technique of applying it is extremely simple, so you can do without visiting a salon. Also among the advantages are the following.
- Save time. The technology requires applying only two layers of the main color, which halves the time spent on manicure compared to three-phase coatings.
- Saving money. Instead of three products, you only need to buy one.
- The three-phase coating is very dense, prevents the nail plate from breathing, dehydrates and dries it out. Single-phase coating has a lower density, which has a positive effect on the appearance of nails.
Here you can also add ease of application, perfectly smooth, durable coating and incredible richness of colors. This manicure will be a worthy decoration for your hands and will eliminate the need to frequently apply regular decorative varnish.
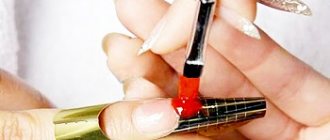
Extension on forms
Let’s make a reservation right away that this material is not suitable for the top forms that are fashionable today. Only classic lower forms can be used.
There's no need to rush. If you have little experience yet, work with each finger separately, drying each layer. Before you start using single-phase extension gel, nails should be thoroughly treated, degreased and coated with primer.
- Adjust the shape to the nail, making cuts if necessary so that the base fits as tightly as possible.
- Carefully glue the edges together, making sure that all symmetrical elements match completely. You can use a stationery stapler to prevent the form from coming unglued while working.
- Using rubbing movements, apply the first base layer of single-phase gel, starting from the end and moving towards the cuticle. Avoid contact with skin! If the gel is baked on the cuticle, detachments are inevitable.
- Cure the material in the lamp for as long as the manufacturer recommends. Evaluate the result by lightly tapping the surface with a pusher.
- Place a drop of gel on the mold, where the free edge will form. Use confident strokes to distribute the material, following the markings. Shape the apex depending on the desired length. Place in a lamp to dry.
- Carefully evaluate the surface, if necessary, add a little gel to the gaps. File off unnecessary bulges with a file. If you don't plan on doing the design, simply cover the nail with another thin layer of gel, turn your hand over, palm down, and let the material level out. Send the work back to the lamp.
- You can start sawing. Follow the direction of the side edges, check the symmetry of the nail. Single-phase gel does not need a topcoat, but you can use, for example, a satin or velor finish for decorative purposes.
- All that remains is to remove the dust and remove the stickiness with a special product.
Polymerization time
Always pay close attention to the manufacturer's recommendations if you have purchased a new single-phase nail extension gel. How to use the material, how long to dry the layers and other recommendations - all this is usually indicated on the packaging. On average, it takes 1-3 minutes to dry the gel in a hybrid lamp for each layer.
What is the difference between single-phase gel polishes and three-phase ones?
The permanent coatings that are familiar to us, which are usually used in salons, are three-phase. The technique for applying them is quite complex. As the name implies, the coating needs to be applied in three phases: base, main color and top. This is a fairly lengthy procedure.
Single-phase gel polish is a new product on the nail products market. According to the manufacturers, one bottle already contains everything you need for a flawless manicure. They have a completely different, improved composition. That is, there is no need to apply a base and cover with a top. At the same time, the durability of the manicure and its brightness are no different from the three-phase analogue.
Why does the gel bake in the lamp?
In reviews of single-phase nail extension gels, you can often find indignation about burning during drying. This occurs due to the fact that the material passes from one state of aggregation to another, crystal lattices are formed. Chemical processes are accompanied by the release of heat.
It is enough to simply reduce the lamp power (if this function is provided by the equipment manufacturer). When working with unregulated lamps, you can simply remove your hand for a few seconds, allowing the heated material to cool slightly. As soon as the gel “sets”, the burning sensation will go away.
It should be understood that this is not a lack of material, but a technological feature.
Reviews
Reviews about single-phase gels are positive. And not only from ordinary users, but also from professionals. The effectiveness of their use, more or less safe composition, texture features and, most importantly, the possibility of training without a huge waste of money on each individual drug are assessed. This option is ideal even for allergy sufferers and those with sensitive skin.
We also recommend that you read in more detail about simple gel polish nail designs for beginners.
Common questions and answers
Most often, beginners wonder whether it is possible to use products of a three-phase system as a single-phase gel. Unfortunately this is not possible. But a single-phase one is suitable instead of a modeling or finishing coating.
It is highly undesirable to use this material for French lay-outs. In any case, you will need at least two gels of different colors, so what is the point of using a single-phase one? It is much easier to use a three-phase system.
Doubts are often raised about the possibility of using a single-phase gel to strengthen nails without extensions. The material is excellent for these purposes. It can be used as a base for gel polish and for repairing broken nails.