Single-phase gel polish is a color coating that is applied in 1 step, that is, without base and top, and then dried in a lamp. It looks good on nails with a smooth surface, without defects, and not very long. Flower beds come in enamel, transparent, dense color, shimmer, mother-of-pearl, and thermo.
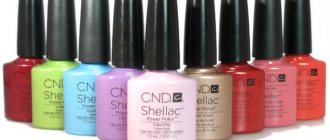
Before applying gel polish, it is enough to perform a manicure, buff, degrease and coat your nails with primer. If you follow the technique, the coating will last 2-2.5 weeks. A single-phase product saves time and money, since flower beds cost 170-300 rubles. The best are produced by TNL, Masura, Patrisa Nail, Solomeya, Irisk Professional, RuNail.
Single-phase gel polish: characteristics, what it is
Single-phase gel polish is a three-in-one color polymerizing coating, that is, used without a base and top. Such products have several characteristics that three-phase and two-phase liquids do not have:
- Good adhesion. Single-phase nail polishes adhere tightly to the surface of the nails, so no base is applied underneath them.
- The ability to protect the plate from pigment penetration. This quality also allows them to be applied to “bare” nails.
- Durability. This property eliminates the need to use a topcoat.
- Bright shine. The quality also makes applying topcoat unnecessary.
Single-phase gel polish is a product whose usage algorithm is similar to regular varnish. But, unlike the latter, it is dried in a lamp, so the design is worn for up to 2-2.5 weeks.
Single-phase shellac comes in different colors. After applying to the nails and drying, it always has a glossy surface.
Features of single-phase gel polish: what should be taken into account?
In order for single-phase gel polish to look beautiful and delight the owner of the manicure with durability for a long time, it is necessary to apply such material correctly. Indeed, the technique of applying such material directly affects the durability of the manicure. If the application work is done professionally, then even after the nail plate has already noticeably grown, the layer of varnish will continue to please the eye with a smooth and uniform surface.
How long does single-phase gel polish last? If applied correctly, the coating will last from 5 to 10 days, which is undoubtedly a plus for quick application, in contrast to the three-phase system, which uses a base and top coat.
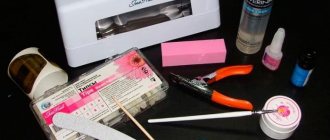
What's the secret? You should not compare the technology of applying regular and gel polish. Professional quality materials require equally professional materials and tools. You need to have on hand:
- UV lamp;
- Single-phase gel polish;
- Degreaser (special product or alcohol);
- Nail treatment kit.
Advantages of single-phase gel polish
Single-phase gel polishes are in demand, as their use is associated with many advantages:
- The composition of the products is such that it does not harm the nails. It also contains natural ingredients.
- No need to buy base and top. This allows you to save money, as well as space on your dressing table or nail technician’s workbox.
- Performing a manicure with it will take less time. After all, you won’t need to level and gloss your nails using a finish.
- The palette of shades is no less than that of three-phase flower beds. It has pastel and bright colors.
- The coating is polymerized under ultraviolet and LED lamps. The drying time is the same as for regular gel polishes; it is indicated on the bottle.
- The coating is thinner than when using three-phase devices. This makes the appearance neater, the growth of nails more aesthetic, and also reduces the likelihood of chipping.
- The coating is more reliable than when using conventional varnishes that are washed off with solvents. And this makes the plates stronger and less likely to break off.
- Flower beds can be used for natural and extended nails. In the latter case, a moderate thickness of the coating will make them more natural.
- The single-phase connection is removed easier and faster. It is enough to soak it with a special liquid and remove it with an orange stick.
What is three-phase gel polish, two-phase, how do they differ?
Three-phase gel polish differs from single-phase gel polish in the need to apply a base coat under the first product, and a topcoat on top.
Thus, the manicure is done in 3 stages, not counting the preparation of the nails and the polymerization of each product. The coating consists of 4 layers:
- a base that serves as protection and strengthening for the plates, ensuring adhesion of the gel polish to them;
- 2 layers of flower bed to make the shade brighter and without streaks;
- top for protecting gel polish from damage, giving it shine or matte.
Sometimes the first product is applied twice to level the surfaces of the plates. Then there are 5 layers. Each one must be dried in a lamp.
Single-phase and three-phase gel polish means that the first product should be used without a base and top, and the second necessarily requires the application of a base coat and a topcoat. Otherwise, the flower bed will quickly fly off the nails, and before that it will not have that attractive appearance that a high-quality manicure has.
In some cases, applying a three-phase coating is cumbersome, and not only because of the additional waste of time. For example, with strong, thick nails, the coating looks unnatural and unsightly, because layers of products increase the thickness. When built up, a three-phase unit can also look rough and unnatural. And artificial nails do not need additional strengthening. For these reasons, when building up, single-phase coating is more suitable.
Two-phase gel polish requires the use of a finishing agent over it, that is, it is applied in 2 stages. In this case, a base is not needed. The two-phase unit already contains its components. These gel polishes can be applied in 1 or 2 layers for a dense shade. The top is used matte or glossy.
Features of single-phase coating
The new long-lasting varnishes are perfect for use by professionals and at home. In this case, applying single-phase shellac is quite easy, which means a significant saving of time.
Manufacturers guarantee that nails will remain beautiful for more than a week; according to girls’ reviews, at least 10 days. Beautiful palettes are produced by the famous companies Bluesky, Masura and Patrisa Nail.
You can understand what it is, see the advantages of using it and what advantages the use of single-phase shellac provides from the reviews of craftsmen who work with it:
- The special formula does not require a base coat or sealing, so there is no need to purchase additional bottles from different companies. This significantly saves the master’s budget.
- There is no need to purchase expensive additional nail treatment products and tools, which means a reduction in manicure time.
- Some single-phase shellacs, such as Masura and Patrisa Nail, do not have a sticky layer. Immediately after drying, you can do your usual household chores.
- No need to apply multiple layers to enhance color intensity. Bluesky's dense single-phase shellac looks great after one coat.
- Maximum ease of use, which makes it possible to decorate nails at home.
Single-phase gel polish: step-by-step application technique
The step-by-step technique for applying single-phase gel polish is as follows:
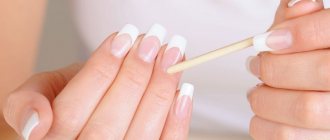
- Nails are prepared for coating. You need to use a file to shape them, remove the keratinized part of the cuticle and clean the pterygium, and also sand the skin around the plates. If errors remain in this part, it will be difficult to correct them after applying the coating, and the coating may be damaged.
- The surfaces of the nails are polished with a buff. It must be even, because a base is not used here, and it will not be possible to correct the depressions and bumps with a flower garden.
- The nails are wiped with a degreaser, and after it dries, a primer is applied. This stage cannot be skipped, otherwise the single-phase compound will quickly begin to chip off the nails in pieces.
- The bottle of gel polish should be gently rolled in your palms for a couple of minutes. This will give the product a more uniform consistency and make it easier to apply.
- Paint the nail with the first layer of gel polish. It should be thin and uniform across the entire plate.
- The product is polymerized. The usual time is 30 seconds with an LED lamp, and 2 minutes with a UV dryer. But it can be more, you need to look at the instructions for the flower garden.
- Apply a second layer of gel polish. It should also be thin and uniform along the entire length.
- All that remains is to polymerize the product. If it has a sticky residual layer, remove it with a cleaner after 1-2 minutes.
After the 5th step, you can use acrylic powder to make the coating more durable and strengthen your nails. The product is poured onto an undried surface using a spatula, allowed to soak in a little and fan the nail with a fan brush. After this, the flower bed is dried, and then its 2nd layer is applied.
It is necessary to work with each plate separately. That is, you cannot paint all your nails at once and then put your hand in the lamp. The varnish will spread and everything will have to be redone.
One-phase UV gel for strengthening and extending nails should be applied almost the same way as a flower garden:
- Prepared nails are treated with a buff over all surfaces.
- Wipe them with a degreaser.
- Apply primer to the nails, including the ends, and let it air dry for a few seconds.
- Apply a single-phase gel and distribute it evenly.
- The coating is polymerized in an ultraviolet lamp.
Then you can apply colored gel polish or camouflage gel for extensions. Otherwise, the nails will remain natural in color, since the product used is transparent, but will gain shine and strength.
Watch the video about the technology of applying and strengthening nails with single-phase gel polish:
Do I need to apply a base underneath it?
There is no need to apply a base under a single-phase gel, whether we are talking about a flower garden or a transparent strengthening and building product. They both contain components that:
- allow you to stay on the nail plate;
- protect it from external influences;
- do not penetrate into the stratum corneum.
It is only necessary to use an acid-free primer under the colored single-phase gel polish or extension gel. The liquid will slightly loosen the nails, which will make the grip stronger.
How to remove single-phase conductors
Remove single-phase gel polish as follows:
- Soak pieces of cotton pad in a remover designed to dissolve gel polish.
- Apply them to the surfaces of your nails and wrap them tightly with foil or put on silicone caps.
- Leave for 10-15 minutes.
- Remove everything and use an orange stick to clean the removed product from the plates.
- Wash your hands with soap, apply cream, and apply caring oil to your nails and the skin around them.
If there is no liquid for gel polish, a regular remover containing acetone will also work. But you may have to keep it on your nails a little longer.
It is permissible to cut a single-phase wire with a hardware cutter or manually. But this requires great care and experience due to the thinness of the coating, as there is a risk of injuring the nails.
How to apply single-phase gel polish?
The beauty industry is developing rapidly, and new techniques and techniques appear at such a speed that even professional artists do not always have time to keep up with all the innovations.
What can we say about girls who are used to doing manicures at home. They had just learned how to cover and/or extend their nails with gel polish on their own, when it turned out that not all gel polishes are the same. Moreover: there are three-phase and single-phase nail extensions with gel polish, and each requires a special approach. Someone will give up and go to a nail salon so as not to delve into these subtleties. We suggest you learn how to apply single-phase gel polish in order to easily extend your nails yourself. What is the difference and features of single-phase and three-phase gel polish?
Today it is difficult to find a woman who does not know that gel polish is an incredibly convenient invention that allows you not to worry about the condition of your manicure and not have to renew it every three days. The gel polish coating lasts longer than the nail retains its length and shape, and you are more likely to have to remove gel polish from overgrown nails than to notice chips or scratches on its surface. Gel polish does not harm the nails, protects and even strengthens them, protecting them from brittleness and delamination. In short, it’s simply a godsend for those with weak nails and anyone who simply doesn’t have time to sit for hours in front of a manicurist. But with all these advantages, gel polishes have disadvantages: complex application technology and the need to use a lot of rather expensive tools and consumables. It was then that single-phase gel polish was invented as an alternative to the previous multi-stage method. The features and advantages of single-phase gel polish are as follows:
- The layer-by-layer application of components has been replaced by a single layer, which combines the necessary properties.
- Accordingly, there is no need for different jars of material: if previously three layers were used, now all the material is packaged in one tube.
UV lamp - Single-phase gel polish can be polymerized (baked) not only using ultraviolet, but also using an LED manicure lamp.
- After applying and drying single-phase gel polish, a sticky layer does not form on the surface of the nails, as is usually the case when coating with three-phase gel polish.
- Single-phase gel polishes do not contain formaldehyde, toluene, alkali and/or acid, so they do not cause allergic reactions and do not damage nails and skin.
- The quality of coating with single-phase gel polish is no worse than when using traditional three-phase gel polish.
And since the properties do not deteriorate, then why spend more time and effort on three-phase nail extensions or coating? Single-phase gel polish is loved by many precisely for its efficiency and ease of use. True, some masters still believe that applying single-phase gel polish is the prerogative of non-professionals. We can agree with them in the sense that applying single-phase gel polish at home is really easier than three-phase gel polish. But as for the quality of the coating, in the end you will not notice the difference between single-phase and three-phase gels. Technology for applying single-phase gel polish
A simplified system of use does not mean that you do not need to learn how to apply single-phase gel polish. As with any nail extension, applying single-phase gel requires certain knowledge, skills and, of course, accuracy. Otherwise, your nails may suffer and you will be disappointed with the results. To avoid mistakes, follow the rules for applying single-phase gel polish:
varnish application technology
- Although separate packages of the base coat and top coat are not needed, you will still need a degreasing liquid, the gel polish itself in the desired color, an ultraviolet lamp and a hygienic manicure kit.
- Prepare your natural nails and get them into perfect condition: straighten the length, adjust the shape, remove cuticles and polish the nail plate.
- Degrease the nail plates before applying single-phase gel polish.
- Apply gel polish in one even layer. For those who have little experience in using gel polish, it is better to start with one nail. For those who feel confident in their abilities, you can cover all the nails of one hand with gel polish at once.
- Dry the applied layer of gel polish under an ultraviolet lamp for 1-1.5 minutes.
- When using an LED lamp, drying may take a little longer - this depends on the power of the device and is specified in the manufacturer’s instructions.
- Apply a layer of gel polish to the other hand and repeat drying under the lamp.
- As a rule, one layer of single-phase gel polish is enough to create a dense, continuous coating. But if the shade you chose turns out to be translucent and/or streaky, apply a second thin coat of the same colored gel polish to each nail and dry again.
- Check the quality of the coating and seal the ends (cuts) of the nail plates with the same varnish.
- Treat the cuticles and skin around your nails with manicure oil.
From now on and for the next two or three (depending on the individual nail growth rate), your manicure will be flawless. Some manufacturers of single-phase gel polishes offer to additionally treat nails with a protective coating, but this is nothing more than a marketing technique - in fact, single-phase gel polish no longer needs any protection. Rules for using single-phase gel polish
As you can see, there are no fundamental differences in how to apply single-phase or three-phase gel polish. At first glance, the whole difference between them lies in reducing the number of steps and speeding up the creation of a manicure. But for those who plan to apply single-phase gel polish regularly and often, it is advisable to be aware of all its features:
rules for using varnish
- Single-phase gel polish can be applied without interruption, immediately after removing the previous coating and hygienic treatment of nails. This is possible due to the safe composition and porous structure of the coating formed on the surface of the nail. Nails do not become thinner and do not dry out even with repeated sequential application of single-phase gel polish.
- Since there is no base coating required before applying single-phase gel polish, the nail plate may be stained - this risk is greater when using dark and/or bright shades of varnish. To avoid staining your natural nails, do not file or polish them deeply if you plan to apply gel polish in this color range.
- It is important to strictly observe the drying time of single-phase gel polish under a lamp. The exact periods of time are indicated by manufacturers on the packaging. If these instructions are violated, the coating may be damaged: it will wrinkle if it is baked for less than the prescribed period, and crack if you hold your hands under the lamp.
- One package (bottle, tube) of single-phase gel polish with a volume of 10 grams is enough for an average of 35 manicure sessions. At the same time, single-phase gel polish can be applied to the nails of both the hands and feet - the quality and durability of the coating does not change.
Today, the palette of gel polishes is wide enough for you to find and choose from it the appropriate shade to suit your taste, a specific outfit and mood. Do not forget that on long nails it is better to apply single-phase gel polish in light shades, while on short nails bright, expressive colors of varnish look good. But the range of colors is constantly updated according to fashion trends, so keep an eye on the new products and replenish your own arsenal. How to remove single-phase gel polish?
Removing single-phase gel polish corresponds to its entire concept, that is, it is also not difficult. You will need to remove the gel polish no earlier than your nails have noticeably grown and a sloppy strip of “bare” nail plate appears at the base. Most likely, even before this you will want to change the color of the gel coating. Then here are the instructions for removing single-phase gel polish:
- Single-phase gel polish can be easily removed with a standard gel polish remover. It dissolves both single-phase and three-phase coatings equally well.
- You can use a product from the same series as the gel polish itself, or a product from a different brand - all these liquids are very similar in composition.
- Apply gel polish remover to pieces of cotton wool or small swabs and apply to your nails.
- Wrap and secure the outer phalanx of each finger, along with the nail and tampon, with a strip of foil.
- After 10-12 minutes, remove the foil and tampons in the same order in which you applied them to your nails.
- Remains of gel polish can be easily removed with cotton wool or cleaned with a bamboo stick to remove the cuticle.
To speed up the removal of single-phase gel polish, place your nails in a foil wrap under a turned on ultraviolet lamp. Under the influence of heat, the dissolution process will occur in 5-7 minutes. Thus, correction of single-phase gel polish will not take much time, and immediately after it you can apply gel polish to your nails again. Single-phase gel polish is the undisputed leader among modern manicure products. If you learn how to apply single-phase gel polish at home, you will probably forget to even think about other coating options. Shiny and strong, nails under gel polish remain healthy and recover well. But only if you took good care of them and before applying single-phase gel polish. Take care of your beauty and enjoy a fashionable manicure.
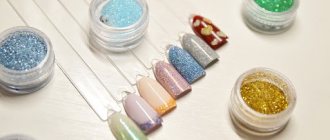
Types of single-phase nail polishes
Single-phase nail polish comes in several types:
- Traditional enamel products. This is a colored coating in bright or pastel shades with a glossy sheen.
- Translucent. Used to give nails a natural and healthy look, they have subtle natural shades. Good for a plain manicure or a French manicure.
- Mother of pearl. There are juicy and light shades with a pearly shine.
- With shimmer. These are gel polishes of different colors with small or large glitter. The shimmer can be silver, golden, or the same shade as the flower bed itself.
- Neon. As a rule, these are bright shades that look like enamel in normal lighting. But under the neon lamp they begin to glow.
- Thermo. These products change depending on the temperature, so the shades are lighter at the tips of the nails. In the cold the color will also be different than in the warm.
The best single-phase gel polish: review of companies
The best single-phase gel polish should be chosen from several brands:
- TNL Professional. These are Korean products that are distinguished by good pigmentation, durability, and thick texture. The line includes many shades to suit every taste. The price of 1 bottle, containing 6 ml, is 170 rubles.
- Masura. The manufacturer claims that these products can be applied even without a primer, they have such high adhesive properties. The consistency is quite liquid, but with careful use the gel polish does not run off onto the skin. Another plus is that these products are hypoallergenic. They cost 250-300 rubles. for a 6.5 ml bottle.
- Solomeya. This brand also has a huge number of colors. Dark shades can be applied in 1 layer, they are very dense. The products are characterized by a high degree of safety and are worn for a long time without the appearance of coating defects. Cost – 220 rub. for 5 ml.
- Irisk Professional. These are Russian gel polishes with a minimum of active ingredients. Therefore, they are very suitable for allergy sufferers. Sometimes they need to be painted in 3 layers. But they are applied thinly, evenly, and are used sparingly. The price of a single-phase unit is 210-230 rubles. per bottle of 6 ml.
- RuNail. Products from domestic manufacturers have a high degree of safety, as they are made from European raw materials. Varnishes are distinguished by dense and varied shades, are easy to apply and retain color and shine for a long time. They cost 300 rubles. for 15 ml.
- Patrisa N. Also Russian single-phase ones, which have earned high praise from nail experts. They are particularly durable and have a thick, easy-to-use texture. It is better to apply in 2 layers. The price of Patrisa Nail gel polishes is also attractive. She is the most modest of all - 170 rubles. per bottle 5 ml.
- Giorgio Capachini. Another Russian brand with a lot of colors. The products are good with a thick texture, a wide comfortable brush, and a density of all shades. These gel polishes have virtually no odor and do not cause pain when drying. Cost – 250-300 rubles. for 7 ml.
- MILV. These are thick hypoallergenic products without a sticky layer, made in Russia. They quickly polymerize in any lamp and do not cause burning. There are many shades, all well pigmented. A bottle of 11 ml will cost 400 rubles.
How to remove single-phase gel polish?
You need to remove single-phase gel polish in almost the same way as the classic version - the technology remains unchanged. It includes the following steps:
- Apply gel polish remover to a cotton pad (you can also use regular acetone, but it will take more time).
- Place the discs on your nails and secure them with foil.
- Remove residues using a pusher.
Advice! You can pre-treat the coating with a buffer so that the liquid penetrates it better, or place your nails under a lamp directly in foil - then after 5 minutes it will be easy to remove the gel polish.
Single-phase gel polish is a coating that helps save time and money. There are no difficulties in working with it, you just need to follow the technology and avoid common mistakes - and then your manicure will delight you with a smooth finish and a beautiful shine for a long time.
How to use single-phase gel polish
To use single-phase gel polish for the effect to meet your expectations, you should do the following:
- Store at a temperature no higher than 25 degrees, screwing the cap tightly after use. Otherwise, the composition will thicken and deteriorate before the expiration date.
- Stir before use. But under no circumstances should you shake it, as this will cause bubbles on the coating. You should roll the bottle in your hands or slowly work a toothpick into the liquid.
- Apply in thin layers. If you try to get by with just one thick one, the product will not dry out or will curdle during polymerization.
- Dry each nail after applying the composition so that it does not have time to spread. If you work quickly, you can paint and polymerize 2 plates at a time.
- Remove the sticky layer with a cloth moistened with a cleanser 1-2 minutes after drying. You need to let the coating cool, then it will last longer. But it should be borne in mind that not all single-phase compounds have residual stickiness.
- You can cover the dried gel polish with a matte or glossy topcoat. This will increase the wearing life of the design.
- You should not use any decor on a single-phase circuit. This contributes to the appearance of detachments.
- You can use this gel polish to create designs on the base coat. Or mix shades to create a new color.
Watch the video on how to apply and remove single-phase gel polish:
Why does single-phase gel polish sometimes not last well?
In order for your manicure to be durable, you need to use only high-quality products from trusted manufacturers. If, even if this rule is observed, the durability of the coating leaves much to be desired, this indicates that errors were made during application, due to which air bubbles appeared and adhesion to the surface deteriorated. How to apply single-phase gel polish correctly so that it does not lose its beauty even after a week?
- Do not shake the bottle before use.
- The polishing of the nail must be of high quality so that there are no grooves or other defects left on the surface.
- It is necessary to apply layers of medium thickness so that they can dry well.
- You can touch your nails only after the coating has cooled completely - a few minutes after application.
Despite the lack of base and top, single-phase products are in no way inferior to three-phase gel polishes. And for home use, this option is completely optimal, since its application takes almost the same time as a regular manicure, but its durability is several times higher.
Useful tips
Single-phase manicures will become your favorite means for long-term manicure if:
- choose well-established product brands;
- buy them in trusted stores to avoid purchasing counterfeits;
- use for strong nails with a smooth surface, since leveling with a base is not provided here;
- Do not apply to thin, bendable, very long or peeling plates;
- carry out preliminary preparation of nails in a high-quality manner so that skin particles on them do not provoke detachments;
- for 3 hours after a manicure, do not fiddle with your hands in water, otherwise the coating will quickly fade and come off;
- in the future, work with gloves so that the design remains fresh longer;
- After removal, give the nails a rest for 1 day, only then apply a new coating.
Three-in-one gel polishes help out if you don’t have time for a professional manicure with base and top. They are widespread, you can choose a shade to suit every taste, and apply the coating yourself. But you need to keep in mind that this type of product is not suitable for all nails, and they do not last as long as three-phase ones.