Wedding accessories
- Champagne decoration
- Wedding bulls: types of design
- A simple master class on how to decorate a champagne bottle for a wedding with your own hands
- Decoration with satin ribbons
- Decoupage wedding bottles
- Decor using polymer clay
- How to decorate wedding glasses yourself
In the process of preparing for a wedding celebration, you must not forget about such an important attribute as champagne and wine glasses for the newlyweds, which must certainly decorate the festive table. It is customary to put two bottles and a couple of glasses, which need to be beautifully decorated in accordance with the style of the wedding. In the old days, it was customary to give a pair of bulls to the newlyweds on their wedding day. This is probably why champagne intended for newlyweds is called “wedding bulls”. Nowadays, donors very often decorate their own bottles of champagne.
Watch the video - master class “do-it-yourself bulls for a wedding”:
Champagne decoration
Making wedding champagne for the bride and groom with your own hands is not at all difficult. You just need to use your imagination and apply a little diligence. But how impressive will a masterpiece made by yourself look? Decor options and simple recommendations for decorating will be outlined step by step below in the article.
In the meantime, watch an interesting video - master class “do-it-yourself wedding champagne for the bride and groom”:
Why decorate champagne bottles? Firstly, they look very solemn on the table, emphasizing the festive event and the heroes of the occasion, in contrast to the custom of simply placing champagne in a basket. Secondly, the newlyweds will take these bottles with them at the end of the ceremony to open on their wedding anniversary and during the first addition to the family. All this time they will be present in the interior and remind you of the exciting wedding moments.
Photo of DIY wedding bull decorations
Origins of the tradition
The word “bulls” for the beautiful bottles on the table, of course, is not the most beautiful one chosen. But it takes its roots from the Don Cossacks. In their villages, it was customary to give a wedding gift of a cow and a bull, tied by the horns with beautiful ribbons. They were given by parents so that a young family could feed itself in the first year, and a year later give relatives fresh milk. This was considered a sign of a strong family, a sign that the young were coping with family life.
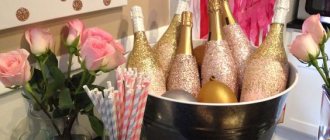
Of course, now it would be strange for city residents to receive livestock as a gift. But the tradition, although modified, remained firmly in our heads. And the current “bulls” look much more beautiful. The alcohol used is usually champagne or wine, but you can also take different types of alcohol: one bottle is the bride’s favorite drink, the other is the groom’s.
Related article: Cross-shaped cast-on with double thread knitting needles with video
Also, wedding traditions, along with “bulls”, include a wedding loaf, “shishki” - small buns that are distributed to guests in order “not to cause problems in family life”, bonbonnieres - gifts or compliments to guests (as a rule, these are small candies or chocolates with notes of gratitude), drinking glasses, and so on.
Wedding bulls: types of design
Below is a video - a master class on how to decorate champagne for a wedding with your own hands:
There are several options for how to decorate champagne bottles and wine glasses for the bride and groom in an original way.
Among them, the most popular are the following:
- Textile design . It involves the use of satin ribbons, which are used not only to create bows and flowers on the bottle, but also allow you to completely decorate the glass surface, creating an unusual “clothes”. Brocade and velvet removable or fixed covers, decorated with beads, rhinestones and beads, which are very easy to sew, look very rich. Another way is to knit an openwork cover using thin viscose or cotton yarn, which can then be decorated with decorative elements. Such removable clothes are very practical and can be used repeatedly.
- Polymer clay . You can make individual elements from it by first marking decoration patterns on the bottles and gluing the finished decor in accordance with them. You can also add fabric-based elements.
- Decoupage and painting . The first method is easy to master by taking a simple master class on decoupage of hard surfaces. Painting requires artistic skills. But even if you are not an artist, you can easily paint the bottle in the chosen color, glue decorative elements, and draw hearts, rings or small flowers in the free spaces, and even make inscriptions using prepared stencils.
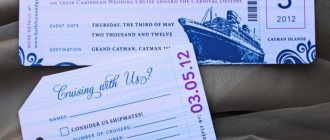
- Stickers . You can place a photo of the bride and groom, inscriptions and the wedding date on the champagne using printing on self-adhesive film. In this case, you need to contact the printing house.
- Engraving . A very fashionable and effective way, adding style and individuality to champagne. But it is performed exclusively by masters.
- Natural flowers . This is the simplest, but, alas, short-lived method of decoration.
DIY photo of a wedding bottle of champagne for the bride and groom
An ox carriage is a decoration for the newlyweds’ table!
Bulls on the wedding table are a long-standing tradition, without which it is difficult to imagine a gala banquet. Before the wedding, every couple thinks about how to decorate champagne bottles in the most original way. We allowed our thoughts to expand wider - we made a real carriage for the bulls!
How to make a bull carriage with your own hands?
Our carriage turned out to be elegant, and it cost us practically nothing, because it was made from scrap materials.
№1
1. First of all, we decorated the bulls. The bottles had their labels washed off and were then spray painted. It seemed to me that a classic black and white design would be stylish. We had to paint it in two layers, since one turned out to be too transparent.
№2
Bottle decorations were made from satin ribbons by combining thin and thick ribbon. The idea of a two-color bow is far from new, but this solution always looks advantageous.
№3
2. Next, the man's work begins, it is necessary to cut out elements for the future carriage from wood, we took plywood that was left after the repair. You can also use thick plastic, but this is much less aesthetically pleasing. The carriage consists of:
- 2 longitudinal walls;
- 2 end walls;
- 4 wheels;
- bottom of the carriage.
I drew the cutting template myself on paper and then traced it on plywood. On the Internet you can find many templates for beautiful carriages, for example, ours even had neat windows.
№4
3. When the parts are cut, you need to go over them with sandpaper to smooth out any irregularities. Then you can start painting. Our plywood was not very beautiful, so we painted the elements with paint; if it were of better quality, we could have varnished it.
4. The parts dried from the paint for about a day, then we began assembling the structure. Ours turned out to be a little more complicated, since we made the bottom inclined in different directions so that each of the bottles stood slightly at an angle.
№5
The bottom halves and longitudinal walls were glued together with special wood glue; this matter should not be rushed. It is advisable to keep each element under pressure after gluing so that the quality of gluing is higher. It is very inconvenient to glue the side walls, so they were cut out taking into account subsequent installation with attachment to the bottom.
№6
The wheels could also be glued, but we did it more elegantly and attached them to nails with neat hats. This decision was completely justified; the carriage with such wheels looks realistic!
№7
№8
5. The finished carriage with bulls can be decorated to your liking, but if the carriage turns out to be as spectacular as ours, then there will be no great need for this!
№9
The main indicator of the success of the carriage idea was that when the bulls were stolen, no one even noticed it right away. All attention was focused on the carriage!
№10
A simple master class on how to decorate a champagne bottle for a wedding with your own hands
In this article we will look at the MK of several techniques for decorating wedding bottles and wine glasses. Remember that no matter what option you choose, the main thing is that the design is in harmony with the overall wedding style and color scheme.
Photo of how to decorate a bottle of champagne for a wedding with your own hands
What are wedding bulls, and how to make them yourself?
A wedding is a long-awaited event for which the bride and groom carefully prepare. On this beautiful day, everything must be perfect, so the organizers carefully think through every detail and decoration of the holiday. One of the popular and traditional accessories on the newlyweds’ table are wedding bulls. These are bottles of champagne, wine or cognac (the bride and groom’s favorite alcoholic drink), decorated with a wide variety of decorative elements.
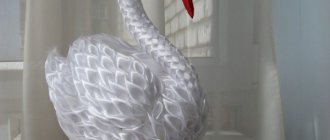
Decoration with satin ribbons
Video - decorating wedding champagne bottles with your own hands:
Procedure:
- We will need satin ribbons in basic wedding colors. If this is a classic wedding, the “clothing” on the bottle will be black for the groom and white for the bride.
- We wrap the bottle, starting from the narrowest place from the neck, using bias tape . The tape must be overlapped and fixed to the surface using special glue (for example, “Moment”, but not “PVA”) or double-sided tape.
- We wrap the bottom and neck of the bottle with straight tape, cutting to the required length and fixing the ends of the tapes.
- The next stage is decoration . For the bride's bottle, you can make a veil from organza, fastening it with an elastic band, or a hat, using small bottle caps decorated with ribbon as a base.
- The brim of the hat can be cut out of cardboard and glued to the base.
- Beaded beads, rhinestones and sparkles will add brightness and charm .
- At the bottom we attach a “skirt”, also from an assembled piece of organza. The groom's bottle is decorated with a white collar with a butterfly, a small boutonniere, and buttons.
Photo of DIY wedding champagne bottle decoration in the form of the bride and groom
DIY wedding champagne
For work I needed:
Wedding Champagne Ribbon
Wedding champagne can also be decorated with a satin ribbon. But, unlike binding, the tape does not stretch. It is more difficult to glue it to the bottle, where the transition from the narrow to the wide part begins. The end result is not as neat as with bias tape.
How to choose glue for work
Separately, I want to share with you my opinion about the glue that I use. Through trial and error, I came to the conclusion that it is best to glue the trim using glue - a pencil. It does not leave obvious marks on the binding, which is important.
And also, when dry, it does not harden like hot-melt glue, “Moment” in tubes or glue – “Titan”. I once experimented and glued it with Titan glue. It didn’t leave marks, but when it dried, there were obvious bumps in places under the trim.
Therefore, now, when I decorate wedding champagne, I use glue - a pencil. I usually took a pencil. And I tried to find “Crystal”. It has a red and yellow label, but is rare and must be looked for. And this time, by chance (for the first time), I saw the “Moment” glue stick. I bought it, tried it out before work and was pleased with it. This time I used the “Moment” glue stick to glue it.
I will mainly show how I made wedding champagne - the bride. And the groom and the boy are made by analogy, but much simpler. That's why I'll start with the bride.
Wedding champagne - bride
Wedding champagne - a skirt for the bride.
I decided to make the skirt from three frills of a wide bow.
For each frill, I took 1 meter of organza bow and made a circle out of it, soldering the edges of the bow.
In the photo below, you can see the gaps between the bottle and the assembly.
The next step is gluing the frills.
Monofilament is good because it is practically invisible.
Neck
I decorated the neck like this: I glued rhinestones onto a golden ribbon, 0.5 cm wide, with hot glue. And I glued this tape around the neck using a hot glue gun. Attention! If you glue with hot glue, then you should not touch the tape with the tip of the gun, because it warps due to temperature. And also, my golden ribbon was 5 cm wide. I cut the ribbon I needed, 0.5 cm wide, using a soldering iron.
Decoupage wedding bottles
First of all, you need to prepare the surface itself - remove all stickers and apply a primer layer. When choosing what to paint the main surface with, focus on acrylic paints, which are more practical.
Procedure:
- Mix the paint of the selected color with PVA glue and apply evenly to the surface.
- After drying, apply another base coat of paint . How to paint, the choice is yours - you can use a sponge or a brush.
- We select the design that is supposed to be applied to the bottle. It can be found on specialized websites or created in a graphics program, and then printed on thin paper, trimming the background edges.
- Next, put the picture on the file and soak it in water so that it is completely soaked. After this, carefully apply it to the surface of the bottle.
- Apply transparent glue on top and let dry.
- The final touch is to remove any remaining paper around the edges of the design using sandpaper.
- When all the work is done, we coat the surface with varnish.
- You can additionally “dress up” your masterpiece with three-dimensional elements: hearts, flowers, rings made of fabrics, satin ribbons or clay, tie the neck with organza or satin, decorate with fresh or artificial flowers, depending on the composition of the design.
Photos of decorating champagne for a wedding with your own hands
Removable clothes for a festive bottle for a wedding
No wedding is complete without “bulls” or wedding champagne. For ease of transportation or an unusual gift, removable clothing is increasingly being ordered. There are two options: soft and on a frame. I like framed clothes.
Today I will show my way of creating it.
- cardboard, pencil and ruler for the base;
- pistol glue (you can use another one, but it will take much longer);
- satin ribbon of the required color, I have a beige 4 cm (you can use any width in principle, but there will be some nuances);
- braid or lace;
- rhinestones and ribbon with rhinestones for decoration;
- foamiran roses for a bouquet.
First, cut out two blanks from cardboard. The dimensions in the photo are suitable for Russian Champagne, Bossca and other bottles of the same size.
We cut out additional rectangles for gluing the sides - joint to joint.
Then he glues the two halves together. Having connected them on the bottle, we raise the upper part by half a centimeter and apply glue to all the teeth and then lower it back and check whether it is fixed everywhere.
The base is ready. Can be covered with tape.
For the upper part, we adjust the length, directly according to the model. We burn each section with a lighter.
There is a difficult transition section at the docking site. There's a little secret here. From the beginning, we glue the tape only along the top edge with a little tension. Then we raise the ends. And after applying glue to two perpendicular sides (except for the very tip), we pull the tape diagonally by the corner. We do the same with the other side. Two or three rows are glued this way.
Well, the bottom is left, we measure the tape according to the bottle with a margin of 2-3 cm and cut another 4-5 pieces using its template. Don't forget to burn the edges. And having estimated the center, glue the tape 2 cm from the center, wrap it, glue the other end and glue the beginning on top. And so on until the end.
This is how the groom's suit is made. All you have to do is add buttons, a pocket, a bow tie (or tie) and a hat, and you're done.
But we continue. Now you need to make the skirt. A real wedding dress is lush and airy :) So you need tulle. Hard for the petticoat and soft for the skirt itself
Hard tulle. We cut a strip 14-15 cm wide. Fold it like an accordion and glue it together - I use a metal ruler, the glue from it hardens quickly and peels off easily. When finished, the girth should overlap.
Glue 1 cm below the joint of the halves.
Soft tulle. Cut a piece about 30 cm wide and one and a half times longer than the girth, about 50-60 cm. Glue the two upper corners at the back of the waistband over the “petticoat”. Now, having found the middle, assemble a small accordion and glue it to the front of the dress. We repeat the same on the sides. And add the remaining sections
We begin to form the skirt. Fold the bottom a centimeter and make a small gather. Drop a little glue and glue the half bead there. You need to glue the lower and upper tulle with this “point”. To avoid burning our fingers, we will again use a ruler. We move from the center to the sides, pulling and collecting the tulle into “bundles”. Using this action we adjust the lower girth of the skirt. You can finally form the girth using the free lower ends of the tulle, tightening or gluing the very ends.
Now all that remains is to assemble the “top” using the same actions. You can do this chaotically or in a checkerboard pattern.
Almost done. All that remains is to close the belt with braid or lace.
And now the best part is the decor of the dress. We are making a bouquet for the bride, in my case there were already ready-made flowers from foamiran. We decorate the corset with rhinestones. We “put on” the necklace. And we make a crown.
OK it's all over Now! Our queen is ready! We can remove it from the “mannequin” and wrap it in a gift box.
I hope my master class will help you make a wonderful gift for your loved ones or a “royal” table decoration.
PS I tried to describe and photograph everything in as much detail as possible.
If you have any questions, I will definitely answer.
My master class is participating in the “Wedding Boom” competition, I will be glad to receive your support and votes :) Thank you for your attention!
Source
How to decorate wedding glasses yourself
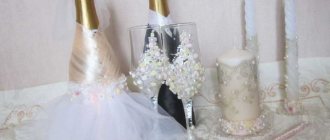
Glasses for the bride and groom should be decorated in the same style as the bottles using similar decor and materials. The lower part of the leg and the middle of the bowl are decorated. The top of the glass remains empty. It is also advisable to leave the stem itself undecorated so that the glass is comfortable to hold in your hands. The design uses a more laconic design with an emphasis on the key elements of bottle decor. For example, it could be a small composition of flowers that dominate the champagne or elegant bows. Also, glasses can, in miniature, replicate the clothing of the bride and groom’s bottles.
Video - decorating champagne bottles for a wedding:
Of course, to save time, you can order decor from professionals. But the creative process itself, putting your soul and positivity into a future product will bring pleasant emotions and pleasure from contemplating the beauty created with your own hands.
Bottles with the image of newlyweds
Bottles depicting the bride and groom are no less popular. Designing in this style is as easy as shelling pears. To do this, you need to choose your favorite photo and contact a printing company that will print a high-quality label or large photograph on special material. The lovers will only have to glue the wrapper to the bottle.
There are a lot of design options for wedding bottles, so everyone can choose the decor based on their own desires and preferences.
Source