A wedding is a precious and exciting event, especially for the bride. After all, every newlywed wants to look stunning. To create the perfect look, you need to take into account so many details - dress, makeup, perfume, jewelry and, of course, hairstyle. A wedding hairstyle with a braid (braids) can be an excellent option, since only braids, individually or in combination with other elements, with their diversity and versatility can make any girl sophisticated, chic, romantic and irresistible.
Wedding hairstyles braids with bangs
Braids always look great in combination with bangs and wedding hairstyles with braids are no exception. The bangs can be anything, for example, straight, oblique, curly or behind the ear.
Hair shell with smooth side bangs, decorated with braids and flower
- Leave strands for bangs and two braids, and collect the rest in a ponytail.
- Curl the ponytail onto the roller, pin and straighten the hair.
- Braid the sides of the braid.
- Twist the remaining strand, forming a beautiful bang and pin.
- Twist the end of the strand into a rope and form a flower over the shell.
- Twist the braids around it.
Original high hairstyle with braided bangs
- A strand is left at the forehead, the rest of the hair is collected in a ponytail.
- The tail is wound onto the roller and straightened out along it, except for one small strand.
- A braided bang is formed from a strand left at the forehead.
- Weaving begins with a standard braid.
- After two weaves, 4 strands are added and intertwined with others so that the strands are in a checkerboard pattern.
- Then 5 strands are added and intertwined, then 6 and so on until the hair allocated to the bangs ends.
- The bangs are laid, straightened and pinned.
- The remaining end is braided into an openwork braid and placed in front of the shell.
- From the left ponytail, a braid is braided at the back, from which a flower is formed under the shell.
Step-by-step video instructions for braiding your own hair
Any girl is proud of her long luxurious hair, because since ancient times it was considered not only the main decoration of a girl, but also her strength. We all remember the red maidens from folk tales with beautiful braids. Modern fashion favors this hairstyle, so it always remains in trend. Especially relevant are unusual braids, which are complex designs of intertwined curls. In the videos below you will see a visual process of creating all kinds of braided hairstyles.
Reverse braiding technique with ribbon
Ribbons are an excellent hair accessory. You can choose openwork, multi-colored, satin. The braid, on the contrary, with such an accessory looks fresh and original. It will harmoniously complement the image of any girl, becoming the main decoration. The braid, on the contrary, looks very voluminous. The length of the hair for such weaving should be at least 20 cm. You should not braid it very tightly, since modern trends dictate the fashion for disheveled, slightly careless weaving. You will see how to weave a braid in reverse with a ribbon to yourself in this video.
Wide braid with elastic bands
This is an original way of weaving that will become the highlight of the image. It will help you create a chic, voluminous hairstyle even from a modest amount of hair. The elastic bands make the braid secure, so the hairstyle will last a very long time, and you will have no reason to worry about it getting disheveled. The method of weaving this hairstyle itself cannot be called easy, but with a little patience and skill, you will get an excellent result.
Round 3-D braid of 4 strands
The following technique is one of the varieties of braiding yourself from four strands. Its main feature is that you will get a volumetric effect. Don't be scared, because weaving is easy. If you don’t understand it the first time, then watch the proposed video lesson for beginners again. With a little practice, you can create this hairstyle for yourself in a few minutes without any extra effort.
How to braid a beautiful braid on your bangs
A braid on bangs can enliven and add originality to any hairstyle, making the image feminine and romantic. The video below clearly demonstrates the process of creating such a styling. You may not get a beautiful braid on your own bangs the first time, but with a little practice you will succeed. This hairstyle is relevant if you are growing your hair or don’t have time to style it. You can experiment with accessories, weaving ribbons, decorating with small flower buds.
Openwork braid in the shape of a flower
Openwork weaving has become very popular. It is found both in everyday life and at festive events. Thin strands form a pattern of indescribable beauty, creating a perfect composition on your head. In this video tutorial you will learn how to weave an openwork braid in the shape of a flower for yourself. This hairstyle is difficult, so you will have to practice. It is ideal for special occasions.
Wedding hairstyle braid with veil
The veil is a symbol of the purity and crystal frequency of the newlywed. It is not a mandatory attribute in a wedding hairstyle, but it is the veil that makes the bride’s image complete and harmonious. And in combination with braids it looks just great.
Volumetric braid using extensions, decorated with a branch of flowers and a veil
- Curls are formed and additional strands are sewn on (if the hair is not thick or long enough).
- The upper half of the hair is pulled forward, and the rest of the hair is woven into a French braid, only additional strands are first twisted into a braid.
- Another braid is braided from part of the left hair, a flower is formed from its tip and laid slightly to one side.
- A few more parts of the remaining hair on the sides are combed back one by one and beautifully laid on the braid.
- The volume on the crown and bangs are formed from the two remaining strands.
- A branch of flowers is sewn onto the top of the braid and a veil is attached underneath it.
Veil combined with a smooth bun, braids and a branch of flowers
- Part of the hair is left in front, and a tail is formed from the rest, which is thrown forward and pinned at the base with an invisible pin.
- A donut is placed on the tail, then the hair is distributed over it to form a tall, smooth bun.
- The part of hair left in front should be divided into three parts (central and side).
- Each of them is combed back to the bun in stages.
- The ends of the side strands are wrapped around the bun.
- The central part is pre-combed.
- Two small strands are pulled out of the bun, braided and wrapped around it (you can add an artificial braid).
- A branch of flowers is sewn on top of the braids, and a veil is attached under the bun.
Easy options
You can achieve the most spectacular hairstyle without having any prior training in braiding.
French braid
There are a lot of types of braids, but it is French braids that are very popular among masters and beginners alike. Since there are about a dozen of them, the weaving technique is different.
Option 1 “Spikelet”
People call this hairstyle a “spikelet.” This is one of the available options for braiding hair for medium hair. It can also be braided on long and short hair. Looks unusual on regrown hair after dyeing.
The step-by-step process of weaving a French braid goes like this:
- After thoroughly combing, select a section of hair on the top of the head. If you have bangs, you need to separate them or straighten them into your hair.
- Divide it into three strands.
- Start weaving. Place the strand on the left on the middle one, and take it instead of the left one. Place the strand on the right on top of the middle one, taking the last one instead of the right one.
- Add one strand of medium density to the left, weave in. Add the same to the right one, weave it in.
- Adding one strand on each side, go down.
- After finishing braiding, continue with simple braiding. Leave a small tip and tie with an elastic band.
Option 2 “Fishtail”
This braid is also called a “fishtail”.
The process of weaving a braid is practically no different from the previous version, only at the weaving stage small strands are taken from both sides. The strands are woven very tightly.
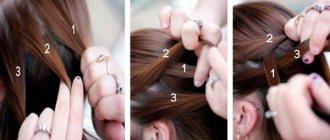
Option 3 “Braid inside out”
These voluminous braids are designed for medium or long hair. They are very fashionable, they can weave either in the middle of the head or on the side, diagonally.
- Select part of the hair on the top of the head. The more of them are highlighted (the upper part from ear to ear), the thicker the braid will be.
- Divide into three equal strands.
- We place the strand on the right under the middle one, and put the left one on top. Then we place the right one on top of the left one. Each strand should be well tightened in the braid.
- Release your left hand so that all parts of the hairstyle are in your right hand. Select a strand on the left, place it under the middle one, insert the left strand into the braid. This will free up your right hand. Select a strand on the right, place it under the middle one, insert the right strand into the braid. As a result, which hand is freed, select the strand from that side.
- Braid to the back of the head, letting all parts of the hair into the braid. Next, you can tie your hair into a ponytail or braid it to the ends. Tie an elastic band.
"Fishtail" from the tail
Looks good on girls and girls with bangs.
- Gather loose hair into a ponytail. The tail can be made either on the top or back of the head
- Divide the tail into three parts: the middle part should be the largest. The two side strands are small.
- Weave a classic braid from the base of the tail.
- It is good to tighten each strand, making sure that the middle strand is always larger than the rest. Otherwise, the fishtail will not work.
- After finishing weaving, tie an elastic band.
For such a hairstyle, you can use a chignon, and if you need to diversify the look, use Kanekalon. Having curly hair, each curl will stand out individually. Before braiding a fishtail, it is recommended to first straighten each curl with an iron.
Several spikelets
One of the simplest, but most effective and fashionable hairstyles is two spikelets. To make beautiful spikelets, you can have hair of any length.
- After combing your hair, make a parting from the forehead to the back of the head in the middle of the head. The parting can be done either straight or zigzag.
- Gather the hair on one side with an elastic band (so as not to interfere). From the free side, start weaving a French braid using method 1 or 3. The neatness of the hairstyle depends on the size of the strands that are woven.
- Having completed weaving on one side, begin weaving on the second.
For special originality, a larger number of spikelets are braided. Since the afro braid is still popular, you can continue weaving a large number of spikelets using them. Then you should start weaving using method 3 to get a realistic result. The weaving of threads diversifies dreadlocks both in color and length. But it is worth considering that each hair must be carefully woven, otherwise the appearance of the hairstyle will be untidy.
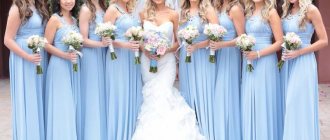
Wedding hairstyles with side braids
Wedding hairstyles with voluminous side braids look great with any dress. They will add airiness and weightlessness to the bride’s image, making her look like a fairy.
Chic voluminous side braid
- All hair is combed to one side.
- One strand is taken from the temple, tied into a ponytail and pulled through itself.
- On the sides of the first strand, two more are grabbed, tied with an elastic band and also pulled through, then the resulting turns fluff up.
- Then follow the same pattern - two strands on the sides, an elastic band, a twist, fluff it up.
- In this way, a voluminous braid is formed from elastic bands on one side.
- You need to move diagonally, from the temple to the opposite ear, and then down the entire length of the hair.
- Decorate with flower branches.
French fishtail braided in a zigzag and decorated with roses
- Divide all hair into two parts (top and bottom).
- From the top part, braid the hair using the fishtail technique, moving from the temple to the ear on the other side of the head.
- Release the second part and, using hair from it, braid the fishtail diagonally in the opposite direction to form a zigzag.
- Twist the remaining hair into a braid and place it beautifully behind the ear.
- Decorate with roses.
What should you consider when choosing a hairstyle for a wedding?
Receiving a wedding invitation is exciting for everyone.
Girls are especially worried - after all, for a special holiday it is necessary to create an appropriate image.
And considerable importance is given to hairstyle. It directly determines how harmonious your image will be.
A wedding hairstyle should be beautiful and unusual.
And even if the holiday is not yours, and you are just a guest or a witness, this does not mean at all that you should not approach the choice of hairstyle irresponsibly.
After all, people will also pay attention to you, you will be in wedding photographs, so you need to be properly prepared. Regardless of what you choose, a complex hairstyle or a simple styling, you must remember that the wedding celebration lasts all day
Regardless of what you choose, a complex hairstyle or a simple styling, you must remember that the wedding celebration lasts all day.
For a long time, your hair should look simply flawless.
In addition, we should not forget that you will have to dance and take part in competitions, and your hairstyle must withstand these tests with flying colors.
Almost any hairstyle can be suitable for a special event. In many ways, the choice, of course, depends on the condition and length of the hair.
Wedding hairstyle with braid elements
Braids are good because they look great both separately and in combination with other elements. In wedding hairstyles, these can be smooth, voluminous, braided and twisted buns, shells, plaits, combing and curls.
Crown braid and twisted bun
- Gather part of the hair on the top of the head into a ponytail, twist it and pin it up for a while.
- From the hair left around the tail, braid a circular braid, fluffing it periodically. Lay the end along it and secure with bobby pins.
- Around the remaining ponytail, attach additional strands a few shades lighter (optional).
- Place a bagel on top.
- Twisting the strands into bundles and pulling out its turns to form a voluminous twisted bundle.
- Decorate the bun with small flowers.
Braid "Goddess"
- To achieve the desired length and thickness, it is recommended to use extensions.
- Separate part of the hair under the entire mass, braid it into a fishtail and fluff it up.
- Separate another small part from the total mass and curl it with a curling iron.
- Fluff each curl and place it on the braid, securing with a hairpin.
- Let down a little more hair again, twist the curls again and lay them on the braid.
- Do these steps with all your hair.
Two Danish braids and a twisted bun
- Separate a small strand of hair from each side of your face and braid two Danish (Dutch) braids, not forgetting to fluff them up as you braid.
- Connect them together approximately at the base of the neck.
- Separate small strands from the remaining hair, twist them into a braid, fluff them and place them at the junction of the braids, thereby forming an airy twisted bun.
- Carefully secure each element of the hairstyle with hairpins.
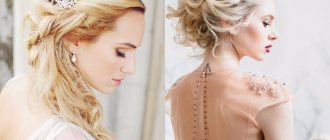
Elegant French braid with bun and wreath
- Curl the curls and securely install the wreath.
- Separate a strand from one side in front of the wreath and braid a French braid, grabbing additional strands and moving towards the back of the head.
- On the other side, throw the front part of the hair back (over the wreath), slightly twisting it for fullness.
- Gather all the hair, braid and front strand into a common ponytail at the back of the head.
- Raise the tail and pin it over the elastic band.
- Take the tail by the end, twist it a little and lift it, forming a beautiful voluminous bun.
- Pin and hide the ends, straighten your hair.
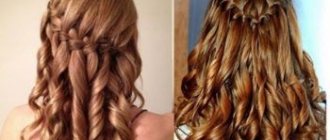
Fish tail
Straight long strands are ideal for fishtail braiding. You can do this hairstyle on wavy hair, but on straight hair it looks perfect.
To highlight the beauty of your hairstyle, you can pre-highlight it. The technique of creating such weaving on long strands is not particularly difficult and looks like this:
- Carefully combed curls should be divided into two equal parts. If the braid needs to be neat, this is achieved with the help of a comb. If slight negligence is acceptable, the hair is separated by hand.
- At the outer edge of the left part, separate a small strand and lay it over the left part, and then pass it under the right part.
- A similar procedure must be performed with the right side.
- Repeat such alternations until all the hair is braided.
The thinner the strands you separate, the more beautiful the end result will be. True, this will take more time, but you shouldn’t save on it. The fishtail should not be braided too tightly - the whole beauty of this weaving lies in its slight carelessness. This braid goes well with a wreath of fresh flowers.
Wedding hairstyles braid with flowers
Since ancient times, women have braided their hair and decorated it with flowers, because this is a symbol of divine beauty, femininity and falling in love. Therefore, wedding hairstyles with braids and flowers are very popular among brides all over the world.
An incredibly beautiful braid, decorated with strands and small flowers
- Make a backcomb on the top of the head, smooth the hair and pin it with a bobby pin, fixing the volume.
- Under the backcomb, braid a French braid from the middle part of the hair, leaving the side strands untouched.
- Take a small strand from each side one by one, twist it into a bundle, fluff it up and pin the end to the opposite edge of the head.
- Going lower, do the same thing, only pin the ends of the strands with hairpins to the spikelet and so on along the entire length of the hair.
- Straighten your hair and insert small bouquets of small flowers into your hair.
Charming braid made of elastic bands, decorated with carnations
- Separate two small strands on the sides and tie them together with a transparent silicone elastic band closer to one ear.
- Twist, pushing the end through the middle of the part of the resulting ponytail that remains above the elastic band.
- Fluff the coils, pulling out small strands of them.
- Take two more strands. Add the previous tail to one of them.
- Tie them together again, but closer to the other ear.
- Twist and fluff the coil again.
- Do the same along the entire length of the hair.
- Insert cloves into the center of the ponytails.
They say that a white dress and veil makes any girl beautiful and this is obvious. But still, the main decoration of the bride is her happy smile and shining eyes.
A few final tips
- Remember, you need to choose a braid not only that you like and that suits your face type, but also one that will perfectly match the image of the bride and the style of the wedding as a whole.
- Also try to find a good and conscientious hairdresser who will not only give good advice and do a trial hairstyle, but will also not be late for you on your wedding day.
- Before you trust your head to a stranger, be sure to read his works and reviews about him on the Internet.
- Don't overload your hair with too many accessories, because it will look ugly and maybe even funny.
- Think about making your hairstyle not only fashionable and interesting, but also convenient and comfortable , because you will have to wear it all day.