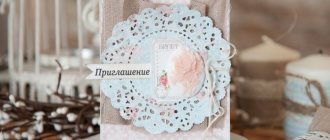
Preparations for the wedding ceremony should take into account all the subtleties of the celebration so that it is remembered by the atmosphere of tenderness of the nascent family. The style of the wedding is maintained even in the smallest detail, without losing sight of the design and decor of the ceremony room, the matching of the newlyweds’ outfits and accessories. A wedding ring box given to small children looks elegant. Nowadays, manufacturers offer an abundance of shapes and materials for boxes, although it is easy to make a unique item with your own hands.
Purpose and history of appearance
The Soviet tradition of presenting rings to newlyweds on a saucer is becoming a thing of the past; more and more often, lovers are returning to their roots, having seen enough of ancient reproductions depicting the sacrament of marriage. The boxes create an atmosphere of love and respect and do not contradict folk traditions. The purpose of the chest is not limited to storing wedding rings and other jewelry, it turns into a reminder of the best day of your life.
The tradition of sealing marriage ties with rings originated in Ancient Egypt. This is where the history of storing jewelry in special jars begins. Chinese craftsmen, who are drawn to making complex mechanisms, suggested storing wedding rings in small wooden boxes.
Ancient Rus' was famous for its cabinetmakers. They made not only large forged chests, but also ring boxes inlaid with precious stones. Other jewelry of the owner was stored in such caskets.
Products were often equipped with secret compartments and locks hidden at the bottom or side. It was there that rings and earrings were hidden, which could be retrieved by pressing special buttons. The entire structure was varnished, and folk motifs were cut out or painted on the lid. The casket had a high cost and was considered available only in rich boyars' chambers.
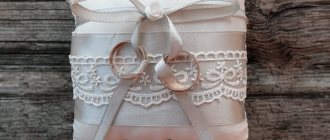
It was among the nobility that the custom of using boxes with cushions for wedding rings arose. They were often decorated with lace, velvet or satin.
Bamboo napkin box: detailed master class
A bamboo box can be found in every home. Moreover, you can rarely find monochromatic options; most of them are decorated with original patterns. To create a voluminous box from a thick napkin, you need to sew decorative thick fabric to its edges on both sides.
Your task is to secure the sides as tightly as possible so that they do not become frayed while using the item. Finish the edges of the napkin with beautiful thick threads, which will strengthen the structure and make it neater. Cut 2 round blanks from fabric; they will serve as the sides of the box.
You can reinforce it with cardboard or plastic inserts. You can connect the fabric and bamboo napkin using Moment glue or threads. Only 3 sides of the fabric blank are connected, the remaining upper part is processed with a beautiful seam or decorated in another way.
Use the original button and eyelet as a fastener. Ready-made fastener options can be found in hardware stores.
The finished box is coated with acrylic varnish. This way it will get dirty less and look neat longer.
Varieties
When choosing a ring box for your wedding, you should consider the style of the wedding. There are many varieties of interesting models of boxes, differing in design and design:
- Wooden and forged chests will decorate a classic wedding. Excessive decor is not acceptable at a celebration; it is enough to put a satin pillow for rings inside.
- For a rustic celebration, a casket covered with burlap and lace is suitable.
- A fashionable celebration in the shabby chic style will be decorated with an aged box with tea roses painted on the lid.
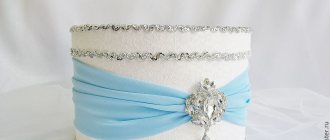
- A wedding in red colors will be complemented by a laconic velvet box in the shape of a heart. For a colorful celebration, a casket is selected to match the color for a harmonious relationship with the decoration of the hall.
- A nautical wedding will benefit from a ring accessory in the form of a glass cube, decorated with shells, colored salt and pearls.
- For an outdoor ceremony, you can pick up an openwork box and fill it inside with moss and flower petals.
It is recommended to cover a regular box with silk or velvet and decorate it with beads, feathers or seed beads. The novice craftswoman will enjoy the work, and the finished product will become a talisman of happiness for a young family.
According to the material of manufacture
Ring boxes are distinguished by the material they are made of. Jewelry can be presented in a classic wooden box or choose an exquisite forged item. Rings can fall off an ordinary fabric pad with one careless movement, causing unpleasant associations, so it is better to choose a beautiful box or chest.
- Wooden models are a universal solution for any wedding. The initials of the newlyweds are cut out on them, and the product is covered with lace or twine. A wooden chest painted in folk style looks beautiful.
- Glass or crystal boxes are made in various shapes. The rings are served in a weightless glass cube, glass slipper or heart. An improvised florarium with moss, rosebuds and beads looks interesting. With proper care of the vegetation, you can admire the greenery in a transparent box for a long time.
- Metal boxes are used much less frequently. Chests made in the style of artistic forging will decorate the celebration and become the “highlight” of the interior.
- Stone boxes are an unexpected solution for a wedding. Beautiful caskets attract glances and will become the subject of envy. You will have to be very careful with such models, because they are prone to cracks or chips.
- Ceramics are fragile materials and may accidentally break during the ceremony. Now they offer small models with removable lids, decorated with roses or doves.
- Velvet or satin boxes are available in various configurations. In such beautiful caskets you can store gifts from your spouse after the wedding.
An exotic wedding in eco-style will be complemented by an original box with bamboo. A hexagonal box made of sticks will add a touch of lightness and become an unexpected solution.
By style
Ring boxes should match the style of the wedding. An ill-chosen accessory will be a disappointment for the bride and will spoil the mood for a long time:
- The classic theme implies a minimum of decorations and the use of only expensive materials in decoration. A laconic wooden box with a satin pillow, embroidered with a row of pearls, will naturally fit into the celebration.
- Rustic style gravitates towards natural materials. Choose a regular box for rings and paste them around the perimeter with pieces of bark or branches. You can decorate the product with grass and dried flowers.
- An eco-style wedding will be decorated with a box covered with linen fabric or burlap. The diameter of the product is covered with small cones, acorns, moss, and rowan berries.
- The tenderness of French Provence is reflected in the combination of purple, pink and cream shades. For the rings, choose a ceramic or glass box decorated with sprigs of lavender and olive.
- Vintage style wedding is trendy. They use wooden caskets decorated with old black and white photographs.
- A rich Moroccan wedding is complemented by bright, luxurious ring chests. The craftswoman can use her imagination when sewing an original box, that is, cover it with velvet, embroider it with gold threads and beads.
- Glass boxes look beautiful at a seaside wedding. Choose a transparent cube and cover it with shells.
Design options
Particular attention should be paid to decorating the finished product. Be based, first of all, on the concept and theme of the celebration
Do not overdo it with the decor - the box should look stylish and neat, but not too provocative.
Popular articles Making a textile passport cover
How to decorate a wedding box:
- A wooden product will be transformed if you paint it in colors that will suit the wedding palette. You can choose a color to match the bride's dress or the groom's suit. An inscription is burned on a wooden surface or the initials of the newlyweds are cut out, a family coat of arms or monogram is drawn, and decorated with plants or ribbons.
- A glass box will look stylish if you decorate it with dry grass or moss. The walls can be decorated with shells, beads, colored stones - choose any option that suits the theme of the celebration.
- Cardboard caskets are covered with fabric and decorated with ribbons, rhinestones, beads, buttons, and flowers. Craftswomen often add lace and satin bows to the decor - such accessories look gentle and touching.
- Fans of original ideas can be amazed by this unusual option: a box in the shape of a berry or fruit is completely covered with rhinestones or beads. A “juicy” strawberry, a shiny pineapple or a sparkling peach with wedding rings inside will cause everyone’s delight.
When planning your wedding celebration down to the smallest detail, pay attention to the box in which the wedding rings will be carried out at the wedding ceremony. It can be made from a variety of materials: wood, metal, cardboard, glass, ceramics
The decor should match the theme of the wedding, and everything else is a flight of your imagination. Let the box with rings become a family heirloom and bring happiness to the young family.
Decoration methods
A wooden box for wedding rings will sparkle with new colors if you take the time to decorate it. The names of the newlyweds are burned or cut out on the product, and the coat of arms or monogram of the young family is painted.
The wooden surface will be transformed after painting or drawing. If you lack artistic skills, decoupage will help. All that remains is to choose a napkin with a beautiful pattern to transfer to the lid of the box.
The simplest option for a village wedding is to cover the box with small branches and acorns; a scarlet ribbon with the wedding date will serve as a bright accent.
Glass caskets are decorated with moss and dry grass. You can cover the sides of the product with shells or flowers, or make a mosaic of multi-colored pebbles.
Cardboard boxes allow the craftswoman to realize all her fantasies. The products are covered with any fabric, trimmed with lace or satin bows. A row of beads, rhinestones or flowers are glued along the edge.
Fans of non-standard solutions choose decoration with rhinestones. A box is selected according to the shape of any fruit or berry, after which it is thickly covered with beads and rhinestones. A sparkling pineapple containing the newlyweds' rings under the lid will cause general delight.
how to create a gift box for a ring – Crafts Fair
Beautiful packaging for a gift is never superfluous, and in today’s master class I will show and tell you how I made a gift box for a ring. I wanted to make something light that complements and matches the jewelry itself.
To make the box, I have prepared a ready-made template for printing on A4, with which the work will be easy and enjoyable, and the result will please you.
The layouts were created by me for personal use by everyone; please do not use them for commercial purposes, and when copying this material, provide a direct link to the source.
For work we will need:
1. Binding cardboard 2 mm thick, about 1/4 sheet A 4 is enough.
2. Printed template. You can print on plain paper or self-adhesive paper. This issue is not fundamental; self-adhesive will simply speed up the work somewhat and eliminate unnecessary fuss with glue.
3. Regular office glue, PVA in a pencil, Moment-Crystal or any other.
4. Metal ruler and construction, breadboard or stationery knife, scissors.
5. Decorative elements - 2-3 brads, corners, satin ribbon.
I apologize for the quality of the photo, today it is a little lower than usual, it just so happened.
We cut off the part with the details of the box from the printed sheet and glue it onto the binding cardboard.
Cut out all the details using a knife and ruler. The parts can be divided into three groups: for making the box itself, for the “cover” and for the lid.
We take the parts for the box and carefully glue them together with glue, matching the sides to the corresponding sizes.
The finished box should be smooth and neat.
We take the printout sheet again and cut out the remaining parts for gluing the box.
We glue all sides sequentially, folding the top edges to the inside.
Now we take the parts for the inside.
And we cover the inside of the box with them.
We glue the lid in the same way.
Now let's move on to the cover. We take cardboard parts and glue them onto a paper sticker with a wooden texture.
We bend the edges to the inside.
All the parts are pasted over, you can put everything together.
Before final assembly, glue the tape onto the cover.
We glue the tag and secure everything with brads in several places.
Now we glue the box and lid into the cover.
The last step remains - take the remaining part that will hold the ring and fold it as shown in the photo.
Glue the part inside the box.
Metal corners can be added if desired.
All is ready! You can wrap a gift