Shooting wedding rings is a classic wedding photograph. Such a shot has long been firmly established in the mandatory program of all professional photographers. But gone are the days when rings were removed simply lying on a pad or in a box - this is too standard and boring. Also, photographers are gradually moving away from close-up photography of the newlyweds’ hands, when the rings are already put on the ring fingers.
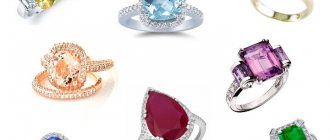
Wedding rings deserve special attention from the photographer, because they are the main symbol of love and marital fidelity of a couple. How to make such photos original and truly beautiful? We've put together some tips for photographing engagement rings, and a selection of incredible ring shots to serve as inspiration.
1
Jewelry Photography Lighting
It's no secret that lighting plays a decisive role in product photography. In the case of miniature jewelry, precision and proper lighting settings become even more important. For a truly beautiful shot of jewelry, soft, diffused lighting is required. Therefore, you can immediately stop using on-camera flash. It is advisable to use fluorescent daylight lamps as optimal light sources here. If you want the stones to “play” in the photograph, one of the light sources should be directed towards the subject being photographed. Moreover, it should be located at approximately the same distance from the product as the camera.
Thus, two lights are placed on either side of the photo box in which the jewelry is placed to create soft lighting. They are directed, accordingly, to the walls of the box. And the third light source, weaker in power, should shine directly on the stone. You will need to move it along the box to experimentally find the optimal placement of light that would make the jewelry truly “sparkle.” Watch the “sparkle” of the stones through the viewfinder of your DSLR camera. In order to make diamonds and some other stones literally sparkle with lights, you should use a colored LED lamp. It can favorably highlight the sparkle of many jewelry.
This lighting scheme is quite simple, and in practice it is not difficult to master even at home. But in fact, in order to highlight the true beauty of a piece of jewelry, professional photographers often spend more than one hour just setting up the light correctly. Everything so that the precious stones “play” beautifully in the frame. Especially if we are not talking about catalog photography, but about artistic photography, when the photographer tries to achieve maximum special effects.
The combination of proper lighting and the photographer's creative approach allows you to achieve truly impressive results when photographing jewelry. There are no universal lighting schemes; in any case, you will have to experiment if you want to get interesting and bright photographs. For example, you can try hanging the product and photographing it in backlight. The effect can be truly stunning.
Creative photo
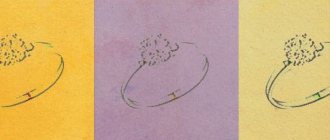
Such pictures with a concept and a story always look especially touching, especially if they are taken by the grooms themselves. But they have value only when they were taken spontaneously, from the heart; it’s not worth arranging a careful production for the sake of such a picture.
@val_2323, @she_saidyes
Even more useful information about preparing for a wedding and wedding trends can be found in our guides.
How to photograph jewelry without a studio. Guide to action
Many online store owners worry about how to capture the beauty of sparkling jewelry in photos. However, shooting jewelry is not as difficult as it may seem. Here is a checklist of simple points that will be useful to follow in order to get successful photographs.
Prepare props and materials
- Window and natural light
Photographing shiny jewelry using flash is not a good idea because the jewelry will reflect bright light, creating glare and harsh shadows in the background, as the two examples below demonstrate.
Unless you are an experienced photographer with access to a professional studio, take jewelry photos using natural lighting, such as light from a window. Although bright sunlight will create glare and harsh shadows, this light can be diffused by covering the window with a white screen. Please note that any color other than white on such a screen will change the hue of the light itself.
- Background for shooting: white sheet or paper
The reflective nature of the surfaces of most jewelry means that all other colors will be absorbed, so to avoid discoloration of the item, you should shoot items against a white background. White reflects light, while dark colors absorb it, so your subject will be better lit if you use a white background, such as a white sheet of paper.
- Camera and tripod
When photographing jewelry, it's less about the camera itself and more about the lens. When purchasing your first macro lens, we recommend choosing a lens with a focal length of 60 mm. This focal length will provide 0.5x magnification, while more expensive macro lenses provide life-size (1:1) magnification. And using a good tripod will ensure that your photos are in sharp focus and sharp.
- Dummy
Most hand-made stores sell bust mannequins, which are a great way to give jewelry a beautiful and realistic appearance. Most stores sell black busts, which highlight the jewelry and add elegance to it. However, it is better to photograph jewelry against a white background, so you can cover the mannequin with a white cloth.
- Cardboard
Don't have a mannequin? Create a unique jewelry tablet stand. Take a piece of cardboard, wrap it in white paper, and attach or tape the ends of the necklace to the back of it. So, for example, you can adjust the length of the chain and not worry about its size if you don't have a large tablet.
- Using a glue gun or double-sided tape
When photographing jewelry rings, it is convenient to use a drop of glue from a glue gun or double-sided tape to fix them. In this case, you can fix the rings at the desired angle, as shown in the photo below.
- fishing line
We recommend using fishing line to photograph items such as dangly earrings. You can use a piece of cardboard folded in half and stretch the fishing line from one plane to another, as shown in the picture below. When taking photographs, make sure that the jewelry does not swing on such a hanger.
Shooting jewelry
- Use a special lens
If you purchased a digital SLR or mirrorless camera, then you will have a lens included with it, which is usually a wide-angle with a short zoom. Numerically, the focal length most often ranges from 18 to 55 mm. These lenses are great for everyday photography, but they are not suitable for photographing small objects such as rings or earrings.
For such purposes you will need to purchase a special lens. Look for a model on sale that has a focal length of about 60 mm. You can install the camera at a short distance from the object, the magnification will be 0.5x. If you have the financial means, buy a macro lens that allows you to shoot at a 1:1 scale.
- Use a sturdy tripod
Camera shake is a photographer's worst enemy. When working with small objects such as jewelry, any slight vibration caused by holding the camera with your hand will appear as a blur in the final photo. To avoid this, choose a sturdy tripod. In the tripod, note the presence of a removable ball head compatible with the platform camera and the presence of a spirit level in the legs or on the head of the tripod.
The advantage of a tripod ball head is that it uses liquid to achieve the desired angle. As long as the head is unlocked, you can freely adjust the camera to further lock the selected angle.
- Illuminate jewelry evenly and completely
A standard lighting setup for macro photography should include at least two light sources - flash or continuous light. One is to the left of the object, and the other is to the right.
- Choose the right aperture and make sure everything is in focus
When using a macro lens to photograph jewelry, don't assume that a wider aperture (f2.8 or f4) will make your photos brighter.
If you choose a large aperture (f2.8), more light will enter the lens, but only a small amount of the subject will be in focus. The rest of the focus "falls off" and this effect is called "bokeh".
The bokeh effect is suitable for portrait photography, but not for jewelry photography. Therefore, a large aperture of f2.8 or f4 is not suitable as you will not be able to see all the details of the decoration.
For best results when shooting in aperture priority mode (labeled Av or A on most camera mode settings), choose an aperture of f11 or f16. These lower values produce less bokeh, which is better for depicting all the details of the jewelry.
Common Mistakes to Avoid When Photographing Jewelry
- You didn't prepare the products very well. Clean your jewelry and polish it before shooting. This will save you time that you would otherwise have to spend on post-editing your images to remove dust and fingerprints from your jewelry.
- Bad light. Lighting should be complete and the same for a series of photographs.
- Glare. Incorrect lighting will cause glare in photos and hide product details.
- Incorrect color rendering. The color of products should be as close to reality as possible so as not to mislead the buyer.
- Inappropriate image size. Jewelry (and especially earrings) can really vary in size. So keep your images to the same size so everything is aligned and easy to view on your online store site.
- Inappropriate background. Take photographs of jewelry from the same brand against the same background.
- Insufficient number of photos. Take more photos of products, in great detail and from all angles. Show the details, clasps, chain and how this jewelry should be worn.
Final advice
Keeping your photos consistent makes it much easier for customers to view your products. Such uniform requirements for photographs can be described in general recommendations for a team of photographers. Can you imagine that every time you change the photographer, the style of the photographs taken for the site changes?
If you're not sure, make it simple. Use a clean background in all product images.