Principle and advantages
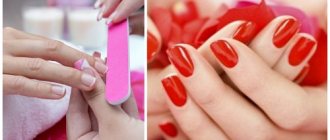
Trimming manicure is a nail treatment technique in which the cuticle and adjacent side ridges get rid of growths using cuts after preliminary soaking.
Circumcision is carried out with nail clippers or scissors, but only dead, excess skin is affected, while healthy skin is not damaged. Benefits of trim manicure :
- speed . The trimming technique allows you to process two hands in just 10-20 minutes;
- relatively low cost . To carry out the procedure, you do not need to purchase special devices, products or tools. Just a pair of wire cutters or regular nail scissors is enough;
- ease of execution . You can do a trimmed manicure at home, just master the basic knowledge of the structure of the cuticle and the technique of execution.
Flaws:
- traumatic . And due to the use of cutting tools, there is a high probability of wounds and cuts. Much here depends not only on the qualifications of the master, but also on the characteristics of the client’s circulatory system. With closely spaced capillaries, blood discharge is almost impossible to avoid. In addition, cutting a manicure if the technique is violated can lead to the formation of burrs;
- increasing the rate of regrowth . It was experimentally revealed that with the trimming method, the cuticle grows faster than with hardware or European manicure;
- the likelihood of infection . Due to the violation of the integrity of the skin, with the cutting technique, the risk of infection, including hepatitis or HIV, is much higher. Of course, this largely depends on the master and his methods of processing tools.
Cuticle Care Rules - A Guide to Products and Procedures
Manicure at home: video
Tags: nails
Market Analytics
- 2020 in the beauty industry – innovation without borders
- Black Lives Matter movement: reaction and consequences for the beauty industry
- COVID-19 is changing the rules of the game in the cosmetics market
Convenient search for beauty salons on our website
Beauty salons in Moscow Beauty salons in St. Petersburg Beauty salons in Ekaterinburg Beauty salons in Novosibirsk
Latest blog posts on our website
- Naturecream / Arnica - the magical plant of alchemists
- Naturecream / Tremella Extract - Snow Mushroom Detox for Skin
- Prostye-sovety / How to visually enlarge your lips with makeup
- Naturecream / Apricot kernel oil for face
- Naturecream / MATRIXYL3000 - the best skin elasticity stimulator
- Naturecream / SPF in Natural Oils
- Naturecream / Geranium (Pelargonium) oil for skin health and beauty
- Prostye-sovety / Save on a beauty salon: procedures that can be done at home
- Naturecream / Growth Factor - brings back youth?
- Oksana-Lezina / 3 effective abdominal exercises from a fitness instructor for beginners
Latest forum topics on our website
- Natalya / How to properly make a gelatin mask?
- Mrs._Smith / Badly sunburned! What to do?((
- Ice / Is it necessary to combine fitness classes with a diet?
- Antonova / What can be used for hair loss?
- Radio operatorKat / Who was on a protein diet?
Other articles in this section
| Drawings on nails Drawings on nails can be done with acrylic paints, gel polish or shellac using a needle, brush, toothpick, stamping, water, tape, sponge and newspaper. If you are tired of a boring, monotonous manicure, it's time to familiarize yourself with unique design options that allow you to create beautiful designs on your nails. Some of them require professional skill, but many of them can be learned on your own. |
| Manicure: apple (photo and step-by-step instructions) Today we will look at how to draw apples on your nails. This nail design is suitable for both summer and autumn. Apples can be made red, green or yellow, or you can draw a cut apple with seeds. So let's get down to step-by-step manicure: apple. |
| Review of gel polish removers A review of gel polish removers will help you decide on the best product. |
| Manicure with foil Nail design options are very diverse. One of the most original techniques with a wide range of design options is decorating nails with foil. This nail art is very impressive, noticeable and immediately attracts attention to its owner. And you don’t have to be a professional to do it. The necessary materials, instructions, a little practice - and you will succeed. |
| Water manicure An attractive and original manicure will decorate any woman, and this is not surprising, because it is women’s hands that people pay attention to first. Well-groomed hands immediately reveal a woman’s desire to be beautiful and indicate that a woman devotes a lot of time to caring for her appearance. Many ladies trust the creation of nail designs exclusively to professionals, not suspecting that they themselves can do an excellent job of creating a unique marble or water-based manicure. |
| How to choose and make the right nail shape The choice of nail shape directly depends on the shape of the cuticle edge and the length of the nail plate. A manicure can look completely different in each case. Choosing the shape of your nails is like choosing a silhouette in clothes: it will help hide imperfections, visually lengthen your nails, or vice versa, make your hands coarser and your fingers shorter. |
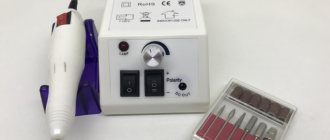
| Hardware manicure Hardware manicure is a way to tidy up your nails without using cutting tools. The method is an excellent alternative to trimmed manicure, especially if the nails are problematic or deformed. |
| Nail design Nail design is a modern type of aesthetic cosmetology that favorably emphasizes the beauty of women's hands, and also allows you to hide minor imperfections. The history of nail art dates back to Ancient China, where high-status fashionistas grew their nails up to 25 cm long and put tips on top to avoid damaging them. |
| French pedicure (French) Beautiful, well-groomed legs are the dream of every woman. Delicate skin of the feet and neat, beautifully shaped nails are a real decoration, eloquently speaking about your desire for perfection in everything. Not even the most thoughtful look will be complete if you forget about the pedicure - unkempt legs will negate the impression of a beautiful outfit and spectacular makeup. This problem is especially relevant in the summer - the time for sandals and open sandals obliges us to carefully monitor the beauty of our feet more than ever. |
| Medical pedicure The beauty of your legs is achieved through a good pedicure, however, if medical problems arise, a regular pedicure cannot help. |
Comments
- Svetlana | 2016-06-08 11:18:03 Classic manicure seems very simple, but in fact there are so many nuances! Only a master can do it correctly from start to finish. Previously, I also tried to do something myself, but once I visited a manicurist, I felt the difference. Now I only go to a manicure specialist, they are truly professionals in their field.
- Alina |
2016-06-07 11:19:52 Files do not need to be washed at all, they should be disposable! Another reason to go only to professionals with sterile instruments. I got my manicure done in a salon, and everything there is absolutely sterile and the instruments are disposable. The circumcision process is underway there!
What do you need
Trim manicure is economical, as it does not involve the use of expensive products or devices. However, you will still have to purchase a minimum set of necessary tools.
Cuticle nippers
The first thing you need to pay attention to is the sharpening of the wire cutters. The duller the tool, the higher the chance of cuts and wounds.
When choosing clippers for trim manicure, also pay attention to:
- material . Buy cutters made of medical, carbon or alloy steel, as these materials are the most unpretentious and at the same time durable. The steel is resistant to disinfectant and can be sharpened;
- move . Before purchasing, take your chosen nippers in your hands. Squeeze and unclench them several times to evaluate the smoothness of the ride. When unclenched, the cutters should not “bounce”;
- cutting element length. Cuticle nippers differ in the size of their cutting edge - it can be from 3 to 12 mm. You should choose clippers based on the size of your nail. A manicurist should ideally have 2 sizes – up to 6 mm for narrow nails and from 6 to 12 for wide ones;
- overall tool size . Make sure that the nippers fit comfortably in your hand and that the length of the handles does not cause discomfort. For craftsmen with short fingers, all sizes are equally suitable, and here habit becomes the decisive factor. For those who have long fingers, tools with short handles are absolutely not suitable.
When choosing, pay attention to the Staleks SMART NS-30-7 steel nippers for wide nails with an edge length of 7 mm. The nippers are easy to sharpen and fit well in the hand.
Instead of clippers, you can use nail scissors, for example, ZINGER Premium 1303 Salon, however, masters often prefer clippers, considering them more convenient.
Nippers for manicure and pedicure - types, brands, selection criteria and operating rules
Pusher
The purpose of the pusher is to move and lift the cuticle for its further removal using nippers.
When choosing a pusher, consider:
- blade width . It is selected based on the width of the nail. If you buy a pusher for yourself, focus on your nails. Craftsmen are recommended to buy several pushers with different blade sizes;
- raw materials Pushers made of medical, carbon or alloy steel, like wire cutters, are subject to all types of processing and can be sharpened;
- convenience . The pusher should lie comfortably in your hand so that nothing causes you discomfort while working. By the way, pay attention to models with a corrugated handle surface - it performs an anti-slip function;
- quality . The pusher should not have nicks, “fences” or crooked edges. To check for the smallest protrusions, run the working part of the tool across your palm. A high-quality pusher does not “scrape” the skin.
As for functionality, choose a pusher at your discretion - one-sided or two-sided. High-quality pushers are offered by Zinger. The brand has pushers of different sizes and functionality, including double-sided ones, like the MC-0011 model.
All types of pushers - comparison, characteristics, operating rules
From additional tools:
- buff for polishing nails. For these purposes, you can purchase a buff with different sides of hardness, like four-sided No. 979 from Mertz;
- glass or plastic file, for example, plastic from CND with abrasive edges 240 and 360 grit;
- soaking tray. For trimmed manicure, you can get by with a regular ruNail plastic bath without heating and maintaining temperature.
Manicure files - we understand their types, shapes and types
Step-by-step instruction
We recommend that you carry out the first procedure with a specialist in a salon if you have not dealt with trimmed manicure before. This way, you can follow the sequence of steps and see how to work with the leather correctly so as not to damage it.
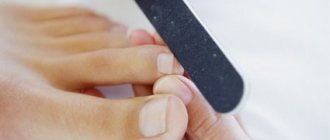
- Adjust the length and shape of your nails using a file. It is better to choose a file made of glass or plastic - it is less damaging to the nail plate;
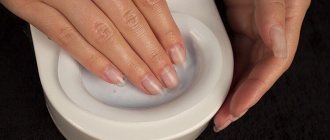
- Fill the bath with water at a temperature of 30-40 degrees and lower your hands for 5-10 minutes;
- Use the wide part of the pusher to gently lift the cuticle to separate it from the nail plate. Movements should not be sudden so as not to injure the skin;
- Using nippers, starting from the side roller through the center of the cuticle, begin to cut off the skin. Try to ensure that the new cut begins exactly where the previous one ended - this will avoid “hairiness”;
- Polish the nail with a polishing buff 900-1200 grit;
- Apply oil to the cuticles and moisturizer to the skin of your hands.
If a remover is used to soak the cuticle and remove it from the nail plate, skip the step of soaking your hands. In this case, the product is applied to dry skin for 1-5 minutes, depending on the product, after which it is also lifted with a pusher and cut off.
At the same time, the use of softening baths is considered a classic method and is used most often. And if you add additional ingredients to the water, you can:
- strengthen the nail plate - add 1 tbsp to the water. l. sea salt;
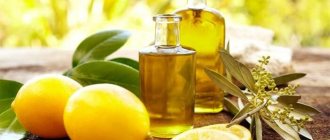
- moisturize and nourish the nail and periungual space by dropping a few drops of grape seed, jojoba or shea oil;
- disinfect by choosing 5-6 drops of tea tree oil as an additional component.
Manufacturers of manicure products also offer special ready-made compositions for baths.
- Morizo milk with three oils softens and nourishes the skin and nails. Suitable for all skin types, including sensitive and prone to allergic rashes;
- salt Orly Pro Purifying Soak for hands . Effectively cleanses the skin and starts the process of cell regeneration. Prepares the cuticle for subsequent manipulations. Due to the use of Dead Sea salt, it has a rejuvenating effect.
What is manicure, its types and popular nail design options
We perform trim manicure at home
Performing a trim manicure at home is easy. First of all, make sure that all tools are sharp and absolutely clean. A master class will help you perform a trim manicure correctly; videos of which are posted online by beauty bloggers or professional nail technicians.
Our instructions will help you perform a trim manicure at home: step by step, with photos and detailed descriptions, we will look at each stage of the procedure.
Step 1: Remove the old coating
Before starting the procedure, you must remove the old coating (nail polish or protective coating from the nails). The best way to do this is with a cotton pad and nail polish remover. Apply a small amount of product to a cotton pad, press it onto the nail for a few seconds and slide the disc towards the edge of the nail. Repeat if necessary. Afterwards, wash your hands with soap and water to remove any remaining nail polish remover.
Step 2: Give your nails the desired shape
The next step is to work on the shape of the nails. If you need to shorten your nails, use scissors; if you only need to correct the shape, you will only need a nail file. To ensure that all layers of the nail plate are filed evenly, hold the file at a 90º angle to the edge of the nail. Try to make movements in one direction, this will prevent the nail plate from peeling. Remember the “rule of three nails”: the length of the free edge of the nail on the index, middle and ring fingers should be the same, on the little finger - a millimeter shorter, on the big - a little longer. The shape of the nails on all fingers should be the same.
Step 3: Hand Bath
When performing a trim manicure at home, you can use any shallow dish as a bath. Fill it with warm (35-40º) water. You can make a special solution by adding 1. Sea salt 2. Essential oils 3. Liquid soap or shower gel to the water.
Dip your fingertips into the bath and hold for 10 minutes.
Step 4: Pushing back the cuticle
Use the wide, spatula-shaped side of the pusher to gently push the softened cuticle toward the base of the nail. You should not hold the tool at a large angle to the nail plate or press too hard on the nail - the risk of injury to the bed increases. The spatula should practically lie on the surface of the nail. Don’t forget to push back the cuticle at the side rollers as well. If necessary, use the sharp part of the pusher to clean the nail from the ptergy, the thinnest layer of skin.
Step 5: Cut the cuticle
Nippers or nail scissors with rounded ends are suitable for removing cuticles: choose the tool that is more convenient for you to work with. Trim the cuticle as close to the base as possible. Try to keep the cutting line perfectly straight and not interrupted. After the excess skin has been removed, use a sanding file to carefully go over the surface of the nail. Finish the procedure by applying cuticle oil.
Step 6: Apply a protective or decorative coating
This step is optional, however, without a protective or decorative coating, the manicure will not look complete. Before applying a coating to your nails, you need to degrease them - regular nail polish remover will do for this.
A manicure made using classical technology is ready. Enjoy the beauty of your hands!
Precautionary measures
- When performing trim manicure at home, make sure that the clippers or scissors are sharp enough . A dull tool will not allow you to achieve a “clean” manicure;
- ensure sterility .
Even if you are only doing a manicure for yourself, treat your tools. Of course, you won’t get serious infections in this case, but bacteria that multiply on the surface of the pusher or nippers will happily “migrate” to the fresh cuticle cut. To treat your personal instruments, use an alcohol solution. Masters must carry out a full sterilization cycle. How and with what to disinfect, sterilize and clean manicure instruments