Manipulations are carried out using a special device - a milling cutter with several interchangeable attachments. It allows you to quickly and easily: get rid of the old decorative coating, give the desired shape to the edge of the nail plate, remove the cuticle, pterygium and deeply clean the lateral sinuses, sand the nail and, if necessary, level its surface before applying a new layer of varnish.
Which is better – edged or hardware manicure:
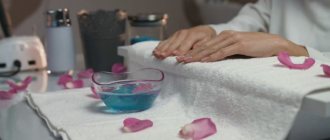
We are constantly looking for the most gentle ways to get our hands in order. The aggressive trimmed manicure was replaced by the European one, with its careful processing of the cuticle without removing it. However, this technology is not suitable for everyone.
Hardware manicure is the next step towards the development of the nail industry. Its undoubted advantages:
- The cutter carefully removes only dead skin particles without damaging the cuticle, as often happens when trimming with tweezers. As a result, there is no danger of wounds with further possibility of infection. Not only thin, but also denser cuticles are effectively removed, leaving the nail hole smooth and neat.
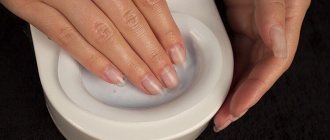
- To perform a classic manicure with high quality, hands are first steamed in a bath, which provokes the spread of fungal diseases. Hardware treatment is performed on dry skin, so it is much more hygienic.
- After gentle removal with a cutter, the cuticle grows longer and does not become rough, as with a trimmed manicure.
- Problematic nails are treated delicately: brittle, flaking, uneven, damaged by improper extensions. As a result, any gel polish then fits and lasts much better on them.
- The skin around the nails looks healthier and more well-groomed. You can also use a cutter to remove calluses from your fingers if they have formed from work.
- The procedure is easy to carry out at home. It is enough to go through video training, watch relevant lessons and step-by-step photos from professionals, and then practice a little to achieve tangible success. The machine for hardware manicure is so easy to use that high-quality nail treatment will not be a problem even for beginners.
- All necessary operations are performed in 30–50 minutes. For a trimmed manicure, the master will need 1.5 hours.
Machine processing is often called the improved European method. Problems can only arise if the nails are in very poor condition. It will not be possible to bring them back to normal in one session.
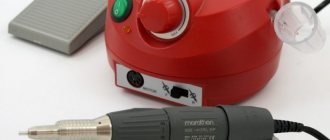
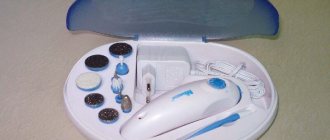
Rules for installing a nozzle in a manicure machine
Beginners very often do not know how to insert the attachment into the handle of a manicure device and how to remove it. To do everything correctly, you should read the instructions and find out what type of clamp your device is equipped with. There are three types of clamps: manual, automatic and semi-automatic:
- Manual clamp: after pressing the button on the body, you need to unscrew the washer and insert the attachment. Then press the button again and close the clamp.
- Semi-automatic clamping: turn the handle to open the collet clamp, insert the attachment and close the clamp.
- Automatic clamping: The cutter will lock into the clamp as soon as it is inserted into it. Everything is simple and clear, however, there is one caveat - the nozzle or plug must be in the device at all times. If the clip is left empty, it can only be opened by a professional repairman.
Distinctive features of hardware manicure.
- The first thing that distinguishes a hardware manicure from a classic one is that the skin near the nail plate is not cut off, but filed down using an attachment called a cutter. That is why hardware manicure is considered safe and fast.
- The second difference from the classic one is that all manipulations are performed on dry skin, i.e. the soaking stage is eliminated.
This means that you can easily save on baths, disposable bags, bath salts and of course water.
- The third and fundamental difference between hardware and classic manicure is the tool with which the master works. In a classic manicure, this is a set consisting of nippers, scissors and a pusher (special spatula), and in a hardware manicure, all these tools are replaced by one device called a milling cutter.
And such manipulations as removing old coating, manicure, and cuticle removal are performed using cutters. They are different, depending on their purpose, but let's talk about this in more detail.
How to choose a router for home hardware manicure?
- The power of the device must be at least 35 W. If you plan to do manicures not only for yourself, but also for clients, the optimal value will be 100 - 120 W.
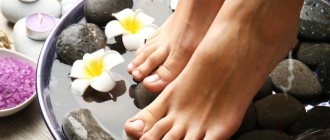
- Another important indicator is speed. For a hardware manicure at home, a cutter rotation speed of 20 thousand rpm will be sufficient, and a pedicure will require 35 - 40 thousand rpm.
- The device should not be too expensive, but you should avoid cheap models as their quality leaves much to be desired.
- A machine with reverse is preferable.
- It is important that the handle of the router has a collet clamp - it is the most convenient and reliable, and is also equipped with a cooling system.
Salon
When performed by a competent and qualified master, this type of manicure is completely non-traumatic. However, not all masters are fully familiar with the hardware manicure technique. The danger of illiterate handling of the device is that the nail can be easily damaged even in a short time. Therefore, you should be completely confident in your abilities before you begin to perform such processing yourself at home. Although devices for home use most often have much lower power and operating speed, so it is quite difficult to cause injury with them.
Not all masters have proper training, however, almost everyone uses the device in their work, combining it with other types of processing. For example, it is absolutely necessary at all stages of working with extended nails. During the actual extension, you can quickly cut down the nail plate with cutters; during correction, you can remove the lower layers of the old gel and form an arch; when removing, you can quickly file down the artificial nail. But the device is also actively used when working with natural plates on the hands and feet, for example, when polishing.
Most often in salons the device is used before a SPA session - manicure or design. The master has a large number of attachments (usually more than what you can afford at home), and therefore the possibilities for selecting them are much wider. But some clients may purchase their own set if they have reason to believe that the master’s cutters are not processed well enough. They must be sterilized in the same way as any other instruments and equipment.
A hardware manicure, if the technology for performing it has been followed, should be done a little less frequently than a classic and, especially, a European one. It is enough to conduct a session only twice a month. In this case, your nails will always look well-groomed and aesthetically pleasing.
[yandex2] [google2]
Description of cutters for hardware manicure
Diamond tips work best with thin cuticles; you can “trust” them with the most complex nails. However, the cost of such products is high. When performing hardware manicure at home, two cone-shaped diamond cutters of different diameters will be quite sufficient.
Diamond cutters
Ceramic cutters
Advice: ceramic nozzles are ideal for beginner craftswomen. They are considered the safest because they do not injure the skin and do not heat up during operation.
Pay attention to the markings of the cutters. For manicure, you usually need a tool with a red and blue line, which means low and medium abrasiveness, respectively.
Which attachments should I use for what?
| Type of cutter | Function | |
| Boron (ball) | Thins and gently removes the keratinized part of the cuticle, polishes the nail fold | |
| Flame | Treatment of the lateral sinuses | |
| Cone with rounded point | Cleaning the pterygium, making the side ridges smooth. | |
| Frustum | Sanding the skin adjacent to the nail plate | |
| Reverse cone | Forming the free edge of the nail during a French manicure | |
| Rounded cylinder | A universal tool. Lifts cuticles, cleans nails from pterygium, polishes, removes artificial coating. | |
| Needle | Deep cleaning of the lateral sinuses and sinuses | |
| Silicone polisher | Adding gloss to the nail plate and surrounding skin |
Step-by-step hardware manicure technique
The procedure is carried out in the following sequence:
- Remove previous covering.
- Degrease hands and treat with antiseptic agents.
- Apply softening oil to the cuticle and gently move it away using an orange stick.
- Adjust the shape of the nail and its width.
- Use a cone-shaped diamond tip to remove the stratum corneum from the side ridges and open the cuticle.
- Clean the plate from the pterygium using a truncated cone cutter.
- Remove the separated part of the cuticle using a ball-shaped nozzle with minimal rigidity.
- Remove excess nail length using a cylindrical cap. Leave at least 2 mm.
- Treat the nail plates with silicone or cotton polishing cutters. You can use felt tips. The main thing is that the surface does not heat up. To do this, the device must always move without stopping.
- Remove dust with a special brush.
- Wipe your nails with degreasing lotion.
- Apply decorative coating.
- Treat your hands with oil or suitable cream. Easy to massage.
The master adapts the care process to himself, as a result, some stages may change places. But the essence remains the same: the cuticle is processed, the stratum corneum is removed from the skin ridges, the nails are given the desired shape, the plates are polished.
How to properly do a hardware manicure at home
Attention: To treat your own nails, it will be enough to read the step-by-step description of the hardware method on the Internet and watch the corresponding video materials intended for training beginners. However, if you plan to serve clients, you should complete professional courses where they will tell you about the secrets and intricacies of this procedure.
Hardware manicure for beginners step by step
Apply disinfectant solution to your hands.
We give the free edge of the nail plate the desired shape with a file with an abrasiveness of 180 grit.
Before doing a hardware manicure, carefully push back the cuticle using a pusher or a wooden stick (the second method is more delicate).
We remove the pterygium and lift the cuticle using a cone-shaped cutter with a rounded tip.
Important: The nozzle must be positioned parallel to the nail plate so as not to accidentally make a cut.
We work in reverse. When moving the cutter to the right, move your hand to the left and vice versa. Correctly performing a manicure involves first treating one side of the nail on all ten fingers and only then, after switching the cutter, the other.
At the same time, we grind the side rollers.
Manicure for beginners at this stage is optimally done at 15 - 17 thousand rpm.
We thin the cuticle with a spherical bur, d 1.2 mm.
Important: Hold the cutter perpendicular to the nail plate. We move the ball only along the skin so as not to leave scratches. It is very important, when going through the sinus, not to change the position of the cutter, following the shape of the nail, otherwise you can snag and tear the cuticle skin. We guide the nozzle all the time in one direction, turning not it, but the finger.
We cut the cuticle with a round bur, d 3.0 mm, with fine abrasiveness. Here you need to move parallel to the nail, repeating the shape of the hole. We work at 17 thousand rpm.
Important: do not hold the ball at one point for more than 5 seconds. Even if the desired result was not achieved, it is necessary to move to another area to avoid overheating of the skin.
Using a rough grinder, we process the nail plate for a decorative coating. You can replace the cutter with a buff with the same abrasiveness.
Use a gray polisher to go over the skin adjacent to the nail. The rotation speed of the cutter should be no more than 7 thousand rpm. We work only with the tip of the polisher, making light pushing movements and moving along the cuticle growth zone.
Using oil with regenerating properties, we nourish the nails and, at the same time, remove sawdust from them. Remove excess with a napkin.
The main mistakes in performing a manicure
- Careless attitude towards the router and other working tools. Poor quality, poorly cleaned of sawdust, undisinfected attachments can lead to problems with nails and skin of the hands.
- High speed. While we are just undergoing training in hardware manicure, we cannot work at high speeds, this is fraught with injuries.
- Incorrectly selected cutters when removing pterygium. “Bullet” and “flame”, loved by many beginners, do not open the cuticle enough and also leave cuts on the nail.
- Working with a polisher. Do not hold the cutter in one place for more than 1 second or bring it close to the edge of the nail.
- Incorrectly selected abrasiveness. Nozzles with blue markings are suitable for coarse cuticles, while those with red markings are only suitable for thin or weakened cuticles.
- Continuous operation of the device. It is necessary to stop every 6 - 8 minutes to allow it to overheat.
- Cuticle remover oil should not be applied before the procedure, as its effectiveness will not increase, but will decrease.
Nails after a hardware manicure should be ideal in shape and retain their original appearance for a long time.
Selecting a nozzle depending on the material
To work with the skin around the nail, diamond tips with natural and artificial coating are most often used. They polish the surface carefully and efficiently. Thanks to the breadth of choice, it is easy to find the desired degree of abrasiveness and grain size. Models with a large diameter and medium hardness (mainly in the form of a bullet) are used when working on the first phalanges of the fingers, removing roughness on the side pads. Thin, delicate cutters are suitable for “spot” grinding in the area of the nail sinuses, completing the correction of errors. Fine-grained attachments work on thin, sensitive, aging skin.
Milling cutters made of sintered ceramics and silicon are also convenient for grinding. They are relatively inexpensive, quickly and safely remove keratinization and rough areas on the fingers, and are suitable for beginners and home use. Depending on the degree of abrasiveness, they are used for delicate areas or dense, hardened surfaces - including the toes.
Carbide cutters are suitable for removing very dense keratinization on the side ridges, and steel attachments (most often these are small balls) do a good job of removing rough skin around the nail plates. To complete the finishing process and make the leather smooth, use special polishing attachments.