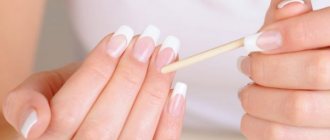
Gel polish under the cuticle is applied with a brush from the bottle, fluffing it or bringing it closer to the skin with pushing movements. You can also use a fine bristled tool. For a good result, a clean manicure is important, that is, cutting off the stratum corneum of the skin, clearing the sinuses, and removing dust. But you should handle your nails with care, otherwise injury, infection, unevenness and separation will occur.
The thickness of the gel polish and base, speed of work, hand position, and good lighting are important for deep coverage. Any streaks that have arisen are removed with an orange stick and a flat brush soaked in degreaser. If the coating has already dried, the defect is cleaned with a pusher or a hardware diamond nozzle.
Pros and cons of applying gel polish under the cuticle
When performing a manicure on their own, most girls and, of course, nail technicians tend to apply gel polish under the cuticle, since the method allows:
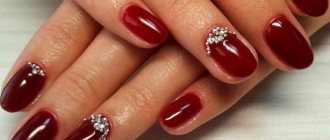
- give your nails a more attractive look, make them visually longer and more elegant;
- Wear the design longer and it will seem fresh for at least 2-2.5 weeks;
- your nails will look beautiful and neat when they grow noticeably;
- save time and money on manicure.
It also has disadvantages:
- difficulties in implementation; not everyone immediately masters the technique even after the training course;
- the likelihood of streaks appearing, which are then difficult to correct;
- the need to perform high-quality hygienic manicure, which not everyone can do, especially at home;
- the danger of damaging the nails in the matrix area and deteriorating their appearance, causing further disease;
- the sloppy appearance of the hands as they grow back plates, if the coating was done poorly.
Secrets of applying gel polish under the cuticle
In conclusion, I would like to draw your attention to some tricks that make it faster and easier to apply gel polish this way.
- The main thing in a beautiful and correct application of gel polish under the cuticle is a high-quality preliminary manicure and the removal of all irregularities and roughness in the area of both the cuticle itself and the side ridges. There should be no hangnails or cracks on the skin.
- To help the gel polish lie as close to the cuticle as possible, take an orange stick or pusher and first move it away. After applying the coating, the cuticle will “return to place” and cover the visible border of the gel polish.
- Try using different techniques to paint the nail plate under the cuticle if something doesn’t seem to work for you the first time. After all, you know that in manicure the ideal is achieved only by practice.
I hope these tips help you create your perfect finish!
How to protect your nails and skin when applying gel polish under the cuticle
Gel polish application under the cuticle should be performed with clean hands and nails, treated with tools and following the following precautions:
- for thin and brittle plates, it is better to use not a metal pusher, but a plastic one or an orange stick;
- perform sliding movements with the tool along the surface, rather than cutting into its depths;
- use the device only after a training course, or at least use the softest cutters possible;
- Before coating, apply protectors to the skin around the nails, which will prevent the gel polish from staining it;
- remove streaks before drying in the lamp;
- If the problem is discovered after polymerization, apply remover to the stain to soften the cuticle, then clean off the gel polish with a pusher.
And there is no need to strive to literally flood the flower garden under the skin. You should paint in such a way as not to feel pain or discomfort.
How to properly treat cuticles before gel polish
To properly treat the cuticle before gel polish, there are 2 ways:
- Hardware manicure.
First, lift the cuticle with a pusher and use it to clean the nail near the skin. You can do the same with a “short flame” router. Next, the cuticle is lifted and cut off with a cylindrical cutter. In some cases, it is better to use the classic “flame” with a red notch. - Manually.
The cuticle is pushed back with a pusher or an orange stick. Using the second tool, the pterygium is cleaned dry, working along the space of the nail near the skin. Then a remover is applied to the cuticle. It is kept for the required time, blotted with a napkin and once again cleaned with a pusher all the previously passed places.
The keratinized but soaked part of the cuticle is cut off with special scissors or nippers. Lightly go over the side rollers with a buff, removing small burrs.
Is this manicure harmful?
If all stages of the procedure are followed correctly and the nails and skin are handled carefully, a deep manicure is not dangerous. But if you put too much pressure on the plates and try to cut off as much “extra” as possible, problems may occur:
- wounds on the skin that can become infected;
- damage to the growth layer of the nail, after which the plate becomes uneven, layered, brittle, or begins to move away from the bed (this is onycholysis).
After the coating has dried and when you continue to wear the manicure, you should take care of your skin. Emollient oils and creams are applied to the cuticle daily.
Training on how to create a manicure and apply gel polish through video tutorials
Visual perception plays a very important role in our daily lives, helping in learning and making it possible to convey important information quickly and clearly. First we look, then we process what we see and in a matter of minutes we understand what needs to be done.
In the modern world, most women perceive visual information much better than huge canvases with many letters. Therefore, I suggest you watch a few video tutorials on how to create a manicure with gel polish . I tried to make for you a selection of the most useful video materials, which at one time helped me a lot in becoming a professional in the field of creating gel polish manicure.
Videos for beginners
Video tutorial No. 1 “Full review: starter kit for gel polish. Part 1"
Video tutorial No. 2 “Full review: starter kit for gel polish. Part 2"
Video lesson No. 3 “Removing the old coating and making a new one”
Video tutorial No. 4 “Gel polish manicure at home with a detailed discussion of all sorts of subtleties”
Video tutorial No. 5 “How to apply/remove gel polish”
Video master class from professional cosmetologists
Video No. 1 “Step-by-step instructions for applying gel polish”
Video No. 2 “Three effective ways to remove gel polish”
Video No. 3 “Removing gel polish with a cutter + hardware manicure. Part 1"
Video No. 4 “Complicated repair, extension and straightening of nails. Part 2"
Video No. 5 “Gel polish correction. Combined manicure for beginners with one cutter. Part 1"
Video No. 6 “Applying gel polish under the cuticle: leveling + strengthening + highlights. Part 2"
How to apply gel polish under the cuticle: step-by-step technology
The step-by-step technology for applying gel polish under the cuticle is as follows:
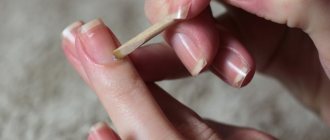
- After drying the base, the peel is pushed back again with an orange stick.
- Then you need to position the light correctly so that it falls on the space under the cuticle.
- The finger is positioned so that the free edge of the nail is below the base.
- Apply a minimum of varnish to the brush and place it on the plate close to the cuticle.
- Then you need to go down 1-2 mm.
- Using pushing movements of the brush, the material is sent closer to the cuticle and under it.
- The tool is led down to the end.
- Then they return to the base of the nail, but place the brush slightly diagonally, fluff the pile with pressure on the surface, and paint the next strip along the side roller.
- The same is done on the other side of the plate.
- Then add more material to the brush and paint the nail to create a dense shade using long strokes from the base down.
- After drying, cover with a second layer of flower bed following the same steps as the first.
To apply gel polish evenly at the cuticle, you should use your finger to pull the skin away from the nail at stages 6, 8 and 9.
Working with a separate brush
To simplify the process, you can use a thin “hair” brush designed for making drawings:
- First, a flower bed is applied along the center line and side ridges with a tool from a bottle. This is done as close to the cuticle as possible.
- Apply gel polish onto a hair brush so that part of the bristles near the applicator remains clean.
- Pull the cuticle away from the nail with your finger and use short strokes to paint the remaining light stripe on the base and at the side ridges.
- Then use a brush from the bottle to coat the surface again.
- After drying, a second layer of the flower bed is applied, but without using the “hair”.
You should work with a thin brush in literally dotted strokes. Otherwise, instead of covering, she will make bald spots, pushing the already applied flower bed away from the surface.
The first thing you can do is paint the space under the cuticle with a thin brush and dry this layer. And only then apply the flower garden to the rest of the nail with a regular tool from the bottle.
Tactile method of subcuticular application
Subcuticular application of gel polish is possible in another way:
- Most of the material is removed from the bottle brush by wiping it on the edges of the container.
- The instrument is placed 2-3 mm from the cuticle, slightly moved down, then pushed up as far as possible.
- The nail is painted in the center to the end and sealed.
- Turning the pile slightly, apply gel polish to the sides of the plate.
- Wring out the brush again.
- The skin is pulled away from the nail and held.
- Place the brush with the edge of the bristles towards the sinus and fluff it up strongly.
- The lateral villi move along the cuticle, painting the space.
- Using the same sides of the brush, apply the product close to the side rollers, also alternately pulling the skin away from the plate.
- Then another layer of gel polish is applied over the wet one and dried.
The second time they paint without fluffing the brush.
Watch the video on how to properly apply gel polish under the cuticle:
Secrets of applying close to the cuticle
Good masters know the secrets of applying close to the cuticle, which can also help when doing a manicure yourself:
- High-quality nail preparation is necessary. The excess part of the cuticle should be trimmed evenly, and the pterygium should be thoroughly cleaned. If tiny fragments of skin remain on the plate, streaking is inevitable.
- When doing a trim manicure, you should cut the cuticle with a continuous strip, not in pieces. Only in this way will the remaining part be smooth, and therefore the border of the gel polish will be neat. But for this you need to have good scissors or nippers and work with them correctly.
- Move back the cuticle after drying the base, before the first application of the flower bed. This is done using an orange stick on each finger immediately before using the material, and not on all of them at once.
- Set the light correctly. Its source should be located below the master’s face, and the radiation should fall on the area under the cuticle, but not on top of it.
- Choose high-quality bases, gel polishes and tops. They usually have a thick consistency, spread less, and it is easier to avoid coating defects.
- Even when performing a manicure yourself, keep the hand on which it is being done with your fingertips pointing down. This will prevent the varnish from spontaneously spreading onto the cuticle.
- Have support for the arm in which the brush is located, even when applying the coating to yourself. It is better to place your elbow on the table. And rest your little finger on the palm of your other hand or on a stand.
Gel polish under the cuticle: pros and cons
We all remember the main and unshakable rule of manicure - when applying gel polish, you must retreat 1 mm from the cuticle area. This requirement can be explained by hygienic aspects - the cuticle zone protects the nail from harmful bacteria, and a small area of the unpainted nail, just that millimeter, guarantees that oxygen will flow to the plate, albeit in a minimal amount.
Photo from the site: taginstant.com
The second aspect of why when painting nails you need to make a minimum distance from the cuticle is aesthetic. When applying gel polishes, even by a professional master, there is always a risk of the varnish flowing onto the cuticle and staining it. Such a manicure will look sloppy, and the shelf life of such a manicure is significantly reduced due to peeling in the area of contact with the cuticle. Why does gel polish peel off at the cuticle? Yes, because the cuticle and the pterygium located near it prevent good adhesion to the nail plate.
Meanwhile, the technique of applying gel polish under the cuticle exists, and even professional artists use it. Why? Let's look at the advantages of this technique:
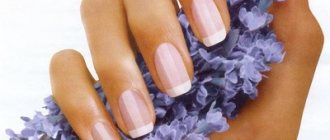
- Long wearing period. Nails painted under the cuticle will look as if you had recently visited a specialist for almost two weeks. The thing is that the gel polish is applied deep under the cuticle itself, which is why in the first week of such a manicure the effect is created that already colored plates are growing from under the cuticle. In the second, the gel polish is very tightly located at the very base of the cuticle, and only in the 3rd week can you see the usual picture with a standard one-millimeter indentation from the cuticle. In other words, a manicure created using this technology will last instead of the standard 3 weeks, 5, or even 6 weeks!
- Economical. This point smoothly follows from the first one - the longer you can wear a manicure, the less often you will have to make corrections, and, accordingly, resort to lower costs.
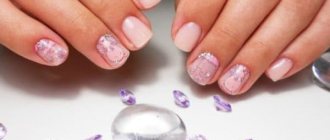
- Aesthetics. In the first weeks, a manicure under the cuticle looks seamless, without sloppy gaps that form as it grows.
Photo from the site: divanail.ru
These three points alone are enough to make you want to make a similar option. But remember - all these advantages are possible only if you or your master knows how to apply gel polish under the cuticle. Otherwise, significant disadvantages cannot be avoided:
- Uneven line at the base. It’s not enough to “drive” the gel polish under the cuticle; you need to be able to do it carefully, forming a beautiful curve, which, when grown, will look the same as neatly painted nails with gel polish at the cuticle at a standard distance of 1 mm. If the line at the base is torn and spread, then such a manicure will last only two instead of the prescribed 5-6 weeks. Those. it will have to be removed as soon as an uneven border appears.
- Decorative coating coming off. When applying gel polish under the cuticle, it is very important to remove all the pterygium located under the cuticle, which is quite problematic. If you neglect this requirement, then the manicure will not last even a week. As the pterygium grows, the gel polish will move away from the nail, and water entering under the voids will intensify the peeling process. As a result, either part or all of the decorative coating is lost.
- Sloppy look. How not to stain the cuticle with gel polish and at the same time do deep coloring is not an easy task, which definitely requires skill and perseverance. If the gel polish does leak onto the cuticle, it will definitely stain it with pigment, which will neutralize the entire effect of the manicure. Another point is that overgrown nails lose their attractive shape. Untreated corners and edges of the plates, as they grow back, “gape” with their lack of painting. And the natural slope of the nails in one direction or another will look sloppy in just three weeks.
On a note
To avoid the risk of cuticle staining, take care of a special protective agent for it in advance. Apply it in a thin layer to the cuticle, let it dry and start coloring. After you complete all the decorative work, it is enough to remove from the cuticle the thin strip formed by the protective agent, along with the remnants of the gel polish adhering to it.
- Expensive. It’s a paradox, but saving on correction, you will have to fork out for the technique of painting nails under the cuticle, which costs 10 - 20% more.
- Damage to the plates. The most terrible consequence. In case of inept manicure or excessive cleansing of the nail root from the pterygium, damage to the proximal zone of the nail and matrix is possible, which entails separation of the plates from the bed and the risk of infection.
But don’t be so scared of side effects; if you follow the technology and hygiene requirements, you can easily avoid these troubles.
Trim manicure when painting nails under the cuticle with gel polish
With a trim manicure, painting nails under the cuticle with gel polish turns out to be of better quality if you follow the procedure correctly:
- First, shape your nails using a nail file. You should not file them after soaking; this will lead to delamination and weakening of the plates.
- Place your fingertips in a bath of warm water so that your nails and cuticles are completely submerged. After a few minutes, take your hand out and blot it with a napkin.
- The previous stage can be replaced by using a remover. It is applied to the cuticle and side ridges, left for the time specified in the instructions and washed with a napkin.
- Push back and lift the cuticle with an orange stick or silicone “hoof”. They also need to clean the pterygium from the surfaces using movements without strong pressure on the plate.
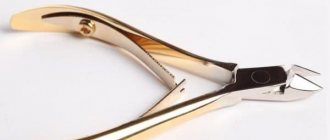
- It is necessary to remove the cuticle before applying gel polish using scissors or nippers designed for this purpose. If possible, it is worth pulling it up during the process so that the removed part is not pressed against the plate again.
- When all the plates have been processed, wash your hands and dry with a towel. Nails and the skin around them are treated with an antiseptic.
- The surfaces of the plates are polished with a soft buff to remove roughness. Then they are wiped with a degreaser, and the base can be applied.
How to paint nails under the cuticle with gel polish with an unedged manicure
Before painting your nails under the cuticle with gel polish, some people perform an unedged or European manicure:
- The peel is peeled back with an orange stick to reveal the “pockets.”
- The shape of the nails is corrected with a file with an abrasiveness of 180 grit, and the length is adjusted if desired.
- The side rollers are ground with the same tool.
- It is necessary to lightly walk over the surface of the plate, especially if the old coating was cut off from it.
- The file is placed edgewise and the sinuses are cleared, removing the pterygium.
- Then you need to take a ceramic file or euro-pumice and use it to process the side pockets of the nail with its edge.
- Use the flat surface of the tool to polish the cuticle.
- When it lifts, use the edge of a ceramic file to remove the layer of rough skin.
- Remove sawdust using a cloth moistened with a degreaser.
- The skin around the nail is treated with the soft side of the buff to get rid of hangnails.
- Once all the plates are finished, they are wiped down again with a degreaser, and you can proceed with the coating as usual.
This method of performing manicure is good for dry and thin cuticles, practically absent. At stage 8, you can use the orange stick again if the skin has not lifted well as a result of the previous action.
Why does gel polish run under the cuticle?
Gel polish flows under the cuticle for several reasons:
- The manicure was done poorly, the cut was uneven. The remaining skin particles may be difficult to see, but are revealed when a flower bed comes into contact with them.
- Primer applied too much or poorly dried. Or there is a lot of base on the nail, it lies incorrectly, “humped”, which contributes to the flow of the flower bed.
- An excessive amount of gel polish was taken. It may end up not only on the rear cushion, but also on the side ones.
- The hand on which the coating is being performed is lying incorrectly. If it is on a flat surface, or your fingers are raised up, the gel polish will inevitably stain the skin at the base of the nails.
- Incorrect hand position in the lamp. You should not lift your fingers up even a little bit, as undried gel polish may partially flow down to the cuticle.
- The base is poorly applied. The clear product is difficult to detect on the skin until it dries. But if the base is there, the gel polish will also flow.
- The flower bed has a liquid texture. Such funds spread even in small quantities.
- The work of the master is too slow. In this case, even thick products will move from the plate to the skin.
How to apply gel polish under the cuticle? Let's disassemble the equipment
How to apply gel polish under the cuticle? First, you should detail the essence of the issue. Application under the cuticle is possible only with an unedged version of the manicure, when the cuticle only moves towards the base. With the trimmed version of the manicure, the cuticle is cut off as much as possible, and in this case they are already talking about how to paint gel polish close to the cuticle, because in the latter case, the cut cuticle, as it grows, grows onto the painted base of the nail, hiding it with its body. Accordingly, with the latter option, the work is greatly simplified and the risk of cuticle staining is reduced. But, in any case, the gel polish will end up under the cuticle.
Photo from the site: nails.saracentre.ru
Now let’s talk in detail about how to paint your nails with gel polish under the cuticle. Please note the following important points.
- The main and unshakable rule is carefully prepared nail plates. No roughness, unevenness or other annoying little things that can ruin the whole impression of a manicure. Requires careful sanding using a buff.
- Hygienic manicure is done only using the dry method. Those. no softening baths or gels. The ideal option is to work with a cutter. With its help, the dead layer of cuticle is cut off and the ptergy is cleaned. A wet cuticle will not allow gel polish to adhere well.
On a note
If you prefer to remove cuticles using a wet method, then perform a manicure in advance, or use a little trick - dry your nails with a stream of warm air from a hairdryer.
- Careful polishing of the nail plate and removal of pterygium even under the cuticle is necessary. To do this, move it as far as possible to the base of the nail.
There are only three rules, but they are the ones that will allow you to create a high-quality manicure for the cuticle. There are many techniques for performing such a variation of coloring; let’s look at some of them.
- Method 1. In order to paint the nail as close to the cuticle as possible, you need to push the cuticle very deeply to the base of the nail. When painting each finger, slightly stretch the skin from the base of the nail and from the side ridges. Then carefully, using an almost dry brush, paint the area adjacent to the cuticle, moving from the central part to the base. After drying in the lamp, they will repeat, but this time it is necessary to apply a drop of varnish to the top of the brush. After the contour is outlined, you can paint the entire nail plate more freely, without fear of pigment getting on the cuticle.
Photo from the site: progellak.ru
- Method 2. Again, you need to move the cuticle as far as possible to the base of the nail and fix it with your fingers. The area near the cuticle should be painted with a brush at an angle of 45 degrees. The brush should be almost dry. After fixing the two layers, a decision is made on the need to apply additional pigment.
Photo from the site: 1001notes.ru
- Method 3. Using a thin brush, you need to paint the area near the cuticle. Then, after drying it in the lamp, continue to apply the coating according to the usual scheme. If dexterity allows and the varnish does not spread, then you can not pre-dry the first line, but simply immediately apply gel polish to the entire surface. Another variation of this method: apply the coating according to the usual pattern, indenting from the cuticle. Then, when the nail plate is completely painted, you need to push the cuticle as far as possible and paint the deep areas adjacent to the cuticle.
Photo from website: ok.ru
The best way to describe the procedure for applying gel polish under the cuticle is in a video. But more on that below.
Shellac under the cuticle: how to paint using the technique so that it doesn’t smear
You should apply shellac under the cuticle to prevent it from running, using the same technique as with gel polish, that is, this is your choice:
- A “native” brush from a flower garden, with which the product is applied first in the center, then along the side rollers. At the same time, the cuticle is pulled up, and the pile of the instrument is pushed towards it with small movements.
- Fan technique, in which the brush is fluffed. Staining under the skin is carried out with the edge of the pile, and the cuticle itself is strongly pulled away from the nail.
- Use a thin brush for the most difficult operations. You can first paint the main part of the nail with the tool from the bottle. Only then take a “hair” and apply the material close to the cuticle. Or you can also use it first and dry this gel polish track in a lamp. Then the nail is painted completely.
It must be taken into account that the texture of shellacs is usually more liquid than that of gel polishes. Therefore, beginners should use the latter method, although the choice, of course, depends on personal preference. And be sure to dry each nail separately in a lamp, and not cover everything and only then polymerize it.
Gel polish flows onto the cuticle: what to do
If the gel polish flows onto the cuticle, you need to do the following:
- Take an orange stick, a flat or thin brush, and a toothpick, dip them in degreaser and wipe off the stain. The choice of tool depends on the size and location of the problem.
- If the previous option does not help, it is better to erase the coating completely and then reapply. For the procedure you will need a lint-free cloth and a degreaser.
- If a streak appears after polymerization, you can try to remove it with a pusher and an orange stick. Sometimes cuticle nippers or scissors help. But you can’t use them often; the tools quickly become dull.
- You can cut out the streak with a hardware attachment. Use a diamond cutter with a thin tip.
- If the side rollers are stained with gel polish, the polymerized product is removed with a file with an abrasiveness of 180 grit. Then you need to go over the skin with a soft buff.
Painting under the cuticle with gel polish is not easy for those who have taken courses. But with experience and the use of different techniques, choosing the appropriate one, this skill comes. And if errors occur, there are many ways to eliminate them. The main thing to do is to perform a good hygienic manicure.