The appearance and condition of the manicure is the calling card of the fair sex. Therefore, it is important to pay attention not only to the skin, but also to the nails, in particular. Some people prefer to visit a specialist who will do a professional manicure, while others take care of their nails on their own. It’s easy to apply a beautiful design on your nails at home, but read our publication to learn how to do it.
How to learn to paint on nails at home
To learn how to make beautiful designs on your nails yourself, it is not at all necessary to purchase devices and tools like your master. Most of them can be replaced at first with available household items. When the drawings begin to work out, and you enjoy the created masterpiece, then it will be advisable to purchase a professional tool.
To try drawing a picture, arm yourself with:
- thin brush;
- toothpick;
- orange stick for manicure;
- sponge;
- sponge.
Start creating the design with the base coat of the nail plate. Take any desired shade of varnish as a base and apply carefully in 2 layers. Then start with the simplest patterns, for example, make curls with a thin brush or put dots, connecting them together with a thin line. Do not limit yourself, the drawing depends entirely on your imagination. Try not to clutter the nail. Over time, you will skillfully arrange simple elements together, creating complex drawings.
How to learn to paint on nails with gel polish
To perform simple designs with gel polish on nails, you will need the same ordinary things as for drawings with regular varnish.
Also prepare:
- gel polishes of different shades;
- basic framework;
- final base;
- drying lamp;
- gel polish solvent.
Mastering drawings at home with gel polishes should start with simple lines, zigzags and dots. The end result will look neater if you combine contrasting shades. At first, apply the drawings only to a few fingers, for example, the ring and index fingers. Then, as you polish your skills, move on to complex compositions.
It’s easy to make dotted patterns with gel polish at home:
- Paint only 2 nails on one hand with one color, and cover the rest with a contrasting shade.
- Dry the coating under the lamp.
- On the selected nails, make dots of different sizes with a brush or dot (manicure tool).
- Dry.
- Apply a final coat.
- Dry.
Features of a beautiful manicure with butterflies
Just as nature creates many types of butterflies, you can experiment endlessly in design. The theme of fairy forests and butterflies is popular among leading high fashion houses . The silhouettes of these light creatures decorate not only clothes, but also shoes, handbags, and appear on accessories.
Famous jewelry brands are also keeping up and encrusting golden butterflies with diamonds. So a manicure with a subtle image of multi-colored wings is always a couture design . I am an artist, as I see it, there is no taboo in the color scheme for such a design. Just as a photographic likeness is not required, the design of the wings can be depicted stylistically.
Remember your favorite bright colors and paint . Ladies of an elegant age choose a design on a transparent background. The design looks appropriate at any length. The image should have one noticeable detail that attracts attention. So let it be a manicure with a butterfly pattern.
How to learn to draw monograms on nails step by step
Before you start drawing monograms on your nails, you will need to choose a comfortable brush. It is important to consider the width and length of the brush bristles. The bristles on the brush should not bristle and the hairs should be collected.
- Dip the brush into varnish or gel and pick up a small amount of material. Over time, you will learn to control the amount of varnish for a specific task.
- First of all, learn to draw lines in different directions. To do this, place a dot on the nail plate, then draw a line in the desired direction, slowly lifting the brush.
- With each subsequent monogram, add a new portion of varnish to the brush. Continue composing the drawing by placing dots and drawing back the brush.
Choice of shape and color
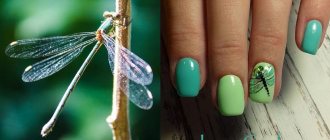
Butterflies and dragonflies look great on both long and short nails. They do not saturate the manicure with details, but on the contrary, they introduce elements of lightness, airiness, and tenderness. The shape of the nail plate can be any: oval, rectangular with sharp or rounded edges. A design in the form of butterflies or dragonflies will add elegance to both extended and natural nails.
As for the color scheme , classic tones and delicate pastel shades are recommended for everyday options. The optimal butterfly pattern can be selected for the base coat of absolutely any color. Avoid sharp contrasts, do not get carried away with shiny elements. But for the evening, feel free to choose a brighter design. Bright colors, sparkles, and rhinestones would be appropriate here - the possibilities are limited only by your imagination and the talent of the craftsman.
Which material to choose - gel or varnish? Gel coatings for extensions and designs will provide a more durable dragonfly design on your nails. This option is optimal for everyday designs or for going on vacation. If you need an unusual design for one day - for example, to show off at your spouse’s birthday or a festive corporate party, give preference to varnishes.
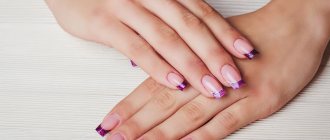
How to learn to draw French on nails
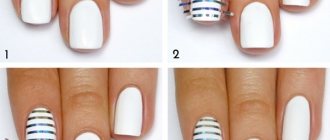
When painting French nails at home, start with a layer of base color in a soft pink shade. Let it dry.
Once the base shade has dried well, you can proceed to the next steps. There are several ways to apply white varnish to the tip of a nail; we will describe simple and affordable options, which will include available means.
Option 1.
This method involves using a native white thick varnish brush. Start from the corner of the nail, draw a smile with a smooth movement, while focusing on the little finger of your working hand (turn the finger if necessary). This way, the brush will not slip, and you will get the perfect French coat as a result.
Option 2.
Stencils that can be purchased in the store are convenient for creating French and stickers. The main secret to using a stencil is a perfectly dry base layer, otherwise part of the manicure will go away along with the stencil. Glue the stencil, making sure it fits snugly. Then apply white varnish and remove the stencil.
Option 3.
An excellent replacement for a stencil can be considered an ordinary patch, the tip of which has a rounded shape. Glue the patch to the dried base layer, apply white thick varnish, remove the patch, cover the nail plate with top coat.
Butterflies fluttering in nail art
Charming, sensual, feminine... Compliments that many girls want to hear addressed to them. To look like a fragile lady in the eyes of men, sometimes it is not enough to have only an ideal character. It is very important to be able to emphasize it by dressing it in a gentle, touching image. Smooth hair, silky skin and properly chosen nail design are essential components of female beauty. An elegant manicure can fully reflect the inner world of its owner. For sensual people, one of the most successful nail art designs is butterflies on the nails.
- Technique for drawing butterflies on nails
- Nail art ideas with butterfly
To complete a spectacular design, you will need a little patience and perseverance, but believe me, the result will pleasantly surprise you. Video tutorials will help you create drawings quickly and easily, and a colorful photo gallery will inspire you to new experiments. Over time, with experience, you will be able to decorate your nails with butterflies without much effort.
Technique for drawing butterflies on nails
Before you begin the artistic process, decide what paints you will use to paint your designs. These can be regular nail polishes or gel formulations. Prepare all the necessary tools in advance. You will need:
- A flat brush with a beveled or straight edge.
- Dots for nails.
- Short hair brush.
Using one design as an example, we will tell and show you how to make an elegant manicure: a butterfly on your nails will look very gentle and airy. Nail art is not complicated and is performed with elements of Chinese painting techniques. Before drawing pictures, be sure to treat your nails by doing, for example, a classic or European manicure.
Step one
Butterfly nail art is performed in several stages and, like any design, begins with applying a base coat. For a delicate manicure, it is better to use soft muted shades of beige, blue or pink. When the base is dry, you can start drawing the butterfly. Apply two colors to the palette, for example, white and blue. Use one corner of a flat brush to grab the first shade, and the other corner to grab the second shade. There will be two colors at the tip. Draw butterfly wings on your nails as shown in the photo.
Step two
The next step is to frame the picture. Dip a thin brush in black and outline the wings. Next, you need to draw thin veins inside to make the butterflies on your nails look more realistic. In the photo you can see what kind of picture you should get.
Step three
For the next element you will need dots. Black dots are drawn along the wings, imitating the body of a butterfly. To make the design brighter, you can apply small white polka dots along the contour, as shown in the photo. Black mustaches are painted on with a thin brush.
Step four
Finally, you can decorate your nails with rhinestones or glitter. This will make the drawings brighter and more noticeable. To make the butterflies on your nails last longer, be sure to cover them with a top coat of varnish. To consolidate your knowledge, we invite you to watch a short video from a foreign beauty blogger who brings her idea to life using a tip.
Nail art ideas with butterfly
What effect do you want from your manicure? If your goal is to give the image a gentle, tremulous note, pay attention to the color palette. The base should not be bright or dark. Give preference to light shades, in which patterns with butterflies look especially elegant. Girls who love classics can combine a beautiful design with a French jacket. If you prefer a brighter nail art, try painting butterflies on your nails with a rich, solid color finish. To focus attention on the picture, make the outline contrasting and clear. There are a lot of interesting options, so we invite you to get ideas for creativity from the photo gallery that we have prepared for you.
If the world of nail art is no longer new to you, and you are confident in your abilities, try to implement more complex compositions. An example of a very labor-intensive, but elegant design in all respects can be seen in the final video tutorial. Let the butterflies give you a great mood, unprecedented lightness and new sensations !
How to learn to draw flowers on nails step by step
- Apply the base color to your nails.
- Dip the brush in the varnish and paint the stems.
- Place a small drop at the base of the stems and draw thin lines from it.
- Dry.
- Draw the petals by placing the flower buds in the tendrils drawn in the previous step.
- At the base of the buds, apply a drop of a color more saturated than the base of the bud, then use a brush to stretch the drop, making a smooth transition between shades.
- Dry.
- In the center of the bud, place a drop of a rich shade to match the tone of the buds, stretch it, simulating the petals.
- Dry.
- Draw the outline of the sepals and stems. Dry. Apply topcoat.
How to learn to draw thin lines on your nails
To draw thin lines on your own, first of all, you need to learn how to correctly apply the material to the brush. You can use any flat surface, such as foil, as a palette for work.
- Saturate the working brush completely with varnish.
- Drag the brush across the palette. This will remove excess varnish from the brush and create a thin tip.
- On a piece of paper, practice drawing thin lines in different directions. Try to paint only with the tip of the brush. If you need a thicker line, then press the brush a little onto the surface and then draw it out.
- Practice drawing different shapes and waves.
- After practicing on a sheet, try to consolidate your skills on a tip with a sanded surface by making some simple drawing, and only then start drawing on your nails.
How to learn to paint on nails with acrylic paints
Acrylic paints are simple and easy to use, which is their advantage over other materials. They are also easy to dilute with water and mix with each other, creating unique shades. Acrylic is safe because it does not contain toxic substances. This material is great for beginners; it can be easily washed off and dried quickly.
You should start painting from the base, drying layer by layer. Then proceed to the contours of the future drawing. For drawings, beginners are advised to use the smallest brush size. There is an unspoken rule for beginners - the fewer elements in the drawing, the neater it looks.
As a rule, nail service specialists have their own secret tools for applying acrylic patterns. At home, you can also use improvised means, such as toothpicks, thin needles, cotton swabs and anything else that will allow you to draw elements of various sizes.
Simple and interesting designs are obtained by mixing different shades directly on the nail plate. To do this, place multi-colored dots and connect them with curls using a toothpick or a needle.
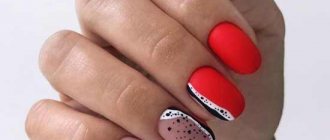
Design for a special occasion
Butterflies on nails can transform any fingers. A huge number of different options will appeal to teenagers and girls. Here everything depends only on your imagination. Nail designs with butterflies can be anything!
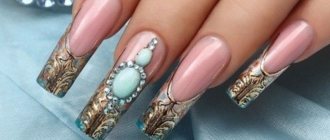
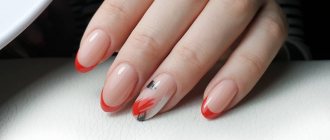
French with butterflies
French manicure is a true classic that most girls like. French with butterflies is a great idea to dilute the classic material. It is these graceful moths that will add more sophistication to your look. The classic smile and delicate underlay go perfectly with the delicate wings.
If you want to make the wings stand out from the overall composition, try making a edging from gold casting foil or sprinkling them with small sparkles.
What you will need for the design:
- base;
- white gel polish;
- beige or nude gel polish;
- thin brush;
- black gel polish;
- foil for casting;
- translucent or colored rhinestones;
- toothpick or orange stick;
- top
How to do a manicure with butterflies:
- Apply one coat of base coat to prepared nails.
- Dry everything thoroughly in a lamp.
- Coat your nails with beige varnish in 2 layers and dry everything well in a lamp.
- Carefully draw a white smile line with a thin brush or use special stencils.
- You don’t have to decorate one nail, but draw a beautiful butterfly on it.
- Using a thin brush, you first need to paint one half of the wing, then the other.
- Remove the antennae and dry the layer in a lamp.
- Print foil for casting onto the undried layer.
- Place rhinestones all over the butterfly silhouette.
- Use a glossy top coat to secure all the rhinestones on your nails.
- Rhinestone butterflies on nails are ready.
Any manicure with butterflies in the photo looks very feminine and elegant.
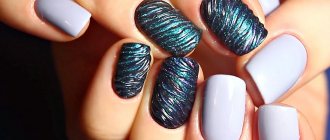
Butterfly with broken glass
This master class on how to create a butterfly with broken glass will appeal to many princesses who love everything iridescent. The unusual texture of broken glass foil gives a special shimmer to your nails. If you look at the design from different light angles, it may seem like a moth is fluttering.
What you will need for the design:
- base;
- neutral gel polish;
- white gel paste;
- thin brush;
- foil for broken glass;
- nail scissors;
- tweezers or orange stick;
- top
How to make butterflies on your nails:
- Apply any colored base coat to treated nails that are already coated with base. Neutral shades work best. But it is also recommended to use dark ones.
- Use scissors to cut the foil into any pieces. These can be oblong stripes, diamonds, triangles, circles or chaotic particles.
- Use a thin brush to mark where the butterfly's wings will be approximately.
- Carefully fill the entire space with shards of broken glass using a toothpick, tweezers or an orange stick.
- Using a thin brush, draw the outline of the butterfly.
- Draw the mustache.
- Apply a finishing topcoat to the design.
If some parts of the “shards” stick out from under the manicure, they can be slightly buffed.
Video instruction
How to draw butterflies on nails correctly? Another original idea can be seen in the video.
How to learn to draw roses on your nails
- Apply the base shade of varnish in two layers. Dry.
- Draw a swirl that resembles the shape of a rosebud.
- Then draw the petals. The further the petals are from the bud, the larger they should be.
- Use a shade darker than the base to paint only half the middle of the petals. Cover with top coat.
Butterfly on nails step by step
Apply a little varnish of two different shades to the palette with a brush. Using a brush, pick up a darker shade and place dots that will serve as a guide. First place a dot in the place where the butterfly's body will be, then place dots for the tips of the wings.
Connect the dots with thin lines.
Paint the top edge of the wings, and then make thin strokes towards the center.
Using a different shade of varnish, place a dot in the center of the wing near the body, and use strokes to draw the color onto the wing.
If desired, apply glitter polish to the tips of the wings.
Use black varnish to outline the wings and body, add antennae, and cover with topcoat.
Butterfly nail design
We all love photographing and drawing butterflies. Their charming wings are painted in the most unexpected color combinations. And their shape is so diverse that from a distance these variegated petals resemble bright exotic inflorescences. But such beauty can be transferred to your nails, which will make them simply exquisite.
Making such a drawing is not as difficult as it seems. You will need colored varnishes and dots
When trying to depict these insects, it is important to maintain their basic proportions. For example, the upper wings are always larger than the lower wings. Before you start drawing a butterfly, you need to outline its contours. Of course, there are no particular difficulties in its form, but if you are not a very skilled artist, you can first practice on a piece of paper - so to speak, get better at it. So, we begin to draw with an image of the moth’s body - a line of two thickenings (in the thoracic and abdominal sections). In its upper part we draw a small oval - the head of an insect, from which antennae extend. Further from the chest area, draw diagonal soft lines upward to the sides. The end of this diagonal will indicate the height of the upper wings. Oval lines are drawn down towards the butterfly's body, which will outline the upper pair of wings. The lower wings need to be made slightly smaller. The shape of the wings is chosen according to the artist's taste. But usually the upper wings are usually drawn a little pointed, and the lower wings more rounded. True, the butterfly nail design does not provide for any dogmas. Any color combination and any background shade are suitable for coloring the wings. And it is not necessary to adhere to a pattern that exists in nature, because, firstly, this is a fantasy drawing that allows the imagination of the creator to fly, and secondly, there are such a huge number of butterflies that few people can confidently say that the pattern you depicted is in real life does not exist. But the background can generally be made multi-colored, although a plain one will look better under a colorful moth. Butterflies on a jacket turn out beautiful. For less confident artists, there are special stencils and even ready-made flat and voluminous stickers for manicure in the shape of butterflies.
On topic: DIY necklace