The image of a modern lady should be perfect: from the tips of her hair to the tips of her nails. That’s why it’s so important to follow fashion trends in hairstyles and manicure. The nails of a well-groomed girl should look neat and stylish. At the same time, you don’t have to do a discreet manicure; you can experiment with the design. Thanks to modern tools, you can create real masterpieces on your nails. A trendy way to draw attention to your hands is with a gradient manicure.
Gradient in light colors
Types of gradient manicure
A gradient is a nail design that uses several shades of polish that smoothly flow from one to another. It looks impressive on paper, but even more impressive on nails.
Types of coating using gradient technique
There are several types of gradient manicure.
Their choice largely depends on the shape of the nails and their length:
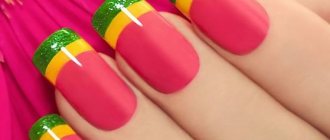
- Vertical is a traditional gradient option. It can be called universal, as it suits all nails. With a vertical manicure, the transition of shades occurs from the root part of the nail to the tip. A video tutorial on gradient gel polish on short nails can be seen below.
- Horizontal. The color changes from the left side of the nail to the right. More suitable for medium-length nails. This manicure can visually lengthen your nails.
- French. White is applied to the edges of the nails and made more transparent closer to the roots. This type of manicure is suitable exclusively for girls with graceful fingers and long and thin nails.
- Gradient with transition. Fingernails are painted with different gel polishes, close to each other in tone. This creates an overall picture of the transition from dark colors to lighter ones. This option is the simplest and is suitable for short nails.
- Linear. Thin lines, straight or curved, are drawn on the nails. Each new line is made a tone darker than the previous one.
Vertical gradient
For a gradient, both tones of the same color and completely different colors are used. Usually they take from 2 to 4 colors.
A manicure with a color transition can be done with regular varnishes, but everything will have to be done very quickly, before the varnish has time to dry. It is much more convenient to create a gradient on your nails with gel polish. This material does not dry in the air, and besides, such a manicure will last much longer than a traditional one.
Horizontal Gradient
Manicure technique using a sponge
Simple gradient manicure technique
- First you need to do a regular manicure , treating the nail plates and cuticles.
- Next, apply the base varnish and dry it.
- Apply one of the selected varnishes to the nail plate ; usually the lightest shade of varnish is selected for this layer. The layer should not be thick, but dense enough. We wait until the varnish dries.
- Apply the second varnish to the sponge in two stripes. This is done in such a way that one part of the sponge is densely covered with color, and the second - not so intensely.
- Press the sponge quickly onto the nail from the middle of the nail plate to its tip. The closer to the free edge, the denser the coloring. To do this, apply the sponge to the nail several times, most often closer to the tip.
- We fix the manicure with a layer of top protective coating.
Gradient manicure technique
The second simple way to perform a manicure with a sponge
- The nails are covered with a base coat , which must dry.
- Varnishes of the selected colors are applied in strips directly to the sponge transferred to the nail with a few tapping movements .
- Excess varnish that gets onto the cuticle area and finger skin is carefully removed.
- A top coat is applied over the dried manicure .
Manicure with a sponge
This method is quite simple even for a beginner, and you can verify this by watching the video:
Smooth color stretching on nails
This manicure method is more complex than the previous ones, but the boundaries between colors are almost invisible, and the transition is very smooth. To do this , carefully apply drops of varnish to the palette . close to each other .
For a beautiful color transition, carefully blend the borders of the varnishes
Depending on the desired design, varnish blots can be arranged vertically or horizontally in order or randomly. Mix the varnishes very carefully along the border of the colors with a needle or toothpick. The colors should transition one into another smoothly.
We blot with a sponge apply it to the nail plate with a smooth and quick movement .
Don't forget to clean the skin around the nail with concealer or nail polish remover applied to a cotton swab.
In addition, it is better to cut the sponge into smaller pieces, and apply BF or PVA glue to the cuticles, which should be removed at the end of the manicure.
To prevent bubbles from appearing on the nail coating, blot the sponge on the foil a couple of times before processing the plate.
Nail preparation
Before creating a gradient, you need to prepare your nails:
- Sand the surface of the nails with a buff.
- Adjust the length.
- Apply primer to them and dry under a UV lamp. The primer makes the nails drier, improving their adhesion to the polish.
- Apply base coat and dry it. Usually the base is transparent, but sometimes it can have a pink color.
Nail preparation
After preparing your nails, you can proceed to their design.
Creating a gradient with a sponge
The most common way to create a gradient on your nails involves using a sponge or an ordinary kitchen sponge. This method is recommended for beginners.
Step-by-step design process:
- Take a sponge and cut off a small piece, slightly larger than a nail.
- Apply a couple of drops of varnish of different colors to the surface of the sponge. Mix drops of varnish with a brush to create a color stretch.
- Apply the sponge to the nail so that the gel polish imprints on it. The sponge is applied with light, patting movements. To fix the color, the procedure can be repeated, but only after the first layer has dried.
Gradient sponge
In addition to the above, there is another way to make a gradient of gel polish with a sponge. It involves using a tablet on which gel polish is applied and the transition is shaded. You can use any surface as a tablet - plastic, glass, silicone. To create a transition, take an orange stick or a regular toothpick.
In the future, the sponge must be slightly moistened, pressed onto the resulting range, and then onto the nail. You shouldn’t rub your nail with a sponge for a long time, otherwise the varnishes will mix and give a dirty tint.
After the nails are completely dry, you need to remove any remaining polish from the skin. A cotton swab is suitable for this, which must be dipped in nail polish remover in advance. The process of creating a gradient using a sponge on short nails can be seen in the video.
Advice! To quickly clean the cuticle and side ridges of the skin, you can use a professional product - Defender. It is a quick-drying product that forms a film on the skin, which is easily removed from the skin after painting the nails.
Linear ombre
- Clean and trim nails , push back cuticles and wipe with nail polish remover to remove grease and unnecessary substances that affect the durability of the manicure.
- Cover with base.
- Cover with the main shade closer to the base. At the ends, the opposite color will cover any imperfections. Dry with a lamp.
- Take a small portion of the contrasting shade with the end of a cosmetic sponge. Smear it all over the tip, moving the opposite color down towards the center, allowing for a softer transition.
- Add contrasting colors in parts , going deeper towards the ends.
- Once finished, use nail polish remover to remove excess coating.
- Apply protective coating. Because it can pick up polish with each stroke, cover the nail horizontally with it so that there is no blending of the contrasting shade throughout the base.
Using a fine brush
Creating a gradient with a brush is not difficult, but for everything to work out successfully, you should first practice not on your nails, but on third-party objects.
Graphic gradient with thin brush
Step by step creation of a gradient:
- Two (or more) colors are selected and applied in two stripes to the sanded nail. Varnishes should be applied in equal proportions.
- Take a brush (size zero), soak it in degreaser and squeeze it out.
- The brush is passed along the junction of colors, forming a smooth transition between them. The procedure can be repeated several times.
After each stroke, the brush must be thoroughly wiped with a napkin. There should be no lint left on it.
It is necessary to dry the coating thoroughly
Performing degradation on nails with a dish sponge
An ombre manicure can also be done using a regular foam sponge. If anyone else doesn’t know how to make a gradient manicure at home using a sponge, then we hasten to explain the process of creating it:
- Paint your nails with colored paint and dry.
- Combine two varnishes on the foil.
- Blot the sponge well in the mixed palette. To avoid bubbles on the nails after applying a piece of washcloth to the plate, the first two or three prints with bubbles should be made on foil.
- After this, you can begin to transfer the gel polish with soft but quick movements. Repeat steps 1, 3 and 4 several times, applying new layers to the nails until the desired effect is achieved (often 3 layers are required).
- The final touch is to cover all the nails with top coat.
By making a transition from one color to another using this technique, you will get a gradual, soft and beautiful gradient. By the way, color transitions can be done both horizontally and vertically. To dilute the image a little and make it light, you can apply pea dots. And a vertical gradient in pastel colors looks cute and gentle even on long nails.
Gradient using a fan brush
You can make a gradient with gel polish using a fan brush.
To do this you need:
- Choose two colors: dark and light.
- Apply gel polish of the background color to your nails. It will be visible at the roots. It is recommended to choose light colors as a base.
- Mix both colors on a tablet to obtain a medium tone. Cover the middle of the nail with this tone, marking the transition point.
- Apply a darker color to the tip of the nail plate.
- Take a fan brush and start shading with light hand movements.
- Dry the nail under the lamp.
- Repeat the procedure to achieve brighter colors. In this case, the base color should be applied only to the root part of the nail.
Fan brushes
The ombre effect on nails looks very attractive. It can be done in both pastel and bright colors. The process of creating a gradient on nails with a brush can be seen in the photo.
Video tutorial on how to make a gradient on your nails with gel polish and a brush
The video shows a simple basic technique for working with gel polish and a brush (in some cases the brush can be replaced with a small sponge), as a result of which the author gets an excellent bright one-color gradient on the nails . The master explains what kind of brush should be used for shading gel polishes and demonstrates the correct positioning of the brush while working.
Spectacular, eye-catching design is ideal for summer manicure. Such lessons with videos will help even beginners in working with gel polish to be guaranteed to get the expected result - a gradient on the nails.
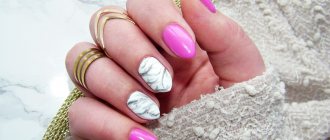
Gradient with glitter
An interesting option for nail design is creating a gradient with glitter. As a background, you can use a plain gel polish or a ready-made gradient. Sprinkle glitter onto the newly applied layer of varnish using a dry brush. More glitter is applied to one part, less glitter to the second. The glitter gradient can be made both vertical and horizontal. It will shimmer beautifully and look especially interesting on short nails.
Glitter Gradient
Gradient pigments
For the base, use white gel polish or just a base. If pigments are used to create the entire gradient in two shades, and not half of the nail, then a silver layer of varnish or just a base will be enough. The sticky layer does not come off.
- We cover the nail with two layers of colored blue or turquoise varnish.
- Using a flat or round brush, select the pigment and place it on the sticky layer using small strokes and lightly patting movements.
- We move from the zone of maximum color intensity to the transition zone, depending on how you arrange the shades.
- We make the layer of pigment thin but dense.
- If you combine two pigments, then start applying it in the same way from the edge to the middle of the nail. In the middle, where two pigments meet, carefully mix them with a brush, drawing one into the other. We get the pigment and put it where the bald spots form.
- We seal the result with topcoat.
- We process the cuticle.
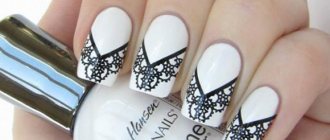
Graphic gradient
In 2021, the trend is gradients with geometric patterns. To create it, you need to prepare a thin brush and two gel polishes: colored and white. The geometric gradient is drawn step by step, gradually diluting the bright color with white. This type of manicure can be challenging for beginners.
The varnish is applied in a thin layer so that it does not spread over the entire surface of the nail plate. They begin to draw from white to dark. When creating this type of manicure, there is no need to dry your nails after each step. Only when the drawing is completely ready are the hands placed under a UV lamp.
Graphic gradient
The most popular geometric manicure options are those with diamonds and circles. A spectacular gradient manicure design with geometric shapes can be seen in the photo.
How to do a gradient manicure at home
Select your shades first - this process may take longer than the coloring process itself! You can choose shades of the same color and make a smooth transition, for example, from lilac to soft pink.
But the colors don’t have to be similar: a manicure with a transition from blue to yellow or from green to black will look very bold! To create a spectacular evening gradient manicure, you can use varnishes with glitter.
You can create a color block from shades of different colors - it will look especially expressive
: remember how the colors of the rainbow change from one to another. Experiment with different color combinations so that you can start your manicure with a ready-made solution.
When choosing the number of color stripes, consider the length of your nails. Long ones are more convenient to work with, and more transitions from one color to another will “fit” on them. On short ones, a blend of two shades looks harmonious, otherwise the colors will mix too much and the manicure will be blurry.
Helpful tip: if you have white or black polishes, they can be mixed with any other polishes to obtain a darker or lighter shade. The color transition on the nail plate can be done both vertically and horizontally.
The final stage of manicure
After creating the design, you need to dry your nails under the lamp for 4-5 minutes. After this, you should fix the gel polish with a top coat. After the nails are completely dry, the cuticle must be lubricated with a special oil.
Author's gradient
Gradient gel polish manicure is a fashionable and practical way to decorate your nails. Many options for performing multi-color manicure allow you to find a suitable design for every woman. The technique of creating a gradient manicure is not complicated, but it does require patience and time. Step-by-step implementation of the technology for creating a gradient will make your nails beautiful even at home.
Types of gradient
A gradient on the nails means that the manicure is made with different varnishes: the colors touch each other, forming a smooth transition, blurring the border. There are several gradient options:
- Horizontal - stretching the color from the beginning of the nail to the edge.
- Vertical – color transition from left to right.
- Gradient on each finger. Nails are covered with various varnishes. From light shade to dark. A good option for short nails.
- French manicure. The color stretches from light pink to white. This look fits well into the formal atmosphere.
All types of gradients can be reproduced on your own, at home.
Gradient using a sponge
For a manicure at home using a sponge, you will need:
- A sponge for a gradient manicure, or a foam sponge cut into pieces;
- Bondex;
- Lucky;
- Base and fixative;
- Container with water;
- Cotton swabs and toothpicks;
- Cotton pads;
- Nail polish remover;
- UV lamp;
- A piece of foil;
- PVA glue, or cream, or a film mask for the face.
Editor's choice: Fashionable moon manicure 2021: photo guide
The procedure itself consists of several stages:
- First, prepare the nails: clean, remove the cuticle, degrease and dry in a UV lamp.
- Apply the base and dry it in a UV lamp. Use a cotton pad with degreaser to wipe the nails, removing the sticky layer.
- Strips of gel polish are painted onto a piece of foil so that they touch.
- Stir the varnishes at the points of contact with a toothpick to obtain a smooth color transition.
- Soak the foil with varnish with a sponge. In order to find out what the result will be, you should put a test stamp on foil or paper.
- Press the sponge onto the nail, moving it slightly along the nail plate. Dry in a UV lamp. Get rid of the sticky layer by wiping your nails.
- Apply the fixative and dry again in a UV lamp.
To easily remove excess polish, apply PVA glue, a film mask, or a moisturizer to the skin around the nail. After the nails are dry, remove excess polish.
Gradient brush
To create a gradient manicure with a brush, similar components are used as for a manicure created with a sponge. It is also worth preparing gel polishes in advance, doing a manicure and degreasing your nails. Then the nails are covered with base and dried. It is worth lubricating the skin around the nails with cream, applying PVA glue or a face film mask to easily remove excess polish. Apply colored polish to your nails. Next, spread the other polish over half of the nail. Use a brush to create a gradient while the varnishes are still wet. Perform movements quickly. Dry your nails and apply a sealer.
Editor's choice: Lilac manicure: original design options
Gradient with glitter
To create a gradient you need glitter of two different colors. Prepare your nails: manicure, degrease, apply base and dry. Apply gel polish to your nails and do not dry. Pick up the glitter and pour it onto half of the nail, patting it with your fingers. Distribute the glitter evenly using the applicator. Cover your nails with gel polish, then apply glitter to the other part of the nail. Dry in a UV lamp. Cover with top varnish and dry. Wipe your nails with a cotton pad and degreaser.
geometric gradient
Geometric gradient is at the peak of popularity. There are a large number of gradient options. It all depends only on desire and skill. Let's take a closer look at creating diamond-shaped gradients.
- Prepare your nails: manicure and degrease.
- Create a gradient sketch on paper.
- Cover your nails with base coat and dry.
- Apply white polish to your nails.
- To create a gradient, a couple of varnishes are laid out on the palette. For example, white and red. Repeat each time before application, gradually increasing the area of red varnish.
- Mix the shades and apply to the nail with a thin brush, drawing the outlines of diamonds and painting over them.
- The diamonds are drawn in a checkerboard pattern with a darker shade obtained from mixing white and red varnish and painted over.
- At the tips of the nails you should get diamonds of a rich red color, almost without any white impurities.
Editor's choice: How to make a beautiful manicure at home: simple ideas for manicure
Cover with matte top.
There are a lot of video tutorials on the topic of geometric gradients. Below is an example of one of them: