07/15/2015 / Manicure and pedicure
Bright and unusual color combinations, smooth transitions of shades on the nails - a fashionable manicure with a gradient effect has not lost its relevance for several seasons. Despite all the apparent complexity, the gradient manicure technique is quite simple, and making a manicure with a gradient effect at home is quite simple. Read our article about how to make a gradient on your nails correctly, what techniques exist for creating smooth color transitions on your nails, and what shades are best to choose.
What is a gradient manicure?
Gradient manicure (ombre, degrade) is a type of decorative nail coating with the effect of a smooth transition of colors. A manicure in a gradient style can be done in shades of one color (the color changes its intensity from light to dark shades), or it can be a transition of two or more colors. Both similar shades and contrasting shades can be combined - both versions of the gradient on the nails look impressive.
There is another option for a gradient - in this case, each nail on the hand is painted in different shades of the same color, from the lightest to the darkest, or a gradient manicure in different colors is possible.
When making a gradient, you can choose any color combinations - it all depends only on your imagination. A gradient manicure looks equally good on short nails and long nails of any shape.
What is a gradient?
A gradient is a smooth transition of two or more colors. Moreover, these colors are not always of a similar shade or tone. Quite often, craftsmen use several opposite shades at once: red and white, black and green. It all depends on the mood and general style that such a manicure should suit.
There can also be several gradient options on nails:
- Light shades from the cuticle and dark ones at the end of the nail plate;
- Horizontal color transitions;
- Vertical shade transitions;
- Oblique gradient formation options;
- Gradient combined with French manicure;
- Rainbow gradient. This is the most complex technique, which requires not only a certain professionalism, but also the ability to combine different colors.
Gradient manicure techniques
A gradient style manicure can be done in several different ways. The gradient on the nails with a sponge is done in the first two methods, and in the third using a brush.
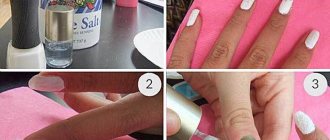
1. The first method is one of the easiest. It requires several shades of nail polish (2 or more) and a small piece of sponge. Strips of varnish are applied to it in the required sequence. Then the sponge is gently pressed onto the surface of the nail - the colors are transferred to the nail plate. To achieve maximum brightness of colors, you can first apply a thick white varnish to your nails. Excess color is removed from the skin with nail polish remover, and the nails are covered with a topcoat - a finishing coat that fixes the color and gives a glossy (or, if desired, matte) finish to the manicure.
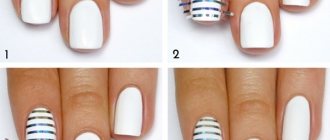
Gradient manicure (photo) is performed step by step on each nail:
2. The second method allows you to achieve the smoothest color transitions. This gradient is performed step by step: varnishes of different shades are first mixed on a flat surface, and then the colors are transferred to a sponge, and only then to the surface of the nail. This is the most common way to make a gradient manicure with varnish (step-by-step photo):
3. The third gradient technique allows you to do without a sponge. This is the easiest way to make a transition from one color to another, but achieving smoothness in this case is very difficult. The surface of the nail is covered in one or two layers with a base shade of varnish, after which has dried, another varnish is applied to part of the nail plate in the usual way. Gradient manicure with a brush is simple and quick to perform, but often it does not look neat enough.
Using gel polish for gradient manicure
A gradient manicure with shellac or gel polish looks more impressive and lasts much longer than using a regular finish. The technique is similar, but if you do not have special equipment and cosmetics, then it is better to do this procedure in a salon.
A gradient manicure with gel polish is performed as follows:
- Nails are degreased with a dehydrator.
- An acid-free primer is applied. Then the base, which is baked for a minute under a UV lamp.
- A lighter gel polish is applied from the base of the nail to the middle. The remaining part is painted over with a dark shade. The joint line should be smooth.
- The border between colors is blurred with a thin paint brush or sponge.
- After erasing the boundaries, the nails on each hand are dried under a lamp for one and a half to two minutes.
- If it is necessary to obtain a more saturated shade, steps 3-5 are repeated.
- The painted legs are covered with fixing gel polish and dried again under the lamp.
What is needed to perform a gradient manicure?
To make a gradient varnish, you will need:
1. Several varnishes of suitable shades. There can be two or more of them - it all depends on your desire.
2. Sponge for gradient manicure. The smaller the pores of the sponge, the more accurate and smooth the shade transitions will be. An ordinary sponge for washing dishes will do, but it is best to use a cosmetic sponge to apply foundation, cutting it to the required size.
3. A working surface for mixing varnishes - this can be a piece of plastic or film.
4. Toothpick or needle for mixing shades.
5. Nail polish remover - with its help, excess color is removed from the skin around the nail.
6. Finishing coat - a topcoat to fix the color.
How to make a gradient with transition?
To create a manicure with a transition, choose five shades of one varnish. Not every girl can have such a rich palette, for example, green or red coating. In this case, you can use a simple method - mixing.
- Apply a base color, for example, red, to the first nail.
- In a container, mix the main and additional white color, which changes the shade. The tone of the varnish will become lighter.
- Apply a light shade to the second nail.
- Continue adding more white to make the shade even lighter.
- Apply to the nail.
- On the last nail we stop mixing polishes.
- In this way, you can cover your nails from red with its shades to white.
How to make a gradient on your nails
It’s not difficult to perform a gradient manicure at home; you just need to prepare all the necessary materials and be patient. It is necessary to perform a gradient manicure step by step:
Step 1
Before you do a gradient manicure, you need to take care of the shape of your nails and the skin around them. Give your nails the desired shape using a nail file and scissors, remove the cuticle and polish the surface of the nail plate, that is, do either a classic edged manicure or a European unedged manicure.
Step 2
Apply a layer of base coat to your nails. This can be a clear primer, a thick white varnish, or one of the shades used.
Step 3
Apply strips of varnish of different colors onto a flat surface so that they touch. Gently mix the colors at the junction using a needle or toothpick.
Step 4
Press a piece of sponge or sponge onto the painted surface, then press the sponge onto your nail and transfer the color onto it. Try to do this as carefully as possible, in one movement, so as not to smudge the colors.
Step 5
Remove excess polish from the skin around your nails using nail polish remover. The easiest way to do this is with a small cotton swab.
Step 6
Wait until the color coat dries and cover your nails with top coat - it will fix the color and prolong the durability of the manicure.
Gradient manicure at home step by step:
Creating a gradient with a sponge
The most common way to create a gradient on your nails involves using a sponge or an ordinary kitchen sponge. This method is recommended for beginners.
Step-by-step design process:
- Take a sponge and cut off a small piece, slightly larger than a nail.
- Apply a couple of drops of varnish of different colors to the surface of the sponge. Mix drops of varnish with a brush to create a color stretch.
- Apply the sponge to the nail so that the gel polish imprints on it. The sponge is applied with light, patting movements. To fix the color, the procedure can be repeated, but only after the first layer has dried.
Gradient sponge
In addition to the above, there is another way to make a gradient of gel polish with a sponge. It involves using a tablet on which gel polish is applied and the transition is shaded. You can use any surface as a tablet - plastic, glass, silicone. To create a transition, take an orange stick or a regular toothpick.
In the future, the sponge must be slightly moistened, pressed onto the resulting range, and then onto the nail. You shouldn’t rub your nail with a sponge for a long time, otherwise the varnishes will mix and give a dirty tint.
After the nails are completely dry, you need to remove any remaining polish from the skin. A cotton swab is suitable for this, which must be dipped in nail polish remover in advance. The process of creating a gradient using a sponge on short nails can be seen in the video.
Advice! To quickly clean the cuticle and side ridges of the skin, you can use a professional product - Defender. It is a quick-drying product that forms a film on the skin, which is easily removed from the skin after painting the nails.
Gradient manicure with gel polish and shellac
You already know how to make an ombre and gradient manicure at home yourself, using regular nail polishes. But this method has a small drawback - the beauty you create on your nails will last for a maximum of a week. What to do if you want to extend the pleasure of a beautiful manicure for several weeks?
There is a way out - make a gradient on your nails with shellac or using gel polishes. In this case, a beautiful manicure will delight you for at least three weeks without losing its original characteristics. How to make a gradient manicure with gel polish? The execution technique in this case is not very different from the usual one, however, the peculiar properties of durable coatings require special care, thoroughness and professionalism. In addition, each layer of durable coating requires polymerization under a UV lamp.
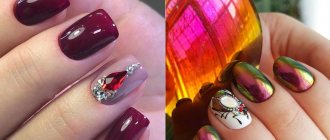
Gradient manicure with gel polish (step by step photo)
If you are not sure that you can complete all the steps correctly, you should entrust this work to a nail service specialist, then the result will be of the highest quality.
Gradient on nails with gel polish (photo):
Gradient on nails with a brush
This option is considered the most difficult. To use, you must have some experience and a clear understanding of the sequence of actions. The brush must also be selected correctly. It must be a thick brush with an oblique cut. The bristles are of natural origin. With it, the color will apply smoothly, without sharp transitions or stripes.
- Apply a base (colored or transparent) to the nail;
- Depending on the type of transition (horizontal or vertical), apply colored varnishes evenly, without “overlapping”. The lines should only touch each other;
- At the junction of the flowers, brush with a thin brush from top to bottom, or from one side to the other. The brush should be very thin, the result depends on this;
- Initially, you will get certain lines that are still visible, and after some time the lines will connect and a smooth transition will form;
- Then again you need to apply gel polish in the same amount as the first time, to the same place, on top of the previously formed transition;
- Repeat the manipulations. At this stage, a more saturated and deep shade will be formed, which, due to the layer of varnish, will smoothly transition and form a line with a transition shade;
- Secure the resulting result with colorless varnish and cover the cuticle with oil to prevent the skin from drying out.
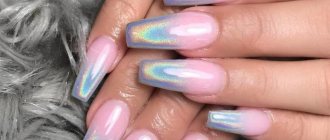
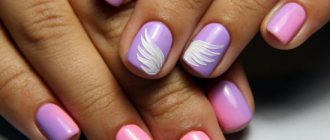
Some gradient nail ideas
We invite you to evaluate interesting gradient manicure ideas. Perhaps some of them will inspire you to recreate this beauty yourself.
White gradient on nails
The closest “relative” of French manicure. Delicate transitions of white, cream or light pink colors give the hands a special grace. A tan will perfectly set off a white gradient manicure.
Black gradient on nails
The dramatic combination of black and deep scarlet is sure to turn heads in your hands. A black gradient manicure in combination with white will give your nails rigor and elegance.
Red gradient manicure
A gradient in shades of red - from bright scarlet to almost black burgundy - is ideal for an evening out. A red gradient on nails can also be made with a transition to other colors.
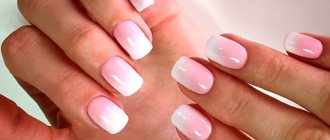
Pink gradient on nails
The combination of delicate pink shades will suit everyone - from a young girl to an accomplished lady. Pink gradient manicure makes the look feminine and delicate.
Brown gradient manicure
Blue gradient on nails
Blue gradient on nails
Green gradient on nails
Summer gradient manicure
Create a summer gradient on your nails in bright, rich neon colors. Even the brightest rainbow on nails will look appropriate in the sun, by the pool or on the beach.
Gradient manicure with glitter
Here are just a few ideas for creating a gradient on your nails. For even more combination options, as well as professional gradient manicure lessons, watch the video.
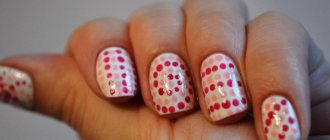
Gradient nails with a pattern
Gradient gel polish using a brush
Here I will dwell in detail on one option for performing a gradient manicure with gel polish - vertical with a brush, I will tell you briefly about the rest.
To complete the design you will need:
- A set for creating a long-term coating on nails: a base for gel polish and top coat, an ultraviolet or LED lamp, a product for degreasing the nail plate and removing the sticky layer, cuticle oil, a sanding file, lint-free wipes.
- Two colored gel polishes (I used yellow and orange BlueSky Shellac numbers CS18 and A115)
- Flat and thin brush.
Technique for creating a vertical gradient with gel polish
I have prepared a short video tutorial on creating a vertical gradient, and you can read a detailed step-by-step description of it under the video:
- We prepare the nails for a long-term coating: push back the cuticle with an orange stick, remove the natural gloss from the nails using a grinder file (if you also use BlueSky Shellac brand gel polishes, then you can skip this step), apply a degreaser. To create a more reliable coating, you can additionally apply a primer: it promotes adhesion of the nail surface to the gel polish.
- Apply the base for gel polish and dry in a lamp for 2 minutes (in a LED lamp for 30 seconds). I recommend using the 4+1 technique.
- We apply the lightest of the selected gradient gel polish colors to the entire surface of the nail in a thin layer and send it to dry in the lamp.
- Next, apply the same color to half of the nail, and to the other half, apply the second selected color of the gradient, joint to joint with the first.
- Blend the colors using a flat brush where they meet. It is convenient to use a flat brush for this, but it must be soft, otherwise the bristles will simply remove all the gel polish from the middle. You can also use a regular thin brush to blend the flowers in the middle. After we have obtained an acceptable result, we send it to dry in a lamp.
- We repeat the second and third layers in the same way, maybe even the fourth and fifth, until the result satisfies you, but then you need to try to make the layers thin so that the coating does not look too artificial.
- Next, we apply a fixing topcoat and also dry it in a lamp, after which we remove the sticky layer with a special means.
This is how you can easily create a vertical gradient with gel polish. For my version, I chose milky yellow and light orange colors of BlueSky Shellac gel polishes, which are adjacent in the color wheel, so their combination also looks very organic and gentle.
I recommend reading: Combining colors in manicure using a color wheel.
Using a brush you can also create a horizontal gradient with gel polish . To do this, it is more convenient to use a fan brush: it will allow you to simultaneously smooth the color over the entire surface of the nail. The only caveat: with such shading, there is a high probability of getting the gel polish on the skin, so before sending the gel polish with the created gradient into the lamp, you should completely clean the nail folds from it or use liquid tape or other means to protect them.
Gradient manicure: photo
Rainbow gradient manicure
Now you know how to do a gradient manicure at home. Any manicure requires practice, so don't be upset if your first experience isn't perfect. Experiment with colors, try different techniques - and soon you will be able to get a result that is indistinguishable from a professional one. Video tutorials from beauty bloggers and professional nail technicians will help you perform a gradient manicure as correctly as possible.
Photo
The photographs show examples of manicure design using a gradient transition. They can be dark, light, sharp or smooth.
In order to create a gradient with gel polish yourself, you can currently purchase many different products and devices in stores. Due to its durability, gel polish will stay on your nails for a long time, so you don’t have to worry about the safety of such an unusual manicure. The gradient must be applied very carefully, avoiding contact with the skin. After several sessions of this manicure at home, applying a gradient color to your nails will not cause any difficulties.
Gradient manicure: video
Tags: nails
Market Analytics
- 2020 in the beauty industry – innovation without borders
- Black Lives Matter movement: reaction and consequences for the beauty industry
- COVID-19 is changing the rules of the game in the cosmetics market
Convenient search for beauty salons on our website
Beauty salons in Moscow Beauty salons in St. Petersburg Beauty salons in Ekaterinburg Beauty salons in Novosibirsk
Latest blog posts on our website
- Naturecream / Arnica - the magical plant of alchemists
- Naturecream / Tremella Extract - Snow Mushroom Detox for Skin
- Prostye-sovety / How to visually enlarge your lips with makeup
- Naturecream / Apricot kernel oil for face
- Naturecream / MATRIXYL3000 - the best skin elasticity stimulator
- Naturecream / SPF in Natural Oils
- Naturecream / Geranium (Pelargonium) oil for skin health and beauty
- Prostye-sovety / Save on a beauty salon: procedures that can be done at home
- Naturecream / Growth Factor - brings back youth?
- Oksana-Lezina / 3 effective abdominal exercises from a fitness instructor for beginners
Latest forum topics on our website
- Natalya / How to properly make a gelatin mask?
- Mrs._Smith / Badly sunburned! What to do?((
- Ice / Is it necessary to combine fitness classes with a diet?
- Antonova / What can be used for hair loss?
- Radio operatorKat / Who was on a protein diet?
Other articles in this section
| Manicure: apple (photo and step-by-step instructions) Today we will look at how to draw apples on your nails. This nail design is suitable for both summer and autumn. Apples can be made red, green or yellow, or you can draw a cut apple with seeds. So let's get down to step-by-step manicure: apple. |
| Medical pedicure The beauty of your legs is achieved through a good pedicure, however, if medical problems arise, a regular pedicure cannot help. |
| Manicure with foil Nail design options are very diverse. One of the most original techniques with a wide range of design options is decorating nails with foil. This nail art is very impressive, noticeable and immediately attracts attention to its owner. And you don’t have to be a professional to do it. The necessary materials, instructions, a little practice - and you will succeed. |
| Nail design Nail design is a modern type of aesthetic cosmetology that favorably emphasizes the beauty of women's hands, and also allows you to hide minor imperfections. The history of nail art dates back to Ancient China, where high-status fashionistas grew their nails up to 25 cm long and put tips on top to avoid damaging them. |
| Spring manicure With the onset of spring, we all dream of changes for the better. Many girls strive to bring something new to their usual look, change their hairstyle and buy new clothes. And here you can’t ignore spring manicure, which has some special features. |
| Nail polish: composition, types and brands, application rules Nail polish is the basis of any modern manicure. By choosing a coating of different colors, women not only emphasize the beauty of the nail plate and protect it from harmful chemicals and mechanical influences, but also strive to change their image by adding bright colors and tones. |
| Japanese manicure: what is it and how is it done If the French are usually called trendsetters, then the Japanese are leaders in the number of various spectacular and beautiful rituals associated with caring for their body, hair and nails. Few women have ever heard of Japanese manicure, but this technique deserves close attention. |
| Knitted manicure Knitted manicure on nails is a very interesting, relevant and fashionable solution. With the onset of cold weather, we so want to dress warmly and each of us remembers the sweaters carefully knitted by our mother or grandmother. Large, beautiful knitting makes the product incredibly beautiful, cozy and homely. And it is precisely this texture that modern fashionistas strive to depict on their claws today. |
| Combined manicure Every girl chooses the type of manicure depending on her personal preferences, but combined manicure is becoming more and more popular. |
| Classic edged manicure Classic (traditional, edged) manicure rightfully occupies an honorable place as an old-timer among other types of manicure. Initially, any manicure was performed using this technique, and only relatively recently did alternative versions appear - unedged European, Japanese and others. How to perform a classic edged manicure, what tools are needed for it and how to properly do such a manicure at home, read our article. |