Peculiarities
The main feature of French manicure is its relevance and versatility. Fashion trends change from season to season. And only this type of manicure always remains in the top. It is suitable for both special occasions and everyday looks.
If you have all the necessary tools, it is quite possible to do it at home. It won't take much time, but it will look great.
With the classic design (with a beige base), the nail growth line at the base will not be as noticeable as when covered with bright colors. Shellac lasts quite a long time on nails, so this aspect becomes very important.
Nail design options
The French manicure itself is self-sufficient, but if you want to make it more original, then there are many ways to decorate and complement it. Below are only some of the possible ideas and options, since the final design depends entirely on your imagination and capabilities.
Golden French
It can be done in several ways. The golden tips can be painted on with the appropriate gel polish or covered with small glitter. In combination with a neutral base, this option will look quite restrained and interesting.
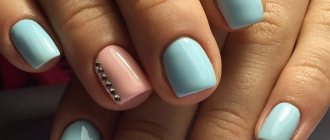
Colored French
There are no restrictions on the choice of shades. It all depends on your desire and wardrobe. You can add brightness to your manicure using red shades or make it very cheerful using neon colors. The advantage is that even the brightest and most saturated colors will be present on the fingers in small quantities. The manicure will not be provocative.
Double
If you have a favorite combination of shades, then you can transfer it to your fingers. This option is quite acceptable. Especially if one of the shades is repeated in your accessories or clothes. The main advantage of such a manicure is originality.
Chevron
A beautiful name and an equally beautiful result. The peculiarity of this type of jacket is that the smile line is an angle. The width of the strip itself at the fingertip can also vary. This allows you to create a unique design that meets exactly your requirements and ideas. The above corner can also be moved closer to one or the other edge of the nail.
Obliquely
A tempting design that has several options for implementation. You can make the oblique line very smooth, or you can draw it in a straight line. The height and angle of inclination also vary. If you want to create a subtle accent, then draw a thin white stripe diagonally. Lovers of bright manicures should choose rich shades and a wider area to paint.
Matte
With the invention of a matte shellac finish, any shade can be transformed without much effort. The same applies to French. In the absence of the usual glossy shine, it looks even more noble and elegant. But it is worth considering that light shades will quickly get dirty. But washing it is much more problematic than regular gloss.
Floral and fruity
If you are in a bright summer mood, then why not reflect this in your manicure? At the same time, it is not necessary to paint all the nails in flashy shades. It will be enough to apply a floral pattern instead of the usual white stripe, or decorate them with “fruit slices”. This juicy manicure is perfect for a light summer sundress.
Monograms
French can be complemented with exquisite patterns, which have acquired the name “monogram”. Masters are specially trained in this drawing technique in courses. You can also practice at home on plain paper. If you are not confident in your own abilities, then use stickers or stamping.
Lace
What girl doesn't love these delicate intricacies? Today you can easily repeat them on your own nails, even without special skills. To do this, just buy the appropriate stickers in a specialized store. When performing a French manicure, they can be used to decorate only the tip or the main length of the nail.
Veil
A trend that appeared not so long ago. Its distinctive property is its black (or any dark) color. It is when drawing individual elements in these shades that the visual impression is created that there is a real veil on the nail. To repeat it at home, draw a black tip, then place black dots along the length of the nail in a checkerboard pattern and connect them with thin lines.
Patterns
Their diversity and color are amazing. To create complex small motifs, you can use stencils, stamps or stickers. But if you have the skills of an artist, then you can turn your nails into a real work of art yourself. Today there is a tendency to place bright accents on only one or two nails. So, the manicure doesn’t look tacky.
With peas
On the one hand, peas can look very strict if done very large. On the other hand, small circles will emphasize playfulness and lightness of character. The color range here is also unlimited. It is only worth noting that the peas should be either on the colored tip or on the main length of the nail plate. If you place it both here and there, you can overdo it, and then all your efforts will come to nothing.
French manicure with gel polish for beginners
For a classic French design, you need standard manicure tools, equipment and materials:
- file, buff, pusher, orange stick for processing the cuticle, modeling the shape of the nail plate, removing its natural shine;
- base, top for manicure;
- degreaser, dehydrator;
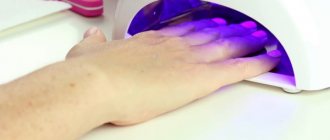
- lamp for polymerization of materials;
- colored gel polish for working using the French technique;
- thin and flat brush for design;
- stencils for French manicure.
As for the main gel polish, which covers the entire nail plate, choose it according to the color of your skin:
- for yellowish - peach shades;
- reddish - pale pink;
- pale - translucent milky.
This is very important because the wrong shade can ruin the entire manicure.
For the smile line, use white gel polish or gel paint. Many brands produce gel polish coatings in different shades, warm and cold. Gel paint is thicker and denser, which may make it easier for you to paint with it. You can draw a smile manually or using a stencil. The easiest and fastest way is to use a stencil. This is suitable for those who have not yet gotten their hands on it. Ready-made templates are sold in stores selling nail service products. They are shaped strips on a self-adhesive base.
How to make French step by step with a stencil
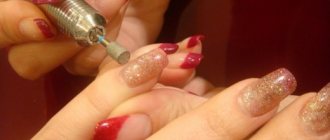
- We prepare the nails - remove the old coating, the glossy layer (buff), give the correct shape (semicircular, square), degrease.
- Apply the selected color gel polish coating. If you want to camouflage a natural plate, apply gel polish in 2 layers, drying each one. Then the base will become dense and rich. If you are satisfied with natural nails, there are no defects on them, do one layer of coating or simply use one camouflage base, without colored varnish. This makes the manicure look more gentle and natural.
- After drying the base in the lamp, remove the sticky layer with a dry, clean brush.
- Glue the stencil to the nail, pressing it well with a toothpick, pusher or wooden stick to the surface, on the side areas, along its lower part (so that the polish does not leak).
- Apply a thin layer of white gel polish to the free edge. We send it to the lamp. After drying, cover with a second layer.
- After polymerization, carefully remove the stencil.
- Cover the entire surface with topcoat, not forgetting to seal the end, and dry it in a lamp.
- Finally, apply cuticle oil.
Step-by-step manicure with a brush
If you have painting experience, you can make the design with a brush. But you need more patience and accuracy. Please note that a gel polish brush is not suitable for painting a smile. Take any design brush. Step-by-step instructions:
- Step back from the free edge by 2-3 mm.
- Draw a white smile line. To prevent your hand from shaking, draw from the corner to the center on one side and do the same on the other. Then adjust the strip. If you don't work fast enough, the gel polish may run on the sticky layer. Remove the dispersion from the base, and the white color will be fixed more reliably.
- Paint over the free edge without going beyond the drawn stripe.
- Next - dry-top-dry.
If you are making a French jacket for yourself at home, we recommend drawing two fingers at a time and sending them to dry without waiting for the others to be ready. This way the gel polish will not spread. By covering with the finish, you smooth out all the unevenness; the white stripe will not protrude from the overall pattern. If you applied the gel polish too thickly without pressing, gently buff the smile line and cover it with top coat to get a smooth, even surface.
How to draw a French jacket with stripes (step by step)
- Using a thin brush, draw an even white strip parallel to the free edge.
- Perpendicular to the first line, draw one oblique line along the sides of the nail.
- We paint over the free edge until the inclined and straight stripes are drawn.
- Soften and correct sharp corners to create a finished smile line.
- We dry it, go over it again with white, polymerize it, and cover it with topcoat.
You can paint a smile with a flat brush. Changing the angle of its location, draw a semicircular strip with jerky movements. We paint over the free edge and then proceed using the gel polish coating technology. French manicure is ready.
When doing a French manicure for yourself, do not make mistakes:
- Do not apply gel polish to the cuticle, it is better to leave 1 mm before it starts. Even if it is flesh-colored, the flaws in the jacket are clearly visible, and this gives the design a sloppy appearance;
- consider the length of the nail. If you draw the smile line further than the free edge begins, this will not make the nail look longer. While the manicure will look ridiculous;
- Don’t make your nails different lengths, even if you don’t think it’s too noticeable. A white stripe will not correct the defect. Align them to the shortest one and paint over the smile line with a thinner strip;
- do not forget to cover with top coat, otherwise the gel polish will not last long. The finish evens out the surface and adds shine to the manicure;
- Don’t rush into making a French design for yourself. If you don't have much time, don't even bother doing this. You will need at least an hour to get neat hands, otherwise in a hurry all the stripes and lines will be crooked even if drawn correctly;
Don't draw by hand unless you have experience. White varnish is quite capricious. Practice with palettes and use stencils on natural nails. The wrong “smile” will ruin the entire manicure.
First learn the basic technique so that you can create any design with a French jacket.
How to do it?
If you are used to getting your nails done in a salon, then this issue should not worry you. An experienced master will not only do everything in the best possible way, but will also advise what shape, length and design to use. You can also do this elegant manicure at home. Let's look at step-by-step instructions for its implementation.
- Any manicure begins with nail treatment. In most cases, masters do a hardware manicure, but if this is not possible, then you can also perform a regular edged manicure. To do this, you will need a standard set of tools: a stick, a nail file, a pouf, scissors, and a cuticle trimmer. Nails should be the same shape and length. Even minor differences in the final result will be visible. Before applying the base, nails must be degreased with a special product.
Types of brushes
All manicure brushes can be divided into several large categories according to their scope of application. Due to certain features, using the same brush in different areas is impossible and inconvenient. So, according to this parameter, brushes can be divided into:
- Brushes for Chinese acrylic painting;
- Brushes for painting nail polish;
- French brushes;
- Gel extension brushes;
- Brushes for acrylic extensions.
Based on the material, all brushes are divided into natural and synthetic. Natural ones are very similar to those used by painters and are made of the same material - mink or sable. They are wear-resistant, durable and quite expensive. Synthetic brushes are much cheaper, less durable and are most often used by beginners. A set of natural manicure brushes can cost several thousand, while a synthetic one doesn’t even reach a thousand.
Additional characteristics that influence the choice of brush are their width, flexibility, elasticity, and cut shape. In addition, the comfort of the handle plays a significant role. If the master is determined to further improve his skill, then it is more profitable to immediately purchase expensive and high-quality brushes. When choosing brushes for home use, you can get by with a more budget-friendly option. Manicure brushes are generally characterized by a rather variable price; it is influenced not only by the material, but also by the brand and design.
How to do a French manicure with shellac
French manicure with shellac is in high demand. The reason for this is the durability of the decorative coating and the aesthetic appeal of this type of design.
To understand the secret of French manicure, it’s worth plunging into the history of the 70s. This is a period of rapid development of the film industry in Hollywood. Producers and directors were then seriously puzzled by finding a universal coating for the nails of actresses that would fit all outfits and looks. The task seemed impossible until the talented entrepreneur and founder of the ORLY company, Jeff Pink, developed a unique design, which was called French. In the fashion world then he created a real sensation.
As it turned out, a natural, uncomplicated, sophisticated French manicure was ideally combined with a wide variety of wardrobe items and accessories. From that moment on, French manicure conquered the whole world.
What does French shellac manicure represent today?
Despite the fact that many decades have passed since the first discovery of the French design, it does not lose its relevance; on the contrary, its popularity is growing every year. Today, French manicure with shellac is performed in a wide variety of variations. It is enough to provide a creative approach, turn on the imagination, and you can make your nails so that it will be difficult to take your eyes off them. By strictly following the instructions that will be described below, you will be able to give yourself a manicure no worse than a master.
Before you start working, it is important to decide on the type of French shellac for short nails. He can be:
- classic - implies a solid base, white tip;
- chevron - the “smile” is made in the form of a V-shaped line, the shade can be used either classic white or colored;
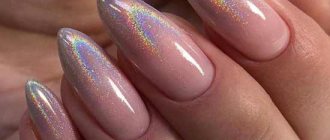
- millennium - the free edge of the nail plate is decorated with sparkles, sand (decorative elements);
- colored - as the name implies, the tip of the nail is made contrasting;
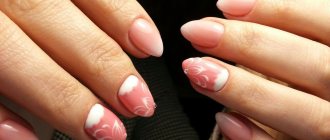
- fan-french - lace, dried flowers, bouillons, foil, rhinestones can be used as decoration elements;
- wedding - done using special brushes for pattern painting;
- art French - implies the presence of a variety of images.
For a visual example, it is recommended to use a photo of a French manicure with shellac.
French manicure with shellac - what will you need for the job?
Do you dream of doing a shellac French manicure at home, but are you afraid that it won’t work? Know that this is quite possible. You cannot do without the following tools and materials:
- tongs, scissors (manicure);
- nail files with varying degrees of abrasive;
- a stick intended for processing cuticles (orange);
- remover - a liquid with a softening effect;
- base - varnish;
- white varnish, if necessary, a pastel coating;
- top product;
- brush for drawing a smile (thin), you can also use stencils.
If you don’t have a complete set of tools in your home, you can purchase it at a specialty store. Before you start creating a French manicure with shellac at home, it won’t hurt to watch a thematic video.
As you understand, the accuracy of the finished result depends on the evenness of the smile drawn with shellac on the free end of the nail plate. Without experience in this matter, it is better to purchase special stencils in the form of stickers of different shapes (they are straight, triangular, oval).
When purchasing, keep in mind that the strips can only be used once, so you need to take them with a reserve. These must be high quality stickers, because too cheap ones will stick strongly to the surface of the nail, thereby spoiling the base coat. It is not recommended to use adhesive tape for these purposes.
Phased
So, here's what you need to do - step by step, short and precise:
- We do a manicure-cleaning: we very carefully remove the cuticle, pterygium, polish the nails with the hard side of the buff, but without pressing - there is no need to remove the keratin layer, only particles of fat. For the same purpose, we wipe the HDSL plates. Don't forget to sand the end. After this treatment, you should not touch anything with your nails - the duration of wear depends on this.
- Cover your nails with a thin layer of base coat. It needs to be rubbed into the plates, as if applied without gaps. We polymerize the layer for 2 minutes in a UV lamp.
- Cover the free edge with white shellac using a varnish brush. We polymerize the layer in the lamp for one and a half minutes.
- Using a thin brush, we smooth out the unevenness of the smile line, extend it to the side rollers, arching and correcting it. Don't forget to process the end. Dry for the same amount of time.
- Cover the nails with top gel and dry for 2 minutes.
- Remove the dispersed layer.
Second option:
- We apply a light edging to the dried sticky base, correct it with a second layer and dry each of them.
- On the rest of the nail, apply a transparent base with a brush (or the one that is necessary for the design you like) using the butt-to-end method, and dry it.
- Cover with top coat and dry.
- Remove the sticky layer. French shellac manicure is ready.
In the second option, the manicure is more neat, and the transition line is slightly blurred. You can play on this if your smile line is not yet perfect.
How to do a French manicure with shellac, step-by-step instructions
Before you start doing a French manicure using shellac, you need to get your nails in order. To do this, remove the old coating (if any), then give the plates the desired shape/length using a nail file. By the way, it will be easier to remove cuticles if you first take a salt bath or apply a remover. Use an orange stick to push back the cuticle, then polish the nail with a buff, apply a base (this can be a colorless hardener).
If you like a transparent base, then you can immediately proceed to drawing smiles; if not, then apply shellac in a pastel shade, place your hands under a UV lamp, where the coating polymerizes.
Photo: French manicure ideas
Using gel-based polish to create a French manicure has become a godsend for craftsmen and home professionals. The durability of the nail plate coating helps your hands look neat for at least 2.5-3 weeks; when using biogel, the period increases. The photos show different options for using gel polish and shellac. It is important to perform a French manicure with an inverted reverse moon, an additional pattern, a double stripe, or replacing the white color along the edge with a bright palette.
Fashion trends for French manicure in the salon and at home
French manicure, or French manicure, has been in the top spot for decades, but still not all masters know how to make such a manicure smooth and long-lasting. Meanwhile, many consider it an essential attribute of a woman who wants to look elegant. In our article we will tell you everything about the most popular nail design, from its appearance to step-by-step master classes with photos.
How did the French jacket become fashionable?
French manicure its appearance to Hollywood. Screen stars of yesteryear—Grace Kelly, Sophia Loren, Vivien Leigh—changed outfits for different takes several times during a shooting day. Each time the actresses had to get a new manicure to match the next dress and makeup. To get away from this, the film industry turned to Jeff Pink, a nail polish specialist, to come up with a universal design for all occasions. This is how the familiar white “smile” at the tip of the nail appeared - a simple and sophisticated decor, close to the look of healthy natural nails. In those years, trends prevailed to position beauty products as French, so the design of nails “according to Jeff Pink” was dubbed French manicure.
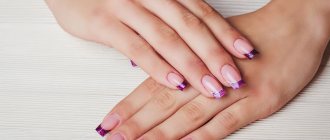
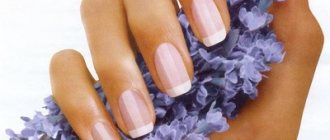
What does a classic nail design look like in a French manicure?
The main element of this design is the white tip of the nail, or smile. It is by this that one can judge the professionalism of the master. The smile should be even and deep: this will visually lengthen the nail. In addition, the technology for drawing a smile must ensure its durability, because it is the tip of the nail that is subject to stress during everyday activities.
The nail bed must be coated with a natural pink shade, or camouflage. This ensures that your manicure looks great even weeks after your visit to the salon. If you do not camouflage your nail, then in a couple of days a transparent strip of overgrown nail will appear next to your smile, and the manicure will become untidy.
How to choose pink polish or gel polish for a French manicure
To do a French manicure, you will need a pink camouflage polish; it helps to hide the imperfections of the natural nail and hide the regrowth line of the free edge. There are photos of new products in the camouflage lines for French nails on the Internet. Sparkles, chameleon effect, all shades of pink and beige - how to choose “your” colors in such a variety?
To make a French manicure look good with your skin tone, follow these rules:
- For fair skin, choose soft pink and peach shades.
- For dark skin, shades of beige and “dusty rose” are suitable.
- If you need a “going out” manicure, take a closer look at gels and polishes with small glitter.
- The contrast of camouflage and a smile made with snow-white varnish or gel looks impressive.
- For a more natural effect, choose muted white and milky colors.
Recently, the opinion that one can judge her by the appearance of a woman’s hands has become very popular. It’s quite difficult to disagree with this, because if your hands are dirty and unkempt, then the desire to interact with a person disappears.
One of the most popular and popular types of manicure is the “French manicure” or as it is otherwise called “French”.
This type of manicure involves covering the nail with white or colored varnish or gel from the middle or grown part of the nail and covering it with a second translucent layer of varnish. There is a wide variety of types of French manicure: classic, colored, millennium, non-standard with the use of additional materials. The undoubted advantage of the French coat is that it is suitable for almost any nail shape. French manicure looks very original and stylish, fashion for it doesn’t even think about passing, and it’s suitable for absolutely any event. Most often, French manicure is performed using white and translucent varnish, which is applied as a fixative. Few people know which brush to paint French hair with correctly. More on this later.
To perform a neat French manicure yourself, you cannot do without a special brush, which is used to apply the so-called “smile” to the nail plate. There is a huge selection of manicure brushes, to choose the right one, you need to know some rules. All manicure brushes can be divided into several types, depending on the material from which they are made and the thickness of the brush itself. Nowadays there are French brushes on sale, both made from natural and artificial materials. Natural tassels for French coats are mainly made from sable or kolinsky fur. Artificial brushes are made from polymers such as nylon.
By size, brushes are divided into numbers from 0 to 8. For a French manicure, the most suitable would be a thin brush with a thickness number of 0, having a width of no more than 1 mm, it is desirable that it be made of natural material, since such a brush is softer and will last much longer than artificial. Using a thin brush, you can perfectly draw a “smile” on your nail. You can also use a brush with a flat edge. It will allow you to draw a thin, even line, and remove the excess with a thin brush dipped in nail polish remover. It is better to flatten the flat brush on both sides to get rid of the excess after the flat brush is saturated with varnish. But you may not be able to achieve the desired result the first time. But with experience, only perfect drawings will definitely come out and the French manicure will turn out perfect.
You can also use a brush with a beveled edge. This brush is suitable for both short and long nails. This brush has wide and fairly dense bristles, and the tip is beveled. Such a brush is soaked in varnish, then two stripes are drawn perpendicular to the nail: from the edges of the nail to the middle. To give clarity and evenness to the resulting pattern, you need to draw a dividing line with the long part of the brush. A French beveled brush looks great on long nails. If you want to make a very deep French coat, then a brush with a beveled tip will be most suitable for this, since a thin tip can correct some imperfections when applying varnish or gel.
Of course, for different types of French it is better to use different brushes. A thin brush is perfect if your nails are short. With it you can easily draw thin and neat lines. On long nails, it is better to use a flat brush with not very long bristles, drawing a stripe without lifting the brush from the nail. The angled brush can be used for both long and short nails.
The main thing when applying a French manicure is accuracy. It’s better to try applying varnish with all types of brushes, and only then decide which brush is more convenient for painting French. Only by trial and error can you make the right choice of the right tool for work in the salon or at home, which will serve for years. .
For the first works, it is better to purchase brushes made from artificial materials, because they are inexpensive, and you have the opportunity to choose the most suitable option for yourself. And don’t forget that the perfect French jacket is a matter of experience.
What is the best way to make French? Gel, acrylic, shellac, false nails and other materials
There are several ways to do a French manicure. Each technology implies a beautiful and durable French manicure, provided that a professional works. When looking at pictures from the Internet, you are unlikely to determine what the master worked with, because the result will be equally good. To choose a material, evaluate what result you want to achieve.
- Acrylic and gel extensions - high durability of the coating (correction after 3-4 weeks), long procedure (from 1.5 hours), high cost.
- Gel polish - average durability (correction after 1-2 weeks), quick procedure, average price.
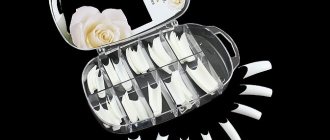
- False nails - low durability (correction after 7-10 days), quick procedure, affordable price.
- Nail polish - the lowest durability (from 3 to 7 days), quick application, affordable price.
Subtleties of working with shellac
A few important nuances that will help you avoid common mistakes:
- After cleaning, do not apply any care products. It is better to do this after completing the manicure.
- To draw a smile line, both at home and in the salon, you cannot use stencils. Mark it with a large brush with 2 strokes towards the center, dry, then apply a second coat and adjust with a thin brush.
- The brush you use to process the free edge must be pressed well. It's better if it's short.
- We apply each layer (base, pigment, and top) to the end of the nail. Otherwise, the manicure will wear out in a few days.
- Regarding drying: if you have a UV lamp with a power lower than 36 Watt, dry the base for 2 minutes, color - 3 minutes for each layer, top - 3 minutes. If the lamp is 36 Watt, then the time is 1.2 and 2 minutes, and if you have an LED lamp, then 10, 30 and 30 seconds, respectively.
- If colored varnish is chosen for the base of the French coat, it needs to be dried for one and a half minutes, not 2.
- White shellac needs to be kept in the lamp for a shorter amount of time - it may turn yellow. For elements of this color, we reduce the drying time by 30 seconds or by 10 seconds for an LED device.
These details are very important both for the quality of the manicure and for its durability. Of course, even if all the rules are followed, after 3-4 weeks the manicure will need to be changed, and the answer to the question: how to remove shellac, you will find on the pages of our website.
French acrylic
In acrylic extensions on tips or forms, the French is laid out with two balls: first, a camouflage is formed from pink powder, then a smile is formed from white powder. The higher the professionalism of the master, the less sawdust the finished nail requires.
For those who work with acrylic, we have prepared a selection of three training videos. From them you will learn the secrets of quickly laying out acrylic on tips and forms with minimal cutting, and also see how professionals lay out a smile the first time.
French nail polish
If you are in doubt about the best way to do a French manicure at home at minimal cost, then start with a regular one.
nail polish. Both ready-made kits and all components separately are available for sale. The kits usually include:
- base coat;
- pink camouflage;
- white nail polish for a smile;
- top coat for durability and shine.
To get an even smile line the first time, use stencils for a French manicure.
Short nails and French nails are friends forever
The ideal manicure option for short nails is a classic French manicure. It makes your fingers graceful and well-groomed. In addition, skillful application of decor visually lengthens the nail plate. It is better not to decorate French manicure on short nails with a lot of sparkles and stones, because a too rich design in this case looks vulgar.
According to ideal nail art criteria, the colored edge in a French manicure should not occupy more than a quarter of the base of the nail.
French manicure has been popular for over 30 years. It is ideal for any occasion: wedding, date or every day. Doing it correctly at home is inexpensive and easy. Buy a manicure set, French polishes, special stencils, whitening pencil or tape. You can practice drawing a thin and even line at the end of the nail by hand - after a while you will have excellent skills in making a French cut yourself.
More interesting articles:
How to make an express French look with ready-made Dashing Diva tips
Do you urgently need a French manicure at home, but you don’t have a UV lamp and your drawing skills are failing? Keep on hand the new product from Dashing Diva - the new generation of Virtual Nails French false nails. In our video tutorial, we talk about this miracle product and show how you can “conjure up” a long-lasting manicure in a matter of minutes.
Another new product from this brand is French Wrap Plus tips. With their help, you will make an equally neat French jacket with your own hands, if you carefully look at our photo tutorial.
General rules for performing French
French manicure in the classic version requires compliance with certain rules. If you do a manicure yourself at home, you need to consider the following details:
- A French smile is formed by determining the central axis of the finger, from which it is necessary to symmetrically extend curved smiles to the side ridges.
- It is necessary to designate the end points of smiles in advance.
- The length of the white part of a classic jacket should be at least half as long as the beige part.
- Do-it-yourself French must be created on pre-processed plates.
First method: French using stencils
You can make a French jacket at home using stencils and special blanks. The advantages of this technique for creating a manicure include ease of use, low cost of material and a guaranteed even bend. The disadvantage of paper blanks is that there is a small probability of varnish flowing under the stencil if its fit is not tight enough. Stencils are divided into two types:
- disposable (paper or vinyl films with adhesive backing);
- reusable (plastic or metal plates with a relief pattern).
For a French manicure, as a rule, the first version of stencils is used; they are more convenient when creating a manicure for yourself. The difference between vinyl and paper stickers is the tightness of their adherence to the plate. Vinyl provides reliable protection against varnish bleeding
You can make stencils yourself by making blanks from stationery tape.
French manicure is done at home with regular varnish. In addition to this you will need:
- files of different abrasiveness;
- orange stick;
- cuticle remover;
- stencils for manicure or blanks made from regular tape;
- base;
- top;
- a set of varnishes of two or more colors.
Below are detailed instructions on how to step by step create the perfect traditional French jacket using a stencil:
- It is necessary to give the free edge of each plate the same shape and length.
- Remove the previous layer of varnish.
- Apply cuticle remover and push it back using an orange stick.
- Wash your hands and dry them.
- Carefully apply the base coat and seal the end of the nail, thanks to it the polish will last longer on the nails and the coating will be even.
- If desired, apply a semi-transparent polish or a light pink shade to the nail and wait until it dries completely.
- Using tweezers, separate the stencils from the adhesive base, stick them onto the plates, stepping back a few millimeters from the free edge of the nail, and press tightly with an orange stick or pusher, avoiding bubbles and peeling. Pay special attention to the areas near the side rollers and the bottom so that varnish does not leak there.
- Cover the free edge of the plate with two layers of white varnish and let dry.
- Peel off the strips.
- Cover your nails with top coat and dry it.
It is easy to create a French manicure using this technology; it is important to monitor the tightness of the adhesive strip; the remaining stages of creating a manicure do not require specific skills from the girl.
Second method: French with a brush
You can learn how to paint French nails with a brush. Working with a brush is distinguished by its “jewellery” and low cost: you don’t need to spend money on buying stencils. However, you need to be able to draw French correctly.
Manicure brushes can be made with kolinsky or sable fur bristles and can have nylon bristles. It is more convenient to do French with a zero-thickness brush made of natural material.
For French brushes, flat brushes with medium-length bristles are ideal. Before use, it should be flattened on both sides to form a clear line. Uneven application should be removed with a thin brush, previously soaked in nail polish remover.
The brush with a beveled edge is universal, so it is also suitable for French manicure. Use such a brush to move from the periungual ridges to the middle of the nail, then they are connected by a line parallel to the base.
French is performed as follows:
- It is necessary to remove the cuticle, shape the nails and cover them with a base and beige polish.
- You should draw by applying the flat part of the brush to the plate towards its axis. You need to work with the brush abruptly, constantly changing the angle of its location. The smile is drawn along the natural contour. It is important to change the angle frequently and make the next brush stroke, slightly overlapping the previous one.
- Paint over the remaining free edge of the nail.
- Apply clear varnish.
To technically perform this French method, you will need practice.
Third method: French using dots
You can do a French manicure using dots. Its advantage is minimal financial costs, but creating a beautiful smile will take a lot of time to practice. To properly do a French manicure using dots, you do not need to purchase additional tools or materials. The technique of performing a manicure is to draw a smile as follows: a few drops of varnish are applied to any plastic or glass coating, after which the tip of the dot is dipped in varnish, then with the tool a dot is placed on the center line of the plate and two at the rollers, retreating a few millimeters from the edge of the nail. The next stage: you need to put many dots along an imaginary smile and connect them along a rounded line. Otherwise, the stages of manicure are identical to those presented above.
Fourth method: French pencil for French
Using a French pencil is not always convenient, as it is quickly washed off and moves onto the skin of your fingers throughout the day. However, French manicure with its use looks especially beautiful and natural.
Nowadays, wax-based pencils have become widespread; they last longer on the plates. In addition to them, there are also regular pencils without added wax.
You must first remove particles of dirt and dust from under the nails with a special tool, then moisten the pencil in water and draw the area under the nail with smooth movements, painting over its free edge. You can remove pencil marks from the pad with a cotton swab dipped in water. Only two coats of clear varnish should be applied to the plate on the other side.
French gel polish
Perhaps the optimal combination of speed, durability and affordable price is French gel polish . This procedure is also most convenient from the client’s point of view:
- Fast (up to 1 hour).
- There is no unpleasant odor, as, for example, with acrylic extensions.
- The natural nail is not filed down when applying and removing the coating
- The coating polymerizes in a matter of seconds, no need to wait for it to dry.
Why does shellac from some artists last for weeks, while for others the coating begins to crack and chip off already on the third day? It's all about the subtleties and secrets of technology. For those who want to overcome peelings and delight clients (or yourself, if you do your nails at home), we have prepared lessons on French manicure with photos.
Prepare the client's hands
Remove the old covering and treat the client's hands with a disinfectant.
Prepare your natural nail
To prevent peeling at the base of the nail, carefully push back the cuticle with an orange stick. To make your work easier, apply Color Couture Entity One Cuticle Oil to the border between the nail and the skin. If the cuticle is very grown and dry, give the client a trimmed or European manicure.
Shape the free edge of the nail
Using a CND Kanga Board natural nail file, shape the free edge into an oval or square according to the client’s wishes.
Clean and degrease the nail plate
Wipe nail plate with Entity One Natural Nail Prep using Graham HandsDown Nail Wipes. This stage is needed to remove dust from the surface after sawing the free edge, fat, cuticle particles and other contaminants. Only on perfectly clean nails does French gel polish last without peeling. Be careful not to accidentally touch the client's nails with your fingers after treatment. If this happens, wipe the nail with the product again.
If the client has so-called “wet nails,” then additionally apply Entity One Nail Dehydrator. How to identify such a detail? Ask her how regular polish holds up. If even professional brands of varnish “live” on the client’s hands for 1-2 days, then the reason may be the moisture of the nail plate. Treatment with a dehydrator in this case will help make the coating more durable.
Apply primer
The primer will increase the adhesion of the gel polish to the nail plate and extend the life of the manicure. To perform French with Entity One gel polishes, you can choose between the acidic Entity One Nail Primer - for healthy nails, and the acid-free Entity One Nu Bond - for weak and damaged nails.
Apply base coat
Entity Base Coat protects nails from staining with gel polish pigments, evens out the surface and has a positive effect on durability. Apply the base in a thin layer, making sure to seal the end of the nail. Cure the coating in a UV lamp for 2 minutes or 30 seconds in an LED lamp.
Cover your nail with camouflage
Apply 1 or 2 coats of Nude Fishnets Translucent Beige/Peach Camouflage Gel Polish from Entity One Color Couture. Cure each layer in a lamp - 120 seconds for a UV lamp and 30 seconds for an LED lamp.
Use Entity One Spotlight Gel Polish to create a smile line, making sure to seal the end of the nail. It is better to make a smile in two thin layers, polymerizing each: this way the coating will lie smoothly and without bubbles. The lamp exposure time is the same: 2 minutes for a UV lamp and half a minute for LED equipment.
Masters disagree on how to paint a smile during a French manicure with gel polishes: with a brush from a bottle or with a separate thin brush? In fact, both methods have a right to exist. We have recorded for you a master class on French manicure with shellac, which shows both technologies for removing a smile. Take a look to make it easier to decide.
Treat your nails with a top coat
Entity One Color Couture, Top Coat provides additional protection against fading, damage and chipping, seals previous layers and extends wear life. Apply the top very thinly, not forgetting to cover the end. Curing time is the same as previous products.
Remove the sticky layer
Entity One Nail Prep is suitable not only for preparing the nail plate, but also for removing the dispersion layer. Place liquid onto Graham HandsDown Nail Wipes and buff your nails.
Please note that the stickiness is removed only from the top, and it remains on the previous layers, which improves the adhesion of the layers to each other.
Finish your manicure with cuticle oil.
Cuticle oil Color Couture Entity One Cuticle Oil 15 ml will provide the skin with softening, nutrition and protection. The product is suitable for sensitive skin.
French manicure with gel polish is ready.
You can order all the products used in this master class in our store with delivery to all cities of Russia.
You will also need a base tone and a white Entity One color coat.
Are you using Shellac products from CND? We have made for you a review of shellac shades suitable for camouflage and a white smile, and photographed a manicure using them step by step. You can view the photo tutorial and ask any questions about CND products here.
If you or your client needs a French manicure on short nails , then be sure to watch our video tutorial on how to create the perfect French manicure on short nails.
Master class on application
The application of any durable coating is done in a certain sequence. Shellac differs from varnish in its structure and requires preliminary preparation of the nails.
The step-by-step lesson will tell you how to make a French coat using shellac in 14 steps, and below you can consider in detail the most important points.
- Degrease the nail plate. It is important to apply the coating to the entire nail.
- Apply base varnish. Usually the base is applied in one layer, as opposed to a color coating. Do not forget to carefully paint the top layer of the nail so that the shellac does not begin to peel off. Dry the coating in an ultraviolet lamp for a minute.
- Apply one or two coats of camouflage shellac. Women with fair skin should give preference to pink shades of nail polish; darker-skinned ladies may consider light brown tones. Dry the layer in a lamp.
- Using white shellac, draw a smile line from edge to middle. It should be a rich color, for which it must be applied in two or three layers. Dry each layer in a lamp for two minutes.
- Apply top coat. The topcoat will adhere quite firmly even when applied in one layer. Dry in a UV lamp.
- Remove the sticky layer. For maximum protection and nourishment of nails, apply cuticle oil at the end of the procedure. Now you can forever forget about what it means to renew your manicure every three days!
The video will also help you understand some nuances: