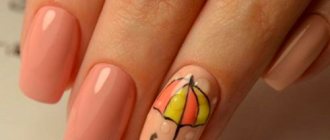
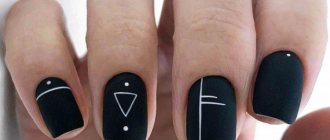
What is thermal film for nails
Manicure with thermal film
This product first appeared in the United States as a replacement for hand-painted nails. Initially, it was less durable and was used as a disposable manicure material. With the development of new technologies in the nail industry, thermal film has changed and become much stronger. Now it holds firm on natural and extended nails .
Currently, film is produced by a wide range of manufacturers, and the most popular are Omnia, NCLA and Minx. Thermal films of the latter have gained such popularity that their name has become a household name. The principle of minx manicure is that the thermal film becomes elastic under the influence of hot air, easily lies on the nail, freely repeating its shape.
What is thermal film?
Thermal film for nails is a relatively new product in the nail art industry. It appeared in the USA, receiving the resounding definition of “Hollywood manicure” or minx manicure. Initially, thermal film (minx) was, according to its developers Dawn Lynch-Goodwin and Janice Jordan, an excellent alternative to hand-painted nails. But, unfortunately, it was not particularly durable, and therefore its use was recommended for social events or especially important occasions.
Today, the situation has changed somewhat, primarily due to improved application technology. More durable analogues of the original minx film can be used not only on natural nails, but also on extended ones, and at the same time they retain all the advantages of the original thermal film.
The advantages of thermal film used for nail design are three main characteristics. Firstly , this is the ease with which an exquisite manicure is performed. In order to decorate your nails with luxurious patterns, for example, trendy lace ones, you don’t have to have artistic talents, you just need to choose the appropriate print. Secondly , this manicure can be done quite quickly even at home. And thirdly , this is the hypoallergenicity of the materials used to create the thermal film.
Advantages and disadvantages of minx manicure
Manicure using thermal film has a number of advantages:
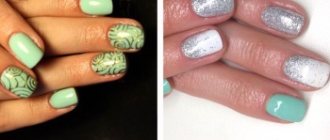
Manicure with thermal film has many advantages
- Thermal film does not cause an allergic reaction and does not have an unpleasant odor.
- Withstands any mechanical damage and retains the effect for several weeks.
- A huge palette of thermal film designs makes it possible to create a manicure to suit every taste.
- The film is easily removed from nails and does not require the use of chemicals.
- The technology allows you to do a manicure no more than once every 3 weeks . Now you don’t need to paint your nails regularly and be afraid of damaging the polish.
The minx manicure has no disadvantages, except perhaps the high price for the work of a master in a nail salon and the need for some skill when applying at home.
What you need to apply thermal film to your nails and how to apply: instructions
A few years ago, manicures with thermal film were only available in the salon. Now you can buy this material in any specialty store , and it will cost less than in a salon . So everyone can try to make such an original manicure on their own.
When drying with a hairdryer, the thermal film may become dull
In addition to the film, you will also need some equipment , such as a special lamp (although some craftsmen claim that you can get by with an ordinary hair dryer) and other tools.
So, here's what you'll need for minx design :
- Manicure scissors
- Wooden stick
- Sanding file
- Thermal film
- Means for degreasing marigolds
- Special lamp or regular hair dryer
Another important factor that you cannot do without is patience and at least 30-40 minutes of time:
- First, get your nails in order : remove the polish, file your nails, polish and degrease them
- Next you need to cut off the required amount of thermal film , but be sure to cut with a margin
- Use a wooden stick or toothpick to separate the sticker from the film . Then warm it up well under a lamp or hairdryer
- Apply the still warm film to the nail plate, straighten it and press it lightly
- Now dry for 4 minutes under the lamp. Make sure the thermal film dries well and sticks to your nails.
- Uneven edges should be trimmed with scissors and filed with a nail file.
- To further protect the material, coat it with a colorless fixing varnish.
A minimum of effort - and a magnificent manicure that even Hollywood celebrities will envy is ready! Flawless nails will delight you for more than two weeks .
Methods for creating film manicure
A fashionable manicure can be done in a beauty salon or at home. Let's take a closer look at each option.
Salon procedure
The master does a regular manicure, removes the cuticle and gives the nail plate the desired shape. After this, he heats the thermal film under a special lamp, then applies the material to the nails. Excess parts of the film are carefully removed from the plate with nail scissors. The entire procedure takes approximately half an hour to complete.
Manicure with thermal film at home
You can easily create a fashionable manicure at home. To do this, you need to stock up on the following tools and resources:
Tools and materials for applying thermal film to nails
- Nail file.
- Orange stick for removing cuticles.
- Nail scissors.
- Ultraviolet lamp for heating thermal film or hair dryer.
- Thermal film.
- Tweezers.
- Base coat.
- Nail degreaser.
- Finish coating.
Step-by-step instructions for home manicure with film consists of the following steps:
- Prepare your nails for a manicure: take a relaxing bath and carefully remove the cuticle. Poor quality nail treatment leads to the thermal film quickly peeling off the nail plate.
- Give the nail the desired shape .
- We adjust the thermal stickers to the size of the nail plate . If necessary, trim the thermal film with scissors.
- Degrease the nail plate and apply a base coat on top.
- Immediately peel the film off the paper using an orange stick. Carefully take the material with tweezers and apply it to the nail.
- We press the thermal adhesive onto the plate, paying special attention to the area near the cuticle. Immediately place your hands under an ultraviolet lamp for a few seconds, or you can direct a stream of hot air from a hairdryer onto your nails. When heated, the sticker will become soft and can be easily placed on the nail or moved in the desired direction.
- Gently smooth the surface with an orange stick. It is important to get rid of air bubbles that have formed under the film.
- If the edges of the sticker extend beyond the border of the nail, trim them using a nail file.
The process of manicure of nails with thermal film
At the end of the manicure, it is recommended to apply a finishing coat to the surface of the nails; thanks to it, the film will last up to 3 weeks.
You can do a manicure according to the proposed scheme, or you can apply thermal film to your nails, preheating it as shown in the video tutorial:
Step-by-step application instructions
Having understood what a manicure thermal coating is, you can begin to study the instructions on how to apply thermal film to your nails correctly.
The first step is to prepare the nail plate and cuticle. Nail art masters note that only dry or machine manicure is suitable for applying thermal film.
The second step is to cover the nail with a nail fresher, which is designed to degrease and slightly dry the natural nail plate. Then, if gel polish is used in the manicure, you should apply Ultrabond, which helps strengthen the varnish bond and the surface of the nail.
The third step is to apply the base coat. This step will allow you to perfectly level the surface of the nail before you start gluing the selected thermal film design. After the base has dried completely, nail art experts recommend removing the sticky layer.
The fourth step is the design itself. Thermal film can decorate all nails, or it can be located on only a few of them. Therefore, it is better to apply varnish to those places that remain free from design. After that, with light movements of a fine abrasive buff, the surface of the plate is lightly wiped to ensure better fastening of the film. Next, the selected sticker is removed from the backing, holding it with tweezers, and using a hair dryer or a regular lamp, heat it for about 10 seconds until it becomes soft. After which it is applied to the nail, starting from the cuticle line and ending with the tip. With gentle movements of an orange stick or a cotton pad, the film is smoothed on the nail, and any excess is carefully cut off with nail scissors. The last action at this stage is to carefully file the ends, on which thermal film has already been applied, with a glass file or a file for natural nails, in order to form an even cut.
Manicure ideas with thermal film
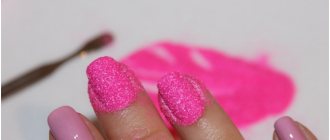
Manicure for a glamorous party
For such an event you need to use thermal film with glitter. It usually resembles gold or silver foil. This material will shimmer elegantly at a party and create a bright effect. You can use this film only on individual nails.
Vacation idea
If you are going on a beach holiday, then for nail design you need to use material with various bright prints: yellow, red, pink. A great idea would be to purchase thermal film with beach designs. For example, this could be a wave pattern in rich blue, bright tropical flowers or images of palm trees.
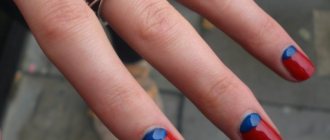
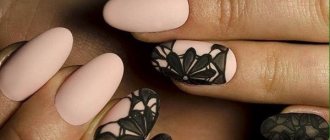
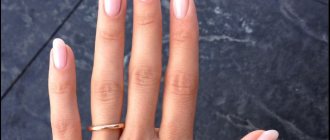
French manicure
Using thermal film you can create an original French manicure. To do this, you need to apply a “smile” of thermal film to the tip of the nail plate.
Manicure with stones
To do this, you need to choose a thermal film with a “casting” effect; with its help you can create precious stones on your nails.
How to apply foil without glue?
If you don’t have glue in your arsenal of nail accessories and you don’t want to buy it, a design with foil on your nails can be done without this product.
Most manicurists, knowing how to apply foil to nails, purchase adhesive tapes and stickers that are easy to apply without glue.
Instead, if you use foil film, you can use varnish, knowing how to stick the foil in this way.
If you don't have glue and want to apply cast foil on your nails, follow these guidelines:
- Remove the cuticle, buff the nail plate, and degrease it.
- Next, use the primer and wait until it dries completely. Do not use a lamp for this. Let it dry naturally.
- Cut or tear the foil. If you have it translated, you can skip this step.
- Apply base coat and dry with a lamp.
- Paint your nail plate with a suitable shade of polish. Dry each finger, one at a time, in the lamp. The coating needs to be completely dry.
- Apply foil covering and spread evenly.
- If the foil is transfer, remove the surface film.
- Cover the plate with top coat. Dry it thoroughly in a lamp.
- Remove stickiness.
Useful tips
- After a manicure with thermal film, you need to avoid contact with hot water . Otherwise, you can ruin the composition of the material, and the manicure will only last a couple of days.
- If during wearing the film begins to peel off, you can try to restore it. Just warm up your nails for a couple of seconds with a hairdryer and press the film onto the plate again. After this method, your manicure will be as good as new.
- Removing the film from nails will not be particularly difficult. You need to take some hot water into a bowl and dip your nails in it for 1-2 minutes. The film will come away from the plates on its own without the use of force.
- Always apply a topcoat to your nails . It will provide the film with additional protection. Otherwise, the thermal film will only last a week, especially if you use chemical cleaning products or frequently come into contact with hot water.
- not recommended to do this manicure before going to the sauna or solarium. Under the influence of temperature, the film will begin to peel off and become deformed; it will no longer be possible to restore such a manicure.
- Before doing the procedure at home, we recommend visiting a salon specialist. Then you can carefully follow the process of creating a minx manicure, learn how to use film and gain visual experience.
- Combine several colors of thermal film to create original and fashionable solutions.
Removing thermal film from nails is not difficult
Before performing a manicure yourself, we recommend visiting a specialist.
Manicure using thermal film is simple, and the benefits of its use are obvious. Having mastered the technique of manicure with a minx coating, you can easily create it at home. Experiment and create bright masterpieces using thermal film for nails.
More interesting articles:
Hollywood manicure with thermal film
The history of the creation of this unusual manicure is very interesting. One day, two friends, one of whom lived in Australia and the other in America, got together to come up with some stunning manicure.
First of all, they sought to make it durable , since one of them worked in a car repair shop. And I wanted to be beautiful even in such a “dirty” job. Technical film coating technology has been known for a long time . And the ladies thought: why not apply this idea for manicure.
Protective film has begun to gain popularity in the states. Metallic shine, golden or silvery nails – isn’t this a real breakthrough in the beauty industry ! Hollywood stars impeccable nail art with pleasure .
Under the spotlight and camera flashes, such an unusual manicure looked especially bright and catchy. After some time, thermal film became available to beauties all over the world .
an unusual manicure is that it can be easily done at home .
Are you going to a party or social event? Then you can safely use golden or silver tones. They will shimmer beautifully and attract attention . For everyday use, there are more muted tones of thermal film. In any case, your nails will look original and flawless .
Simple rules for manicure care
On average, thermal films for nails can decorate a manicure for about two weeks, but with proper care, the period increases to three weeks. The main thing is to adhere to certain rules, for example:
- For the first few days, avoid contact with water, not only hot, but also warm, and, if possible, delegate all household chores to your family. If this option is not suitable, use rubber gloves while cleaning.
- Take a daily shower for about 10 minutes; it is best not to visit the sauna or bathhouse.
- Avoid increased stress on your nails.
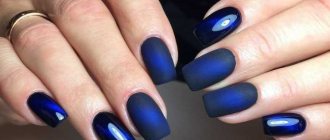
It is worth noting that color and texture also matter, therefore, to extend the life of a manicure based on thermal film, it is best to decorate your nails in a shiny Hollywood style or choose a striped design based on foil.
- If the edges of the film begin to peel off, do not panic too much and completely remove the product. You just need to use a hairdryer to warm up the sticker a little, and then press it tightly to the nail plate.
- During the procedure, you need to apply the film carefully, carefully checking each area and pressing the base tightly against the nail plate.
- In order for the thermal film on nails to have a maximum service life, experts recommend using only trusted nail manufacturers and covering the surface with gel polish.
Nail design with thermal film in a professional setting
If we compare price criteria, we can say for sure that a manicure made with thermal film is more expensive than a nail design based on a traditional varnish coating or a manicure done at home. However, by turning to a professional, you do not risk spoiling the material or applying the film unevenly; the nail artist takes full responsibility for the positive result. But in order to understand the work of a professional and not be deceived, you need to know about the sequence of the procedure:
- First of all, the nail artist must prepare the nails by doing a classic manicure.
- The selected film is heated under an ultraviolet lamp and carefully applied to the surface of the nail plate.
- At the final stage, the master must remove excess thermal tape and file down any irregularities.
- If you decide to fix the design, the master will cover the nail with topcoat or clear varnish.