How to apply marmalade for nails: basic rules
The application technique is quite simple - below we will discuss nail designs with marmalade step by step. The procedure includes several main steps:
- Get a manicure - process the cuticle, shape, polish and level the nail plate with a buff. Create a carousel Add a description
- Treat your nails with a degreaser, apply a base, dry for 1 minute in an LED lamp, 2 minutes in a UV lamp. Create a carousel Add a description
- Apply the selected color shade and finishing coat - each layer is thoroughly dried in a lamp. Create a carousel Add a description
- Without removing the sticky layer, pour colored sand, rub it into the nail plate, and remove excess material with a brush. Create a carousel Add a description
- Cover your nails with topcoat and dry for 2 minutes in a UV lamp (1 minute in an LED).
It is important not only to understand how to apply marmalade for nail design, but also to take into account an important nuance, which is the choice of colors. When choosing a shade, you need to take into account that in the dry version, sand looks slightly different than when applied to the nail plate.
Creating the “marmalade” effect
When creating a manicure with gel polish, you must carefully follow the instructions for its use. This determines how durable the manicure will be. We provide step-by-step instructions on how to apply marmalade for nail design yourself and at home:
- The first thing you need to do is prepare your nails well, that is, do a basic manicure. You need to give your nails the desired shape and carefully treat the cuticles.
- Before applying gel polish, the nail plates must be as smooth as possible, so we apply a buffer to them.
- The next step is to treat your nails with a degreaser. Once it is applied, the nail plate should not be touched.
- Primer is applied to the nails. This is done in order to open the scales of the nail plate. This way the interaction with the gel polish will be as dense as possible. After applying the primer, you must wait until the nail turns white.
- We apply a transparent base and send the nails to dry under an ultraviolet lamp. Drying time is indicated in the instructions for the base. After drying, remove the sticky layer.
- Next, a color layer is applied. It should not be very thick so that it does not flow or crack when drying. It also dries under an ultraviolet lamp. Then we do not erase the sticky layer, but proceed to applying powder.
- Apply colored sand to the sticky layer and gently rub it in with a brush. Then we brush off the excess material.
- We cover the nail plates with the finishing coat and dry them in an ultraviolet lamp for two minutes.
This is how the “marmalade” nail design is obtained, the photo of which we see in the article. Everything is quite quick and simple, the main thing is to remember the sequence.
How to make marmalade on your nails with a “sugar” manicure effect
How to make marmalade on your nails to get a voluminous texture? In this case, a different method of applying velvet sand is used. You need to completely complete the manicure, remove the sticky layer, and perform the following steps:
- Apply base coat to the nail plate.
- Cover with marmalade, carefully spreading it over the nail.
- Dry in a UV lamp for 2 minutes, remove excess with a brush - no final coating required.
It is important to carry out the marmalade design on nails according to the steps described above - accuracy in work and strict adherence to technology will help you get an impressive result. You need to remove marmalade just like gel polish - for this purpose, a special product is used, which is applied to a cotton swab and fixed on the nail with foil. After the required time, all that remains is to remove the remaining coating.
Creating “candied” marigolds
The sequence of performing a “sugar” manicure is not much different from the “marmalade” technique for nail design. Several nuances change.
We repeat points 1–5 exactly as for “marmalade”, but in point 6 the final stage will be the complete removal of the sticky layer and obtaining a completely finished nail. After this, apply a base (rubber) to the nail plate and sprinkle it with powder on top. You shouldn’t skimp on consumables when applying it to your nail. Next, put it in the lamp for 2 minutes. And we take out the ready-made “sugar” marigolds. Remaining material can be easily removed with a brush. There is no need to additionally coat the nail plate with “finish”.
The instructions for creating the “marmalade” style for nail design indicate that the colored gel polish is applied in one layer. But if there is a need to apply a second layer to create a pattern or increase color density, then no one forbids doing this.
How to use marmalade for nail design: important nuances
To figure out how to properly apply marmalade on your nails, you should use professional secrets that will be useful to both beginners and experienced professionals. Namely:
- You need to apply the topcoat with a separate brush, thoroughly cleaning it before each immersion in a bottle of topcoat - for this purpose, you should moisten a lint-free cloth with gel polish remover and keep it handy. Otherwise, shining particles will get into the top, and it will be damaged.
- The question often arises about how to make marmalade on nails, creating beautiful patterns. To do this, you need to perform a classic manicure, remove the sticky layer, and then apply the selected design with a thin brush. All that remains is to cover it with sand crystals and dry it in a lamp.
- It is better to use a white shade as a basis for any drawings - it does not change the color of the marmalade.
Tips on how to apply marmalade for nails will help you understand the nuances of the procedure - and then the first time you will be able to create a beautiful manicure with an unusual texture.
Step-by-step instruction
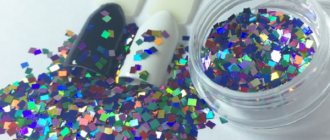
Melange for nails looks like small multi-colored sugar crystals or confectionery sprinkles. Applied to nails, it creates the effect of an original “candied” surface, which looks very unusual and interesting. Making this nail design is very simple - any girl can handle it. We bring to your attention step-by-step instructions so that you can be convinced of the simplicity of this nail art.
- Prepare your nails for applying decorative coating. Get a hygienic manicure, give your nails a beautiful shape, and degrease the surface.
- Melange is usually used to decorate only one nail, and the rest are covered with a monochrome coating, designs or something else at your discretion. Therefore, cover all the nails with the base, then with the main color, leaving the ring finger untouched. Dry in a lamp.
- Cover the nail of the ring finger with a layer of thick top or base. Now you need to apply the melange. Sprinkle it onto the nail using a spatula, holding your finger over the jar or lid. Make sure that there are no uncovered areas on the nail. Dry in the lamp twice as long as usual.
- Brush off excess decor with a brush.
As you can see, getting the marmalade effect on your nails is very easy. Melange can be used in other ways. For example, apply to patterns painted with acrylic paints, or use as a rub. When rubbed, you get a completely different manicure, closer to the traditional one, but no less beautiful. You will find all three options for using “marmalade decor” in an interesting video.
Nail design with marmalade: photo
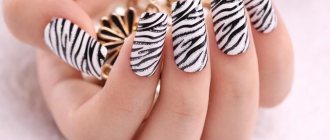
“Sugar” or “marmalade” manicure is a spectacular idea. Sand looks best in combination with bright, rich shades: red, purple, blue. Below are photos of nail designs with marmalade that will help you appreciate the beauty and originality of this design.
Some tips for applying melange
You are already convinced that there is nothing complicated in creating a marmalade manicure. You will definitely succeed the first time - there will be no unsuccessful attempts. To make it even easier for you to master this simple art, be sure to read our recommendations.
- If the base gel polish has a sticky layer, then the melange can be applied directly to it. If there is no sticky layer, then first coat your nails with a base or top coat. According to the observations of many women, melange on the base lasts longer than on the top.
- The coating turns out to be rough, which is not always convenient from a practical point of view. If you don’t like it, then simply cover the design with a layer of topcoat and dry it in a lamp - the surface will become smooth.
- The most convenient way to apply “marmalade” is with a pusher. It is better to do this directly above the jar with the decor so that the excess pours back. This way you will significantly reduce material consumption.
- Sprinkle the melange starting from the nail hole to the free edge to distribute the particles evenly.
- Be sure to dry the design well in a lamp. Drying time is twice as long as when using gel polish.
Photo gallery of bright and juicy nail art
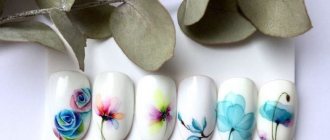
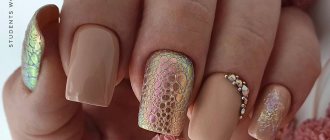
A manicure using a special melange sprinkle turns out unusual, bright and very stylish. By using your imagination, you can create different designs every time. Melange can be applied to just one nail to complement the design or to all of them at once for maximum saturation. Nail design can be complemented with rhinestones, painting and other decorative elements. After looking at the photo, you will understand why marmalade nails have become so popular.
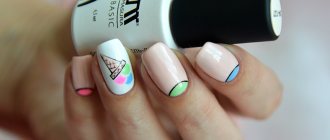
This beautiful manicure can be done using melange for nail design. This will take you a minimum of time and effort, and the result will certainly exceed all expectations. We highly recommend that you learn how to make a beautiful matte geometric manicure using marmalade. You will find a detailed tutorial on how to perform this nail art in the final video.
Nail design with marmalade is perhaps the most delicious design option. In its structure, it looks like a cross between velvet sand, sparkles and broths. But it has its own advantages over each of these materials.
Pros of marmalade:
- creates a velvet effect on the nails, and marmalade creates a sugar effect;
- give a pronounced shine, but with marmalade it’s more like a shimmer rather than a shine - very subtle and delicate,
- They look like droplets of water, but the marmalade fully lives up to its name and creates the effect of a delicious delicacy.
Despite the fact that marmalade nail design looks very unusual, it can easily be used in everyday life and even integrated into a business dress code. There will be no problems with application either - you can even do it at home, since no special means are required to attach the marmalade.
So, how to make a manicure using sugar?
1. Prepare your nails for design, apply and dry.
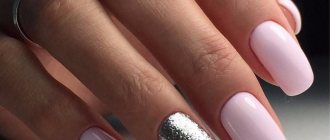
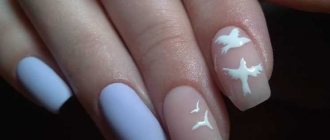
2. Cover your nails with colored gel polish and dry in a lamp. Pink, lilac and peach shades look the most delicious. We used the following:
3. Cover the nail chosen for the design and use a small amount of marmalade to cover the entire surface of the nail. Dry in a lamp and remove excess with a brush.
4. Cover all other nails with top coat and dry. The design is ready!
As you can see, there are no difficulties in application and even a beginner can cope with it. Experiment and surprise others with your bright and unusual manicure!
Choose your color to create a stunning design!
Basic rules for applying marmalade for nails. The procedure includes several stages:
- We provide a high-quality manicure with complete treatment of the cuticle, shape the nails, polish and level the nail plate using a buff.
- Thoroughly degrease nails, apply base coat, dry for 1-2 minutes.
- Apply 2 thin layers of colored gel polish. Dry all layers thoroughly.
- Without removing the sticky layer of the colored coating, pour colored sand onto the nails, gently rubbing it into the nail plate, removing the excess.
- We cover the nails with top gel polish and dry for 2 minutes in a UV lamp (or 1 minute in an LED lamp).
It is important to take into account a small nuance when choosing a shade; in the dry version, the sand looks a little different than when applied directly. It is advisable to avoid faded and overly variegated colors.