Almost all the time, women's hands are in plain sight, which is why it is so important to properly care for them. A beautiful manicure is part of the beauty routine, and in this article we will tell you how to give yourself an excellent manicure correctly, quickly and with maximum savings of money and time.
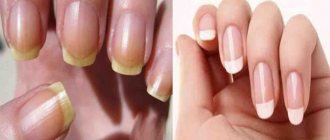
Where does any manicure begin? Of course, with nail care. You need to remove the cuticle and then give it a beautiful shape and attractive length. According to the latest fashion trends, the most current length can be called short - the edge of the nail protrudes only 1-3 millimeters.
Correct application of varnish
One of the main rules for covering nails with colored varnish is to apply a protective layer. Before painting the plates with a decorative shade, be sure to cover the nail with a special transparent coating. It comes in various types, and you need to choose it based on the characteristics of your hands:
- Crack filler - will make the nail smoother and without unevenness.
- The strengthening solution will not only create the necessary protective layer, but will also strengthen the plate from the inside.
Why is this necessary? By their nature, marigolds have a rather porous structure, which leads to the appearance of unsightly spots after decoration.
You need to apply the varnish in a small layer from the center of the nail plate - the result is a neat and even layer. For everything to work out in the best possible way, the brush needs to be set one or two millimeters from the beginning of the cuticle, and move forward. You need to cover the entire nail with three even and not sharp strokes. The root area is painted last using light shearing movements.
After the first thin layer of varnish has dried, you need to apply a second one - it will give the nail a rich color and cover all possible gaps in the first layer. You need to complete your perfect manicure with a transparent finish - a protective varnish.
Also, do not forget about such an important detail as correctly immersing the brush in a jar of varnish. If you do not follow this rule, the manicure may not turn out very neat and beautiful. The brush is immersed each time before applying varnish to the nail - get rid of excess by lightly touching the walls of the bottle.
Video: how to make a beautiful manicure at home
Doing a manicure yourself is not difficult, especially when you have video tutorials from the best masters at hand, where the process is described step by step. By following all the recommendations from the video instructions, you will learn how to carefully paint your nails at the cuticle, how to beautifully paint short nails, and others. Photos of manicure options will help you quickly decide on a color or style, and you will see how to properly paint your nails in different colors. A little patience and everything will start to work out for you.
Easy manicure
Smooth and neat around the cuticle
On short nails
Beautiful painted nails
Types of decorative manicure
In this article we will describe several methods of decorating women's marigolds. In fact, there are many more of them, and you can choose the right one for yourself from a huge list. In the coming new season, the most relevant and popular are:
French style. And not only its classic variations (natural coating and white edge), but also completely different shades - from bright pink or yellow, to rich burgundy and even black. French manicure is chosen by those who love universal options, since manicure is great for business meetings, romantic dates, and even for a wedding event. You can create a perfectly smooth French manicure at home using convenient stickers.
Aged paint effect. It is otherwise called craquelure and can be perfectly created at home without any effort. This technique involves applying two varnishes - a multi-colored smooth base and a coating with a cracking effect. This special varnish, after application, spreads across the nail plate in intricate patterns that make up an excellent overall picture. For beginning fashionistas, experts recommend experimenting with classic black craquelure, which goes well with gold, white or silver base polish.
"Scotch tape" patterns. You can create your own unique style using ordinary, familiar masking tape. It turns out that it is used not only by builders to protect surfaces from paint, but also by manicurists. The technique of using tape for manicure is clear to everyone:
- Apply the first layer of the selected varnish.
- After complete drying, use tape to protect areas that will not be painted over with a second layer of a different shade.
- After this, you can apply a second coat, and after three to five minutes the tape is removed.
You can use not only masking tape, but also stationery tape (often leaves sticky marks) or special thin manicure tape, which was invented specifically for this technique. Due to its structure, it can be used to create the finest decorative strips.
Important : If you want to get visually longer nails, apply vertical rather than horizontal stripes.
How to paint your nails beautifully and correctly
There are so many ways to do your own manicure that it’s impossible to list them all – you’re bound to miss one. However, the rules for preparing hands for the procedure and applying varnish are the same. Before you begin the process of coating the nail plate with varnish, make sure that you have gone through all the preparatory stages and the result of applying varnish will be a perfect manicure that can only be compared with salon manicure procedures.
Before opening a bottle of colored varnish, you need to remove the old coating, shape it, level the plate, remove the cuticle and finally treat the skin around it with nourishing oils:
- To remove old coating, try to choose high-quality products that do not contain acetone.
- The nails are shaped using a nail file. Everyone determines for themselves which type of this tool is more convenient to use at home.
- A nail file is also used to level the entire surface. A more convenient way is a manicure device with a special attachment, which in a matter of minutes will make the plate perfectly flat without damage.
- The cuticle needs to be removed very carefully using tongs or a special trimmer, which is often included in a manicure set.
- You need to treat the skin with vegetable oils (apricot, almond, olive) or special creams.
- How to know that a guardian angel has visited you: 11 signs
- Russians plan to abolish transport tax
- Long service bonus for military personnel - grounds for appointment and calculation procedure as a percentage
How to carefully apply varnish
The first thing worth noting is that before applying any type of varnish, it is necessary to cover the nail plate with a transparent base, especially for manicures for children. It will not only protect your nails from the harmful effects of the coating, but will also allow it to last much longer without chipping. To avoid having to worry about how to paint your nails evenly, there are simple step-by-step instructions for applying polish:
- Step back 3-4 mm from the base of the nail, draw a center line to the tip of the plate with a brush with varnish.
- From the same place, draw another line to the tip of the nail, but this time painting one of the sides.
- Repeat on the other side.
- Finish the procedure by drawing a horizontal line along the tip of the nail, thereby securing the polish.
- Let the coating dry on its own or use a hair dryer to speed up the process.
Gel polish
Shellac is a new way to give your nails a new look, while maintaining it for up to 1 month. The coating is so durable that you will not see chips or cracks for a long time, and the color of the gel polish will remain until the very end of wear. If you do not know how to apply shellac correctly, then the instructions above will help you, the only difference is that drying occurs under an ultraviolet lamp, the light of which causes the coating to harden in a few seconds.
Simple varnish
When purchasing nail polish, choose a quality manufacturer, otherwise you risk using paint from an unknown manufacturer. In addition, varnishes from well-known brands are easy and even to apply. You will no longer have a question about how to beautifully paint your nails. They allow you to enjoy the results of your manicure longer. Good coatings are often more harmless than their cheaper counterparts. Application brushes also have a certain shape, which contributes to a smoother and faster application.
- 15 countries where you can get citizenship by buying a home
- Facial brush - how to use it correctly and choose an electric, silicone or ultrasonic one
- 40 ways to maintain healthy skin after 40
Color combination on nails
Recently, girls often choose multi-colored manicures. This trend has already firmly entered the fashion world, so the most famous brands specially produce sets of nail polishes so that you don’t have to think about which colors look best together. There are several types of combinations of varnishes that will help in the question of how to beautifully paint your nails in two colors:
- contrasting: yellow with purple, red with blue, etc.;
- monochrome: combinations of color shades, for example, pink with pale pink;
- related: similar colors, for example, blue and green, orange and red, etc.
When choosing colors, don't forget to consider your wardrobe. If you are doing a manicure for a specific outfit, then try to make sure that it does not stand out from the entire color scheme, or let the color of the varnish match some individual accessories - a handbag, a scarf, a bracelet, and the like. Dark colors are ideal for the colder months, while bright, rich, warm tones will look great in spring and summer.
Finishing coats for an extra shiny effect of your manicure
The topcoat is a real protection for the decorative layer, which must be maintained in an attractive condition. The finish protects against chips, cracks and scratches, and many products combine several additional functions. For example, the top can also be a dryer, reducing the drying time several times.
Add a stunning shine to your nails with a glossy or diamond finish. The beauty of this coating also lies in the fact that after several days of wearing your manicure, with the help of such a product you can renew it, giving it its original beauty and freshness.
How to paint your nails with regular polish?
In order for the coloring to be as uniform as possible, you should first warm up the bottle of varnish, for example, simply by rubbing it in your hands. After this, you need to put the required amount of varnish on the brush, after which the first layer is applied. To do this, drop a drop of varnish onto the nails near the cuticle, and then use a brush to stretch it along the entire plate. After the first layer has dried, you need to wait about two minutes and then apply the second. Nails painted in two layers look more vibrant due to the rich color. In general, this procedure will take a short amount of time, about half an hour.
Editor's choice: Fashionable nail ideas for 2021: design, current designs and shape
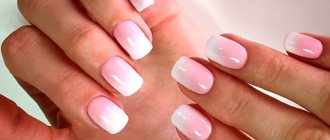
Two-color painting
The technology of painting in two colors is still popular today, since such a bright manicure will add chic to the image. There are several options that can be painted in two colors:
- Nails are painted alternately with different colors;
- Gradient manicure, when contrasting shades are combined with each other;
- Lunar manicure, when one color is used as the base and another color is used to color the hole.
- French manicure, if the base color is calm and the smile is brighter.
Painting in three colors
With the right choice of shades, you can create a beautiful and unique nail design. For example, if two colors predominate in a manicure, and a more contrasting pattern is applied. In addition, everyone’s favorite lunar manicure can be applied in such a way that the color of the hole and smile will be different; this option is most relevant in the summer season. No less interesting is a manicure, in which lines of different colors, arranged in a chaotic order, predominate. There are many options, the main thing is to give free rein to your imagination and keep the line so that the manicure does not look tasteless.
Gel polish coating technology
To properly paint your nails, you need to purchase special equipment and materials:
- UF lamp;
- set of nail files;
- pusher;
- buff;
- lint-free wipes;
- manicure set;
- primer;
- degreaser;
- base and top coat;
- gel polishes;
- decors;
- cuticle oil
So, a lamp that crystallizes gel polish is the main tool for performing manicure. Without it, nothing will work, which means you should purchase high-quality equipment. There are two types of lamps: LED and UF lamps. The first option is much more expensive than the second. The LED lamp is durable and does not require replacement of replaceable elements. However, this does not affect the quality of the manicure. The main characteristic of a lamp is power. It must be at least 36 watts.
In addition, the LED lamp will not be able to cope with all procedures. For example, gel extensions can no longer be performed using this equipment. Therefore, the most versatile and inexpensive option is a UF lamp.
Scissors, tweezers and files are the basis of any manicure. After all, before applying a colored coating, you must first put your nails in order and prepare them for painting. Therefore, you should not save on a manicure set.
There are two more important tools, without which the gel polish will not stick to the nails. These are: dehydrator and primer. A dehydrator - a degreaser is needed to thoroughly clean the natural keratin on the nail plates. This will ensure reliable adhesion of the gel coating and the nail.
What can replace nail degreaser? Many people advise replacing the expensive product with acetone or ethyl alcohol. However, craftsmen strongly recommend not to do this, since these products not only destroy natural fabric, but also do not remove the sticky layer from the surface well. In addition, applying acetone can change the color of the varnish.
Primer is a product that ensures reliable bonding of keratin with the decorative coating. Using a primer extends the life of your manicure.
Decorative manicure begins with applying a base and ends with a top coat. Between these layers is a colored gel polish. The base creates a kind of frame for the nails and protects the nail plate from pigment penetration. A base coat is especially important for ladies with brittle nails.
Top coat is the final layer of manicure. It creates reliable protection against mechanical damage, chips, and scratches.
Colored varnishes only play a decorative role. You should choose a color scheme based on personal preferences. You should not choose very expensive products. The shelf life of any gel polish is 2-3 years. Therefore, you can save on decorative products, and it is better to purchase top and finish from proven, reliable brands!
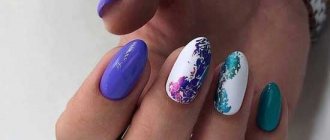
Decorative elements include: rhinestones, sparkles, stones, stickers, sliders. Decors create a mood and a distinctive design. You can buy the cheapest options, because they only decorate the manicure.
Sequence of applying gel polish
So, as soon as all the tools and supplies have been purchased, you should choose a time when no one will disturb you for 1-2 hours and get down to exciting work!
Step-by-step application of gel polish:
- First you need to do the basics - a hygienic manicure. It includes cutting the cuticle and removing hangnails. To prevent this process from causing pain, you need to steam your fingers in a bath and then cover the skin around the nail with cosmetic oil.
- Shaping the nail plate. As shown in the photo, there are several basic nail shapes. It should be noted that you should not “chase” length when your nails are in poor condition: brittle, peeling, etc. It is better to make the average length oval. It will look neat and beautiful!
- Next, prepare the surface. If there is an old coating on the nail, then the glossy layer should be removed. To do this, apply a buffer and wrap the nails in foil to enhance the chemical reaction. You can do this by placing your fingers under a lamp. After 1-2 minutes, unfold the foil and carefully remove the top layer of the old coating.
- Degrease the plate and then apply primer. You should cover not only the main surface, but also the ends of the nail.
- Apply the base in a thin layer. The product should be applied carefully so that it does not spread onto the cuticle and side surfaces.
- Applying decorative varnish in two layers. Moreover, the thumb is painted and dried separately. So, the first layer is applied very thinly to the 4 fingers of the right hand, and then the hand is placed under the lamp for 1-2 minutes. Then the same is done with the left hand. Next, proceed to the thumbs of one hand, and then the second. The second layer of colored varnish is applied in a thicker layer. It fills in all the gaps and also makes the color more saturated. The second layer is also “baked” under the lamp for 1-1.5 minutes. Place your thumbs separately under the lamp.
- How to apply gel polish correctly? You need to start painting from the middle, then paint the cuticle area in a semicircle, retreating 0.5 mm from the skin. This is important, because when the plate grows, the hole should be an even crescent. Then carefully paint the side surfaces of the nail, trying not to go beyond it. If the varnish gets on your skin, you should carefully remove the uneven edges using an orange stick.
- Application of decorative elements. There are no special rules here. It all depends on imagination and the chosen design. The main thing: do not overdo it with decorations. Excess rhinestones and sparkles can ruin the situation. The best option would be to choose a ready-made design from the pages of Internet portals.
- Secured with top coat. This coating is applied in a dense layer. Do not forget to seal the ends of the plate. This stage is very important - because the finishing coat preserves the durability of the manicure.
- Use a degreaser to remove the sticky layer. To do this, dip a cotton swab in this product and carefully treat each finger.
At the end of the procedure, moisturize the cuticle with aromatic oil. In its absence, you can simply lubricate your hands and cuticles with a good nourishing cream.
Shellac application technique
Shellac is not a type of varnish, but a new popular brand in the nail art industry. Why is shellac so popular?
Advantages of shellac:
- long-term coating;
- ease of removal and application;
- absence of traumatic events when removing the coating;
- protection of the nail plate from damage;
- wide range of colors;
- quick manicure process.
How to apply shellac correctly:
- Trim manicure.
- Removing the glossy layer from the nail plate. This is done using a buff. The main difference between applying gel polish and shellac is that in the latter version the surface of the nail is not filed off! It is lightly sanded until it becomes matte.
- Sweep away dust from the plates and then degrease them.
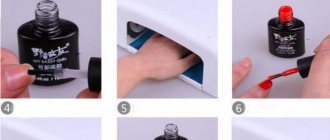
- Primer coating for good adhesion of natural fabric to artificial material. Dry the primer under the lamp for 1-2 minutes.
- Applying the base. This layer is also applied to the ends of the nail, and then dried under a lamp for 2 minutes.
- First color layer. As in the previous technique, first paint 4 fingers with a thin layer, and then dry them under a lamp, and then process the thumbs.
- Repeat the procedure, applying a second decorative layer.
- Finish coating. The top is applied in a thick layer and dried under a lamp for 1.5-2 minutes.
- Removing the sticky layer with a special product.
- Applying oil to the cuticle.
Beautifully painted nails using shellac will delight their owner for a long time, and will also keep the natural plates in a healthy condition!
Possible manicure mistakes
If a girl paints her nails with gel polish for the first time on her own, then due to lack of experience, she may not pay attention to some important nuances. As a result of this, the manicure will not last even a week instead of the desired 3-4 weeks. Why might this happen?
Common mistakes in home nail art:
- Voids and cavities under the gel coating. This happens from insufficient nail treatment. Perhaps the platinum was not degreased enough, a primer was not applied, or the top layer of keratin was not removed. Also, do not forget to seal the nail - apply all layers of coating to the ends. If this is not done, then moisture will easily penetrate under the gel “shell”, creating cavities there. As a result, the coating will simply come off.
- Nail plates break. The cause may be over-polished nails. Removing too much natural keratin thins the nails, making them brittle.
- Cracks and chips in the coating. This occurs mainly from poor-quality finishing coating. We should not forget that you can save on colored nail polish, but not on top coat!
- Blistering of the plate. This happens from too thick a layer of varnish, insufficient drying under the lamp, as well as from poor-quality expired gel.
A sign of a good manicure is its durability. If all the rules are followed, gel nails can delight the owner for a month. They are not spoiled by either weather conditions or everyday housework. Experience and desire will help you achieve excellent results.
The process of preparing women's hands for painting nails
To create the perfect manicure, you need to go through more than one stage of preparation. Preparing women's fingers, in particular the nail plate, is an initial and very important procedure for obtaining the necessary and high-quality result. The procedure consists of the following steps:
- General treatment of the nail plate,
- Cutting out existing cuticles
- Nails must be given the desired shape and length,
- Removing irregularities and burrs around the nail plate,
- Polishing nails with a special file,
- Applying hand cream.
Many people are concerned about how to beautifully paint their nails at home. To do this, you will need everything that is at hand: toothpicks, cotton swabs, a manicure set, nail polish remover, the necessary varnishes or gel paints to create an individual design, as well as auxiliary accessories (all kinds of nail decorations).