You should apply glitter to the gel polish along its sticky surface after drying or use a damp top coat for decoration. This is how the finest shimmering powder, loose glitter, and kamifubuki are fixed. The first two products are applied with a brush or spread with a spatula. For kamifubuki, an orange stick, tweezers or a magnetic pencil are more convenient.
Liquid glitter is fixed onto dried gel polish using a brush from a bottle or a thinner tool. The decor must be secured with a top; it should not stick out or get in the way.
How to properly apply glitter to gel polish
You can correctly apply glitter to gel polish in the following order:
- After performing a manicure, wipe the nails and the skin around them with a degreaser.
- Then the plates are coated with primer and wait until it dries.
- Apply the base, first in a thin layer, then leveling.
- The coating must be dried in a UV lamp or LED.
- Nails are painted with gel polish, if necessary, 2-3 times.
- Each time the hand is placed in a lamp for polymerization.
- Apply a topcoat to the flower bed, do not dry it.
- The decor is transferred to the damp surface and waited a few seconds until it “settles down”.
- The hand is placed in a drying lamp.
- Fan the surface of the plate with a fan brush.
- The end should be filed so that rough particles do not stick out from the edge.
- The nails are covered with top coat and the finishing agent is dried.
How to make glitter on gel polish
You should apply liquid glitter to gel polish differently than powder or glitter:
- Remove dust and grease from treated nails using a napkin and a special product.
- They are coated with primer and allowed to dry.
- Then follow 2 layers of base and dry each of them in turn.
- Nails are painted with gel polish of the desired shade and polymerized.
- Using a thin brush, take a portion of glitter from the jar and place it on the plate.
- You should try to distribute it so that the product lays down in an even layer.
- Next comes another drying.
- The ends of the nails must be slightly filed to remove small particles of glitter.
- Top coat is applied to the plates.
- And it should be polymerized.
Liquid glitter can be applied in 2 layers if there are bald spots left after the first one. Instead of using a base at the 3rd stage, you can use acrygel to strengthen your nails.
Glitter manicure ideas
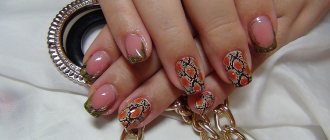
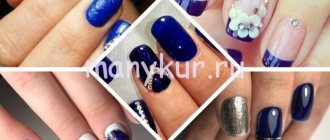
The simplest and most elegant nail design is the French manicure with glitter, or millennium (pictured). Unlike the classic French manicure, with this technique the free edge of the nail is decorated not with white, but with various sparkles and rubs. This is an excellent alternative to a strict manicure, allowing you to realize the most daring ideas. The combination of transparent canvas with a gold or turquoise edge looks very stylish, but you can choose colors based on your own taste or intended image.
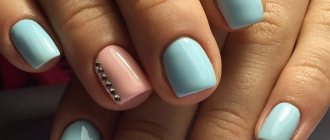
Millennium and lunar manicures look great in designs - in this case, glitter is applied not to the edge of the nail, but to its base.
The most fashionable trends of this manicure are:
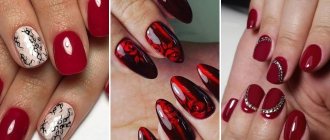
- red gel polish with glitter;
- black canvas with gold glitter;
- blue with silver;
- red and gold;
- white with gold or silver.
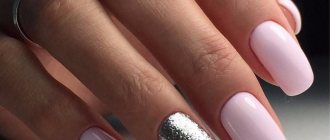
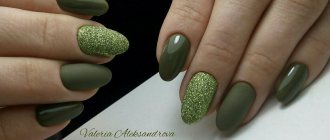
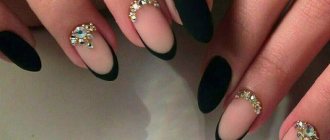
Designs that combine matte finish with glitter are also very popular. A matte red or black manicure looks very restrained and laconic, and a little sparkle will turn it into a luxurious decoration. You can completely cover accent nails with glitter or use them to design individual nails (pictured).
Using glitter, you can create a fashionable ombre effect on your nails (stretching color or shine). Most often, in this case, the maximum amount of glitter is placed on the free edge and reduced towards the base of the nail. It is more convenient to stretch with liquid glitter, since it is quite difficult to create a smooth transition with dry glitter. If you don’t have liquid glitter, mix dry glitter in clear varnish and, using a thin brush, carefully stretch from the edge of the nail to the base. For a successful result, it is better to choose small, uniform glitter. Nude shades, as well as bright colors: black, red, blue, look especially impressive with stretchy sparkles.
As you can see, if desired, any girl can independently make a fashionable manicure with glitter. All you need is a few colored gel polishes, glitter and a lamp to dry your nails. If you still have questions about how to use glitter to decorate your nails, watch the video attached to the article.
How to glue glitter onto gel polish
Gluing large glitter onto gel polish is also easy if you know how to do it:
- Once tidied up, the surfaces of the nails are treated with a buff.
- Now they need to be wiped with a degreaser.
- Next, apply the base using rubbing movements.
- It is polymerized in a lamp.
- A flower bed of the chosen shade is applied to the base, preferably in 2 layers.
- Both times the hand is placed in the lamp.
- The next layer is the top, it is applied very thinly.
- Using a dot or orange stick, large glitter is placed onto the wet finish on the nails.
- The hand is placed in the lamp.
- The nails are covered with the last layer of top coat and polymerized.
As an adhesive base for kamifubuki and other types of large glitter, you can use a transparent base rather than a finishing agent.
Watch the video on how to glue glitter onto gel polish:
What is a nail rub?
Nail rub is a very fine, almost powdery pigment with a shiny color. Having the consistency of weightless powder, it is intended for rubbing into the nail coating, and gel polish, gel, or just varnish is suitable as a base.
Depending on the application technology, rubbing allows you to obtain a variety of nail designs. It can be:
- colored or plain glitter on the base coat of varnish;
- mirror manicure - chrome or gold;
- decorative elements - French, patterns, ornaments on nails.
The use of rubbing is not complicated, but has its own nuances, since even a small change in application technology can give a completely unexpected result.
How to use glitter for gel polish
It is more convenient to use sparkles for medium-sized gel polish, which are also called sequins, as follows:
- Prepared nails are painted with a flower bed over a dried base.
- The coating is dried in a lamp.
- Then a topcoat is used on the nails.
- Shiny sequins are transferred to a damp surface with a brush and placed in random order.
- Use an orange stick to remove shiny particles from the skin around the nails.
- The coating is dried under a lamp.
- To secure the decor, another layer of finishing agent is applied.
- It is also polymerized.
- It is necessary to remove the sticky layer by moistening the napkin with a cleanser.
- The surfaces of the nails and ends are treated with a buff.
- Now they should be wiped with a degreaser.
- Then use the last layer of topcoat and dry it in a lamp.
Rubbing on nails: how to apply
A beginner may think that rubbing nails is too complicated a technology. Actually this is not true. You don’t have to be a master; it’s enough to purchase all the necessary materials and tools, and strictly follow the instructions.
How to apply rubbing on regular varnish? Use a step-by-step plan:
- Get your nails in order - get a manicure: give the nail plate the required shape and polish your nails with a buff.
- Apply the base and let it dry.
- Select and apply a polish, smoothing out any uneven nails with a top coat and drying it a little.
- Taking a small amount of acrylic powder onto your fingertip, apply it to the surface of the nail with light progressive movements. Use gloves.
- Rub the pigment so that it is completely absorbed into the varnish layer.
- After brushing off any remaining pigment, apply a layer of topcoat.
- As a finish, use a gel polish topcoat or a regular water-based one to preserve the pigment and extend its shine for several weeks.
How to Apply Glitter to Shellac
Applying glitter to shellac is no more difficult than applying glitter to gel coating, but you need to be careful when shaking off excess decor. To do this, it is better to use a fan brush rather than a brush or buff. Shellac is a more delicate coating than gel. And it is easy to scratch it with hard tools.
Here's how to use glitter nails with shellac:
- Apply a base to the treated plates and polymerize the layer.
- Paint your nails with a flower garden, also dry, but shortening the time your hand spends in the lamp by 2 times.
- Take a small brush, pick up glitter with it and place it on the plate.
- Use the same tool to distribute the decor more evenly.
- Dry the coating completely.
- Apply a buff to the ends of the nails and fan the surfaces with a fan brush.
- Use finishing agent.
- Dry it.
How to sprinkle glitter on gel polish
You can sprinkle glitter on the gel polish if they are dry, that is, powder or glitter are suitable for this method:
- A coated manicure is done on the nails.
- A layer of top coat is applied to the dried gel polish.
- Using a pusher or a plastic spatula, take portions of glitter and pour the product onto the wet surface of the nail until it is completely covered.
- You need to wait a few seconds until the glitter penetrates the top and “sits.”
- You need to lower your finger and tap on it so that the excess glitter falls off.
- The coating is dried in a lamp.
- The surface of the nail is treated with a brush to remove excess glitter.
- All that remains is to apply the top coat and cure it.
While sprinkling the plate with sparkles, your finger should be held over the container in which they are stored. And you should put a large napkin under it, as the decor easily scatters around.
How to apply dust to gel polish
There are several ways to apply dust to gel polish, the first one should be:
- Prepare your nails, apply primer, apply base, and dry.
- Paint your nails with a flower garden and polymerize the coating.
- Apply another layer of base or top, do not dry.
- Dip your finger into the jar of glitter powder several times.
- Remove it, lower it down and knock so that the excess powder falls off.
- After a few seconds of waiting, the finger is placed in the lamp.
- Fan the nail with a fan brush or brush to get rid of any remaining excess powder.
In the second method, shining dust is sprinkled onto the wet coating several times until it completely covers the nail. Excess amount of product should be shaken off by lowering your finger and tapping it with the applicator. Then the coating is dried, after which the nail is lightly brushed. And a top coat is applied on top, which is also polymerized.
The third method involves mixing glitter powder with a finish or transparent base. The proportions are chosen independently. And the product is applied like a gel polish, that is, on a dried base, possibly in 2-3 layers. This method is more convenient than others if you need to highlight a design with sparkles or draw patterns.
How to mix gel polish with glitter
To mix gel polish with glitter, you need to place a few drops of it on the palette. A pinch of decor is poured nearby. And mix both components with a thin brush or spatula. After this, the varnish must be applied to the nails so that the glitter does not sink to the bottom of the liquid. But you should prepare such a quantity of the mixture that there is enough for everything, otherwise it will be difficult to achieve uniform coating on each plate. This method is suitable for powder and glitter.
You should not pour glitter directly into a bottle of gel polish. They will quickly settle to the bottom. And in order to distribute the decor evenly, you will have to shake the bottle before use. And this will lead to bubbles on the nails when applying gel polish.
It is best to add sparkles not to the flower bed, but to the top. Finishing agents have greater adhesion than gel polish. And the decor will not prevent the top from adhering tightly to the previous coating. And gel polish with glitter can fly off your nails faster than they grow back.
Step-by-step instructions for different types of glitter
Before each technique, you must first prepare your nails and cuticles. The preparatory process includes several stages:
- First you need to remove the hangnails, soften the cuticle with a special oil and trim it. If it is not wide, you can gently push it towards the nail bed with an orange stick or pusher.
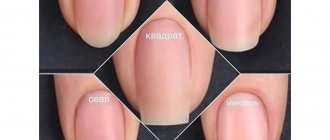
- Using a file, you need to give the nail the desired length and shape. Do not forget that the nail can be cut strictly in one direction, this will reduce the risk of formation of detachments.
- After that, you need to degrease the nail plate and treat it with a de-gloss buff so that the surface becomes matte. It is important to do this in only one direction. Grinding should be done with careful movements, walking over the same place no more than three times. Without removing the top layer, the coating will not be durable.
- After polishing, you need to remove the resulting dust from the nails and skin of your hands, and then wipe the surface of the nail with a dehydrator. It is necessary to remove dirt, excess moisture and better adhesion of the material to the plate.
- Next, you need to carefully apply the primer in a thin layer so that it does not get on the skin and leave to dry.
- Then, to level the surface, the nail plate is covered with a base coat. It is applied in a thin layer so that it does not flow beyond the nail and dried in a lamp.
- To complete the preparatory process, gel polish of any color is used. They need to cover the nail plate in 2-3 layers, each of which must be dried in a lamp. During application, be sure to seal the top end of the nail.
Now you can proceed directly to creating a manicure using loose elements. You should study each technique in detail and choose the most suitable one.
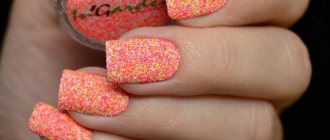
Dry
Dry glitter is a crumbly powder of shiny elements of different sizes and shapes. This powder can be used to cover the entire nail or different areas. They are sprinkled on a sticky layer of gel polish, and during polymerization they stick to it.
Thanks to this, the durability of the manicure is achieved. Also, it can be added to a bottle of gel polish, creating new and unusual combinations. Sometimes dry elements can be large, which are difficult to apply to the nail without special tools, but sometimes they can be small, into which you can simply dip the entire nail. There are two types of dry glitter:
- Glitter – large size decor;
- Dust is a shimmering powder similar to pollen.
This method of applying decor is not popular due to its wastefulness. To do it you need to step by step:
- Do not remove the sticky layer after polymerization or cover the nail with a thin layer of gel polish. You need to place your finger over some container or surface so that excess decor falls there.
- Use a special spatula or pusher to scoop up the selected glitter and gently sprinkle it on your nail.
- The crumbled elements can be reused.
- Repeat the procedure until the desired result is achieved.
- You need to carefully shake off the residue with a fan-shaped brush.
- Then you need to dry your finger, cover it with a top coat and put it back into the lamp.
You can learn more about how to properly apply dry glitter yourself from the video:
Small
- You need to pick up the loose decor with a brush and cover the sticky layer of gel polish with light, patting movements.
- In a similar way, you need to apply a small amount of particles to the entire surface of the nail.
- When the entire surface is properly covered with glitter, you should try to work it into the coating with delicate, patting movements.
- Next, you need to carefully walk with a brush, sweeping away all the residue.
- Next, you should put your finger in the lamp.
- Cover with topcoat and return to the lamp.
- Small glitters can be mixed with clear gel to create interesting designs with patterns. Also, they will look very impressive in a French manicure, besides, a sparkling French manicure is always relevant. There are several options for designing a smile nail:
- Covering the entire surface of the free edge with sparkling elements.
- Designing only a smile separating the nail bed with the free edge.
Complementing the classic version by applying particles to the base in the form of a specific pattern or a chaotic scattering, leaving a free edge of white color.
French is the opposite. It is not the tip of the nail that is highlighted with glitter, but the hole, thereby forming something like a crescent.
Applying decor with a gradient effect is when the number of elements decreases from the tip to the base of the nail or vice versa.
You can use your favorite color for the base.
On the Internet you can find many photographs in the style of French manicure that will help you choose the appropriate design.
How to make an elegant French jacket with glitter at home will be discussed in detail in the video:
Average
This technique is convenient to use for designs with drawings. The resulting shiny gel will easily apply patterns and draw lines. This size of glitter is also suitable for framing a smile in a French jacket. How to apply correctly step by step:
- To complete a design with medium-sized glitter, you will need a few drops of transparent gel polish and a regular container.
- Next, you need to pour the required amount of particles into the gel and mix well. If it seems that the shine is not enough, you can add more. You can add different shades. Before performing such a combination, you must first think through the design and calculate all the materials. Otherwise, it will be difficult to repeat the same consistency and the nails will have a different coating.
- Using a flat brush, apply these liquid glitters to the nail plate and dry in a lamp.
- Cover with topcoat and put it in the lamp to dry again.
Large
It would be better to think through such a design in advance, since, improvising on the go, large sparkles will not be able to be positioned as desired. But it will not be possible to remove such large particles without compromising the design. How to apply step by step:
After drying the colored gel polish in a lamp, you need to apply a transparent layer of gel on it.
- Using a special device, you should try to carefully transfer the elements onto the nail so as not to spoil the manicure. It will be more convenient to pour the glitter onto some surface to make it easier to take.
- The glitter should be placed in the place intended in the design. There is no need to move them around the surface, this will ruin the entire design.
- For a fairly large decor, it is necessary to apply a finishing coat to completely cover its volume.
- Then you need to dry the top in a lamp.
If you are interested in the content, write in the comments, how often do you do manicures with shimmering additions and would you like to try some of the designs from the article? Ask any questions on the topic.
How to apply dry glitter to gel polish
There are several ways to apply dry glitter to gel polish:
- Mix them on the palette with a transparent top or base. The resulting product is applied to the dried colored coating, polymerized, then the ends are treated with a buffer. And on top the nails are protected with a finish.
- On the sticky layer of the flower bed. Nails are painted with gel polish; after drying in a lamp, the surface is not wiped. A portion of dry glitter is poured onto it and carefully distributed over the plate with a flat brush. After a couple of seconds, you need to work on the surface with a clean fan brush so that the excess particles fly off. Then you need to apply topcoat and dry.
- For a wet finish. The product is applied over dried polymerizing varnish. Decor is poured onto it, controlling the density of the layer. The hand is placed under the lamp. Then the excess shimmering particles are brushed off, and the ends of the nails are treated with a file for the same purpose. You need to cover everything with one more layer of finish, dry it, and the design is ready.
Dry glitter
There are also dry nail glitters that are sold in small jars. There are a huge number of different forms. This:
- stars;
- circles;
- stripes;
- triangles;
- hearts and stuff.
There are 2 types of glitter. This is dats, which is finely ground colored powder, and glitter. The second has large dimensions - up to 2 mm. Transparent chameleon glosses are also sold. If you look at a photo of a gel polish manicure with chameleon-type sparkles, they shimmer at different light angles.
How to rub glitter into gel polish
You can also rub glitter into gel polish if you use finely ground decor:
- The nails are painted over a dried base with a flower bed with a sticky layer.
- It needs to be dried in a lamp.
- The shiny powder is scooped up with a brush and applied to the plate with patting movements.
- The same tool is used to distribute the decor more evenly.
- You need to wait a few seconds for the shining particles to connect more tightly with the sticky layer of varnish.
- Use a soft fan brush to fan your nails to remove excess shiny particles.
- The next layer is the top.
- It needs to be polymerized.
Glitter powder, glitter or kamifubuki, as well as liquid shining compositions, make the design catchy and original. The decor looks good with bright lacquer colors and pastels. Just don’t use it in abundance so that your nails don’t look like Christmas tree decorations. However, if you want just such an effect, a manicure will not cost you much. After all, a jar of glitter costs only 25-60 rubles.
Color combinations in glitter nail designs
Taking into account which design option was chosen, there can be a wide variety of combinations of sparkles and varnish colors. A gentle transition of shade or a play on contrast - the most important thing is to find the perfect design that will help emphasize the beauty and sophistication of the image.