Foil for nail design
We won’t be lying if we say that rhinestones have somewhat lost their former relevance, but girls still have a penchant for luxurious glitter on their nails. What to do - tame your desires or find a healthy alternative to them? For an experienced manicurist, the answer is obvious - use a trendy and unusual nail art design, such as a foil print, reminiscent of a glare of precious metal.
The best photos that reflect the essence of such a popular trend in manicure are collected in our inspiring selection.
What types of nail foil are there?
Before you run to the nearest supermarket or explore the deposits of your kitchen cabinets at home, find out for sure how suitable classic foil in a roll is for such painstaking work. The Prostonail guide will tell you about the variety of varieties of this material in order to choose the most effective and impressive specimen for the collection.
Transfer foil
Ultra-thin foil for nails in jars. Its standard length is a meter and width is about 3 centimeters. The main feature is a pattern or spraying applied to the surface that can be imprinted on the nail plate in a matter of seconds.
Liquid foil for nails
It has a thick, viscous consistency. Essentially the same gel polish or shellac with the addition of glitter of different sizes, diameters and degrees of shine. Convenient when working with brushes.
Holographic Nail Foil
When applied to nails, this type of decor acquires an unusual holographic finish, shining with all the colors of the rainbow. You can find the product in the assortment of popular mass market brands such as avon or divage.
Self Adhesive Nail Foil
Having this type of material in your arsenal, you can do without glue. This is because on the back of the product there is already a sticky layer to fix the design.
Screen foil
Foil with a pattern for decorating plain pigmented surfaces. Ideal for those who do not have special artistic skills.
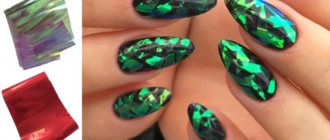
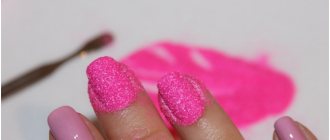
Broken glass foil
The design of shattered Glass Nails looks stylish and unique, and its creation only takes a few minutes. A transparent thin plate of foil is cut into fragments and laid out on the nail plate, secured with a top coat.
Tear Foil for Nails
The name itself gives a direct hint at the principle of use. The instructions are as follows: tear off a piece of the sticker and attach it to the desired area of the nail.
Crinkled nail foil
Behind the walls of the miniature jar is hidden a very unusual crumpled foil, which must be fixed with nail glue.
Matte foil
Sounds like a phantasmagoria, doesn't it? And it looks no less impressive. The colored foil simply transfers its pigment onto the sticky layer of gel polish, polymerizing under the LED light.
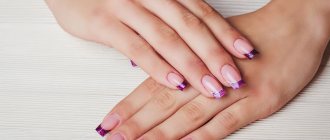
Lace foil
In fact, another type of transfer foil. Only its print is stylized as lace, which looks luxurious in a French manicure.
Thermo foil
Film for nails, differing in the way it is fixed. In order for the designs to migrate from the roll to the surface of the claw, you need to preheat the material under the heat of ultraviolet light.
Foil for casting
A special casting technique replicates the metallic sheen of the same type of artistic activity. Silver or gold foil creates the illusion of a product “forged” by the hand of a skilled craftsman.
Methods of applying foil to gel polish
This decorative material for manicure is very fragile and thin. When applied to nails, it has the ability to break and crack. It is very difficult to get rid of fractures, but knowing how to properly attach the decor to the nail, you can create a beautiful, shiny ornament.
On the sticky layer
!— Yandex.RTB RA-461895-21 — >
—>
This method is quite simple, but it cannot protect the nail from fractures and cracks in the foil. For the drawing to be of high quality, the materials must be branded. It is also important not to overexpose the applied gel polish under the lamp so that the layer is truly “sticky”, suitable for applying the design.
One of the main nuances is the absence of any lint or dust on the surface of the nail before applying the decorative design. If this condition is met, the layer will be smooth and without cracks.
On undried topcoat
By transferring the design onto a wet topcoat, you can achieve the perfect decor. The only point is the impossibility of transferring the design to the entire nail. It is very difficult to make it even, without creases. Therefore, this option is used for partial decoration.
A nail coated with gel polish—it is advisable to use dark tones, on which shapes and stripes look good—is covered with a layer of top coat and, without drying it under a lamp, pieces of foil are glued on top, creating a pattern. Then the nails are placed under a lamp, doubling the drying time. Then the resulting result is secured with a second layer of topcoat.
—>
Using foil glue
There is also a special glue that can also be used to attach pieces of foil. First you need to degrease and remove the sticky layer from the nail coating. Then dots and lines are applied with glue, which has a translucent color. Within a couple of minutes it will become completely transparent, so you can tell that the glue has dried.
Glue is applied to prepared and coated nails with colored gel polish. After this, pre-cut foil designs are applied to the nails and pressed with a special spatula or simply with your fingers. After a few seconds, the top layer is sharply torn off. Don't worry if the layer is cracked or not printed in some places. Everything can be corrected using gel paint of a similar color.
Without interruption
The foil is very thin, so it can be easily cut into the desired pieces and glued to the sticky layer, simply covering it with a layer of topcoat. After this, the coating is polymerized under a lamp, and the design is ready. Due to the thin layer of decor, the manicure will turn out neat and beautiful.
—>
How to use nail foil
How many people - so many opinions. There are as many types of foil as there are features of their fastening. You will learn about the most important nuances from our training table.
| Type of foil | How to use |
| Zhataya | Similar to ultra-thin tinsel, soft foil. You need to take it with tweezers and lay it on a sticky layer. Used for extensions with an aquarium effect |
| Thermal film | After preheating some of the material under the lamp, attach it to the nail without using glue. |
| Sheet foil | Having cut out the desired pattern, apply glue to its reverse side and fix it on the plate. |
| Ribbon | Requires jeweler precision when applied. Used for geometric decoration in stripe style. The reverse side is sticky |
| Transferable | Tracing paper on an adhesive basis, which accurately transfers the print to the manicure by applying |
Manicure with foil at home
Girls, looking with inspiration at the pages of their favorite glossy magazine, are perplexed by the complexities of metallic manicure design. In fact, the process itself only takes a few minutes and is easy to do even at home. Below we will tell you how to glue foil so that it retains its original attractiveness for a long time.
Nail design with foil: photo step by step
To make such a chic manicure, you will definitely need:
- Transfer foil;
- Varnish for the base. In this case, the tone must be selected in accordance with the color of the metal tape or transparent;
- Extended nails require gel polish or glue;
- An ordinary cotton swab or an orange one;
The foil is attached to the nail plate due to a sticky layer of gel or not the end of the dried transparent varnish. Apply to the nail with the matte side, press well and smooth with an orange or cotton swab. After which, tearing it off with a jerk, a drawing or embossing remains. The top of the foil should be coated with a transparent top varnish, preferably 2 layers.
Transfer foil is sold both in sheets and in strips of various colors and shades. Therefore, there is room for imagination!
If you are working with non-transfer foil , then first you need to cut out the pattern, and then apply it to the varnish and cover it with a fixative. The manicure will look original if you tear the foil into small pieces and use a regular toothpick to lay out a mosaic of your choice. You can use not only sticky gel and acrylic, but also regular varnish. This foil can be used for extensions; it is usually used when creating an aquarium design. As a result, you can end up with a variety of designs, ranging from gold to bold black.
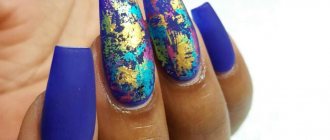
Depending on your mood and wishes, you can cover the entire nail, you can come up with an original pattern, and also decorate it with artistic compositions or flowers. To achieve a mirror effect, you can cover the entire nail with foil. Gold is in fashion right now.
Thermofoil has the easiest application method. All that remains is to choose a ready-made sticker design and attach them to your nails.
One of the latest innovations in manicure design where foil is used is casting on nails with liquid stones. It looks very expensive and amazing. All you need to do is purchase a special thick gel. It has the ability to create an imitation of real gemstones as it creates a convex shape once applied. Well, you can choose the colors, patterns and combinations yourself. There are a huge number of ideas for this.
This precious casting looks great on any nails and at any age. You can combine this effect with a jacket of different colors. And in the photo you can clearly see what a gentle and stunning manicure can be done even at home, if you know the basic technique. Don't be afraid to experiment and have fun with it!
Video “Foil Covering Hollywood”
Nail foil for regular polish
The application algorithm is even more simple compared to the previous task:
- do a classic manicure by pushing back the cuticles;
- polish the nail plate, removing roughness;
- Apply primer to extend durability;
- use nail polish and wait until it dries completely;
- prepare the desired pattern by “trying it on” on your nails in advance;
- apply glue to the back side of the decorative material;
- apply the foil with the matte side to the coating, straightening it with a pusher or stick;
- remove the protective layer away from the nail bed;
- fix the result with a finishing topcoat, apply for a few hours after the end of the procedure.
Types of foil for manicure
A manicure will most likely not work with a regular foil sheet. Yes, you can cut it into small pieces and stick it on your nails to achieve the broken glass effect. However, it will not look as impressive as we would like. Different types of foil are used in nail design:
- Transfer sheet. It may be adhesive on one side, but this is not always convenient. Available in sheets or small rolls 4 cm wide and up to 50 cm long. There are many options for manicure: plain, with a pattern, gradient, holographic effect, mirror. The varnish is first applied, and then the film is applied and smoothed. It must be torn off after this, since the metallic sheen remains only after removal. It is possible to cover the entire nail plate or only a small part of it - it all depends on your imagination.
- Embossed sheets. They differ in embossed patterns, roughness, patterns, and different textures. Like the previous type, it is produced in rolls or sheets.
- Thermo. A type that is gaining popularity due to its ease of use and long wear life. When heated, the sticker takes the shape of the nail, perfectly covering every millimeter of the surface.
- Stickers. They already have the shape of a nail, but you can adjust the length or width with scissors and a file. It is enough to peel off the protective layer from the sticker and then apply it to the nail. They don't last long, especially if you don't use a fixer.
- Tear-off (transferable). The compressed material of different colors is packaged in jars; before use, it is simply plucked off. It is easy to transfer it to gel polish by spreading it over the nail in small pieces.
- Stripes. The width usually ranges from 1 to 5 mm. They have a sticky back side, which allows you to glue the strips onto dried varnish. Suitable for geometric designs.
The most popular shades are gold and silver, but mirror film in blue and red is now widely used. You need to know how to apply foil to gel polish so that it sticks well. The material is always top coated with a finish, otherwise the manicure will be ruined in a couple of days.
How long does nail foil last?
The answer to this question interests all lovers of experiments. Agree that when you visit a beauty salon and make a strong-willed decision to try an unusual design, you hope that at least the manicure will last for 2 weeks. Don’t let your soul be tormented by vague doubts - high-quality, well-glued metal decor lasts for 14-16 days. Things are somewhat different with nail art in its home interpretation. Unfortunately, the glossy design, when worn carefully, retains its presentability only for up to 3-5 days.
How to replace foil?
In the previous paragraphs, we have already clarified the fundamental rules and method of using metal foil. If you are wondering why overpay for a bundle of shiny material and how to replace it, we recommend the following methods as an alternative:
- cosmetic glitter;
- pigmented varnish or gel polish with glitter;
- decorative mica;
- mirror powder.
Manicure using foil is often called “Hollywood” and one cannot but agree with this. It looks stylish, catchy and quite expressive, so that even a calm everyday outfit in basic shades will sparkle in a new way, highlighting the impeccable taste of its owner.
Step-by-step application technique
There are several options for attaching the material to the gel, depending on the type of material you choose, as well as the result you want to achieve.
However, most often when making a design at home using foil, girls prefer to use transfer material, since it is easiest to print on gel polish, preventing a sloppy result.
The technology for using it is quite simple:
- Apply a base coat to the nail and dry it in a lamp.
- 2. Apply two thin layers of the main pigment, top, each layer must be dried in a lamp.
- Remove the sticky layer from the top, if there is any.
- Treat your nails with manicure glue to attach the paper.
- Cut out a small piece of foil (it should not be larger than a marigold).
- After the adhesive base has partially dried (it gradually changes color from white to transparent), remove the protective layer from the front side of the foil and carefully attach it to the nail with tweezers.
- Use an orange stick or a pusher with a rubber tip to spread the material over the nail plate using smoothing movements. Make sure it lays evenly on the gel.
- Tear off the foil with a sharp movement. You need to take it with your finger, since the sharp edges of tweezers can simply tear it.
- Repeat the manipulations separately with each finger. There is no need to apply glue to several of them at once, since this way you will be in a hurry, which will affect the quality of the manipulations.
- 1-2 minutes after the glue has hardened, fix the work with topcoat. Don't forget to walk along the end of the nail to seal the gel, preventing its premature detachment and convergence of the results of the technique. Dry the final layer in a lamp.
- Remove the sticky layer.
Typically, decorating one finger takes up to five minutes, so as a standard, foil is not applied to the entire hand, but only to 1-2 nails. This way the effect will look well-groomed and neat.
You can also create the “broken glass” effect, which is common in salons, but you need to use sheet paper for it. It is first cut into triangles and polygons of different sizes, and then attached to the nail bed using manicure glue in a chaotic manner.
The effect looks stylish especially because it shimmers in different shades when you tilt your fingers. However, do not forget to secure the work with a topcoat, since without it the decor will gradually begin to come off in a few days.