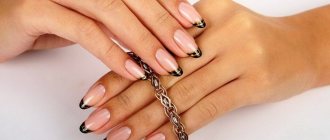
Features of manicure with ribbons
Using ribbons for nail design is as popular a way of individualization as creating a stylistic design using stripes. The abundance of self-adhesive tapes makes this manicure one of the most versatile and practical. In other words, taking into account the main features of the implementation of the technique, you will be able to recreate a stylish look for each nail and at the same time emphasize the features of the wardrobe you are wearing.
As for the main advantages of this option for caring for nail plates, they include:
- Low cost . Finding suitable decorative elements for nail art in specialized stores is quite easy. They are presented in a wide variety of sizes and colors. Moreover, the price of each option pleasantly pleases with its availability. In other words, every representative of the fair sex can afford to create a stylish look at home.
- Variability and practicality . A large number of different options for the products discussed in the article will allow you to create an attractive image on any nails, long or short. At the same time, the tape method of care goes well with other techniques. Therefore, having the skills of combining, you will definitely recreate on your nails the style that will make your image stand out among the “gray mass.”
- Easy to apply. Using ribbons for nail design is not difficult. The classic technique can be mastered by any representative of the fair sex. It is enough to take into account the basic rules and follow the standard step-by-step instructions. By the way, you will get acquainted with it further.
- Durability. If in the process of applying elegant lines on your nails you took into account all the nuances and rules, and also chose high-quality consumables for your manicure, then as a result you will be able to achieve a remarkable effect that requires a long period of wear.
- Relevance. The tape technique for individualizing nail plates has been familiar to girls and women all over the world for several years, but it still remains one of the most popular. The reason for this is versatility. With correctly applied products, you can easily realize any image.
Advantages and disadvantages of using manicure tape
Any, even the most ordinary manicure can be diversified with the help of various types of nail decor. In this case, we are talking about decorative manicure tapes, which are not inferior to other decorative manicure elements, creating their own original and unusual design. But like any material, manicure tape has its pros and cons:
So, what are the advantages of decorative manicure tape:
- Suitable for beginners because it is easy to use and can be used to create a manicure at home;
- It glues easily and holds well (if the tape is of high quality) both on regular varnish and on gel polish or acrylic.;
- Due to the fact that the tape is available in different widths and different colors, they can be combined with each other in a manicure and come up with an even larger number of different designs;
- The tape is harmless to nails;
- Its price in stores is available to everyone.
There are practically no disadvantages to manicure tape. The only thing that should be noted is that when the tape is applied to regular varnish, you need to wait until it is completely dry, otherwise, if in the process of creating a manicure, you stick the tape on wet varnish and you need to re-glue it, then it may come off along with the varnish.
Buy tapes for nail design
Types of manicure tapes and how to use them correctly
Having set yourself the goal of realizing a high-quality image, be prepared to get acquainted with various types of decorative elements. Each of them has its own unique properties and is able to give a unique stylish result. The main parameters according to which modern tapes can be distinguished include:
- Size . Most often, products with a width of 1 mm are found on sale, but sometimes you can find thicker options with 2 and 3 mm, respectively. Typically, thin strips are chosen for square-shaped nails, and wide ones for almond-shaped nails.
- Color . The palette of colors is so diverse that every representative of the fair sex will find her own joy in it. Moreover, not only decorative elements in strict colors are popular, but also bright products.
- Coverage . Today on sale you will find products that can have both a matte and glossy finish. Their selection should be made based on the texture of the pre-selected varnish.
Note! Be sure to use only high quality smoothing fixatives. In this case, you should not save, since the durability of the manicure you implement depends on them.
How to properly do a manicure with ribbons
Having familiarized yourself with all the features of a manicure and decided to perform it at home, keep in mind the fact that for the procedure, in addition to high-quality tapes, you will need:
- Good base coat.
- A varnish that serves as the basis for the formation of an exquisite color.
- Tools for manipulating the main decorative element. They may be ordinary tweezers.
- Ultraviolet glow lamp. Necessary if you plan to use gel polishes.
- Top coating. As in the Broken Glass manicure, the final finishing touch will be the application of a top coat. It will protect decorative elements from various external negative influences.
Once you have all the necessary consumables at your disposal, you can begin designing your nail plates. Next, we’ll look at two ways to use ribbons for nail art.
As decoration
To use ribbon as a decorative element, follow these steps:
- Get a classic manicure. Remove excess skin from the surface of the plates and provide a decent appearance to the cuticles. Next, give your nails the desired stylistic design by choosing the appropriate length and shape.
- Cover the nail with base coat and let it dry.
- Next, apply a single color base coat. It is advisable to do this in 2 layers.
- Cut off a small amount of the decorative element necessary to realize the pattern you have in mind.
- Apply the decorative element to the dry coating, not forgetting to step back a little from the edges of the nail plate.
- Having positioned the nail art item in accordance with the intended design, carefully apply 2 layers of topcoat.
As a stencil
This option for using tapes is also very popular. Its implementation involves the following important steps:
- Get a classic manicure.
- Apply base.
- Apply two coats of the base color.
- Stick several strips in the direction you need.
- Apply another coat of varnish of a different color.
- Let the varnish dry and carefully remove the tapes.
- Apply final clear coat.
The nuances of using tapes
In addition to the main stages of applying a tape manicure, there are a number of nuances that every representative of the fair sex should take into account before using the technique at home. It is advisable to perform tape nail art on a nail plate that has been previously treated with a buffer. The smoother the nail is, the smoother the decorative element will lie.
At the time of application, it is necessary to cut the tape with a small gap of 0.5-1 mm. This gap will help you to properly seal the nail plate when applying top coat. If you use gel polishes, then after each applied layer, be sure to place the handles under the lamp. Dry your nails as responsibly as possible, because the presence of a sticky base will not allow you to manipulate the shape of the decorative product at the time of its use.
Important! Make sure to indent from the edges. The tape should be a couple of millimeters further from the cuticle and other contours of the nail plate. This will prevent the tape from snagging during everyday wear.
Terms of use
Gluing tape at home is quite simple. The main thing is to properly prepare the nail plates, after which you can start doing the manicure.
Preparatory work
At the preparatory stage, the following manipulations are performed:
- The surface is cleaned of old coating.
- The nails are given the desired length and shape.
- Using an orange stick, cuticles are pushed back.
- Nourishing cream is applied to the hands.
- The surface of the plates is degreased. For this purpose, nail polish remover, alcohol or a special degreaser are used.
Gluing rules
When your nails are prepared, you can apply the tape:
- A base layer of varnish is applied to the surface.
- The coating is dried.
- A ribbon is glued on top according to the selected pattern, and the desired design is created.
- A layer of varnish of a different shade is applied on top.
- The manicure tape is removed.
- The coating is drying.
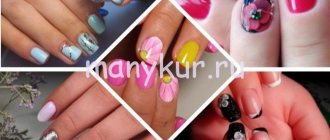
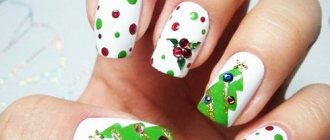
Fashionable manicure ideas with ribbons
Like a high-quality manicure with stickers, nail design using ribbons can bring you a lot of interesting solutions for realizing your image. Next, we have prepared for you several variations of how you can decorate different types of marigolds with high-quality decorative elements. Based on these examples, you can easily decide on your own display style.
For short nails
It is best to apply no more than 1-2 thin strips to small, neatly decorated nail plates. This can be done both along and across the growth of the plates. Try not to clutter your nails with unnecessary lines.
With rhinestones
By combining the decorative elements discussed in the article with the same rhinestones, you will achieve the formation of a non-trivial design style. At the same time, one should also not forget about restraint. To create a balanced look, use a small amount of rhinestones, which can be placed on one or two nails.
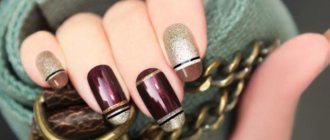
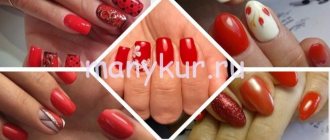
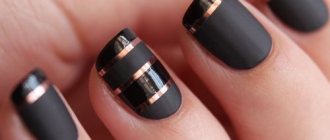
Red
For red marigolds, white or gold stripes are perfect. They will create the necessary contrast and thereby put a peculiar emphasis on your subtle nature. This design is suitable for both everyday wear and any occasion.
Pink
It is best to choose silver decorative elements for a soft pink color. They contrast perfectly, thereby creating a chic look, regardless of the shape and length of the nail plate.
The nuances of performing a manicure with dots with regular polish and gel polish
Like a manicure with stripes, the technique of decorating with ribbons can be done using regular varnishes and coatings with a gel base. The use of each method guarantees its own specific advantages and disadvantages. Next, you will become familiar with the main nuances of using the two coatings, which will later allow you to make a reasoned choice in favor of one product or another.
Active formula
In ordinary varnishes, besides the dense structure and coloring pigments, there is practically nothing, which is why they are capable of performing an exclusively decorative task, while basic gel varnishes form comprehensive care for the nail plates .
Their structure usually contains a large amount of useful microelements and vitamins that nourish the structure of the nail, preventing it from weakening in the face of various external negative factors. That is, you get a great appearance and minimize the need for additional care.
Practicality
A responsibly selected gel polish from a reputable manufacturing company will save you from the need to take breaks. You can apply this composition to the surface of your nails regularly, something that, in principle, ordinary varnish cannot boast of.
In other words, the aggressive nature of standard varnish coatings not only does not nourish the nails, but also prevents them from receiving natural vitamins from the environment. As a result, the plates lose their elasticity and healthy color, becoming prone to aches and other problems.
Application process
Conventional varnishes are applied to the surface of the nails in just a couple of minutes. They do not require any additional materials or tools. The main thing is to choose a branded coating and a comfortable brush . Gel polishes in this case are inferior to their opponents. To fix them on the nails, it is necessary to use ultraviolet lamps.
They allow the polymers in the preparations to harden, creating the necessary conditions for everyday wear. The cost of such lamps is quite high, which is why not all representatives of the fair sex can afford a home manicure with gel bases.
Removal
The procedure for removing the coating is also important. In this case, gel polishes are also inferior to standard coatings. To remove the remnants of the hardened polymer base, you will need to apply a fair amount of a special product to each note, designed to soften the structure of the coating. Thus, the procedure for neutralizing the composition may not take one minute, but an order of magnitude longer.
Durability
Gel polish wins here completely. Unlike his opponent, he guarantees the formation and preservation of an attractive image for 7-30 days. It all depends on the quality of materials, professionalism of application and compliance with relevant rules. A manicure with regular varnish will delight you for just 2-3 days . Then it will begin to peel off and lose its color.
Strength
A significant indicator, especially for those representatives of the fair sex who have to work with their hands. Unlike conventional varnishes, gel-based coatings last much longer. Moreover, they can cope with temperature changes, shocks and other mechanical impacts. To achieve the desired result, it is enough to properly apply and dry each layer.
Important! Try to apply the tape to dry nails. This way you can prevent the appearance of depressions in the varnish from pressing the decorative element against their structure.
Tape gluing technology depending on surface type
The ribbon can be attached to regular varnish and shellac.
To carry out these manipulations you need a minimum of materials and tools:
- varnish coating;
- ribbon;
- scissors;
- tweezers;
- tweezers.
Gluing onto a natural nail
Working with natural nails does not cause any difficulties. The following actions are performed:
- The nail surface is prepared.
- A coating of the desired color is applied to the surface.
- The varnish is dried.
- Using tweezers and tweezers, peel off the required amount of tape. To make it easier to glue, it is recommended to measure with a small margin.
- A tape is glued to the plate in accordance with the selected design.
- The material is pressed along the edges with a manicure stick or finger.
- The excess is trimmed off.
- To consolidate the result, a top coat is applied on top.
For gel polish
The technology is in many ways similar to that used on natural nails:
- The surface is prepared for the procedure.
- The base coat is applied.
- The surface is dried under an LED or UV lamp.
- Apply shellac in the shade you like and dry it under a lamp.
- The top is applied.
- After the coating has dried, the tape is glued.
- At the final stage, the nails are covered with a finishing coat.