Design Features
The technique is based on creating a pattern on the nail plate using wet varnish. Using a special tool, the desired print is applied - flowers, patterns, stencil design. Due to the slight free movement of the hand, beautiful monograms are formed on the nails, and the colors are partially mixed, resulting in bright and original combinations.
The design can be done with simple varnish, but thanks to the special formula of gel polish, it has its own features and advantages:
- Duration of work . The varnish hardens under a UV lamp, as a result of which you can slowly model a clear and even pattern.
- Liquid consistency , thanks to which the lines spread over the nail, forming delicate patterns. Products that are too liquid are not suitable for manicure.
- A bright palette of varnish that has good durability and stays on the nails longer than regular nail polish.
- Easy to apply over wet gel polish. The ability to use simple tools in your work without purchasing professional add-ons.
The viscosity of the gel polish should be taken into account. It should have a medium density and spread slightly over the nail for high-quality fixation of the design.
To bring creative ideas to life, you will need a needle, toothpick or brush. Natural brush bristles will allow you to create soft shapes in the design, while artificial bristles will make them more distinct and brighter.
Step-by-step design instructions
Manicure design using wet polish is carried out in just four stages.
- It is necessary to apply a base - colored varnish, which will serve as a background for the drawings. It needs to be completely dry. If you are making a design with simple varnish, wait the necessary time. When working with gel polish, use a special lamp.
- Cover the plate with a second layer of varnish of the same color. But you don't need to dry it!
- Apply stripes or dots of a different color to the wet base. Confidently create beautiful designs with a needle, dots or brush by mixing shades directly on the plate. After creating the images, you need to dry everything thoroughly.
- Cover the plates with a clear sealer.
Nail Design Ideas
Nail design using wet gel polish:
- Spots . They can be performed using dots in a certain sequence with different colors. The entire nail plate is filled with droplets using the method of building a specific pattern on the sides or in the middle. Colored monograms will flow beautifully, forming special transitions.
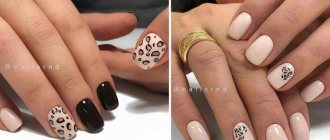
- Imitating the coloring of a reptile . The design is carried out according to the principle of dotted application in a checkerboard pattern, maintaining small distances between the dotted lines.
- Curls . Dots are applied along the nail, and then curls and patterns of the desired shape are formed from them. Original method: drawing figure eights and loops using a needle between the points.
- Flower . To create a chic floral print, you need to put several dots in a circle with varnish, then stretch the lines to the middle or in different directions, forming petals.
- Branches . It is necessary to draw a white line in a dotted manner. Add emerald varnish to the center of each point. Next, slowly draw a toothpick over the points, stretching them to create a branch. Second method: apply dots in two rows, alternating varnish. From each droplet you can draw a leaf, stretching it towards the center, gradually forming a branch.
- Spring . You need to put several dots in a row with alternating colors, and then go through them with dots, making movements in a spiral.
- Seashells . It is necessary to draw a circle of dots, then draw another, smaller in diameter, circle. Then connect the pattern in a spiral, slightly pressing at the curves of the shapes.
- Marble imitation . It is carried out by combining two shades, mainly black and white. On a light tone, specific areas are darkened - on the sides and in the center. Then you need to draw “veins” from one darkening to another, smoothly shading the lines.
- Butterfly . On a single-color varnish, you need to draw several colored parallel lines, and put a transverse line in the center. Next, connect the ends at one point, creating butterfly wings.
- Peacock feather . Apply a drop of polish in the center of the nail and outline it with different colors, carefully extending the design to the sides. It is advisable to take varnishes with glitter.
- Abstraction . You need to use several shades. At a small distance from each other, draw stripes and draw transverse lines, while changing the pace and force of pressure.
- Gossamer mesh . Using a brush from the bottle, draw two or three vertical stripes on the nail. Next, using a thin brush or toothpick, draw transverse lines, as if crossing out the composition. To design the web, do similar steps, but only the transverse lines should be drawn unevenly and to the sides.
- French classic manicure . Performed according to the standard, but with a vague border. On a wet base, you need to draw a curved line along the edge of the nail, and then shade its edges with a needle or a soft brush.
Imitation of water manicure with thick gel polish
Since it sinks in water, the dense gel polish does not form a film on the surface. However, water manicure can be imitated. To do this, you need to prepare your nails: treat the cuticle, adjust the shape and length, apply a base.
After this, we paint our nails with varnishes of different colors, making vertical or horizontal stripes. Then we move the thinnest brush along the surface of the nail, creating stains and patterns, like a water manicure. The brush will have to be wiped periodically to obtain pure colors.
Now you need to place your nails with patterns under an ultraviolet lamp. After the varnish has dried, apply the finishing coat.
If you don’t know how to do a water manicure with gel polish, you can order this nail design at the Manicurof salon. To register for the procedure and clarify prices, call the number provided.
Tips for beginners
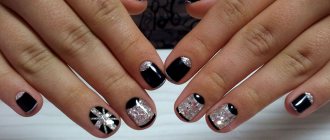
It is better to choose contrasting shades. The most unusual ideas are created by combining bright colors.
If you need to change or adjust the design, the brush should be wiped dry after each step. If you don't do this, the shades will cross and blend beautifully. Therefore, you just need to choose the design you like.
Movements must be done clearly and confidently to create unusual and beautiful drawings. For a specific nail art, for example, an image of a rose, color combinations should be taken into account. Red roses look perfect on a black background.
Before using gel polish, you need to check its consistency on tips or cardboard. If the shellac is very thick, you can mix it with a liquid base.
For high-quality and neat patterns, use a dog brush. It has a thick handle and a thin tip, due to which it paints and picks up paint well. In addition to brushes, you can use tips, pencils, toothpicks, needles and dots of different diameters to create different effects on your nails.
Drawings for beginners. Schemes and implementation features
Professionals advise beginners to start with training tips. And when your hand works more confidently, you can start practicing on the model. When performing the sequences and directions of drawing on wet gel polish, the following basic schemes can be distinguished:
- “dots”, “circles”;
- “cobwebs”, “twigs”;
- “stains”, “spirals”, “curls”.
Of these, more complex designs are already combined: “rose”, “butterfly”, “peacock feather”, “marble”, “abstract patterns”, “reptile skin”.
To make drawings on wet gel polish spectacular and bright, it is better to take contrasting colors of varnishes, you can use varnishes with glitter
Before applying, you need to carefully straighten the cuticle with an orange stick. The first color layer is applied to the nail plate and dried in a lamp. You need to paint in a thin layer so that it does not flow under the cuticle and side ridges.
Important to remember! To draw on wet gel polish, you need a good colored base so that the nail plate does not show through it.
To do this, you need to apply 2 preparatory layers of varnish and dry in a lamp. And only the third layer will be working. The number of layers depends on the manufacturer. Some high-quality varnishes can achieve the desired effect with one coat.
Tips from professionals: Nail rub - what it is, how to use it. Instructions
"Dots", "circles"
Dots are applied to the wet layer of gel polish with a dot. Depending on the order of application and size, different patterns are obtained.
By combining colors you can achieve spectacular results. Small dots and circles in pastel shades look beautiful on a black background. The stone effect is obtained by applying large dots to a wet layer. The edges flow beautifully, and you get a smoky edge, like a shadow cast on a stone.
"Cobwebs", "twigs"
“Cobwebs” should be carefully applied with a thin brush. The thinner the line, the more attractive the drawing will be.
On a mother-of-pearl, iridescent background, a black cobweb looks organic. Drawing branches on wet gel polish begins with applying dots in any order.
You can draw without dots, like a cobweb, by first drawing the twig itself, and then placing a dot and pointing it slightly to the side to achieve the desired shape.
Read the popular article in the category: An effective drug - Mikoderil varnish for nail fungus. Reviews, price.
“Smudges”, “spirals”, “curls”
It is also possible to apply the finishing coat over a wet layer. In this case, a thin layer of topcoat is applied to the dried white color, from under which the nail plate does not show through. The required colors are laid out on the palette.
Note! Using a palette saves the amount of varnish used.
The drawing on wet gel polish begins on one side, with lines going diagonally. On the other side of the nail plate, another color is applied towards the first. If the color is too bright, you can dilute it with a top coat.
Its application also helps to achieve greater blur if the result is not enough. The lines blur towards each other, you can add several points in the resulting voids. After drying in the lamp, a finishing coating is applied, which is also sent to dry.
To obtain a “spiral,” the nail plate is painted in two colors. The border between them can go anywhere, according to the plan. With a smooth movement of the dot, a line is drawn from one color to another.
If you need to get denser transition lines, you can use a brush from the varnish itself. In this case, the nail is completely covered with one color, while a spiral is drawn with another.
“Curls” are obtained from a line drawn on wet varnish. It is enough to make a schematic drawing on the color border, as shown in the photo below.
Read the popular article in the category: Nail fungus: treatment, inexpensive but effective drugs
"Hearts", "shells"
Drawing “hearts” begins with drawing dots. For a multi-layered shape, you can make several dots of different sizes.
With the thin end of the dot, starting from the top, draw a line through the center of all points. They flow into one another, with the tail of the shape indicated at the bottom. You can make a whole branch of “hearts”.
Imitation of a “shell” can be achieved by semi-circular arrangement of dots on a wet layer. Starting from the edge of the nail, dots are applied with the small end of the dot. With each row their size increases. The longest and most elongated points are located in the center. After it the size decreases.
Master class on drawing
For wet design you will need:
- base and top coat;
- primer;
- several colors or shades of varnish - depending on the preferred pattern;
- brushes or needles;
- UV lamp for drying.
Before you start implementing the manicure, the handles need to be put in order: push back the cuticle at the base of the nails, correct the edge of the plates and sand the nail plate of each nail. Apply degreaser, primer and let dry. Then apply a base coat of gel polish. Cover the nail plate with two or three layers of varnish, each of which needs to be dried in a lamp.
Apply an additional layer of gel of an adjacent shade and begin painting.
A step-by-step guide to painting flowers on each nail:
- Use a thin brush to pick up the color and apply a drop on your nails - this is the basis for each flower. Gradually draw out each layer.
- The varnish can spread over the nail and mix with the base, resulting in a good combination and volume.
- After drawing out the lines, you need to wait 10-20 seconds and dry your nails under a UV lamp.
- Seal the image with topcoat and remove the sticky layer.
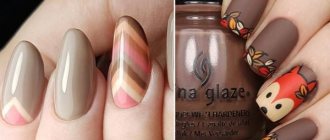
Beige design
This design is good for daily wear and business wear. To work, you need pastel shades of gel polishes, for example, beige and brown. Step by step execution:
- After thoroughly preparing your nails, you need to cover them with a base and dry them under a lamp.
- Paint the nail on the little finger and thumb with beige varnish, and the rest with brown.
- Make an unobtrusive pattern on the nameless one. On the wet brown tone, place white gel polish pointwise on top and bottom, and then stretch it from one and the other edge to the center.
- Cover the painting with finish and dry.
Floral design on wet gel polish
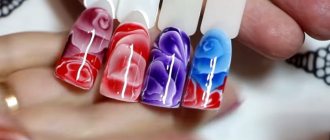
Very popular designs in this manicure technique are flowers on wet gel polish. Most often, girls make roses, and place them in various variations: they make small buds all over the nail, carefully draw a small rose, complement it with petals and thorns, or make a rose nail design for the entire nail. It just seems difficult to paint flowers on wet gel polish. In fact, the process of creating a flower manicure is very easy. We present to your attention a step-by-step process for decorating marigolds with roses using a wet coating:
- Apply the first color layer and dry it in a lamp.
- We apply the second layer, but after that we do not send the fingers into the lamp. It is on the damp surface that floral patterns will be created.
- We draw a rose using wet gel polish: we start with a curl, make several turns around it. Then we draw rose petals. The lines need to be drawn from the center so that the edges are thin. The petals should be placed along the border, as if rounding the flower.
- We fill the entire space of the nail in the same way.
- We correct the roses with a different color depending on the background covering.
- Dry your fingers in a lamp.
- Apply the top coat, dry it, remove the sticky layer.
Rose nail design with wet gel polish is ready. A manicure with flowers on a white background makes the image very gentle and romantic. And red roses on a black surface, on the contrary, create a deep, fatal image.
If roses on your nails do not inspire or delight you, then feel free to experiment and create your own floral compositions in manicure. For example, for an office style, a manicure in gray tones with leaves and daisies that echo the background coating is suitable. And for lovers of indoor plants, we recommend decorating your marigolds with anthurium.