Neat nails are an important part of the appearance of a well-groomed girl, which is why manicures with gel polish are gaining popularity. But to get a perfectly even coating, you need to make an appointment with a specialist, go to a salon or someone’s home, and hope that they will do the job exactly the way you wanted. Of course, doing your own manicure is much more convenient and cheaper.
Do you think learning how to do a manicure is difficult? We will try to prove you wrong!
In this article we will tell you:
- What is gel polish? Its pros and cons
- How to learn how to do a manicure with gel polish
- What you need for a manicure at home
- Step-by-step lesson - how to do a manicure with gel polish at home
- How to do a hardware manicure
- How to choose cutters for hardware manicure
- Step-by-step lesson on hardware manicure
- How to choose a machine for hardware manicure
- How to choose a lamp for manicure
- How to properly sterilize manicure instruments
- Where to learn manicure and how to choose the right manicure courses
Manicure courses for yourself in St. Petersburg
What is gel polish and how does it work?
First, let's figure out what gel polish is? This durable polymer nail coating is a well-known and popular manicure option today.
Pros of gel polish
Gel polish coating has several advantages , which is why it is much more popular than regular polishes.
- Gel polish is durable - lasts from two weeks to a month and pleases the owner with its appearance.
- The strength of gel polish allows the manicure to retain its color, does not rub off from the nails or get scratched, does not allow the nails to break, and they grow faster.
- A wide range of gel polishes allows you to choose a coating that will not spoil your nails and, on the contrary, will strengthen them.
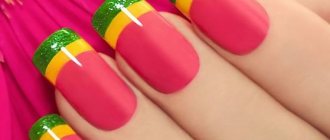
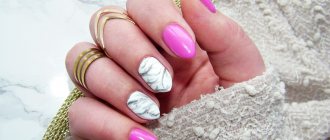
- The choice of color palette and designs is huge. You can create different colors, patterns and combinations of patterns - it will be useful for all lovers of “something new”.
Trimmed manicure with regular polish
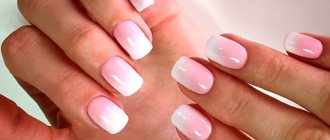
It is advisable to do a manicure on short nails , as it will look more attractive on them. All preparatory procedures are carried out in the same sequence as described above. With a simple varnish you can create such varieties of manicure as: artistic, gradient; ombre, patterns on water.
Regular coating at home is not difficult to do and will save time. After the base is completely dry, coat the nail plate with varnish. If the shade is not too saturated, apply a second layer, but after the first has completely dried. On top of the dried varnish, the nail is covered with a fixative. It sheds the life of the varnish, strengthens the plate, and the fixative also enriches the nails with nutrients.
How to learn how to do a manicure with gel polish yourself?
We promised that learning how to do a manicure is easy! Now we’ll tell you exactly how you can do a manicure yourself at home.
A gel polish manicure is done in two stages: first a simple manicure, and then applying gel polish to the nails.
Advice
First of all, purchase or prepare the necessary tools
To create a neat manicure you will need:
- sharp manicure scissors
- wire cutters
- orange wood cuticle stick
- nail file and polisher
- gel polish of the desired color
- transparent base
- top coating
- drying lamp
- tassels for design
- additional decorations: sparkles, tints, sliders, etc.
Some of these tools can be replaced with a manicure machine, which will allow you to remove cuticles faster and easier.
Step-by-step instructions on how to do a manicure at home
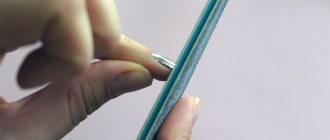
- Use a nail file to create the desired shape for your nails. The picture shows several options for nail shapes that you can make.
- Push back and lift the cuticle using an orange stick and carefully remove it with scissors or nippers.
- Degrease your nails with a good degreaser. Do not use alcohol for this purpose - it dries out the nail plates and you risk damaging your nails!
- We begin to apply gel polish. First, coat your nails with a clear base coat (base), then dry your nails in a lamp for about 30 seconds.
- Apply colored gel polish in the same way as you would apply regular polish. Gel polish needs to be dried in a lamp for about 1 minute.
- For a more saturated color, you can apply a second layer of colored gel polish, and then fix it by drying it under ultraviolet light.
- If you want to draw something on your nails, stick sliders (a variety of stickers on your nails) or decorate your nails with an unusual stamp, you will need special tools and materials. For any of the methods, the technique is the same - apply the desired design to the nail, dry it in a lamp for 30 seconds.
- Secure the result with a top coat. “Cover” the side cut of the nail with varnish and dry the result in a lamp.
- File your nails if necessary.
- Moisturize your nails and fingers with oil or light cream.
- Your wonderful manicure is ready!
Rules for doing a manicure at home
The rules for manicure at home are quite simple, and today in stores there is a huge assortment of all kinds of products for hand care and manicure. What a woman might need if she decides to do a manicure on her own:
- Nail polish remover - it is advisable to purchase one without acetone. Acetone has a negative effect on the nail plate, although it washes off the old coating quickly enough. After such a wash, nails may begin to fade and peel,
- Nail files. It is advisable to purchase a glass file, which is not so aggressive on the nails and will not lead to their delamination. Polishing files may also be needed if the woman prefers polishing. These files are made in the form of a parallelepiped, each side of which has its own coating and number. It is very simple to use - just polish your nails one by one, depending on the number on the edge. However, it is advisable to do such polishing no more than once a month,
- Cuticle sticks
- Special manicure scissors for cutting cuticles or tweezers for removing cuticles. Their size is chosen according to the convenience of the woman herself. It is advisable to choose tools from high-quality steel from well-known manufacturers, then there will be no problems with performing manicures, and they will have to be sharpened very rarely,
- Cuticle oil,
- Cuticle softener,
- Hand scrub,
- Hand care cream,
- Cotton pads,
- Hydrogen peroxide,
- Steam bath,
- Natural bristle brush,
- Nail polish,
- base coat,
- Fixer,
- Cotton napkin or towel.
How to treat your nails at home? Very simple. First you need to remove the old nail polish and use a nail file to make the desired shape of your nails. The file must move in one direction, otherwise you can injure the nail and it will begin to peel.
The shape of the nails is chosen depending on the woman’s preferences. If the cuticle shape is oval or round, then oval or round nail shape is recommended. If the cuticle is shaped closer to a square, then a square nail shape is recommended. The variety of nail shapes allows a woman to create a new nail design every time, depending on her mood.
How to do a hardware manicure?
You can also prepare your nails for applying varnish using a special machine. This type of manicure is called hardware manicure. There is nothing complicated about it, but it looks neater and is much faster.
What are cutters for hardware manicure?
The peculiarity of hardware manicure is that many cutter attachments are used, each of which performs its own functions when processing the cuticle of the fingers during a manicure. Mills are attachments for a manicure machine.
How to choose cutters depending on the material:
- Diamond cutters are not only the most expensive and hardest, but also the most effective. They work best with delicate skin.
- Ceramic cutters are the most common type. Such cutters are used by both experienced craftsmen and beginners.
- Metal cutters are a tool for professionals. You need to work with them carefully.
- Silicon carbide cutters are the best option for beginners. They are the cheapest and are considered disposable.
Milling cutters made from different materials are used in the same way, but the harder the material, the more difficult it is to work with. An experienced craftsman can handle cutters made of different materials equally well and work even with the most delicate skin.
What shapes of cutters will be useful for a novice craftsman:
- Cone-shaped cutters are needed for grinding and polishing the side ridges of the nail.
- A ball-shaped bur is necessary for removing irregularities and cracks.
- Cylindrical cutters are used to create nail shapes and remove gel polish.
- Bullet polishers are made from soft materials such as silicone or plastic and are used for finishing and polishing.
Recommendations for working with the manicure device:
- Only dry cuticles should be treated with the device, otherwise they will heat up and you risk damaging them.
- Do not press the device too hard against your nail, otherwise you may damage the structure of the nail plate.
- First, practice using silicone tips. This will help you master the machine and learn how to operate it.
Ready? You can start creating the perfect manicure!
How to do a hardware manicure - step-by-step instructions:
- Remove the cuticle on the side edges of the nail using a needle-shaped (cone-shaped) cutter. The rotation speed of the cutter should be about 1200 rpm.
- Using the same cutter, we carefully lift the cuticle, running the device along the lower edge of the nail. Be careful, delicate thin skin is very easy to hurt!
- Using a truncated cone cutter running at 1000 rpm, remove cuticles from the nail.
- Using a bullet polisher, gently buff the cuticles.
- If the skin around the nail also requires treatment, use a ball-shaped cutter and go over all the bumps and cracks in the skin around the nail plate.
- To give the nail the desired shape, go along the edge of the nail with a cylindrical cutter.
- Your nails are perfect - apply gel polish!
Products for manicure at home
Products for manicure at home must necessarily include hand skin care products, because a manicure is not only beautiful nails, but also the delicate skin of women’s hands, without “chicks” and rough areas on the fingers from exposure to chemicals, processing vegetables, work in the garden or vegetable garden. After all the manipulations to remove the cuticle from the nail of each finger have been completed, you can use a hand scrub. Apply it to the skin of your hands and massage. Rinse with warm water and wipe dry. Then you need to apply hand cream and give it time to absorb.
Massage movements help to do this perfectly. If a woman is not in a hurry, then you can give your hands a little time to just rest from work, and your nails from coatings. This is how a hygienic manicure is performed. In order to give the manicure a more well-groomed look, when the nail treatment is finished, apply nail polish.
To ensure that the varnish coating lasts a long time, the following steps must be performed before applying it:
- Degrease each nail plate with nail polish remover,
- Apply base coat. As a rule, it contains various vitamin complexes to strengthen nails and protect them from the harmful effects of varnish coating,
- After the base has dried, apply nail polish. The varnish is applied with gentle movements from the cuticle area towards the edge of the nail. First, the central part of the nail is painted, then the side parts,
- The second layer is applied after the first layer has dried,
- Apply a fixative - a special coating that allows the varnish coating to remain shiny and strong longer, and also dry faster,
- When all the coatings have dried, cuticle oil is applied to the cuticle area, which allows the manicure to maintain its beautiful appearance longer.
Many women are interested in how to treat their nails at home so that the cuticle stops growing? The process of getting the cuticle accustomed to the fact that it will not be cut, but will only be pushed back, is quite long, but possible. It is the orange stick that will become an active assistant in this, as well as cuticle care products.
Also, many women are interested in the possibility of performing a hardware manicure at home. Nothing is impossible! To do this, you need to purchase special equipment and complete a minimum training course to operate such a device.
Home hand care treatments can be performed no worse than in an expensive spa center, but much cheaper.
How to choose a machine for hardware manicure?
We figured out how to do a hardware manicure. But how to choose the right manicure machine? There is nothing complicated about this either, the main thing is to understand why you need it.
When choosing a manicure machine, ask yourself these questions:
—What will your machine be used for?
A manicure machine will be significantly cheaper than a manicure and pedicure machine.
— Are you buying a device for yourself or for work as a manicurist?
For professional work, choose a higher-quality and longer-lasting machine, since you will have to use it much more often.
— Will you use it in the salon or at home?
A manicure machine with less power is suitable for home use, while a “severe” professional machine will be needed for a salon.
— Will you work as a manicurist on the road?
If you're working in a client's home, look for lighter models. Included with the machine, purchase a carrying case.
— Are you comfortable working with a manicure machine?
You must understand that the comfort of working with the machine is individual. If possible, touch the manicure device, hold it in your hands, imagine whether it will be convenient for you to work with it.
By answering these simple questions for yourself, you can easily choose the machine that is right for you.
How to choose a lamp for manicure?
A lamp is a necessary thing when creating a manicure with gel polish. They come in several types and are divided by type of radiation:
- Ultraviolet manicure lamps. Inside there are fluorescent lamps that emit ultraviolet light. These are the cheapest lamps and are suitable for beginners. Remember that the radiating element inside needs to be changed every two to three months.
- LED lamps. These lamps contain LEDs. This option is used most often by craftsmen. They are not cheap, but they are superior to UV lamps in power.
- CCFL lamps . There are gas lamps inside. When an electric current passes through this gas, the lamp emits the light necessary for the varnish to harden. Such lamps last for several years and consume little electricity.
- Hybrid lamps for manicure . Hybrid lamps combine all three technologies mentioned above and reduce the curing time of gel polish. They are expensive, but among them you can also find a budget option.
The power of the lamp does not depend on its type. All devices are divided into 9-, 12-, 18-, 36- and 45 - 54 watt.
How to properly sterilize instruments?
We learned how to properly sterilize instruments from an experienced manicurist, Maria Kaverzneva.
Unfortunately, not all clients know that instruments must go through several stages of disinfection and sterilization. The most important thing is a clean instrument.
Clean does not mean washed in soapy water or a disinfectant solution; clean means sterile. And sterilization is the complete destruction of microorganisms, which occurs under the influence of heat at 180 degrees and above.
After each client, all tools (except for orange sticks and disposable nail files, which I throw away) go through several stages of processing.
Stages of sterilization of a manicurist’s tools:
Stage 1 is disinfection and pre-sterilization cleaning. The instruments are soaked in a special disinfectant liquid (I use Aminaz-Plus) and kept in it for a certain amount of time.
Stage 2 - the instrument is thoroughly washed with a brush under running water, dried and placed in a separate hermetically sealed bag - a craft bag.
Stage 3 - the craft package with tools must be placed in a dry-heat oven for 2 hours (along with cooling) at a temperature of 180 degrees. A dry-heat oven is an important stage; it sterilizes any metal instruments (scissors, wire cutters, cutters) with hot air, heated to 180-200 degrees. When using this device, all sterilization standards are observed (it is required by the Sanitary and Epidemiological Station), since it kills 99.9% of all diseases.
After sterilization, the instruments are safely stored in a closed craft bag, which ensures their sterility for up to 20 days and is only taken out in front of the client.
How can you be sure that the instrument is sterile? There is an indicator on the craft package that allows you to determine that sterilization has been carried out. It should be brown or pink.
Remember! No amount of “alcohol” or daily soaking in the solution kills HIV and hepatitis, just like a UV sterilizer, it does not sterilize , but only keeps the instrument clean after sterilization.
How to properly care for your cuticle?
The most important condition for the beauty and health of hands and nails is proper cuticle care. Experts strongly recommend removing the cuticle body, because often this area not only becomes rough and unsightly, but can burst, causing significant pain. In addition, cutting the cuticle lengthens the nail plate, so it is recommended for those with short nails.
To make it easier to work with cuticles, nail experts recommend hand baths. At home, you can remove the cuticle using nail clippers.
You can also move and lift the edge of the cuticle with an orange stick and trim with sharp, rounded scissors.
At home, the cuticle can be softened with fruit acids, which greatly facilitate the further process of removing the cuticle body.
Today, hardware manicure has become very popular. This manicure is very easy to do at home.
Using cutters, you can painlessly and non-traumatically make the cuticle perfectly smooth. On sale there are not only professional devices for salons, but also small kits for home care.
Do not forget that the cuticle area requires regular care and nutrition with oils. Special oil-vitamin cocktails are widely available, sold in an ergonomic tube-handle with a brush.