How to make shellac yourself at home? How not to spend a large amount of money on the services of an experienced specialist? You can learn about this and much more from the following material.
Shellac is a new manicure technique. It is not as harmful as the classic method of nail extension. At the moment, applying gel polish to the feet is rapidly replacing other methods of design and treatment of the nail plate. Many ladies of various ages who try to follow fashion use the services of manicurists when they want to get shellac done. No matter how complicated the process may seem, you can do it yourself at home.
What is shellac?
Shellac is a logical, consistent way to extend gel nails. During the procedure, a set of polymers is used, each of which has the properties of both a varnish and a special gel.
The composition of the coating applied to the nails includes the following components:
- Film former. When this substance hardens, it forms a dense coating that is not afraid of any mechanical stress. The component is considered the basis of any type of shellac.
- Photoinitiator. This substance absorbs the sun's rays, thanks to which the varnish hardens faster.
- Pigment . The shade that is the main component of shellac. Using pigment, you can give your nails a certain shade.
- Thinners . Components that allow you to adjust the consistency of the varnish.
- Supplements . These components enhance and regulate the quality of the varnish. Thanks to additives, the color becomes more intense and resistant to abrasion.
- Shellac looks like a medium liquid mass. The color of this mass may vary. It all depends on the pigment present in the composition. To get a new, unusual shade, you can mix several gel polishes at once.
- The varnish dries using a special UV lamp. A coating that dries under other influences is not very stable. Shellac has increased strength. It can be stored for at least 14 days, while maintaining its original appearance.
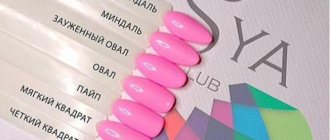
Type of manicure
What you need for a shellac manicure: important tools, materials
For a shellac manicure there is a basic kit that includes tools and materials. Thanks to this set, you can create an exquisite manicure yourself at home:
- UV lamp. The power of such a light bulb should be 36 W. If you have a lamp with a lower power, the varnish may begin to peel off over time. Consequently, you will end up with an ugly manicure.
- Degreaser . Most often, such substances are sold in the same store where all shellac components are sold. If you can't find one, use regular medical alcohol.
- Base coat. Try to choose a high quality foundation.
- Shellac of the required color.
- Finish coating. You also need to choose quality material.
- Orange stick.
- Napkins that have no lint. The fact is that the lint can ruin your manicure. You will have to remove the shellac layer and then reapply it. You will need wipes to remove the sticky layer at the final stage.
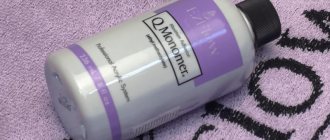
- A liquid used to remove shellac.
When choosing, pay attention to the CND brand. The company sells high-quality material for creating shellac. The fact is that the manufacturer is responsible for the quality of its own products and provides a guarantee for each product.
Basic and additional materials
You can, of course, buy material of lower quality. But with such products you may not get a beautiful, long-lasting manicure. If you save, you won’t be able to get an excellent result - a beautiful, long-lasting, elegant manicure.
Tools needed to apply shellac
Most of the tools needed for step-by-step application of shellac at home can also be found by beginners, as they are mandatory for every lady:
- manicure set (tongs, spatula, orange stick, files);
- brush for removing dust from the nail plate;
- ultraviolet lamp;
- lint-free wipes;
- foil with sponges.
How to properly make your own shellac nails: preparatory stages
So, having prepared all the necessary tools and materials for a shellac manicure, you can begin the preparatory stages. This includes preparing the nail plates.
Preliminary manipulations consist of the following steps:
- Treat the cuticles on your fingers.
- Form the nail shape that you like best.
- Polish your nails. This procedure is considered mandatory. Thanks to it, the shellac and the surface of the nail plate adhere better.
- Treat your nails with an antibacterial agent. It will degrease your nails and ensure even application of the polish.
- Apply a layer of base coat.
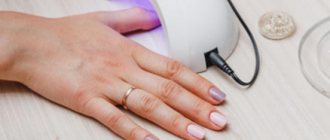
- Warm your nails under a UV lamp to fix the gel polish. The warm-up time should be approximately 30 seconds.
Shellac at home for beginners step by step: base coating
Covering your nails after preparing them begins with applying a base. This layer protects nails from the negative effects of the pigment layer. In addition, the base makes the adhesion of the polish and nail much better.
step by step
according to the following instructions:
- Paint the left edge of the nail plate.
- Paint the right edge.
- Apply the base in the center of the nail.
- Before moving on to the next step, make sure that the edges of each nail are carefully “sealed.”
- Thanks to this technique, you will evenly distribute the base over your nails without catching the skin.
The entire database processing procedure consists of the following steps:
- To begin, twist . This way you will warm up the base, after which it will lie evenly on the nails.
- Apply foundation. Make sure the layer is not too thick. Otherwise, the base will take longer to harden, which can cause unwanted stains on your nails.
- Dry your nails for 30 seconds.
How to apply shellac?
This layer makes your nails the color you want. To properly apply shellac, follow these instructions:
- Apply a thin layer of product. Do not seal the edges of your nails.
- Dry the shellac under the lamp for approximately 3 minutes.
- Next, reapply shellac . You can apply the same varnish or use a different color. With this technique, an original, unusual drawing is obtained.
- Hold your painted nails under a special lamp for approximately 3 minutes.
Keep in mind that each layer of shellac must be thin enough, otherwise the varnish will begin to swell and bubbles will form underneath.
The layer should be thin
- Before applying the varnish, check what condition it is in - the product should not be very thick. Varnish can deteriorate over time if you store it incorrectly.
- Make sure that the cap on the tube is screwed on well. Store the varnish only in a dark place where the temperature is no more than +25°C.
Shellac manicure: how to apply decorative elements correctly?
The scheme and method of applying decor during a manicure with shellac is almost no different from decorating nails during a manicure with ordinary varnish. But here, after applying the decorations, you should also re-coat your nails with a finishing coat of varnish.
The decor on the nails during a shellac manicure can look like:
- Ribbon, stripe.
- Ornaments.
- Various patterns.
- Images.
- Applying several shades of varnish at once.
- Glitter and so on.
Images
Ribbons
Stones
Glitter and powder
Shellac for long nails
Which exercise machine is best for losing weight at home?
In the coming 2021, the well-forgotten old gradient nail art will become new. The essence of this technique comes down to long stripes of several colors of varnish, which are successfully combined. For example, this season it is optimal to mix gray and black colors in different tones.
Note! To achieve this effect, the ombre effect is used, i.e. a smooth transition of color from darker to lighter. For example, the thumbnail can be coated with bright orange varnish, and the little finger with peach shellac. The same can be done with a purple or lilac shade. This type of manicure is called moon manicure.
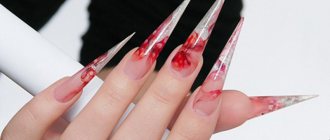
French manicure is performed using almost the same principle. Shellac of a translucent color is used for it, and the tips of the nail are painted white. Using shellac on sharp nails is suitable for special occasions, especially if bright shades of varnish are used.
Seasonal manicure is considered an interesting novelty:
- spring;
- summer;
- autumn;
- winter.
Winter manicure
A spring manicure can be done using shellac on oval nails. Its feature will be delicate shades and thematic patterns. For example, you can use milky shellac as a base, on top of which you can draw or glue spring patterns (this could be ladybugs, butterflies, floral elements, etc.).
The main condition for a summer manicure will be shades of green and yellow in addition to appropriate patterns (berries, leaves, etc.).
In autumn, experts recommend mixing red, orange and yellow colors using a smoothly transitioning gradient, for example, from black to yellow, from orange to green and other color mixtures.
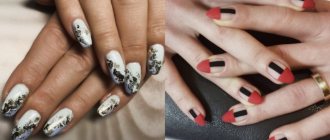
For winter manicure, a variety of design additions are suitable in the form of themed stickers, rhinestones, as well as the “broken glass” or mirror shine technique.
The final stage of a shellac manicure is applying the top.
During the final stage of the manicure, the last layer, the top coat, is applied with shellac. This procedure is performed as follows:
- Apply top coat in a thick layer. Seal each open edge of your nails with topcoat. This way the colored varnish will be in a closed “vessel”.
- Dry your nails. The drying time under a special lamp should be approximately 2 minutes.
- Take a lint-free cloth and a special product. Remove the sticky layer.
- If you don’t have a means to remove the sticky layer, acetone or ordinary alcohol will do. But these substances can ruin your manicure. Therefore, use them extremely carefully.
Applying top coat
Finishing painting consists of only 3 steps:
- Direct application of the mixture, which has several nuances:
- it should be applied in a fairly thick layer;
- Using this coating, it is necessary to seal all the free edges of the nail (thus the colored base will remain, as it were, in an entomological vessel).
- Drying. The exposure time of hands under the lamp is no more than 130 seconds.
- Removing the sticky layer using a special product in which you need to moisten a lint-free cloth. It costs quite a lot, so in extreme cases you can use acetone or alcohol. However, these substances can slightly damage the manicure, so they should be used with caution.
How to properly apply shellac at home: secrets
Making your nails beautiful can sometimes be very difficult, especially when it comes to shellac. If you are a beginner, you can use the detailed instructions above, but it may not be enough for you. After all, you are not familiar with the secrets that real professionals know.
To get the perfect manicure, experts recommend using the following tips:
- To evenly distribute the glitter on the surface of the nail, mix it with a small amount of transparent base. Mix the mixture thoroughly, then apply a second layer of jewelry to your nails.
- To make your manicure last longer, apply shellac in a thin layer. Avoid touching the cuticles to keep your manicure looking neat.
- To do a French manicure, do not use stencils. After all, after drying the varnish, it will be difficult for you to remove them. If you remove the stencils before the gel has dried, it may run.
- If you use shellac to extend your nails, do not file the entire nail down. Just sand .
- To remove cuticles, experts advise using a special product. However, if the cuticles are not very noticeable, then take an orange stick and use it to push back the cuticles on your fingers.
Instructions for home
- When buying a UV lamp , pay special attention to the power of the equipment. The best option is a 36 W lamp. In this case, the varnish will dry quite quickly.
- Any correction must be carried out under this mandatory condition - the nail plate must be dry. Even a gentle file will not be able to keep wet nails intact.
- Use cuticle oil every day. Apply it in the morning, then in the evening. Only in this case will you not get hangnails on your fingers.
- Before visiting a beauty salon, first treat your nails. If your nails are sick, shellac will only make the problem worse. The nails will begin to break, peel, and fungus may appear.
- Do not apply hand cream before applying shellac.
About shellac patterns
Is it possible for pregnant women to do shellac?
For the best results, designer nail designs should be done by a qualified manicurist. Nails with a well-chosen pattern will complement any look, becoming a stylish highlight, diluting the everyday office drabness of a businesswoman’s appearance, or complementing a chic evening look.
You can make an unusual manicure yourself at home, creating various patterns. To understand how to make shellac with strengthening by applying a pattern, you need to know what components can be used.
Interesting manicure at home
It can be:
- varnishes;
- gels;
- special acrylic powder;
- additional decorations.
You can also make three-dimensional images, but such decoration of long or short nails, even done by a professional, will last no longer than 3 days.
To create simple drawings, you can use ordinary home tools.
For this you will need:
- thin needle;
- narrow tape;
- homemade lace.
Ordinary household tools will help you create an unusual manicure
Conventional types of shellac manicure are done simply:
- The design is applied with a thin needle.
- The selected shade of varnish is dripped onto an old saucer or sheet of cardboard.
- The needle is lowered into the varnish and a drop is carefully applied to the nail, forming a pattern as your imagination dictates.
- After drying, the nail is covered with a fixative.
Using narrow tape, the drawing is even easier to make. To do this, apply colored paint (varnish) to the base layer, and then draw a pattern by securing it to the nail with tape. The pattern can be the same on each nail or different. A different color is distributed on top of the tape, then it needs to be removed, all layers are dried and transparent shellac and a fixative are applied to the nails.
Note! Shellac with strengthening helps improve the structure of the nail without harming its appearance and internal condition.
Benefits of shellac manicure
As you can already understand, shellac has many positive aspects. Among them we highlight the following:
- looks just as good on short nails as it does on long nails. This method makes it possible to paint nails to the required length.
- Since shellac is considered a natural remedy, thanks to it, nails are strengthened breaking .
- Shellac can last on nails for quite a long time. Many women wear this manicure for almost 3 weeks.
- To remove shellac, you need a special product. This means that nails coated with this method are not afraid of various household chemicals.
- Thanks to shellac, nails become shiny . The shine on them can last for quite a long period without fading over time.
- Companies that produce shellac products try to closely follow fashion. Therefore, the palette of varnish colors is regularly updated. On sale you can always find both classic shades and bright, interesting, avant-garde tones of gel polishes.
- The main advantage of shellac is that this method of painting nails is considered completely safe . The main components of shellac contain no formaldehyde. That is why such a manicure can be done not only by girls prone to allergies, but also by pregnant women.
- If you suddenly get tired of shellac , you can remove it yourself at home. To do this, purchase a gel polish remover or film in advance from a specialized store. Then carefully study the instructions for beginners , and only after that clean your nails of polish.
Depends on the mood
Gently
Unusual
Bright
Blue
Reds
Types of shellac for nails
Why doesn't shellac stick to nails?
Using shellac you can create almost all types of manicure.
For example it could be:
- New Year's shellac;
New Year's nail design
- for round nails;
- with strengthening;
- peach;
- transparent shellac on nails (it allows you to strengthen your nails without adding a bright color);
- classic shellac (this includes plain varnish, ombre or French manicure);
- translucent shellac;
- on sharp nails;
- milky shellac;
- silver shellac;
- light shellac;
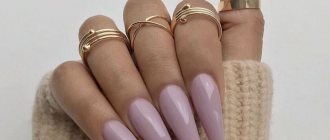
- lilac;
- office shellac with more restrained shades;
- sprayed shellac;
- everyday;
- combined shellac.
Office manicure
New Year's shellac in the coming 2021 should be bright red to meet the requirements of the symbol of the next year of the fiery pig. Red color will attract good luck and replenishment of the budget. A mandatory element of such a manicure will be various shiny elements: sparkles, rhinestones, pictures symbolizing the New Year, etc.
Shellac on round nails will look impressive in various variations:
- gold sputtering;
- decoration with neutral (plain) or flesh-colored varnish;
- Silver shellacs look good on such nails.
Note! These options do not require nail extensions; all manipulations are carried out on short nails. Such minimalist fashion trends are universal, because beautiful short nails are optimal for performing everyday duties or when working at the computer. Such minimalism with the help of varnish will strengthen your nails for a long time and decorate your hands without a complex manicure.
Pearlescent shellac will look good on short nails. However, not knowing which shellac is best to choose, you can look at ready-made options on the Internet and choose the option you like. All that remains is to show the picture to the master, who will repeat the drawing exactly, if he is truly a professional.
Pearlescent shellac
Disadvantages of shellac manicure
Everything that exists on our planet has negative sides. Shellac was no exception. There are few disadvantages to manicure, but you should definitely know about them:
- The shellac procedure is quite expensive . Correction can also cost you a decent amount. So if your nails are growing quickly, accept that you may be incurring additional costs.
- The next negative side of shellac is the following - despite the fact that manufacturers claim that the coating is very durable, due to high temperature, nails can expand and then shrink, returning to their original size.
- Due to warm water while washing dishes or taking a bath, nails can become deformed, resulting in micro-cracks in the coating. Due to such cracks, dirt can get under the varnish, causing the development of bacteria.
- Shellac can stay on nails for a long time, so microbes have a lot of time to develop and damage the nails. If you want to avoid such consequences, try to do all your homework with gloves.
The service is expensive
Long periods of wear can promote the development of bacteria
How to do a manicure with Cat's Eye shellac?
This type of manicure is considered very popular. By using a varnish that contains metal particles in the procedure, you can create unusual patterns that resemble a cat’s eye.
For this design, prepare the following materials:
- Varnish. It should be green.
- Magnet.
If you don't have a special magnet, then take a regular one.
Cat's eye
The process of creating such a manicure consists of the following steps:
- For shellac, prepare your nails and apply a base.
- Dry the base under a UV lamp.
- Apply a special green varnish and dry it too.
- Reapply the polish and hold the magnet near it. The metal particles will form an unusual pattern.
If you approach the magnet with its edge, you will get a pattern in the form of stripes. By twisting the magnet, you will get an interesting pattern that resembles a cat's eye. At the very end, coat the varnish with topcoat.
Shellac: French manicure
Perform French shellac using this method according to the following instructions:
- Initially, remove the cuticles, give the nails the desired shape, remove the oily layer.
- Apply primer.
- Next, cover your nails with a thin layer of base.
- Dry your nails under the lamp for approximately 3 minutes.
- Use a special cloth to remove the sticky layer that forms after drying.
- Paint your nails with the desired color.
- Carefully draw "smiles".
- Cover your nails with base coat.
French
Creating shellac at home is an easy procedure even for beginners. If you follow our instructions, you will definitely get a beautiful manicure.
You can find out more about manicure here:
- Manicure yourself at home, with or without varnish
- Hot manicure at home
- Designs and ideas for purple manicure
- Emerald manicure
- Beautiful knitted manicure
- Manicure with hearts
Applying shellac
This tonic layer gives the nails color and is applied according to the following instructions:
- Apply a thin layer of shellac. There is no need to seal the edges of the nail.
- Dry the coating in a lamp for about 3 minutes.
You can make shellac for beginners at home using step-by-step instructions from professionals. - Apply another coat of varnish. Moreover, you can use either the same color or a different one. By mixing two different shades you can get a very interesting and original option.
- Keep your nails under the lamp for another 3 minutes.
It is worth considering that the layers should be incredibly thin, almost transparent. Otherwise, the varnish may swell and form unpleasant bubbles.
Before applying the varnish, you need to check its condition: it should not be too thick. Damage to the coating can occur due to improper storage or purchasing a low-quality product, which will have a bad effect on the condition of the nails. It must be stored with the cap tightly screwed on and at room temperature. Also, do not leave it in areas exposed to sunlight.