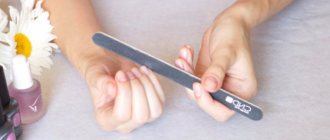
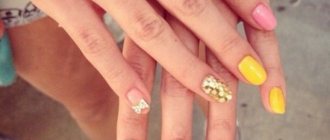
The creation of gel polishes has become a real revolution in the nail industry. Now the decorative coating can be worn for weeks, the nails themselves have become more resistant to chips and damage, and the variety of designs that polymer varnishes can create is simply beyond enumeration. However, even such a perfect coating has one very significant drawback - literally in a week the regrown part of the nail will be visible. Two - and it becomes noticeable that the manicure is stale, three - and your nails with their appearance are literally crying out for the need to visit a master. This circumstance is extremely inconvenient, especially when a long trip is expected, to a place where there is no possibility of undergoing correction. And, it’s trite, regular correction requires certain financial costs.
Photo from website: youtube.com
But recently, in the nail industry, just to solve this problem, a technology has been developed for coating with gel polish under the cuticle, which significantly increases the durability of the manicure. In this review, we will take a closer look at how to apply gel polish under the cuticle with detailed video tutorials.
Gel polish under the cuticle: pros and cons
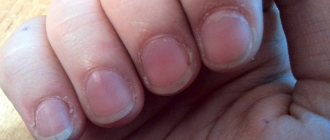
We all remember the main and unshakable rule of manicure - when applying gel polish, you must retreat 1 mm from the cuticle area. This requirement can be explained by hygienic aspects - the cuticle zone protects the nail from harmful bacteria, and a small area of the unpainted nail, just that millimeter, guarantees that oxygen will flow to the plate, albeit in a minimal amount.
Photo from the site: taginstant.com
The second aspect of why when painting nails you need to make a minimum distance from the cuticle is aesthetic. When applying gel polishes, even by a professional master, there is always a risk of the varnish flowing onto the cuticle and staining it. Such a manicure will look sloppy, and the shelf life of such a manicure is significantly reduced due to peeling in the area of contact with the cuticle. Why does gel polish peel off at the cuticle? Yes, because the cuticle and the pterygium located near it prevent good adhesion to the nail plate.
Meanwhile, the technique of applying gel polish under the cuticle exists, and even professional artists use it. Why? Let's look at the advantages of this technique:
- Long wearing period. Nails painted under the cuticle will look as if you had recently visited a specialist for almost two weeks. The thing is that the gel polish is applied deep under the cuticle itself, which is why in the first week of such a manicure the effect is created that already colored plates are growing from under the cuticle. In the second, the gel polish is very tightly located at the very base of the cuticle, and only in the 3rd week can you see the usual picture with a standard one-millimeter indentation from the cuticle. In other words, a manicure created using this technology will last instead of the standard 3 weeks, 5, or even 6 weeks!
- Economical. This point smoothly follows from the first one - the longer you can wear a manicure, the less often you will have to make corrections, and, accordingly, resort to lower costs.
- Aesthetics. In the first weeks, a manicure under the cuticle looks seamless, without sloppy gaps that form as it grows.
Photo from the site: divanail.ru
These three points alone are enough to make you want to make a similar option. But remember - all these advantages are possible only if you or your master knows how to apply gel polish under the cuticle. Otherwise, significant disadvantages cannot be avoided:
- Uneven line at the base. It’s not enough to “drive” the gel polish under the cuticle; you need to be able to do it carefully, forming a beautiful curve, which, when grown, will look the same as neatly painted nails with gel polish at the cuticle at a standard distance of 1 mm. If the line at the base is torn and spread, then such a manicure will last only two instead of the prescribed 5–6 weeks. Those. it will have to be removed as soon as an uneven border appears.
- Decorative coating coming off. When applying gel polish under the cuticle, it is very important to remove all the pterygium located under the cuticle, which is quite problematic. If you neglect this requirement, then the manicure will not last even a week. As the pterygium grows, the gel polish will move away from the nail, and water entering under the voids will intensify the peeling process. As a result, either part or all of the decorative coating is lost.
- Sloppy look. How not to stain the cuticle with gel polish and at the same time do deep coloring is not an easy task, which definitely requires skill and perseverance. If the gel polish does leak onto the cuticle, it will definitely stain it with pigment, which will neutralize the entire effect of the manicure. Another point is that overgrown nails lose their attractive shape. Untreated corners and edges of the plates, as they grow back, “gape” with their lack of painting. And the natural slope of the nails in one direction or another will look sloppy in just three weeks.
On a note
To avoid the risk of cuticle staining, take care of a special protective agent for it in advance. Apply it in a thin layer to the cuticle, let it dry and start coloring. After you complete all the decorative work, it is enough to remove from the cuticle the thin strip formed by the protective agent, along with the remnants of the gel polish adhering to it.
- Expensive. It’s a paradox, but saving on correction, you will have to fork out for the technique of painting nails under the cuticle, which costs 10–20% more.
- Damage to the plates. The most terrible consequence. In case of inept manicure or excessive cleansing of the nail root from the pterygium, damage to the proximal zone of the nail and matrix is possible, which entails separation of the plates from the bed and the risk of infection.
But don’t be so scared of side effects; if you follow the technology and hygiene requirements, you can easily avoid these troubles.
Perfect application of gel polish: what is the secret?
It is known that gel polishes have taken root well and are very popular among many hundreds of thousands of women. Most nail technicians and lovers of home manicures have learned how to do this type of manicure efficiently and correctly.
Without a doubt, gel polishes are one of the best inventions in the nail industry. This is a popular and fashionable service, used by representatives of all ages and professions. Simple, convenient, fast process. This is a big savings in money and time, which is always in short supply.
The shine lasts for several weeks, creating the feeling that the manicure has just been done. It is safe for the nail plate, and also does not contain substances that can cause an allergic reaction on the nails or the skin around them.
It does not crack, does not chip, and with all this splendor, regardless of whether the nails are long or rather short, it looks very natural and is an undoubted adornment of ladies' hands.
So how to achieve the perfect result when applying gel polish under the cuticle?
Absolutely every technique described below is unique in its kind and deserves special attention. Qualified nail service specialists use them in their own work with clients. To find exactly what is close to your heart, you need to try out each technique. This is both experience and passion.
How to apply gel polish under the cuticle? Let's disassemble the equipment
How to apply gel polish under the cuticle? First, you should detail the essence of the issue. Application under the cuticle is possible only with an unedged version of the manicure, when the cuticle only moves towards the base. With the trimmed version of the manicure, the cuticle is cut off as much as possible, and in this case they are already talking about how to paint gel polish close to the cuticle, because in the latter case, the cut cuticle, as it grows, grows onto the painted base of the nail, hiding it with its body. Accordingly, with the latter option, the work is greatly simplified and the risk of cuticle staining is reduced. But, in any case, the gel polish will end up under the cuticle.
Photo from the site: nails.saracentre.ru
Now let’s talk in detail about how to paint your nails with gel polish under the cuticle. Please note the following important points.
- The main and unshakable rule is carefully prepared nail plates. No roughness, unevenness or other annoying little things that can ruin the whole impression of a manicure. Requires careful sanding using a buff.
- Hygienic manicure is done only using the dry method. Those. no softening baths or gels. The ideal option is to work with a cutter. With its help, the dead layer of cuticle is cut off and the ptergy is cleaned. A wet cuticle will not allow gel polish to adhere well.
On a note
If you prefer to remove cuticles using a wet method, then perform a manicure in advance, or use a little trick - dry your nails with a stream of warm air from a hairdryer.
- Careful polishing of the nail plate and removal of pterygium even under the cuticle is necessary. To do this, move it as far as possible to the base of the nail.
There are only three rules, but they are the ones that will allow you to create a high-quality manicure for the cuticle. There are many techniques for performing such a variation of coloring; let’s look at some of them.
- Method 1. In order to paint the nail as close to the cuticle as possible, you need to push the cuticle very deeply to the base of the nail. When painting each finger, slightly stretch the skin from the base of the nail and from the side ridges. Then carefully, using an almost dry brush, paint the area adjacent to the cuticle, moving from the central part to the base. After drying in the lamp, they will repeat, but this time it is necessary to apply a drop of varnish to the top of the brush. After the contour is outlined, you can paint the entire nail plate more freely, without fear of pigment getting on the cuticle.
Photo from the site: progellak.ru
- Method 2. Again, you need to move the cuticle as far as possible to the base of the nail and fix it with your fingers. The area near the cuticle should be painted with a brush at an angle of 45 degrees. The brush should be almost dry. After fixing the two layers, a decision is made on the need to apply additional pigment.
Photo from the site: 1001notes.ru
- Method 3. Using a thin brush, you need to paint the area near the cuticle. Then, after drying it in the lamp, continue to apply the coating according to the usual scheme. If dexterity allows and the varnish does not spread, then you can not pre-dry the first line, but simply immediately apply gel polish to the entire surface. Another variation of this method: apply the coating according to the usual pattern, indenting from the cuticle. Then, when the nail plate is completely painted, you need to push the cuticle as far as possible and paint the deep areas adjacent to the cuticle.
Photo from website: ok.ru
The best way to describe the procedure for applying gel polish under the cuticle is in a video. But more on that below.
A few more nuances...
Naturally, such a technique will require some skill and practice. Few people manage to cover their nails under the cuticle the first time, especially beginners. Even more problems will arise if you decide to do a manicure on your own hands. In all these cases, it will be difficult to avoid the problem of gel polish getting on the cuticle. But there are several tricks on how to remove excess gel polish from the cuticle.
Photo from website: neon-aqua.ru
- Using an orange stick soaked in degreaser. It is necessary to carefully remove the gel polish that has not yet polymerized with the sharp side of the stick. But under no circumstances use cotton swabs. The lint on them can stick to the gel polish and then the manicure will be ruined. After the gel polish is removed from the cuticle, the coating can be dried in a lamp.
- If, nevertheless, the gel polish was not removed on time and has undergone polymerization, then it is necessary to apply a cuticle softener or dip your fingers in a softening bath, and carefully remove the gel polish using the sharp part of the pusher. If it is not possible to remove the varnish the first time, this procedure should be repeated again after some time.
- Despite the fact that manicure under the cuticle lasts for a very long time, you should not overuse it. Be aware that after 4 weeks the gel polish becomes toxic and it is better to remove the old coating.
- The technique of applying gel polish under the cuticle is very traumatic, so it is necessary to pamper the cuticle with oils and creams and massage from time to time. This way it will recover faster and grow back more slowly.
- You should not remove the cuticle before a new manicure. As it grows, it will naturally mask the overgrown border of the nail. And to prevent it from looking neglected, you should again take care of it regularly. If necessary, you can slightly move it with an orange stick to the base of the nail.
That's all the subtleties and features of the technique of applying gel polish under the cuticle. The master class and video from “Ideal Manicure” are naturally not an axiom. Remember that there are many variations, and each master modifies them to suit himself. The main thing is to follow the basic rules and safety precautions, and such a manicure will please you a little more than the classic version of the coating.
How to avoid gel polish peeling?
Obviously, 90% of problems arise at the initial stage of manicure. To prevent this from happening, follow the technology consistently and accurately:
- carefully prepare the nail - remove the pterygium, moisture, grease, dust from sawdust from the surface, using special means and tools;
- choose a high-quality base that will ensure reliable adhesion of the nail to the materials, protect the plate from pigmentation, even out defects of the natural nail, and make the surface perfectly smooth;
- use a good topcoat to protect the coating from cracks, chips, peeling, give your manicure gloss and other effects;
- Apply gel polish no more than 3 layers, otherwise it will not last long, make sure that it does not get on the skin or flow under the cuticle;
- do not forget to seal the ends;
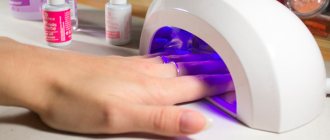
- polymerize in the lamp for the prescribed time - UV - 2 minutes, ICE - 60 seconds.
After drying the finish, do not rush to remove the sticky layer. Let the top cool for 30-40 seconds. To avoid peeling, after applying gel polish, it is advisable not to wet your hands for 2 hours. Although the coating has undergone polymerization, it is still “shrinking.”
Do not pick or try to rip off the detachment, so as not to damage the nail itself. If it is not possible to immediately get a new manicure, cover the gel polish with regular clear polish. This way you can go on for a few more days.