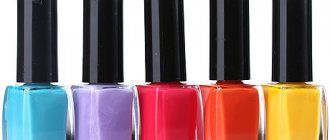
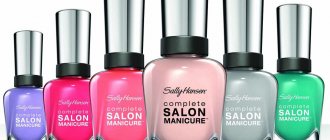
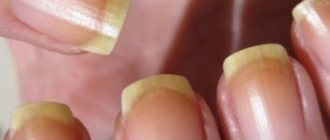
The nail service recently included a nail strengthening system from IBX. And everyone was happy, because our nails, tired from endless experiments with varnishes, gel polishes, bio-gels, required rest and restoration. We again treated them and restored them with no less aggressive agents containing harmful substances (such as formaldehyde and its derivatives). For some time it seemed that we had smoothed over all the negativity from the experiments. But time passed and it became clear that this was a vicious circle. We want to experiment, so we go make gel polish. Having worn it, we understand that it would be good to treat it - we treat it, and after treating it, we use gel polish again. And here the whole question is not in the gel polish coating itself, but in our illiteracy in using various innovations. You shouldn’t overuse anything, and you should give your nails a rest, changing the type of coating from time to time. Fortunately, the choice today is simply huge, from different varnishes, gel polishes to ready-made manicures that are simply glued onto a clean nail.
IBX system: purpose and capabilities.
IBX
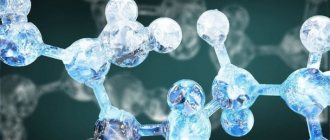
- the world's first internal action system. The penetrating and strengthening system works inside the nail, unlike most traditional products that act on the surface. IBX technology is aimed at maximum absorption and penetration into the nail plate. Apply like a varnish, heat to stimulate absorption, activate with an LED or UV lamp.
The drug is used:
- for restoration or as an addition to complex treatment, especially for weak, thin and damaged nails;
- to correct problematic nails, including the elimination of specific damage, such as chips, peeling on the free edge of the nail;
- as a complete protective layer under nail polish, gel, or gel polish.
By purchasing a professional set you will receive 2 products that are applied in pairs and do not work alone. The box contains instructions and 2 bottles. IBX REPAIR 9.5 ml and IBX 14.3 ml. The difference in volumes in the bottle can be explained by the fact that IBX is applied in 2 layers when first used. For home use, a complex containing IBX REPAIR and IBX in smaller volumes is suitable. For the salon - a set for IBX “everything you need”, which in addition to the oil includes an LED lamp for carrying out the procedure.
Review
The product is made in two dark-colored bottles, which resemble ordinary nail polishes, only in this case the containers are not transparent. You can buy them both together or separately, but you absolutely must use both, because only then will the result be achieved. The bottles are packaged in a black and purple box with two small oval holes through which you can see and even touch the bottles. The containers themselves are matte. Inside the box between the jars you can find instructions, but for most of its owners it is not useful, since it is written entirely in English.
The consistency of the masses from both bottles resembles an oily substance that does not serve as a coloring agent. It is absorbed into the nail plate and has its effect on the internal level. IBX repair does not have any color and emits a subtle odor. The contents of the second container emits a sharper and more perceptible odor.
The volume of the jar with the inscription IBX repair is 9.5 ml. Inside this bottle you can find a short and thin brush. The volume of the second bottle called IBX is 14.3 ml. Here the brush is made in a slightly different design - it is longer and wider.
The effect of the treatment will be very noticeable and long-lasting, but you cannot ignore the genetics of your nails - if by their nature they are prone to splitting and brittleness, then after the nail plate has fully grown (about 4-6 months), the effect of IBX may end. It’s just that to date no drugs have been created that can heal nails forever. Just as there cannot be miraculous results after stopping the use of face cream or hair balm.
We would like to warn you right away: the product does not accelerate nail growth, which many people expect!
However, with regular use you can achieve stunning results:
Step by step application
Although both strengthening bottles are very similar to nail polish bottles, they still need to be used in a completely different way. The whole process consists of fundamentally different stages that must be performed in the correct order. The masters in the studio are specially trained to do this, so you should just relax and enjoy it.
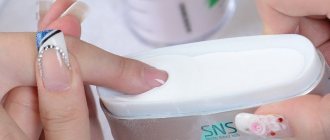
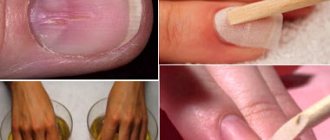
First, we treat our hands (either wash them or wipe them with wet wipes, after which we must treat them with an antiseptic). After drying, use a nail file to adjust the shape of the nails. Next, using a polishing file, we tidy up their surface. We take a product that removes the sticky layer and treat the prepared nail plates.
Now IBX Repair nail strengthener is applied to almost the entire nail plate, without getting on the skin and cuticle. Next, dry the applied product under a hairdryer or a regular incandescent lamp for about 1 minute. Remove the sticky layer with a special product and a lint-free cloth. Place your nails under the lamp again (this time under LED or UV) and dry them for 2 minutes. And now we treat the dried plates for the last time with a lint-free cloth to remove the sticky layer.
IBX Repair restores and treats nails on an internal level.
We take the second bottle called IBX. The process of covering nails with this type of product is absolutely identical to the previous one - apply it to the nails, dry the layer with a hairdryer for 5 minutes, then cover them again with this liquid and dry for 2 minutes. All that remains is to remove the sticky layer with a lint-free cloth.
IBX strengthens the surface of the nails, protects them from harmful influences and aggressive factors, and strengthens the layer of the previous applied material.
During the procedure, your nails look absolutely natural, and you can just as easily apply polishes, gel polishes, and any of your usual products.
The procedure for strengthening nails with the IBX system.
In order for you to strengthen your nails with the IBX system, you will need: liquid to remove the sticky layer, lint-free cloth, 36 W UV lamp (or LED lamp), incandescent lamp.
IMPORTANT!
Before the procedure, you can only do a hardware manicure (i.e. dry without using water and softening agents).
Before the procedure, the nail procedure must be completely dry. To comply with the manufacturer's recommendations, I did a full manicure with remover the day before using the IBX system. But if you need to combine everything at one time, then it is better to change the order of the manicure. First, strengthen your nails with the IBX system, and only then do the manicure you need with baths (using medicinal products for maceration) and removers.
Preparatory procedures.
My nails were prepared the day before: I did a full manicure with remover. I removed the length (for me these words are still a fantasy, because I haven’t had any length for 3 months) and polished the ends. In general, this is my standard manicure procedure. Even before the second IBX procedure, I allowed myself to lightly polish the nail plate, so I think the product will lay down more evenly. In the sense that the manufacturer promises a certain smoothness of the nail relief after several strengthening procedures, but I decided to help the system a little.
Degreasing.
Nails should be treated with a degreasing liquid. A similar liquid is also used in the procedure for applying gel polish. I use lint-free wipes, the same as when applying gel polish. Carefully process the nail until it squeaks.
Application of IBX Repair.
The product is applied in a thin layer, not reaching the edge of the nail a couple of millimeters. This is necessary to ensure that the product does not come into contact with the skin. The end is also not sealed (for the same reason).
Nails look like they have been coated with gel polish, and the smell of IBX is similar to the smell of gel polish.
Warm up.
To activate the strengthening system, you should warm your nails under an incandescent lamp (a lamp whose light produces heat). Here we need a timer and set it to 1 minute.
IMPORTANT!
A regular incandescent lamp is suitable. LED and energy saving lamps are not suitable.
Get wet.
After the lamp, the nails have a visible shine and before polymerization in the UV lamp, it is worth blotting the nails with a clean napkin in order to remove excess IBX repair product. I do each nail separately.
Polymerization.
For polymerization you will need a UV lamp (2 minutes) or LED lamp (1 minute).
Which lamp to choose:
UV lamp 36W;
LED lamp - the power does not matter and does not affect the polymerization time.
After polymerization, the IBX REPAIR layer is practically absorbed into the nail surface, and there is no visible layer of coating.
Degreasing.
The next step is to clean the nails from the sticky layer with a degreaser. Thus, we prepare the nails for applying IBX. A degreaser (any brand) is also used.
Application of IBX.
We cover the nails with a thin layer, also carefully not going into the skin and not reaching the borders of the nail a couple of mm. The end of the nail is NOT sealed. In appearance, the product is visually similar to the base coat in gel polishes. The smell is similar, the consistency is liquid and applies without problems.
IMPORTANT!
If strengthening with the IBX system is done for the first time, then all steps from the moment of application of IBX are repeated twice. Only with a small difference in the time delay when heating.
Warm up.
This product also needs to be heated over an incandescent lamp before polymerization, but for 5 minutes.
So set a timer and be patient. IMPORTANT!
When first strengthening, heat the second layer of applied IBX in an incandescent lamp for 3 minutes.
Get wet.
Afterwards, remove excess product with a clean, dry sponge.
Polymerization.
This stage is no different from the previous one and is polymerized in a lamp: UV lamp (2 minutes) or LED lamp (1 minute).
Degreasing.
And again we need to clean the nail plate from any remaining product. Use a lint-free sponge and liquid to remove the sticky layer.
Moisturizing the cuticle.
The last step in the strengthening procedure is to moisturize the cuticle. Any nail oil or wax will do. I use oil that strengthens and stimulates nail growth, which I think is not at all superfluous in the context of this procedure.
I apply a thick layer to the cuticle and wait a little for it to nourish and soften the cuticle a little. Then I rub it into the cuticle. If the procedure is performed in a nail salon, the master can, at the client’s request, use shimmer oils or shimmer hand creams. They combine deep care for the periungual skin and cuticle with some short-term decoration of the girl with the delicate shine of microglitters.
The result of this procedure:
Frequently asked questions about the IBX system.
Some questions that arose in my mind when deciding to buy this system and that I heard from other people who were interested in this IBX system:
- How to prepare the nail plate before applying IBX?
There is no need to do any special preparation. You do everything you usually do when preparing your nails for a manicure. If you file uneven spots or sand a little to straighten your nails, you can safely do this. You can also do a dry hardware manicure. The main thing to remember is: before the procedure you CANNOT do any water treatments or use softeners/removers. Nails that are saturated with water will not accept IBX and it will not be able to penetrate into the nail to strengthen it. If you need to do both IBX strengthening and a classic manicure at the same time, then the order of execution should be as follows: first strengthening, then manicure. The medicinal coating can also be used in manicure and pedicure.
— Is it difficult to apply?
If you can make your own gel polish coating, then there should be no problems with applying this system. If you are not confident in yourself, then it is better to go to the salon to a specialist you trust. The main thing is to follow the order of application of the products and apply without touching the skin around the nail.
— What do nails with IBX treatment coating look like?
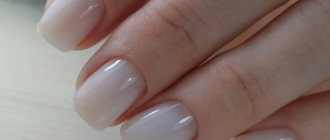
After the IBX strengthening procedure, the nails do not have any visible coating, because all applied strengthening agents penetrate into the nail under the influence of heat and UV rays. At the end of the procedure, the nails “glowed a little with health from the inside” and the visible dryness of the nail plate was eliminated. Similar strengthening can be done for men and there will be no visual coverage; only you and your specialist will know about the procedure performed.
— How to remove the IBX treatment coating?
The IBX system does not have any layer; it is completely absorbed into the nail and is removed only with the cut part of the nail. Although why would you take it off if you are doing it to strengthen it?)
— Is it possible to use the system during pregnancy?
You can use the system with your doctor's permission. Although I think everyone decides for themselves here, some don’t even cut their hair, while others only limit contact with chemicals.
— Which lamp should be used at the WARM UP stage?
A regular incandescent lamp is suitable. LED and energy saving lamps are not suitable. You can also use a hairdryer, but this is not very convenient, because there is no way to warm up both hands at once. And at the stage of applying IBX you have to hold the hair dryer for a very long time, which is not very convenient.
— Which lamp to choose for polymerization
?
UV lamp 36W; LED lamp - the power does not matter and does not affect the polymerization time.
— Is it possible to apply IBX in 3 layers at once during the first procedure?
The drug should be applied strictly following the manufacturer's instructions. This is a chemical drug and the manufacturer recommends the optimal dose for the drug to work and not cause harm to the nails.
— How to combine the IBX strengthening procedure and gel polish coating?
The manufacturer advises doing strengthening procedures once a week only for very damaged nails, which definitely should not be coated with a permanent coating. Therefore, if you are recommended to undergo treatment with a course of 1 r/week, then you should give up gel polish for a while
and just treat your nails. When the nails are a little stronger and it becomes possible to switch to a course of treatment with IBX 1r/2wk, then you can combine the treatment with a permanent gel polish coating.
— Preparing nails for gel polish after the IBX strengthening procedure?
The usual preparation procedures are carried out as if no IBX strengthening had been done. The drug is absorbed into the nail and even minor polishing will not reduce its therapeutic effect. But here you need to understand that damaged nails are strengthened, and strong polishing will only harm such nails.
— What is the shelf life of the IBX medicinal product?
Each bottle has an expiration date of 36 months from opening. When applied correctly, as recommended by the manufacturer, the product is used on average 60 times, plus/minutes depending on the length of the nails.
IBX for nails: instructions for use
Many recommendations, including from professionals, say that you need to apply IBX products strictly following the instructions. At first, this may cause difficulties, especially for people who are inexperienced in the matter of nail beauty. Before application, it is necessary to carry out a hardware or trim manicure procedure to give the desired shape and length to the nails. No softening agents should be applied to the plate: it must remain dry.
After this, proceed to sequential actions:
- Nails are degreased and disinfected.
- Using gentle strokes, apply one layer of liquid from the Repair bottle to the nail plate. Then dry for 1 minute in a special UV lamp for manicure.
- After some time, the dispersion layer formed on their surface is removed from the nails.
- The next step is to apply the liquid from the second IBX bottle.
- After application, each nail is dried in a UV lamp.
- Using a lint-free cloth, remove the sticky layer and, if the procedure is being performed for the first time, the liquid from the IBX bottle is reapplied. In subsequent times there will be no need for this.
- At the end of application, you can leave your nails in this state or apply decorative gel polish or just varnish to their surface.
- The cuticle, as with other types of manicure, must be treated with a special oil.
The first few sessions may take 30-40 minutes. Subsequent times will take less and less time as you gain experience. However, it is worth remembering that the IBX system consists of two products, and using them separately will not benefit your nails.
After completing the procedure, the nails do not shine and do not show any other shades. They look natural and healthy because the liquid is completely absorbed into the nail without any residue. There is no need to remove it, and it is not possible.
The procedure is suitable for both men and women.