Benefits of toenail extensions
Extending toenails will help hide defects such as:
- cracks;
- uneven nail surface;
- plate delamination;
- ingrown nails: with the help of extensions, the growth trajectory of the nail plate changes, which prevents ingrown nails;
- unsightly shape of nails, formed due to frequent wearing of uncomfortable shoes;
Due to uncomfortable shoes or poor quality socks, the nail plate can become deformed and take on an unaesthetic appearance. This procedure will also be an excellent solution for girls who cannot grow their nails due to their fragility. The material used for extensions is harder than the natural nail plate, it will prevent chips and cracks.
The artificial material is not sensitive to the negative effects of varnish, so the design can be changed frequently. Toenails do not grow quickly, so the material, when worn carefully, can last for more than a month, providing long-term well-groomed and aesthetically pleasing feet. Due to the smoothness of the coating, it is easier to decorate and treat extended nails than natural ones.
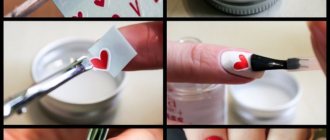
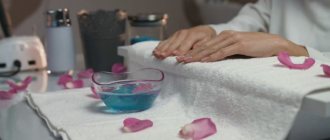
Extension of toenails, photo example. Finished nails are well varnished.
It is recommended to carry out corrections once every 4 weeks and not to remove the material yourself, as the first thin layer of the natural plate may be removed along with the synthetic coating.
Features of artificial coating on nails
As a rule, when it comes to extensions, most often craftsmen give preference to a material such as gel, which is a resin that can be distributed in an even and thin layer over the plate. In addition, it has a rather rare property: it allows air to pass through, allowing the finger to “breathe”. When natural nail plates grow out, the difference between the gel and them will not be noticeable. You will not experience any discomfort if you resort to the extension procedure on your legs. Being plastic, this material is best suited for this kind of pedicure.
The gel has only 1 drawback, but it is quite significant. Once the coating is damaged, you will not be able to restore it. Thus, plates extended with gel are practically impossible to restore. The only right decision in such a situation would be to go to a beauty salon to carry out the procedure again.
How do you know if your nails will handle extensions well? Only by experience. In addition, you can seek advice from a specialist in a narrowly focused field, be it a doctor or an extension specialist who has received a medical education. The gel is not easy to remove - it will have to be carefully cut off, in layers, one after the other. It is better to entrust this to professionals. Don’t be upset if you find yourself in this situation: there are nail plates that do not accept any extensions with any material.
Often girls who have had this procedure opt for a French pedicure. It is able to give your nails not only a neat, but also a well-groomed appearance. How to achieve such a design solution?
We offer you a video of the process of gel toenail extensions, as well as detailed written instructions. We use the French pedicure technique. Almost every girl can do it, so this moment will not bring problems.
Materials to have on hand
- A spatula for pushing back the cuticle. Usually, it can be found in any manicure set.
- A file for gel would be ideal at 180 grit.
- Forms or types, depending on what you choose.
- Tweezers if you chose shapes.
- Glue of forms or tips.
- Artificial flat brush for gel.
- Disinfectants.
- Dehydrator.
- Primer.
- Gel.
- Finish coating.
- Lipid layer remover.
- UV lamp.
Contraindications
Extending toenails has contraindications. It is necessary to refuse the extension procedure if there is a fungus, because due to the lack of access to the natural plate, it will be impossible to treat the disease; the fungus will begin to progress.
Small cuts or wounds are also a contraindication, so it is worth treating the cuticle 2 days before or after extensions. During chemotherapy or antibiotic treatment, you should also avoid artificial material on your nails, as the body produces acetone, which causes its rejection.
Extension can correct small cracks, but it cannot be carried out if a crack has formed in the nail matrix: this will provoke the development of infection in the growth area of the nail plate. Allergic reactions should be considered a special category of contraindications. Girls who are initially prone to allergies are at risk.
If after extensions your toes become red, itchy or swollen, the material must be removed immediately. It is recommended to test for an allergic reaction before starting the procedure: to do this, you need to apply a drop of the material on your wrist without polymerization.
Allergies occur due to substances contained in the gel consistency for correction and extension, agents that remove artificial material, and glue for fixing tips. Methacrylate is a synthetic component of materials for correction and design; it most often causes allergies during extensions.
Sensitivity to methacrylate and other allergens increases during pregnancy, as well as with diseases of the kidneys, thyroid gland, and liver. The reaction may appear throughout the body immediately or after several hours. People with sensitive skin should pay attention to the lamp for polymerizing the gel; allergies may also occur due to radiation.
Pedicure in the salon
There are differing opinions on the question of how often to get a pedicure. Some people don’t see the difference between salon and home care at all. However, this is not the case. Any pedicurist will tell you that it is better to do a pedicure in a salon rather than at home yourself. Because this is the only way to solve most problems. Unfortunately, this cannot be done at home. There is no appropriate equipment or materials.
Of course, if you purchase equipment and take courses, you don’t have to go to the salon. On the contrary, everyone they know will reach out to the newly-minted master for help.
Toenail extensions are often required. Of course, in pedicure there is no extreme length, as in manicure. But the materials used to restore the nail plate are the same as for modeling on the hands. To do a French pedicure, you need at least a minimal free edge. In its absence, you have to slightly extend the tips of your nails.
Required materials and tools
The tools and materials needed to extend the nail plate at home are presented in the table. They are no different from the means that masters use. You should choose high-quality tools and materials, because the health and aesthetics of your nails depends on quality.
| Materials | Tools |
| Transparent base gel | Ultraviolet lamp 24 – 36 W |
| Gel for modeling and fixing | Files: rectangular and oval 100 – 180 grit |
| Primer | Pusher |
| Degreasing solution | Brushes with hard bristles, straight and tapered |
| Manicure glue | Four-way buff |
The gel hardens due to polymerization occurring under the influence of ultraviolet light, so a lamp is a necessary item. The polymerization time is related to the type of equipment, consistency and thickness of the coating. It is better to choose a lamp with a large working surface from a trusted manufacturer.
For independent use, you can purchase an inexpensive device with fluorescent lighting, for professional services - with an LED, since it is more durable with frequent use. After the gel has hardened, a cleanser is applied to remove the sticky part of the coating.
To prepare natural nails for the extension procedure, it is recommended to use ceramic or glass files.
It is better to process only artificial plates with iron tools. For natural nails, files with a hardness of 240 grit are used, for artificial nails - from 80 to 240 grit. When shaping the nail plate at the free edge, it is recommended to use oval files, at the cuticle - a boomerang shape, when polishing - rectangular files.
The buff is designed to work with both natural and artificial plates. All sides of this tool must have different hardness. The buff needs to be processed frequently, so polyethylene foam is suitable as a material. The tool is designed to smooth out unevenness of the nail plate, eliminate peeling and polish nails.
A pusher removes dead cuticle cells before applying gel polish. One end of the tool is shaped like a spatula, the other is shaped like an arrow. Stainless steel is suitable as a material. It is worth choosing a pusher with a grooved handle, as it will prevent your fingers from sliding over the tool, which means minor cuts.
To form a synthetic nail plate, you need straight and tapered brushes with hard bristles. The material must be synthetic. Before use, you need to check whether the bristles are firmly seated in the brush. It is recommended to remove dust that appears during processing of the coating with a synthetic manicure brush.
The gel can combine from one to three phases. Single-phase gel is used as a modeling agent, base, and finish. The two-phase system is designed for modeling and protection, used after the base. The three-phase product provides a base for a modeling coating and a finish. Using a camouflage finish in pastel shades will visually elongate the nail bed.
Nails that are properly applied look natural and do not require design; this material also hardens quickly in a lamp, which is why its popularity is growing. When giving length to nails, the material on which the gel will be applied is used. Forms made of hard paper or plastic are designed for this.
The paper form is attached under the natural nail plate, and the gel is laid out in a dense layer on top. The gel is laid out on plastic forms, then the material is applied to the natural nail. Manicure glue is necessary for nail extensions with tips. The tips are made of soft plastic, so they are easy to shape.
Before applying the base layer, a degreasing agent is applied to each nail: this ensures a tight fit of the artificial material to the natural plate and prevents peeling of the extended nails. Acid-free products delicately treat fragile nails, while acidic products open the nail scales.
Leg extensions features
Basically, extensions on the legs are done only on the big toe, since only compositions are applied to the others. This technique is not very different from a similar procedure on the hands, as you can see by watching videos or photos presented on the Internet. In this case, the same tools and materials are used. However, the procedure itself is done only once every two months, since the plates grow much slower. In addition, no correction is made to them; the material is simply cut off and then applied again. This type of pedicure will maintain an attractive appearance for a long time.
Features of gel polish and polygel coating
Gel polish combines the properties of a corrective gel and decorative varnish. The coating is durable, hard, wearable, the product corrects imperfections, allows you to add length, and does not fade over time. You can remove gel polish using liquid or sawdust; an ultraviolet lamp is required to harden the product.
When applied to the nail plate, the product spreads in a thin layer, so it is sometimes difficult to control the contour of application. Despite the small thickness of the coating, it is difficult to hide regrowth areas. Gel polish allows air to pass through, which allows the nail cells under the coating to breathe.
Due to the need for polymerization in a lamp, the risk of developing a fungal infection during extensions becomes minimal, but burning and discomfort may be felt during irradiation. When processing or cutting off this coating with a manicure machine, light dust is generated, which can cause discomfort for the client and the master, so it is better to use a hood when working with this material.
Gel polish is a soft material that makes it easy to make corrections after extensions.
Toenail extensions can also be done with polygel. The consistency of this material resembles plasticine, so it is easy to control the border and shape of application: there is no risk of the material getting on the skin. You can extend nails using this material on both hands and feet. The material does not fade and retains color for the entire period of wear.
Polygel allows you to smooth out the application border; to do this, just stretch the material with a thin transparent layer using a brush. A special lamp is also required for hardening, but during polymerization there are no uncomfortable sensations. The polygel does not harden in air, which allows you to work with the mold for a long time.
When working with this material, a hood is no longer a necessary tool: when adjusting or removing, a small amount of heavy dust is formed, which is easily removed with a brush.
Polygel allows you to give your nails any shape, since the material is very soft and pliable, any mistake can be easily corrected with a file. This product can only be removed using a manicure machine. A significant advantage is hypoallergenic and odorless.
Gel modeling
You can lengthen your nails with both gel and acrylic. But masters are increasingly choosing toenail extensions with gel. In a salon environment it is easier, it is designed for most designs, and is not afraid of nail polish remover. Sometimes the tips of the nails do not allow you to set the shape, and they are not long enough to glue the tips. In this case, the master will make a thin acrylic backing, restoring the nail plate. After filing it, you can apply gel designs - cat's eye, mirror or pearl rub and others.
The gel is convenient for drawing a French pedicure. This can be done using both gel and acrylic techniques. A white stripe is applied before the top coat, cured for two to three minutes in a UV lamp and 1 minute in an LED.
Step-by-step instructions for extending toenails at home
Before any nail treatment procedure, it is necessary to disinfect the tools: for this you can boil them or treat them with alcohol.
Technology:
- Next, start processing the nail plate. The cuticle must be trimmed, the nail disinfected and degreased. If there are any unevenness, the nail is polished with a buff; in case of chips, it is necessary to remove those parts of the nail plate that have moved away from the skin. If cuts appear on the skin during the treatment, extensions are done only after 2-3 days.
- It is necessary to coat your nails with a primer; it will eliminate the possibility of peeling off the gel or polygel.
- Attach the paper form under the nail. Carefully spread the material onto the plastic mold with a brush.
- The material is laid out on the form. When applying gel polish, precision and quick shaping of the material are required. When working with polygel, the brush with which the material is laid out must be constantly moistened with a degreaser so that the product does not stick to the pile. If the work is done with plastic forms, the material is laid out on a pattern and applied to the nail.
- Place your nails in a lamp to cure the coating. Average hardening time is 2 minutes.
- Carefully remove the forms from the artificial layer: to do this, you need to carefully pull them out.
- The shape and length of the artificial nail is adjusted with files and a buff. Sanding and leveling the surface are required.
- Apply color, create a design, dry finished nails in a lamp.
- Cover with finishing gel to prevent color fading. The finish is applied even if the previous step is missing.
If the coating is damaged, it is important to remove or repair it in time to prevent infection from getting inside. If the design on extended nails is done with a simple varnish, you cannot use liquids with acetone to remove or adjust the coating.
In order to preserve the color of your nail extensions, before applying regular polish, you need to apply a layer of clear polish or gel polish. It is better to remove the coating using a manicure machine, otherwise you can damage the natural nail.
Procedure technology
Extensions do not have to be carried out in a salon, because this procedure is easy to master at home. After all the tools and means have been prepared, you can begin the basic manipulations:
- Treat your feet and nails. Remove the old coating. If necessary, do a pedicure with cuticle removal, as well as grinding, filing and polishing of the plates.
- Disinfect and degrease your nails with primer. If you are prone to fungus, treat all areas with a special antimycotic agent.
- Secure a paper or plastic base under the nail and cover the plates with gel or acrylic. Do this very carefully. Gently distribute the gel polish with a brush. When working with polygel, do not forget to wet the brush in degreaser to remove excess residue.
- Wait for the extensions to dry under the lamp for about two minutes.
- Slowly remove the forms from under the dried material using pulling movements and polish the surface and adjust the length of the nails using files and buffs.
- Apply colored polish and create a design if desired. Dry the plates, then apply the final coat to your nails. It must be applied even if you do not want to pre-paint your nails with varnish.
Procedure for performing toenail extensions
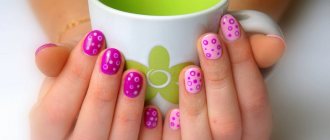
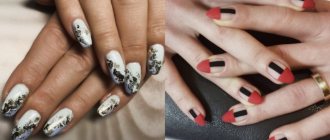
Fashionable ideas for toenail extensions
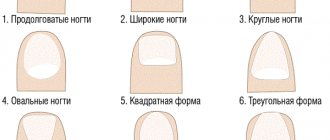
Fashion design ideas appear every season, but they are not suitable for every girl. The design should be selected according to the shape and desired length of the nails.
Toenail Shapes:
- Square.
- Soft square.
- Rocker.
- Circle or oval.
- Trapezoid.
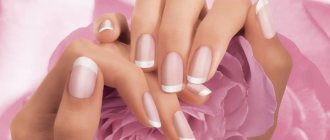
The length of the toenails should be comfortable, not causing discomfort or squeezing when wearing shoes. It is recommended to do French nails for any length of nails in square, rocker and trapezoid shapes. The main trends of this year are minimalism and monochrome.
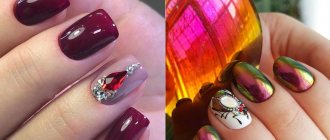
A matte pedicure to match your suit and accessories will look very advantageous. You should not use too active decor in your image: elegant accents are preferable this season. For any shape of nails, a design made in gold or silver metallic is suitable; you can also try combining these colors in one design.
A pedicure in bed colors with a slight emphasis on the big toe is a stylish solution, but it is more suitable for people with a narrow plate, since a light tone can visually expand the nails. If you want to achieve the opposite effect, you should use a dark coating or a combination of a dark color at the edges and a light tone in the middle.
The amber and gradient trend is perfect for any nail shape, especially circle and trapezoid. You can also add light sparkles in the form of flakes at the base of the nail plate to this design. A gradient of glitter or iridescent flakes is especially popular.
Today, geometric solutions in pedicure are popular: these can be broken lines, clear figures, intertwined stripes, but you should choose only the thumb for such an accent. The most popular solutions today are white and red. This trend will help correct the circle, rocker and trapezoid shapes.
Foil of any color will help you create a geometric pattern: small figures made of this material on your nails look modern.
Trendy colors for this season: silver and gold, deep shades of red in a matte finish, white geometry, pastel colors in a matte finish. In bright pedicures, there is a tendency towards abstractionism, for example, chaotic multi-colored spots on a dark background.
Stages of nail extension
Now we will present to you the method of nail extension for pedicure, both with acrylic and gel, after which you can decide which suits you best.
- Preparing the nail plate. We file off the sharp edges, level the surface, polish with a buff to remove unnecessary skin, and degrease.
- We coat it with a primer that will help the artificial turf adhere better to your finger.
- We attach a tip that is driven under the nail, or a special adhesive form.
- One of the presented coatings is applied to the nail and tip - gel or acrylic. If it is a gel, then with a brush, like a varnish, we cover the entire plate from base to top, grabbing the attached tip. If it is acrylic, then first we dip the brush into the liquid, and then into the powder, we get a kind of ball and, like plasticine, we cover the nail along with the form.
- The gel must be dried in a UV lamp for about 2 minutes, and the acrylic itself becomes hard.
- We remove tips or forms. We slowly pull them away from the artificial turf from below.
- We correct the top layer and give the nail a beautiful shape, and also file it to the desired length. The top layer is sawed off only for acrylic to give it a smoother surface and remove unevenness.
- Once completed, it can be varnished.
Once you have done nail extensions during a pedicure, you can enjoy the beauty of your feet for about a month. And if you master this technique at home, it’s also not very expensive. The main thing is to buy everything you need once; you won’t need extension accessories for a long time. It is very important to adhere to all the specified rules during the procedure and not experiment if you doubt your abilities. Also take into account individual contraindications - nail fungus, ingrown toenails, irritation, delamination of the plate, suppuration, etc. In such situations, it is temporarily better to refuse nail extensions, which also applies to hands.
When to make a correction
The coating must be corrected in case of damage: cracks, chips. This will prevent infection from entering and developing. In case of pain, allergic reactions, itching or any discomfort, the extended nails must be removed. Reasons for correction also include fading, clouding or discoloration of the coating.
Optimal correction time without the above reasons: gel polish 3-4 weeks, polygel – a month. Nail extensions are a procedure that makes your look well-groomed and full. In the summer, beautiful toenails perfectly complement open shoes, and with careful wear, timely correction and high-quality work by the master, a pedicure can last the entire season.
Author: 00Lena
Article design: Oleg Lozinsky