Types of foil
Before you learn how to use nail foil, you should consider the varieties of this material. There are several types of foil, they differ in texture and method of application to the nail plate. Some masters practice an innovative method of applying special liquid foil for nails; this method is somewhat easier and faster, but has a number of its own subtleties and features.
It should be remembered that to create a beautiful manicure, ordinary foil will not work, and even if there is a beautiful candy wrapper left, it should not be used for design.
Leafy
Foil in sheets - sold in the form of small plates; there is no special adhesive layer on it, so it is easy to cut out various patterns from this type of foil. To glue the foil to your nails, you should purchase a special glue, thanks to which the material will easily stick to the nail. This type is often used to create a mirror or metallic manicure. It can be used for any flight of fancy, so how to use nail foil is up to you.
Transferable
A special feature of this type of foil is its ability to copy a design onto the nail plate. This type is produced in small rolls placed in jars with a lid. The material is tracing paper with various colored coatings, as well as various designs and intricate hieroglyphs. The roll is approximately three centimeters wide and one meter long. The material is easy to use, so it is well suited for home nail art. You can learn more about how to use nail transfer foil by reading the entire article.
Embossed
Sold in small sheets, matte shades are found in this form, and has a textured, rough surface. Most often it is used in conjunction with other types or to create a pattern on one of the nails.
Thermal film
The film is easy to use and does not require additional materials. A distinctive feature of this type is the method of application to the nail plate. Having chosen the desired size of the material, you need to take it by the corner using tweezers and bring it to an ultraviolet lamp to heat it up. The heated film can be immediately attached to the nail plate, without using an additional adhesive base.
Ribbons and stickers
A special type of material is commercially presented in the form of two-layer strips. The top layer is colored, the bottom is transparent or white. The color range of ribbons is varied; there are: plain, multi-colored, with patterns, and also with stripe stickers. Adhesive tapes are easy to use, which is why they have gained popularity among nail art beginners.
Zhataya
Crumpled foil is sold in special containers. It is very thin, similar to tinsel. In the vessel, the material is placed in a crumpled, crumpled form. Gained wide popularity in creating an aquarium manicure on extended nails.
comparison table
| Name | Can be used for casting | Price, rubles | Glue | Surface |
| Leafy | Yes | 70–150 | Needed | Smooth |
| Transferable | Yes | 70 | Depends on the type | smooth |
| Embossed | No | 60–80 | Needed | Textured |
| Thermofoil | No | 100–450 | Not needed | Mostly smooth |
| Ribbons | No | 50–100 | Not needed | Smooth |
| Zhataya | No | 40–55 | Needed | rough |
Stages of creating a manicure with foil
To create any manicure and master new techniques, you need special tools. To do a manicure using foil at home, you will first need to be patient, and secondly, purchase all the materials listed in the list below.
Required tools:
- cuticle remover;
- manicure set with nail file;
- varnish – base;
- buff;
- degreasing liquid;
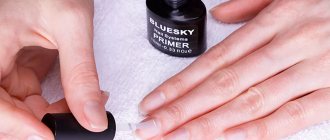
- primer;
- fixative;
- special foil - any shade;
- glue if there is no adhesive base on the foil;
- UV lamp;
- Special stick.
Types of glue
In order to create a design using foil, it is not enough to choose a high-quality base material; you also need to choose the right glue. Glue can be bought both in special stores and ordered online. The main thing is to read reviews about the product when purchasing an adhesive substance online.
Among most users, the most popular glue is Jina. It is sold in tubes with a brush for easier application. The glue from this company adheres well to the nail plate, holds the glued material for a long time, and does not require additional devices for drying. The price for a jar of Jina glue is 80 rubles.
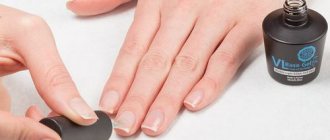
Before using foil glue, you need to apply the base color of the polish to your nails. Only after the base has completely dried can you use glue, applying it in a thin layer to the entire surface of the nail plate. When the glue changes its color, only then can you stick the nail film, otherwise the foil may stick poorly or not stick at all.
HONGYI glue holds not only foil well, but also rhinestones. Sold in jars with a thin brush. A bottle of glue with a volume of 16 milliliters costs 160 rubles. The glue dries within five minutes, does not require additional drying under ultraviolet light and is easily removed from the skin around the fingers.
The Rio Profi company produces transparent glue, which makes it possible to obtain a glossy finish, is evenly distributed over the nail plate, and dries in just three minutes. It goes on sale in black opaque vials with a volume of 10 milliliters. The price of one bottle is 149 rubles.
Global Fashion - the glue from this company dries in just a few minutes; during drying, the product changes color, from white to transparent. A change in color palette is a signal to apply foil to the nail. The glue is sold in 15 ml tubes and can be used with either a thin or a regular brush. The price category varies from 135 rubles to 165 rubles.
Using transfer foil and glue
The instructions below describe in detail how to create a manicure at home on natural nails.
Step-by-step instruction:
- Remove the previous coating from the nails.
- Get a European or edged manicure.
- Using a file, give each nail the desired shape.
- Polish your nails using a buff with 300 grit abrasiveness.
- Degrease your nails.
- Apply base.
- Dry everything under an ultraviolet lamp.
- Remove the sticky layer using a special napkin.
- Paint your nails in a color similar to the color scheme of the foil or apply a transparent base.
- Dry under a UV lamp.
- Remove the sticky layer.
- If you use a simple varnish, then steps 7–11 are not necessary.
- After the varnish has dried, completely coat the nail plate with glue. If you need to make some kind of pattern, then only a certain part of the nail is treated with glue.
- Wait a few minutes, depending on the glue brand, until the coating becomes transparent.
- Apply the inner, white part of the foil to the area where the glue was applied.
- Using a cotton swab or other handy object, distribute the foil evenly over the surface of the nail.
- After a few seconds, the foil must be removed from the nail with a sharp movement to the side.
- After 2 hours, apply a finishing coat to the surface of the nail, preferably a gel finish. If you do this too early, the foil may shrink.
For tear-off foil, it is better to use glue, since the material from which sheet foil is made is more rigid and may not adhere well to the nail.
Working with foil without glue
If you don’t have glue on hand or don’t want to spend money on buying this product, you can use foil to create a beautiful design without first applying glue. The easiest option for working without adhesive is to purchase adhesive tapes or stickers. If you have non-adhesive transfer or sheet foil, then both regular varnish and gel polish are suitable for the job.
How to use nail foil without glue:
- complete the first six steps from the instructions described above;
- coat each nail with primer, wait for it to dry completely without using a lamp;
- cut sheet foil into ten pieces or tear crumpled foil into small pieces;
- if it’s a transfer film, then it doesn’t have to be cut;
- apply foundation;
- give time for complete drying under the lamp;
- Having chosen the color of the gel polish, paint each nail;
- place your nails under the lamp for a few minutes until completely dry;
- Without removing the sticky layer, apply the foil to the nail;
- evenly distribute and level the foil over the entire area of the nail;
- sharply remove the transfer film; for another type, skip this step;
- Apply finish to the surface of the nail with foil;
- let dry under an ultraviolet lamp;
- After drying, remove the sticky layer.
Thermofoil
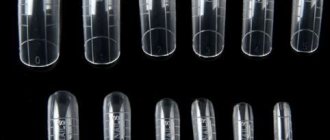
One of the most popular and most convenient types of film. To work with thermal film, in addition to the standard set of tools, you will need a hair dryer or lamp. Foil is often sold in the form of a plate on which ten stickers are glued, shaped like a nail plate. Stickers can be of different colors, with colored designs or simply plain. Before creating a design, you need to get your feet in order by doing a manicure and degreasing your nails.
Depending on the chosen base and main varnish, the design time will increase. If you choose gel polish, you must dry it under a lamp and remove the sticky layer. If you use regular varnish for the base, you just need to wait until it dries completely.
Next, use tweezers to peel off the foil and warm it up a little. Apply the heated form to the root of the nail plate, gently stretching it to the tip of the nail. After application, smooth the foil well and remove excess pieces using a nail file. Secure the result obtained using a special tool.
How to make a manicure using foil and stamping
A bright and spectacular manicure can be easily created in a few minutes using foil and stamping. How? We tell and show.
First, apply a thin layer of foil glue to the nails with a dried base and gel polish.
We polymerize the glue in the lamp according to the instructions, and then apply transfer foil to the nail.
UNO, Adhesive gel for foil, 12 ml
Glue for creating designs using foil.
(65)
450 rub.
450 RUR Buy
-10%
IRISK, Transfer casting foil No. 055
Material for design using the casting technique.
40 RUR 36 RUR
40 RUR 36 RUR Buy
Carefully align the foil on the nail plate and make sure that it fits tightly and does not peel off.
After we have prepared the basis for the future design, we move on to stamping.
Apply black stamping varnish to the plate with roses. You can choose any varnishes and plates from the many presented and experiment.
Klio Professional, Stamping plate No. 011
Plate for stamping design with an original pattern.
500 rub
Expected
Klio Professional, Stamping Varnish No. 30
Special varnish for applying the design using the stamping design technique (10 ml).
(16)
200 rub
200 RUR Buy
We remove the excess product with a scraper, and then “pick up” the design with a convenient stamp from ONIQ with an elastic silicone pad, which makes it easy to adjust and change the size of the image. The kit also includes a scraper to remove residue. You should work quite quickly because this varnish dries in air and does not require curing in a lamp.
This is what the design on the stamp looks like.
Next, use a stamp to transfer the design onto the nail.
At the final stage, all we have to do is cover the design with a top coat and dry the nail in a lamp.
-30%
ONIQ, Echo Stamp and Scraper
Stamp for stamping nail design.
(59)
400 RUR 280 RUR
400 RUR 280 RUR Buy
TNL, Top for gel polish Special Rubber, 10 ml
Rubber top without sticky layer.
(42)
298 RUR
We'll order soon
By trying different foil colors and patterns on the plate, you can create many original designs using this technique.
Ice Nova, Casting foil, red
Material for design using the Casting technique.
(2)
40 rub
40 RUR Buy
De.Lux, Glossy transfer foil, green
Material for design using the Casting technique.
60 rub
60 RUR Buy
You can leave questions about stamping and foil presented in the text in the comments after the article.
You can buy inexpensive and high-quality nail design products quickly and with free delivery in our store, which will definitely please you with its services and prices!
Options for using foil
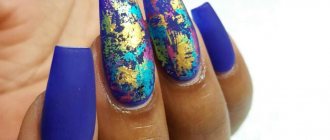
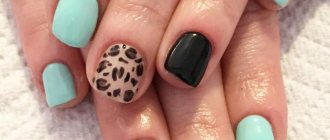
Thanks to foil, you can easily create a beautiful design on your nails. Foil is used for casting on nails, for moon and French manicure. If you are going to a party, you can do a mirror manicure using gold or silver foil. For this design, it is better to take a leaf look.
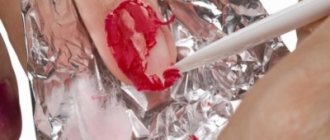
Using crumpled tear-off foil, you can create a beautiful manicure with multi-colored grains. The smaller the pieces of foil are torn, the more beautiful the design turns out. You need to fix small pieces using tweezers; you can stick them either on glue or on an adhesive layer of varnish.
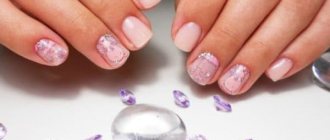
Lunar design
Thanks to the use of foil when creating a lunar manicure, nails not only look beautiful, but also attract the attention of others with their shine and unusual design. Moon manicure looks great on both short and long nails. The main emphasis when creating such a design is on the hole or lunula - a short distance from the base to the center of the nail. The hole can be made in different ways:
- triangular;
- convex;
- curved;
- straight.
Before creating a lunar manicure, you need to think about not only the type of hole, but also the color scheme of both varnish and foil. It is best to choose a contrasting design. For example, a golden moon on a black or dark blue background.
Before creating the decor, you should get your nails in order by doing a manicure and removing any remaining polish. You need to cut out ten pieces of foil to decorate the hole. To make even and neat stripes, it is best to use stencils, or first make a sketch out of paper and then transfer it to foil.
Stages:
- Degreasing.
- Covering the nails with a base.
- Drying the first layer.
- Applying the main varnish color.
- Dry in air or under UV light, depending on the selected material.
- Removing the sticky layer when using gel polish.
- Applying glue to the nail hole.
- After the glue becomes transparent, use tweezers to glue the cut foil.
- Leveling the foil sheet with a cotton swab.
- Apply gel sealant.
- Dry your nails.
If you use transfer foil, then glue a piece of transfer foil onto the wet base layer. After thoroughly leveling and securing, tear off the protective coating with a sharp movement. Then carefully paint each nail with colored polish, leaving a moon shape. Finally, apply the finishing coat.
French with foil
French manicure has gained popularity for a long time. This design is widely used in weddings as well as for everyday gatherings. To add some flair to your French manicure, you can use foil for the smile line. The free edge can be shaped like a crescent or a triangle. For beginners, special stencils are sold that can be used to make straight lines. Thanks to foil, you can create not only a standard jacket, but also an oblique one.
Creating a French manicure is relatively no different from lunar design. The main feature will be gluing the foil not to the hole, but to the regrown area of the nail. For an oblique French, you need to first cut the sheet foil into triangles. If you take a transfer film, then after applying and drying the main color of the varnish, glue a part of the nail diagonally, then you need to follow all the steps for working with the transfer foil.
Mirror or metal manicure
Reflective manicure is best done using thermal film; thanks to this type of foil, the manicure always turns out beautiful, and the nail plate is covered with an even, shiny layer. The rules for using thermofoil are described above. It is best to take foil in silver or gold color, without additional drawings.
Creation:
- treatment of the nail plate;
- cuticle removal;
- degreasing;
- grinding;
- applying the base and drying it;
- covering the entire area of the nail with glue;
- applying foil, apply it to the nail with the inside;
- smoothing the film with a stick;
- removing the top layer of film with a sharp movement;
- Applying a fixing agent.
Nail design casting
A manicure with a casting effect is often created on artificial nails, but it can also be done on natural nails at home. To create a cast manicure, it is best for beginners to take transfer foil; it is much easier to work with it, unlike an invoice - sheet foil.
There are several options for how to use casting foil on your nails. The first method requires the presence of glue; the second option requires gel polish. For each option, you must first do a standard nail treatment: manicure, cuticle removal, degreasing.
Step-by-step instruction:
- Applying a protective coating to the nail.
- Polymerization under ultraviolet lamp.
- Applying the main shade of varnish.
- Drying under a lamp.
- Removing the sticky layer.
- Grinding.
- Applying a design with a thin brush using glue or bright-colored gel polish.
- If glue was applied, then you need to wait for it to discolor, if varnish, then you need to dry the drawing under the lamp for about two minutes.
- A piece of transfer foil must be applied with the inside to the glue or varnish.
- Press the foil onto the entire contour of the design.
- Remove the rest of the foil with a sharp movement.
- Cover the design with a top.
- Dry under a lamp.
- Remove sticky layer.
The casting design can be complemented with liquid stones or acrylic powder. You can make stained glass windows using multi-colored varnishes.
How to glue foil onto gel polish
There are three main ways to glue foil on nails using gel polish:
- special glue for foiling;
- dispersion layer on gel polish or top;
- acid-free primer double-sided tape.
At the time of writing, the most popular method is to apply acid-free primer with double-sided tape.
Double-sided tape is essential for every self-respecting manicurist. It is also a budget method, the average price per tube is 200 - 400 rubles, which will last you a long time. On the Russian market it is in no way inferior to popular import brands.
Special glue for nail foil
The stages of the technical part basically look like this:
- We apply the gel polish base to the pre-treated and prepared nail.
- Dry in a UV (LED) lamp.
- After drying, we apply a color coating and also dry it in a UV (LED) lamp.
- We remove the dispersion layer from the colored coating with a special solution or alcohol.
- Apply a thin layer of foil glue to the nail and air dry until transparent.
- We print the foil with the matte side onto the nail with sharp movements to the side.
- Then be sure to cover the nail with topcoat and dry it in a UV (LED) lamp.
- If necessary, remove the sticky layer from the top.
Dispersion layer on gel polish or top coat
Sequence of work:
- Points 1-3 are standard and described above.
- If there is a good sticky layer on the colored coating, then leave it.
- We print the foil onto the sticky layer.
- Cover with topcoat and dry in a UV (LED) lamp.
- If necessary, remove the sticky layer from the top.
- If there is a bad sticky layer on a colored coating, you can remove or leave the sticky layer if you wish.
- Cover the colored coating with a thin layer of topcoat with a STICKY layer.
- We print the foil with the matte side onto the sticky layer of the top with sharp movements to the side.
- We overlap the top again with topcoat and, if necessary, remove the sticky layer.
Acid-free primer double-sided tape
Stages of work:
- The above points 1-3 are carried out.
- Next, remove the sticky layer from the colored coating.
- Carefully coat the double-sided tape with acid-free primer and let it air dry for 30-60 seconds.
- We print the foil with the matte side onto the sticky layer using sharp movements to the side.
- We apply a topcoat and, if necessary, remove the sticky layer.
How to apply crumpled foil to gel polish
Crumpled foil is a decorative element, very thin, almost like dust. The pieces resemble gold leaf and are of different sizes. They are compressed and crumpled in a box. With the help of a zhata, a magnificent mosaic pattern is created.
The sequence is:
- First, the above steps 1-3 are performed.
- Without removing the sticky layer, we apply the foil with tweezers, “trampling” it on the sticky layer.
- We secure the crumpled foil with a top coat.
How to glue thermal foil onto gel polish
Sequence step by step:
- We repeat points 1-3 again.
- Remove the sticky layer from the colored coating.
- We select the sticker exactly according to the size of the nail, i.e. cut out the nail stencil on a piece of thermal foil and peel off the base.
- Using a hairdryer or lamp, gently heat our base with warm air at low power.
- Using a rubber hoof, smooth the thermal foil over the nail, trying to remove wrinkles.
- Remove excess thermal foil from the end of the nail with a natural nail file. Movements should be from top to bottom.
- We fix the foil with topcoat in two layers, not forgetting to paint the free edge of the nail. Ready!
A small list of interesting brands
- InGarden (USA)
- RainBird Nail
- ruNail (Russia)
- Rio Profi
- TNL Professional (Korea)
- Kodi
- Bluesky (China)
- JessNail
- Zoo
China produces high quality materials that are used even in large salons. They are in demand, inexpensive in price, but not exactly cheap either. When working from home, there is an optimal balance between the quality of design and materials, investments and payback at the average price on the market, based on the costs of the master and the client’s wallet.