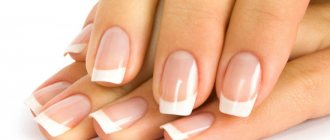
A quilted bag made of delicate calfskin on metal chains, which Coco Chanel presented in 1955 with the words “I’m tired of carrying reticules in my hands,” still drives women crazy today.
The fair sex loves bags. Especially those from Chanel. And if the legendary “2.55” has not yet joined your collection of female weaknesses due to financial circumstances, pay attention to a quilted manicure.
You can afford it even in a crisis. Looks luxurious and warm. And also a favorite of the autumn-winter season.
Fashionable wardrobe for quilted nails
Guided by logic, it is not difficult to understand what to wear with a “warm” quilted manicure.
Voluminous pullovers, knitted turtleneck jumpers, knitted cardigans and other basic items of the autumn-winter wardrobe with this textured nail art look like close relatives.
Do not forget the words of the famous fashion expert Evelina Khromchenko that “fashion is perhaps the most tolerant of all policies.” Fashion's tolerance for quilted manicure is limitless.
Like the Chanel “2.55” handbag, it can be combined with absolutely everything – from ripped jeans to evening wear.
The only “but” is that in everyday life, give up the rhinestones that people so love to “season” quilted nail art. Stash them away for a more appropriate occasion.
As for color schemes, don’t spend too much time worrying about color combinations.
- Firstly, the canons of color harmony have long been overthrown.
- Secondly, a gel polish manicure will last on your nails for at least 2-3 weeks, and it is impossible to predict in advance all the scenes of your looks during this time.
You should like the color palette of the manicure, and this is perhaps the only criterion that should be followed.
Quilted manicure by hand with a brush
7 steps to a quilted manicure with gel polishes
Why gel polish is a question that is indecent to ask today. The strength and durability of this coating have already gone down in history.
In addition, any voluminous nail art, including our hero, can be created on nails only with the help of gel polishes.
Ordinary varnishes only imitate the relief on a plane, and imitation, although sincere, is still a form of plagiarism.
To create a quilted everyday nude manicure you will need:
- gel polishes: base, nude (for example, for a French coat), top coat;
- accessories for nail preparation: soft buffer, degreaser, primer;
- accessories for quilted manicure: adhesive strips, rhinestones or beads;
- UV or LED lamp for drying, cleaner (a means for removing the sticky layer).
Master class on quilted manicure step by step:
- We prepare the nails - we give shape, remove the cuticle, and process the side ridges. We clean the surface of the nail plate with a soft buff and go over it with a degreaser.
- Apply primer to prepared nails so that the manicure lasts as long as possible. Considering the time that will be spent on quilted nail art, we do not recommend skipping this step.
- We cover the nails with base gel polish, seal them in a lamp and apply flesh-colored gel polish. After drying, use a cleaner to remove the stickiness from the background coating.
- We glue self-adhesive strips to the nails - parallel to each other and at the same distance. Smooth it out well. We repeat the procedure in the opposite direction - so that even diamonds are formed on the nails. Leave the tails of the adhesive strips long so that they can be easily picked up and removed later.
- Apply a flesh-colored background gel polish thickly to the entire surface of the nails. We send the nails to dry.
- Use tweezers or your hands to remove (do not tear off!) the strips. If the relief is not enough, you can add volume to the diamonds by carefully, without going into the dividing lines, by drawing them manually with a brush. We dry the voluminous diamonds several at a time, preventing them from spreading.
- We cover the nails with top coat, remove the sticky layer and look fashionable for three weeks. If the nature of the manicure is ceremonial, we attach rhinestones or broths to the “raw” (not dried) top, and only after that we send the nails to the lamp. We remove the sticky layer in this case as well.
VIDEO INSTRUCTIONS » alt=»»>
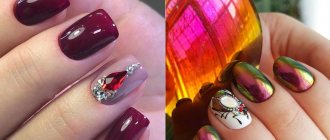
Variations of quilted manicure: color, texture, techniques
What’s great about a quilted manicure is that without additional accessories and with just one polish, you can create an original design that will not go unnoticed. However, you can dream up a “quilted” theme. How?
- Use two colors of gel polishes. In this case, one color is applied under the adhesive tapes, the other (the color of the diamonds) is applied to the adhesive tapes. The covering ability (density) of the top gel polish should be high. You can combine both contrasting colors (for example, silver and black) and shades of the same color (for example, red and pink).
- Go classic. To look in the Chanel style means to give preference to white or black varnish. And so that no one doubts your love for the legendary brand, you can decorate your nails with the emblem of the fashion house.
- Play with textures. Applying transparent acrylic powder to the top layer of varnish makes the manicure even more “quilted” and “warm”, and also eliminates the need to use a top coat.
- Combine techniques. The stripes can be made not sunken, but convex, by drawing diamonds on the background varnish with gel paint. In this case, it is appropriate to decorate the nails with casting, imprinting transfer foil on sticky gel lines.
Stylish perfection of quilted manicure
Often used on women's handbags, the quilted pattern remains incredibly popular. Despite its simplicity, it captivates with its impeccable style and interesting appearance. Therefore, today we invite you to learn how to make a beautiful quilted manicure. Detailed step-by-step instructions will help you quickly master a new nail design with gel polish, and colorful photos will give you a dose of inspiration and good mood.
An easy way to do a quilted manicure
You can perform a manicure using special nail design tapes. This is the most optimal and convenient option. Now we will tell you in detail how to make a simple nail design with diamonds.
- Prepare your nails by giving them a beautiful shape. Apply the first layer of French gel polish, dry it in a lamp and remove the sticky layer.
- Apply the tape so that you get diamonds. Apply gel polish again and cure in a lamp for 30 seconds.
- Carefully remove the ribbons. Using a thin brush and the same gel polish, add volume to each diamond. Periodically fix the pattern in the lamp so that the gel polish does not spread.
- Cover your nails with top gel polish, fix small rhinestones in the corners of the diamond and hold the nails in the lamp for final drying.
- To make the rhinestones stick better, outline them with topcoat using a thin brush and dry again.
After performing these simple procedures, you will receive a very beautiful and neat quilted manicure. It looks very elegant, so it will successfully complement any look. Nail art is suitable for both everyday life and festive events. Be sure to watch the video, which will allow you to get a clear idea of the technique for performing a quilted manicure with gel polish.
Method without using tapes
It may turn out that you do not have special tapes on hand that are used to create quilted nail designs. Good news - now we will tell you how to make an equally beautiful design with diamonds on your nails without using a special manicure tape.
- Before covering your nails with gel polish, be sure to treat their surface with a buff so that the manicure lasts longer. The next step is to thoroughly degrease your nails.
- Apply a base coat to your nails and dry it well in a lamp for 2 minutes.
- To create a design on your nails, you first need to cover them with a base layer of French gel polish. Dry it in a lamp and highlight the free edge of the nail with white gel polish, performing a French manicure. We do not touch one nail on the ring finger - that is what we will decorate with diamonds.
- Using a very thick white gel paint, with a thin brush, begin to carefully apply the design. Draw diamonds from the middle of the nail. After one row is ready, dry the nail in a lamp so that the paint does not spread. When the entire surface is covered with diamonds, dry your nails in the lamp again.
- Next you need to add volume to the drawing. To do this, apply a second layer of paint.
- Apply top coat to the remaining nails, dry the manicure in a lamp and remove the sticky layer.
- The finishing touch is to decorate the quilted nails with rhinestones, fixing them with special glue or gel polish in the corners of the diamonds, and hold them in the lamp for a little longer.
You will get a very beautiful and interesting design that every woman will definitely like. To make it easier for you to master the technique of performing it, we suggest you watch a useful step-by-step video.
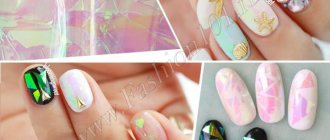
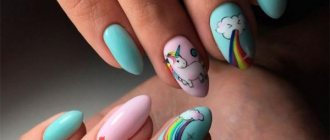
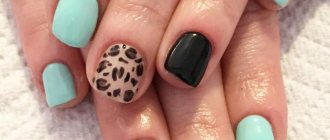
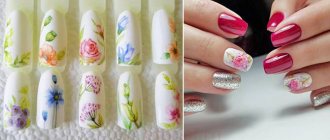
Photo gallery of stylish nail art
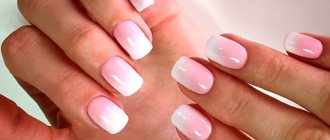
Quilted manicure, depending on the chosen color and technique, can look completely different. You can do it in one color, play with contrasts, make it matte or glossy, complement the design with rhinestones, sparkles and other decorative elements. Every time, even by making minor changes, you will receive a completely unique, beautiful and stylish manicure. We invite you to look at a few photos that will show you all the beauty and charm of quilted nail art.
As you can see, there are a lot of options. Use different colors, get creative, and combine it with other design styles to add a touch of personality to your look . You can decorate all your nails in this style or just one, and apply a monotonous coating to the rest. Limitless scope for imagination opens up before you.
Not all women use gel polish. Many people still make do with regular varnishes, despite the fact that they last much less. They are easier to work with; they do not require the use of additional devices, for example, a UV lamp or liquid to remove the sticky layer. Therefore, many people consider gel polishes to be a product for professionals.
If you don’t have a special lamp and gel polishes, don’t be upset. A manicure with a quilted pattern can also be done with regular polishes. For this you will also need thin self-adhesive tape, varnish and rhinestones. This manicure looks no worse. In conclusion, we bring to your attention another video in which you will find step-by-step instructions on how to perform a quilted manicure with regular polishes.
Materials and tools for creating a quilted manicure with gel polish
So, for a quilted manicure you will need a base coat, a white glitter polish, a nail polish color of your choice, scissors and a roll of tape. In this case, you can make two versions of a quilted manicure - voluminous and flat; you can choose the one that you like best and is suitable for a festive manicure or outfit. The most commonly used color of varnish is white for quilted manicure, as it looks beautiful and festive, especially if the manicure is done for a wedding.
How to make a quilted manicure with gel polish
Before you start working on your quilted manicure, you'll first need to cut out strips of tape. You need to take a piece of tape and place it on your palm to remove some of the sticky layer before cutting it. After this, you need to cut it into small strips - as small as possible. Experts recommend using cuticle scissors or the same type of scissors so that you can control the size of the strips. Usually about six pieces are used, but you can cut off more, depending on what kind of manicure result the girl wants to get.
First, the base color of the varnish is applied. If you want to get a special kind of manicure, you can combine different shades of the same color, for example, mix one or two drops of white with a small amount of polish of a different color. Next, the gel polish needs to be polymerized with an ultraviolet or ice lamp. Then you need to place the adhesive tape accordingly, applying some of the varnish along one diagonal before moving on to the other. The main thing is to make sure that the girl remembers which diagonal she made before removing part of the tape.
Quilted manicure with gel polish
In the mid-twentieth century, Coco Chanel came up with a handbag that has not gone out of fashion for many decades. It is slightly transformed, but the main details remain unchanged and this cute accessory is always easy to recognize.
Quilted manicure is a unique addition for fashionistas in the Chanel style. It is not complicated in execution, but it looks very impressive. This is the trend of the season, like quilted clothing, which is back in fashion.
How to create a quilted manicure?
There are different ways to create a quilted nail design, but if you want to make a manicure, giving it volume, then you will definitely need gel polishes or gels. But to create a picture you can use ordinary varnishes. A mandatory procedure in both cases is a neat manicure, since only on well-groomed nails the pattern will look beautiful.
We use varnishes
After treating your nails, you need to apply a base top coat and let it dry. Next, cover the nails with a layer of varnish and wait for it to harden. Then, with a thin brush, draw lines diagonally in one direction, and after a while, allowing the varnish to harden, in the other, maintaining the same distance.
The result is a diamond-shaped pattern. And to make quilted nails look elegant, you should place small rhinestones or beads at the intersections of the lines.
Volumetric drawing
To create volume, gel polishes are suitable, which will allow you to completely imitate stitching. Quilted manicure with gel polish begins with applying a layer of coating, for example, a delicate shade and drying it with a lamp.
Then a layer of the main color (dark or contrasting) is created and on it, even before drying, lines are drawn that will create the necessary pattern.
After drying, in order to give the nails volume, they complement the quilted manicure with gel polish, filling the diamond shapes with it. Here everything depends on desire, since it is the amount of gel that will regulate the volume of the drawing. And, of course, it is important to dry thoroughly so as not to disturb the design.
Using the tape
You can also create a similar design using adhesive tape. It also needs to be applied in the form of diamonds on the base layer of the selected varnish, without cutting off the ends, then covered with another, main color. After the top layer has dried slightly, the tapes are carefully removed. The result will be a two-color pattern, and the indentations will perfectly imitate stitching. The resulting pattern can also be decorated with rhinestones and beads.
Preparing nails for manicure
The unspoken rule of any manicure, not just quilted ones, is the rule of caring for your nails before applying varnish to them. So, the nails need to be cleaned of old varnish, then shaped and cuticles removed, treated with a buff on the side ridges and nail plate. Next, you need to apply a primer (for manicure with gel polish), after which the base and the main color of the coating, then you can use the technique of applying diamonds to the nails and cover the manicure with a top coat. It is also useful to do nail baths or spa treatments before applying the coating, as well as apply oil or special gels to the cuticles.
For convenience, you immediately need to prepare all the tools for manicure that may be useful in the process. Nearby should be all the varnishes of the selected colors and thin brushes with which the diamonds will be applied.
step-by-step implementation, photo and video lessons
One of the new fashionable designs is quilted manicure. Girls who do needlework know what a quilt is, so this name for a manicure will not be strange to them. We will tell the rest what this nail design is. Usually such a manicure is done with gel polish, since this coating is of high quality, retains the original appearance of the manicure for a long time and strengthens the nails, but it will require a lot of material, special coatings and a lamp for polymerization.
Before carrying out the procedure, beginners can watch a video that describes all the stages of applying gel polish and creating a quilted design.
What is a quilted manicure?
Quilted means that the fabric is arranged in a diamond pattern, which is how it is sewn on. Exactly the same technique is used in manicure, so there will be convex diamond shapes on the nails, which must be done carefully. In this case, the diamonds and the lines along which they will be separated from each other may differ in color, so the technique is quite interesting. You can make a single-color manicure or multi-colored; different colors can be placed on different nails or on one.
Materials and tools for creating a quilted manicure with gel polish
So, for a quilted manicure you will need a base coat, a white glitter polish, a nail polish color of your choice, scissors and a roll of tape. In this case, you can make two versions of a quilted manicure - voluminous and flat; you can choose the one that you like best and is suitable for a festive manicure or outfit. The most commonly used color of varnish is white for quilted manicure, as it looks beautiful and festive, especially if the manicure is done for a wedding.
How to make a quilted manicure with gel polish
Before you start working on your quilted manicure, you'll first need to cut out strips of tape. You need to take a piece of tape and place it on your palm to remove some of the sticky layer before cutting it. After this, you need to cut it into small strips - as small as possible. Experts recommend using cuticle scissors or the same type of scissors so that you can control the size of the strips. Usually about six pieces are used, but you can cut off more, depending on what kind of manicure result the girl wants to get.
First, the base color of the varnish is applied. If you want to get a special kind of manicure, you can combine different shades of the same color, for example, mix one or two drops of white with a small amount of polish of a different color. Next, the gel polish needs to be polymerized with an ultraviolet or ice lamp. Then you need to place the adhesive tape accordingly, applying some of the varnish along one diagonal before moving on to the other. The main thing is to make sure that the girl remembers which diagonal she made before removing part of the tape.
You can use different strips of adhesive tape in width, depending on what size you want to see diamonds on your nails. The stripes can be wide or thin, so you can vary them and use them even on one nail. After the varnish is applied, the adhesive tape is removed in the opposite direction from how it was applied.
This technology makes it possible to apply a quilted manicure step by step, while the chance of failure or incorrect quilted manicure is reduced to a minimum. But to make sure exactly what a quilted manicure looks like, you can look at a photo of this design and, if desired, choose one of the options you like.
If desired, you can make three-dimensional diamonds; to do this, you will need to apply drops of gel polish to the flat diamonds, and then polymerize them again in the lamp so that they become solid. At the end, a top coat is applied to the nails and polymerized again.
To make a multi-colored manicure, first apply one color of varnish, and you can make diamonds in a different color, then apply drops of gel polish in the same color so that they become voluminous.
Preparing nails for manicure
The unspoken rule of any manicure, not just quilted ones, is the rule of caring for your nails before applying varnish to them. So, the nails need to be cleaned of old varnish, then shaped and cuticles removed, treated with a buff on the side ridges and nail plate. Next, you need to apply a primer (for manicure with gel polish), after which the base and the main color of the coating, then you can use the technique of applying diamonds to the nails and cover the manicure with a top coat. It is also useful to do nail baths or spa treatments before applying the coating, as well as apply oil or special gels to the cuticles.
For convenience, you immediately need to prepare all the tools for manicure that may be useful in the process. Nearby should be all the varnishes of the selected colors and thin brushes with which the diamonds will be applied.
Video on the topic of the article
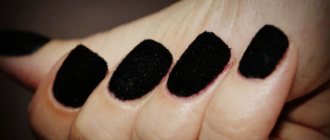
What it is
Knitted is a three-dimensional pattern made on the nails in the form of knitting a woolen sweater: diamonds, braids, cones, etc.
It is most relevant in winter and late autumn. This pattern looks great on nails of any length and shape. To perform it, it is recommended to use gel polish and auxiliary materials, for example, acrylic powder or “velvet sand”, but with regular thick nail polish (for example, TF “Gloss and Volume” varnish, which has a dense texture and glossy finish) and patience , you can try to complete this design without professional equipment.
Advantages and disadvantages
If you are a lover of various designer pieces and like to decorate your nails with unusual patterns, take a closer look at a knitted manicure. It looks very stylish and modern, especially when paired with appropriate clothing. “Knitting” can be performed not on all fingers, but only on two; as a rule, the middle and ring ones are chosen.
Although this pattern is voluminous, it does not cling to clothing, rarely chips and does not weigh down the nail plate, which is evidence in its favor.
But with all its positive characteristics, this type of design also has disadvantages. Firstly, it is quite difficult to do it yourself, since it is quite delicate and painstaking work. Secondly, such a pattern will not look with an evening dress or a formal business suit, only with casual clothes, so if you are going to have an event with a dress code, it is better to choose a different design. And thirdly, this is a seasonal type of print; in summer and spring it is out of date.
Fashion trends
Fashion dictates its own rules and in order to be “in style”, it is advisable to follow its trends. This also applies to the nail industry. There are certain recommendations for implementing a particular design, although, of course, no one can stop you from experimenting. Here's how to best perform a knitted manicure:
- Use soft pastel shades; the pattern will be lost on a dark background;
- If you are not attracted to plain nails, knit in a different color - you will get a “sweater” in the Scandinavian style;
- It is absolutely not necessary to apply the same pattern to all the nails - you can decorate them with different knitted patterns;
- It is also not forbidden to paint your nails with gel polishes of different shades; the main requirement is their harmonious combination with each other;
- A knitted manicure on a matte surface looks very beautiful .
Required materials and tools
To complete this wonderful design using gel polish you will need:
- Base coat;
- The primer is acid-free;
- Finish gel;
- Liquid for removing the dispersion layer;
- Lint-free wipes;
- Files, buff, manicure machine;
- UV lamp;
- Thin brushes for drawing;
- Colored gel polishes;
- Gel paint;
- Optional: acrylic powder or “velvet sand”.
Step-by-step instruction
So, you have stocked up on all the above-mentioned materials, now you can start decorating your marigolds:
- First, we perform a manicure: remove the cuticle, give a beautiful shape to the free edge of the nail, even out the length;
- We clean and degrease the surface of the nail plate;
- Apply a couple of drops of primer to each nail ;
- Cover the nails with base and dry them in a lamp;
- Next, select a suitable gel polish and apply it in 2-3 layers, each of which must be dried in ultraviolet light;
- Remove the sticky layer;
- We select a pattern. It can be a simple “pigtail”, a quilted “sweater” or a “herringbone” . In general, take a closer look at the prints on winter clothes and choose what you like;
- Using a thin brush, scoop up a drop of polish and apply the design to the nail. Gel paint applies more densely, but gel polish is also not bad. Just don’t forget to dry each “knitting” element in a lamp. This way you can avoid spreading of the material;
- The pattern is applied in several layers, as a rule, three will be enough;
- Apply topcoat to your nails and remove the dispersion layer.
If you want a matte effect, use acrylic powder or velvet sand. How to work with it: after applying the last layer of gel polish to the drawing, sprinkle it with powder and send it to dry in a lamp for 2 minutes. Shake off excess powder with a soft brush. You don't need to do anything else.
How to make a knitted manicure with gel polish, see the following video.
Quilted manicure: painting with gel polishes, master class, photo
The geometric diamond pattern, made for the first time on a handbag using a regular stitch, has become a real calling card of the Chanel brand. More than half a century has passed, but the quilted pattern is still relevant. This season they cover jackets, sweaters, trousers and even nails. The site Beauty-Hands.ru will teach you how to do a quilted manicure with gel polish.
Features of working with gel polishes
This manicure option has been the most popular and requested in beauty salons for several years now. There are plenty of advantages to this type of coverage:
- Busy women respect gel polish for its strength and durability. For at least two weeks you can forget about the need to do a manicure.
- This coating gives more scope for creativity. For example, the same quilted manicure is only possible with the help of gel polish.
- Nails are more protected and grow faster, according to numerous reviews.
If you yourself decide to master this type of manicure, then you will need:
- Primer
- Base coat
- Set of colored gel polishes
- Ultraviolet lamp
- Top coating
To perform a quilted manicure with gel polish, you will also need a special thin tape. The main feature of manicure with gel polishes is the need to apply a considerable number of layers of various coatings, which we indicated above. Each layer should be dried well in a UV lamp. Thus, the process itself is very similar to nail extensions and takes longer than a regular manicure. But the result is worth the effort. There is an article about Gzhel manicure and how to do it here>>>.
Quilted manicure with gel polish
Now let's start designing nails in the Chanel style. The algorithm of actions is as follows:
- Mandatory preparation of hands and nails for work. Steam your hands in the bath, apply nourishing cream. The cuticle should be treated with special oil and pushed back with an orange stick.
- Remove the glossy shine from the nail plate using a sanding block. There is no need to be overzealous, just make the surface rough. This stage is necessary for better adhesion of the gel polish to the nail. This will make your quilted manicure last longer.
- Using regular nail polish remover, wipe your nails. This is a way to get rid of dust after grinding and degrease the working surface.
- Apply primer. It should not be confused with base coat. A primer is necessary if you want a long-lasting manicure.
- And now it’s the turn of the base gel. It will protect the nail from coloring pigments and additionally even out the surface. We dry the pens in a UV lamp.
- Be sure to wipe your nails with alcohol or a special liquid to remove sticky residue.
- You have to decide in what color scheme the quilted manicure will be done with gel polish. If you have a Chanel handbag or a copy of it, you can duplicate the shade on your nails. In any case, the choice is yours. Apply a thin layer of the colored gel polish you like and dry it in a UV lamp.
- Again, remove stickiness from your nails using alcohol.
- We will perform the drawing itself using thin adhesive strips of manicure tape. First glue 3-4 parallel strips diagonally, stretching well, at an equal distance from each other. Then repeat the same action in the other direction. You should get even diamonds. The quilted manicure is already starting to take shape.
- Now apply a second layer of colored varnish and dry it in a lamp. If the shade is not saturated enough, you can add a third layer.
- We treat the nails with alcohol and remove the tape. Usually there is nothing complicated in this process, and the sticky strips come off very easily. In their place there remain traces that form the pattern we need.
- We cover the nails with a top coat to give a glossy shine. Are your nail extensions peeling off?
Quilted manicure with gel polish can be applied to all nails or to just one. We offer you some unusual ideas on this topic.
Quilted manicure options
- A familiar jacket can be decorated with a fashionable pattern. This design is perfect for long nails with a wide white tip, which we cover with a quilted pattern.
- Rhinestones or sparkles will help to emphasize the design and add volume to it. This is also a chic option for a special occasion. Glue pebbles or small beads onto the tops of the diamonds using gel glue.
- It is quite possible to take two varnishes of different colors. Then the stitches themselves will contrast with the main background.
- You can coat the diamonds with regular shiny varnish to enhance the effect.
- Decorate your quilted manicure with the Chanel emblem. You can probably find a tiny gold piece in a nail supply store.
If you want to be on trend from your heels to the tips of your nails, then don’t be afraid to try all the proposed new items, of which there are many this year. Neil - Quilted design, which has become a revelation of this season, will definitely make you stylish and bright. This is a great option for confident women.
Ekaterina S for the site Beauty-Hands.ru
Advice from professionals
To make your “sweater” neat and beautiful, listen to the following recommendations:
- If you are a novice craftsman or a self-taught amateur, do not immediately take on complex patterns. The classic “knitted manicure” is a pigtail. It's easy to do, so start with it;
- Practice doing this design on a tip, and then move on to real nails;
- Take the patterned knitting of woolen sweaters as a base. Pay attention to the nuances of the pattern, its expression and volume. Try to repeat this with a brush and gel polish;
- To prevent the pattern from spreading, dry the nails thoroughly and remove the dispersion layer;
- The thinner your brush for drawing, the clearer and more expressive the pattern will be;
- “Knitting” is applied to the nails in at least 3 layers. Only then will you be able to obtain the required volume. Also, the number of layers depends on the consistency of the material with which the drawing is made;
- This type of design will decorate nails of any length, but it is important that they are natural. Thick extended nail plates will look very bulky with this voluminous print;
- If you want to make your nails matte, use a matte finish gel;
- The surface coated with acrylic powder or “velvet sand” does not need to be coated with a finish. Even without it, small particles will be fixed on the undried surface of the design after polymerization in a UV lamp;
- A variety of decorative additions in the form of rhinestones, bouillons, and sparkles will help you create an original design.
The best quilted manicure ideas
Today, the following options for this nail art are popular:
- Quilted, spectacular manicure with a black base and multi-colored sparkles.
- Alternating blue quilted version with rhinestones and a cover with polka dots.
- Pink version with acrylic powder.
- Mustard base with gold bindings.
- Pink quilted version and a flower on the ring finger.
- Beige and white design with holes and stitches with gold stones.
- Lilac background, and stitches on the ring finger.
- Alternating pink gradient and quilted version.
- Pink background with golden glitter stitches.
- Black base with red stitching.