Correct filing of nails, basic mistakes
While some women prefer to get their nails done in salons, most still try to take care of their nails at home. Some people do it extremely professionally, while others suffer, making a huge number of mistakes.
The most common mistakes women make when filing their nails:
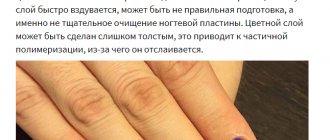
- Most women use low-quality nail files and therefore are not always pleased with the result of the work done with their own hands. The choice in modern stores is quite large and most often ladies buy a nail file without thinking at all about what it can do to their nails. You should know that the rougher the file, no matter how advertised it may be, the greater the likelihood that it will leave microcracks on the surface of the plate. Microcracks subsequently become the beginning of nail breakage. In everyday life, when moisture gets on the nail or it hits the surface, it is quite possible to get a break. Preference should be given to glass and ceramic nail files. Of course, they are more expensive, but in the end, they will be able to please you with a positive result. Also try to always use a nail polishing file, which effectively smoothes all the edges of the nail, rubbing out cracks.
- Another mistake is filing nails with a layer of varnish. Such an activity can quite realistically provoke delamination of the nail plate. If the need for filing is very great, then this should be done with several gentle movements, just removing the sharp tip. This filing will help the nail not to cling to clothes, hair and tights, solving many of your problems and getting rid of unpleasant situations
- A serious mistake is to file your nails simply out of boredom. Too frequent impacts on the nail, vibration of the file and micro cracks will lead the nail to a deplorable state. Remember that high-quality nail filing should only be done once a week.
- Significant harm can be caused to the nail if you are constantly distracted from filing it. Of course, this way you will make the process more interesting, but while watching TV, talking with loved ones and simply taking your eyes off your hands, you risk injuring your nail, which will lead to its delamination and breakage
- The filing technology is of great importance because the usual movements “back and forth” are unnatural to the very structure of the nail plate. If you want not to harm the nail, movements should be made from the edge to the center
- You should not file wet nails, as in this state they are more susceptible to injury caused by a file than dry ones. A particularly serious mistake is considered to be the initial soaking of hands in the bath and subsequent filing
- Other mistakes include such violations as: using a file as a tool not only for nails (it can only file the nail plate, other surfaces spoil it), deep filing of the sides of the nail plate (such filing leaves cracks on the nail that has not yet grown and dooms it to break), improper holding of the nail file
How should you file your nails correctly?
Save peeling nails in 5 minutes
Good day!)
My post today will help solve the problem of peeling nails. How to remove split or chipped nails in 5 minutes. Well, how to nourish the nail plate so that it does not peel off and break further.
When I saw the topic of this flash mob, I realized that I would write about it!
About this wonderful file for peeling nails from Essence.
I have naturally brittle and dry nails. They break easily and very often flake off. Growing long nails is an almost impossible task for me. My nails can break or split under any slight load, and then I struggle to grow these splits back.
But during quarantine, I somehow miraculously managed to grow my nails and I still don’t understand how)))
But let's get back to the file.
This file is designed specifically for peeling nails. I used to have, and even now have, many different files from essence. My favorite is a file in a thick plastic case, which you can carry with you everywhere in your bag and, if necessary, file your nail.
Previously, if there were delaminations, I cut them off with a regular 4- or 6-sided file. Overall, it worked quite well.
But when I saw on the official website that a special file had been developed for my problem, I realized that I absolutely had to have it.
Unfortunately, they don’t send me nail products to test. But this is not a problem at all. The real problem was buying this file! Before quarantine, it had not yet been brought to stores, but during quarantine, try it, find it!
But, I did it! And after following my friend’s tail when ordering from an online store, I became the happy owner of this magical nail file and nail oil.
Oh, that was too long of a preface)))
Let's move on to the products.
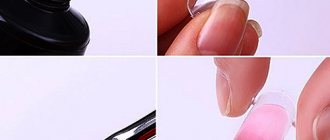
The file comes in a protective case made of thin transparent plastic. And it's enough to protect the file, but not enough to carry it in your bag. Because on one side there is a free edge on the case and the edge of the file sticking out of it can scratch things in the bag.
Essence – Anti split file for thin & brittle nails
The file has a very comfortable and good shape. It is immediately clear that the manufacturer has thought through all the nuances well. For example, if there is a very small chip on the nails, then you do not need to file down the entire nail, but only the area around the chip. Especially for this (well, I think for this purpose) the file has 2 pointed corners. They are very convenient for treating small areas. Next I’ll show you the example of my terrible nails)))
The file has 2 sides. Each of them has information. The blue side says this is step 1. On the pink one, it means that this is the 2nd one.
We work in exactly this sequence.
The 1st step is to cut off the excess.
The 2nd step is polishing.
By the way, the file is not only for working with peeling nails. It is suitable for working with very thin and fragile nails.
In my opinion, it should be used to treat the free edge after each filing and in general for everyone! This will reduce the likelihood of delamination.
Well then. Let's move on to my nails already)
This photo shows the “before” situation.
Here you can clearly see the delamination on the middle and index fingers.
And here is the result of processing with the first step of the file.
And this is after processing with the 2nd step of the file. In my opinion, the result is very cool!
Well, after applying the oil. There are no signs of delamination visible on the nails at all.
And a collage so you can compare the result)))
Well, one more proof.
Here you can see the work of the file on cracks and chips.
Everywhere the top photo is “before” and the bottom photo is “after”
There's a pretty deep crack here. She clung to everything in the world all the time. Due to this, each time it became more and more.
The file smoothed out the edges very well. The crack no longer sticks. And I now have every chance to grow it out painlessly and without the need to file my nails down to the root.
And here is a layering option. The file cut down the delamination perfectly.
There was a mark left on the nail, but in such a place it’s very difficult to remove all the marks without cutting down the nail itself too much.
And an option with a chip. The result in my opinion is very good.
And an important point about using a file
. If you have severe delamination and it occupies a large area, then you need to act in several stages. First you need to remove the delamination with a file, and then, as the free edge grows, gradually file it off with a nail file.
Why? Because after treatment with a delamination file, the nail plate becomes thinner and can break as it grows. Therefore, it is better to regularly file the length of the nail in order to fully grow strong and healthy nails. This growth took me about 1.5 weeks. But it was worth it)))
And after filing, I always use oil to strengthen and moisturize my nails. Now I have restorative oil with argan from the same Essence.
I have been using this oil for about 5 years now. And it has already changed its design 3 or 4 times. Now it looks like this. If I'm not mistaken, now the oil's label has simply changed, and the aroma has changed a little... Perhaps I'm just thinking about the aroma.
And what does the oil do? And it perfectly moisturizes and nourishes! Now, if I weren’t lazy and smeared my nails with it every time, after working with household chemicals or every time before going to bed, then there would definitely be fewer problems with my nails.
After applying oil to your nails, something happens. Nails immediately become more elastic and dense. I don’t know, maybe it’s the power of suggestion, but I see the result. But, an important point: the oil must be used regularly and then the dryness of the nails and cuticles will gradually go away.
Essence – Repair nail oil nails & cuticles nourisher
The oil comes with a brush. Apply to nails quickly and conveniently. Previously, by the way, there was an applicator.
Let's summarize.
If there are problems with your nails and they are dry and have begun to peel, the quickest solution to the problem is a file that will remove delamination and chips.
And the second step will be a moisturizing and nourishing oil that will work on the nail plate.
As for the butter, this is just an example of what I like. But the file really turned out to be a real find!
I hope the post was useful)
Have a good day!
Increase
How to properly file nails on oval-shaped hands?
There is probably no woman who has never filed her nails to give them a more aesthetic appearance, neatness and practicality. But in addition to the fact that you need to be able to file, it is also important to know the features of files, techniques and methods.
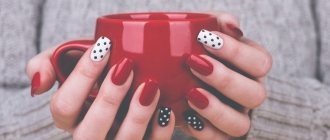
There are certain generally accepted nail shapes that women try to maintain: square, oval, almond-shaped. Modern nails are natural nail plates and extensions with special material. In any case, they require attention and care.
basic nail shapes
An oval nail shape is very feminine. This is a classic option for shaping the nail plate. This shape can even effectively visually lengthen your fingers.
Giving your nail an oval shape is not difficult:
- Get a quality manicure: remove polish from the surface of the plate, clean the nail, remove cuticles and hangnails
- Take a file and first, with smooth movements in one direction, file the edges of the nail plate from the sides to the center
- It is important to know that the movement of the file should be stopped approximately two (maybe a little more) millimeters before the middle of the nail
- If there remains a fairly sharp tip in the center of the nail plate, round it off with horizontal movements as a final result.
- Using a polishing file, rub the edges to make them soft and sloping, and also to avoid microcracks.
Correct filing of beautifully shaped nails
Filing nails
How to restore nails after extensions
In order to properly carry out the filing procedure, the free edge must first be trimmed. It is recommended to shorten with nippers rather than scissors, as scissors displace the layers of the nail plate, leading to delamination.
How to file sharp nails
How to file your nails beautifully? A sharp-shaped sawdust must be started from the junction of the plate with the side of the finger. Manicurists call this place the beginning of a smile. The direction of movement of the file should be towards the center of the nail plate.
Note! You should file until the point where the smile begins is in line with the point of the top of the nail. The second side part is processed in a similar way.
The sawdust ends at the moment when the free edge represents an angle of 90 degrees. For more convenient operation of this manicure, the corner is slightly rounded with pendulum-like movements of the file.
Interesting. The acute form is considered one of the most difficult to create. Most often it is used for competitive shows and is used on very long nails. In everyday life it is not very convenient, as it breaks quite often. Although, recently, short, pointed nails have become popular.
In order to cut a sharp shape on short nails, the file should be held at a sharper angle.
How to file oval shaped nails
Oval and almond shapes are considered classic. Marigolds of such shapes always look well-groomed and neat. They are almost identical to each other, but the difference is that in the almond-shaped one the tip of the free edge is slightly more pointed than in the oval one. The ideal almond shape is obtained on elongated nail plates.
Important! It is recommended to avoid a straight line in a pointed shape. The almond shape consists of soft lines that gradually decline from the slightly rounded end of the free edge to the ends of the smile line.
How to file oval shaped nails? Oval in most cases is a natural shape that requires slight correction. Unlike the procedure for filing a sharp shape, an oval filing starts from the center and with soft movements reaches the ends of the smile. The most difficult step in cutting an oval plate is to achieve complete symmetry of the lateral lines.
How to file almond-shaped nails?
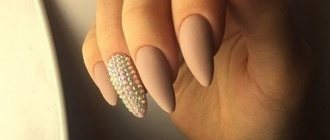
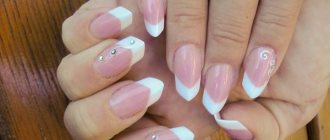
The almond shape is not just a pretty nail shape, it is the most feminine, fashionable and popular way to highlight your hands. This shape visually lengthens the fingers, making them refined, “cat-like,” playful and beautiful.
In some ways, the almond shape resembles a claw. This claw adds charm to a woman and makes her nature more passionate. At the moment, French manicure on almond-shaped nails and a solid red or black base color are very popular.
This form can safely be called classic, because it has existed for a very long time, but has never lost its relevance. It is worth noting that almond-shaped nails should not have any sharp corners, as is observed in the almond nut itself. However, the edges of such a nail and the tip are narrower when compared to the hole of the plate.
It would be quite difficult for a non-professional to model such a shape on nails. This requires precision so you get a nice shape without making the plate too sharp. The most difficult thing, according to women, is to make absolutely all nails the same.
almond shaped nails
Another feature of this form is the presence of sufficient length at the nail. It will not be possible to model nails that are too short. The ideal length of such a nail should be comparable to the bed itself.
Technology for giving almond-shaped nails:
- First of all, perform a thorough manicure, removing all dirt from the nail, varnish, cuticles and hangnails.
- Giving an almond shape involves the initial formation of a square nail. Using nail scissors, trim the tips of your nails into a straight line.
- Use a nail file to file down the sharp corners on both sides. This way the nail will take the shape of an extended trapezoid.
- A softer file should soften the edges of the plate and give the nails a more final shape by squeezing the corners. The nail will gradually take on an almond shape
How to file square nails correctly?
Along with the almond shape, the square shape remains one of the most popular. Such nails suit almost all fingers, thin and full. Both French manicure and any other design look great on these nails. It is much more difficult to give a square shape to natural nails than to nail extensions, but it is quite possible.
square nails
Technology for creating square nails:
- Get a quality manicure: remove polish from the surface of the plate, clean the nail, remove cuticles and hangnails
- The length of the nail should be shortened to the desired size, while trying to make the line as even as possible and along the longitudinal axis of the finger
- You should start filing your nail, holding the file parallel to your finger so that the side is as even as possible.
- This type of sawdust is repeated on the opposite side of the finger.
- Make a horizontal file on the nail, giving it a square shape.
- There are three types of square nails: sharp square, soft square, round square. Each shape depends on how smoothly you cut the sharp corners on the sides
How to cut nail shapes correctly
Before you give the nail plate the desired shape, you should decide on the length. After this, the shape is outlined in general terms and the nail is polished. To give the classic oval shape, the ends must be carefully rounded. To achieve a square shape, the ends are carefully cut in a straight line.
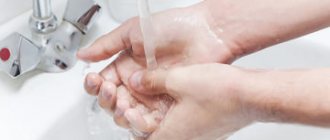
The selected shape is corrected using a file, which should move from the center of the nail plate to its edge. The irregularities are gradually removed, and the plate takes on the desired shape. After this, be sure to wash your hands and wipe with a towel, then apply a coating to the dry nails.
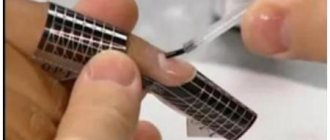
Is it possible and how to file extended nails?
Women who get their nails done in salons have many questions about filing. Such nails are also not immune to the fact that at any moment they can break, crack or form a sharp tip that can cling to hair and clothes.
You can avoid these troubles if you carefully file your extended nails. This can be done, but very carefully. The fact is that being too rough with your nails and filing them with a low-quality tool can lead to delamination, when the material literally tears off the layer of the plate to which it is attached.
It is important to know that such nails should be filed only with a special file. To do this, you will need an abrasive nail file, which is sold in nail art and manicure departments. Such a file can have several sides of different hardness.
filing extended nails
How to file your nails correctly to give them the desired shape
How to properly file nails on oval-shaped hands
Every girl is familiar with the procedure of filing nails. But in order to achieve a neat and effective manicure, you need to know how to file your nails correctly and which file is best to do it. It is also helpful to follow plate processing rules and techniques.
When doing a manicure, girls strive to achieve one of the standard shapes of the nail plates: square, oval or almond-shaped. Both natural and artificial nails need timely care.
The oval shape of the plate is considered a classic. This manicure will look very feminine and elegant. Oval nails visually lengthen your fingers.
How to properly file oval nails:
- Prepare your nails: remove the previous coating, clean the surface, remove cuticles and hangnails.
- Using a file, smoothly file the nail plate from the ends to the central part.
- Follow the rule: stop the movement of the file two millimeters before the center of the nail.
- If the center of the edge of the nail plate has not acquired a beautiful oval, round it with horizontal movements of the tool.
- To prevent microcracks and soften the edges of the nail, use a polisher.
How to file almond shaped nails
Almond-shaped nails make the hands more feminine and graceful, and significantly lengthen the fingers. Almond-shaped nail plates are a real trend this season. They look like cat claws. This adds playfulness and charm to the lady. Nowadays, the combination of an almond shape with a French manicure is in fashion. Also relevant are “cat” marigolds in red or black.
Almond-shaped nails are considered classic. Indeed, this version of manicure appeared quite a long time ago and during its existence has not lost popularity. The shape of the plate should not have sharp ends. The edge of the nail is smooth, but quite narrow.
Recommended articles on this topic:
- Where to buy nail files
- How to choose a manicure set for a beginner master
- Types of pedicure: examples of the most popular today
If you are concerned about how to properly file almond-shaped nails, we want to warn you: this process requires the precision and experience of a professional. It is very difficult to make all nail plates the same on your own. Therefore, it is better to contact a specialist.
To get a beautiful almond shape, your nails must be long enough. This manicure cannot be done on short plates. Their optimal length should be approximately equal to the length of the bed itself.
Now let's look at how to properly file almond-shaped nails:
- Prepare your fingers for a manicure: remove old polish, dirt, cuticles and hangnails.
- Creating an almond shape starts with forming a square. So, trim the edges of the plates along a straight horizontal line.
- File down sharp edges. The shape should be trapezoidal.
- Smooth out sharp corners with a soft nail file. Gradually, the correct almond-shaped shape will “emerge.”
How to file square nails correctly
Classic manicure options include designing nails in the shape of a square. The advantage of this configuration is that it will suit all types of fingers and hands. Any color scheme and pattern looks great on square nails. It is quite difficult to cut natural nail plates into a square. It is much easier to give artificial nails the perfect shape.
How to properly file square nails:
- First, prepare your nail plates: remove the previous coating, clean your nails of dirt, remove cuticles and hangnails.
- File the edge of the nail to the length you require. It is necessary to make the line as smooth and horizontal as possible.
- You need to start cutting along a line parallel to your finger. The side edge should be smooth.
- Repeat the same on the opposite edge of the nail.
- Adjust the horizontal section of the nail plate to create an even square.
There are several varieties of “square” manicure: with a sharp, soft and round square. You can go from a sharp to a smooth square by rounding the sharp edges of the nail.
Below is a video on how to properly file nails:
How to file extended nails and is it possible to do it?
Today, many people get their nails done by specialists. But artificial coating is not a guarantee that cracks cannot form on the nails, that they will not break if caught on any object.
You can maintain the original appearance of artificial nail plates by knowing how to properly file extended nails. However, this process requires care and attention, since a careless movement can open the natural layer and injure it. It is also important to use only high-quality manicure tools.
To process artificial nails, it is correct to use special abrasive files. They can be found in the nail art and manicure department. Such tools often have several working surfaces with different hardnesses.
How to properly file nails coated with gel polish or shellac?
For this purpose, you should use a file with a soft abrasive surface. It is not recommended to use hard, rough devices, as they can tear off the varnish and cause delamination of the natural nail.
If cracks and kinks have formed in the coating, you should file the nail very slowly and carefully. Excessive haste can only do harm.
Read material on the topic: Types of manicure files and features of their use
How to properly file nails with gel polish and shellac?
You can file nails with varnish or shellac, but this should be done with a fairly soft file. You cannot use hard abrasive, large or metal files because they can simply tear off the coating layer and lead to peeling of the nail.
The damaged nail will be much thinner and will be prone to frequent breaks and microcracks. File such nails very slowly and carefully, because if you do it in a hurry and ineptly, you risk ruining the entire manicure.
nail file with different hardness and polishing
How to file your nails if you don’t have a file?
There are situations when a nail breaks suddenly, and there is simply no special file at hand. If you still have a lot of work ahead, you should find a suitable object that can smooth the edges of a broken nail instead of a file. For this you may find it useful:
- An ordinary coin, the side of which (edge) has a ribbed surface
- A brick wall is a gentle nail file, but it can cause your nails to turn red.
- Asphalt is a harder surface, but it is just as effective at eliminating sharp tips on the nail.
Take care of your nails on time, always monitor their shape and listen to the recommendations for filing at home. If you take care of the beauty of your nails, they will also delight you with their health and strength in any situation.