Application technology
Compliance with the rules is mandatory. Failure to follow this procedure will cause the varnish to chip, become stained, or lose its shine. The technology has been thoroughly developed for a long time - you just need to carry out the required manipulations step by step. The procedure can be carried out at home - if you have the necessary materials and tools.
Completion takes at least 30 minutes. This is the case if one color is applied. If you need to apply a lot of tones, create a jacket, a pattern, attach rhinestones or sequins, the process will take about an hour (plus or minus 20 minutes). The cost of a complete set of items for application is about 4 thousand rubles.
Step-by-step instruction
- Treatment of nail plates. The cuticle is removed and given the required shape. You can do a manicure first, then the plate will need to be thoroughly dried, treated with a dehydrator (degreased), and treated with a disinfectant.
- Formation of a free edge. The upper part is given the selected shape using a nail file. Gel polish is applied to nails of any length - short, medium and long.
- Grinding (sawing). The upper part of the plate is cut off with a grinder to ensure adhesion of the gel coating to it.
- Applying the base. The base gel is sold separately or together with the top coat. Apply the base in a very thin layer, as if rubbing it in. The end part is carefully processed.
- Hands are dried in a UV lamp. Average time 1.5-2 minutes.
The optimal period of ultraviolet treatment should be determined according to the recommendations of the product manufacturer for each specific brand individually. Finally, remove excess moisture with a brush or woven napkins. Gel polish is applied carefully with careful up and down movements. The end part must be painted over to avoid chipping in the future. The product is applied in two layers, each layer needs to be dried in a lamp for 1.5-3 minutes. Usually one hand is placed in the lamp, while the artist paints the second hand. - Finish coating. The top (finishing) layer completes the procedure. The fixative is applied to the entire surface, including the end part. The top layer is also dried in a UV lamp for about 2 minutes.
Gel polish designs on nails
If a single-color palette for nail design seems boring, you can experiment like an artist, that is, make drawings on a single-color background. There are many options, but the specifics of application are not very different:
- Applying patterns with gel polish of other shades using special tools after the first layer has dried.
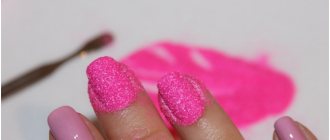
- Mixing two or more shades of wet gel polish.
Gel polish drawings
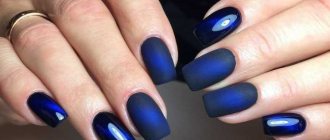
- The main tone is applied, usually bright or dark colors - red, black, blue, green and others. Dries in a lamp.
- The sticky layer is removed with a degreasing compound (cliner).
- Using a special brush or dots, a pattern is applied with a different color of gel polish and dried again.
- At the end of the process, the nail is coated with a finishing compound.
Try to make a bright Gzhel manicure by painting patterns with gel polish:
Mixing shades of gel polish on nails
- Painting with gel polish is carried out with a second layer, that is, after the base color has dried. It is not necessary to remove the stickiness.
- Using a thin brush, apply several colors of the hybrid in the form of stripes.
- We draw waves and cross lines at the junction of colors with a needle, brush or dots.
It turns out to be a variant of drawing on a wet layer. The technology of this design can be seen in videos shared by masters on the Internet.
If the gloss on your nails is tiring and you want to make your manicure matte, it is enough at the end of the procedure, when the finishing layer has been applied and dried, to lightly work with a soft sander from the edge of the nail to the cuticle. The shine will come off, but the gel polish designs on your nails will look amazing.
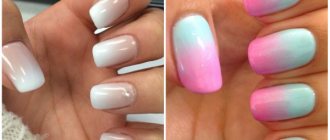
Mixed technique is very suitable for performing a gradient manicure, and how to do such a manicure - see the video tutorial:
How to remove?
The easiest way to remove the product is in the salon with a specialist. A master can remove a “tired” manicure without injuring the plate. The procedure will take 30 minutes.
Quite often situations arise when you urgently need to get rid of the gel and there is no way to get to the salon. You can remove it at home. The main thing to remember is no rush. It is impossible to remove it quickly. Even acetone liquid takes it with difficulty. It’s good when someone helps during the procedure - it’s difficult to wrap your fingertips in foil yourself.
Tools and materials
- Acetone-containing liquid.
- Cotton wool or cosmetic sponges.
- Orange stick.
- File.
- Grinder.
- Pieces of thin foil measuring approximately 5*5 cm.
You can ask the salon what product was used and purchase a remover to remove it from the same manufacturer. There’s no need to worry too much – regular liquid will do.
First you need to apply nail polish remover. To do this, you need to make circles of cotton wool or sponges and generously moisten them with liquid. Some people immerse their fingertips in a glass of liquid for 15 minutes. “Lotions” are applied to each finger in turn and immediately wrap the nail with foil. Keep the compress for 15 minutes.
After compresses, gel polish softens and hangs in rags. It must be carefully scraped off with an orange stick or the blunt end of a nail file. The hardest part is to remove the base - you will have to remove it with a sander. After this, you need to treat the cuticle with oil and massage each finger.
Advice from professional craftsmen
- During the first two days you need to be careful, especially during procedures with hot water - the product still dries out.
- Gel polish can withstand exposure to water, household chemicals and even nail polish remover. The only thing is that a long stay in hot water causes the top layer to soften and a specific smell appears.
- You cannot cut or file your nails, but you can remove cuticles and growths and perform normal hand care.
- It is not safe to use this design continuously. The optimal ratio of using gel polish and “rest”: 3 months of use (apply the product 4 times for a period of 3 weeks) and your hands need a month of rest. During the recovery period, it is recommended to use care products to saturate the nail with nutrients.
Masters and those who have been using gel polishes for a long time recommend “wearing” it for 3 weeks, after which it is better to change it!
Where can I buy?
You can purchase the product in specialized stores that sell products for beauty salons. There is a sufficient number of high-quality products that beauty salons use: CND, KODI, Masura, Bluesky, ruNail.
Among the best, manicurists call professional gel polishes Shellac and KODI.
Shellac is produced by CND. Shellac not only creates a professional finish, but also strengthens thin, brittle nails. The composition of the product includes a moisturizer, vitamins, minerals and caring substances. Shellac retains its plasticity despite its durability. For removal, a harmless product is used that safely removes it within 10 minutes.
KODI gel polishes are becoming increasingly popular due to their high durability, aesthetics and a huge variety of varnish colors. When using KODI, there is no need to file the nail plate.
This video demonstrates in great detail how to properly apply KODI Professional gel polish:
Nail design with frame
Author: Tanusha
Here I want to introduce you to a fairly common technique in nail design, which, however, rarely receives special attention - this is a manicure in a frame. I have already shown several of these nail design options on my blog, without separating them into a separate category.
Read more
Reading time: 1 minutes
Nail design with gel polish
Cost of the procedure
The cost of applying a gel manicure in a salon is one of its few disadvantages. Applying a gel polish coating in a salon costs around 500 rubles. It is cheaper to apply a single-color coating. Creating a pattern, combining several colors and a French manicure cost 200-300 rubles more. Nail pre-treatment, manicure and gel manicure removal are charged separately.
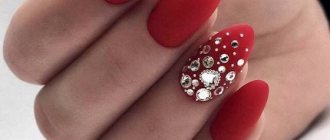
Liquid stones on nails look amazing. Do you agree?
Review of hair dye from Matrix: https://pro-cosmetic.net/volosy/kraska/matrix-opisanie-palitry-tsvetov.html
Spring nail designs 2021
Author: Tanusha
In spring, we all want freshness, warmth and renewal of our image. And you can start with marigolds, because it’s very simple and quick. Let's take a look behind the scenes of the manicure world and see what fresh manicure and nail design ideas spring 2021 can offer us.
Read more
Reading time: 1 minutes
Nail design with gel polish
Briefly about the main thing
Gel polish is an innovative product for applying a high-strength color coating to nails. It remains on the nail for 2-3 weeks without chipping or loss of shine. After 3 weeks, the grown part of the nail gives the manicure a sloppy appearance.
You can apply the gel coating in the salon and at home. You will need the product itself and an ultraviolet lamp.
This type of manicure is removed in a salon. With some effort and spending 30-40 minutes, you can remove the gel coating from your nails yourself.
Resistant to external influences, colorful and shiny manicure is loved by many women, allowing their nails to maintain a flawless, well-groomed appearance for a long time.
Training on how to create a manicure and apply gel polish through video tutorials
Visual perception plays a very important role in our daily lives, helping in learning and making it possible to convey important information quickly and clearly. First we look, then we process what we see and in a matter of minutes we understand what needs to be done.
In the modern world, most women perceive visual information much better than huge canvases with many letters. Therefore, I suggest you watch a few video tutorials on how to create a manicure with gel polish . I tried to make for you a selection of the most useful video materials, which at one time helped me a lot in becoming a professional in the field of creating gel polish manicure.
Videos for beginners
Video tutorial No. 1 “Full review: starter kit for gel polish. Part 1"
Video tutorial No. 2 “Full review: starter kit for gel polish. Part 2"
Video lesson No. 3 “Removing the old coating and making a new one”
Video tutorial No. 4 “Gel polish manicure at home with a detailed discussion of all sorts of subtleties”
Video tutorial No. 5 “How to apply/remove gel polish”
Video master class from professional cosmetologists
Video No. 1 “Step-by-step instructions for applying gel polish”
Video No. 2 “Three effective ways to remove gel polish”
Video No. 3 “Removing gel polish with a cutter + hardware manicure. Part 1"
Video No. 4 “Complicated repair, extension and straightening of nails. Part 2"
Video No. 5 “Gel polish correction. Combined manicure for beginners with one cutter. Part 1"
Video No. 6 “Applying gel polish under the cuticle: leveling + strengthening + highlights. Part 2"