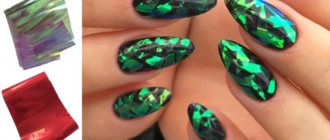
Types of foil for manicure
A manicure will most likely not work with a regular foil sheet. Yes, you can cut it into small pieces and stick it on your nails to achieve the broken glass effect. However, it will not look as impressive as we would like. Different types of foil are used in nail design:
- Transfer sheet. It may be adhesive on one side, but this is not always convenient. Available in sheets or small rolls 4 cm wide and up to 50 cm long. There are many options for manicure: plain, with a pattern, gradient, holographic effect, mirror. The varnish is first applied, and then the film is applied and smoothed. It must be torn off after this, since the metallic sheen remains only after removal. It is possible to cover the entire nail plate or only a small part of it - it all depends on your imagination.
- Embossed sheets. They differ in embossed patterns, roughness, patterns, and different textures. Like the previous type, it is produced in rolls or sheets.
- Thermo. A type that is gaining popularity due to its ease of use and long wear life. When heated, the sticker takes the shape of the nail, perfectly covering every millimeter of the surface.
- Stickers. They already have the shape of a nail, but you can adjust the length or width with scissors and a file. It is enough to peel off the protective layer from the sticker and then apply it to the nail. They don't last long, especially if you don't use a fixer.
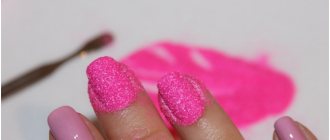
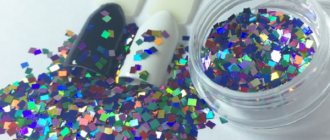
- Tear-off (transferable). The compressed material of different colors is packaged in jars; before use, it is simply plucked off. It is easy to transfer it to gel polish by spreading it over the nail in small pieces.
- Stripes. The width usually ranges from 1 to 5 mm. They have a sticky back side, which allows you to glue the strips onto dried varnish. Suitable for geometric designs.
The most popular shades are gold and silver, but mirror film in blue and red is now widely used. You need to know how to apply foil to gel polish so that it sticks well. The material is always top coated with a finish, otherwise the manicure will be ruined in a couple of days.
Manicure with foil - fashionable and beautiful
Modern trends in nail art involve the use of a variety of materials for decoration. Foil is one of the most original ways to make your hands magically beautiful and attractive. It helps to achieve an amazing design; the main thing is to apply the coating correctly and know the basic fastening techniques.
Important! Decor for nail art is available in several versions. Experienced craftswomen can easily determine which material is most suitable for creating a particular design.
Beautiful, shiny nails with decor look great as part of holiday looks, for example, to create a New Year's look. But even in the gray everyday life, you can easily use such a manicure, adding color to usually boring looks.
—>
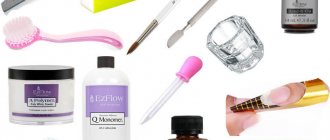
Manicure tools
Before applying foil to gel polish, you need to prepare your tools. Without them, the manicure will not be very neat, especially if you plan to glue the film over the entire nail. It is recommended to use the following materials:
- varnishes - base, color coating, top;
- degreaser or primer for the nail plate;
- orange stick for smoothing;
- tweezers to tear off pieces and transfer them to the nail;
- glue for film, if gels are not intended to be used;
- scissors (needed to adjust the length) or file.
To begin with, a manicure must be done in the usual way: the old coating is removed, the cuticle is pushed back and trimmed, the plate is filed, and the surface is sanded. After this, the marigolds are degreased, and then the design is done directly.
Working with different types of shiny film
The sequence of actions depends on what material is used. If you want to make the entire plate mirror, then you can do without several layers of color coating and work only with the base. For a partial design, you will have to paint your nails first. Many girls are interested in why the foil does not print on gel polish. This usually happens when simple rules are not followed.
Regular
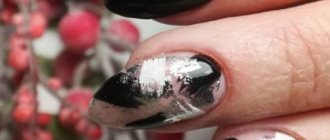
Don't forget why aluminum foil is needed. It is not intended for manicure, so it will not work with most designs. The material must be applied very carefully so as not to tear or wrinkle. Often, it can only be used to make small stripes, since the film does not print and does not shine well.
From a small sheet, cut off several strips or pieces that resemble broken glass. The smaller they are, the better the manicure will be. Apply base and colored varnish, dry in a lamp, but do not remove the sticky layer. The prepared pieces are glued onto it, carefully smoothing it with a wooden stick. From above you need to cover everything with topcoat and dry it again in the lamp. It is possible to make a design with foil on gel polish if you follow the instructions. However, this method will not cover the entire nail plate; it is better to pay attention to other materials.
Transferable
There are several subspecies - this is material in jars (reaper), in rolls (tape) and sheet. Transfer foil adheres well to gel polish, regardless of the form in which it is used. You can cover the entire nail or use the rainbow technique, that is, add small shiny areas to the color coating. It is advisable to practice on tips, as the first times may not turn out perfect. How to print foil on gel:
- immediately cut out pieces of the desired size for convenience;
- make a coating (base and tone, without finish);
- Apply the film with the matte side to the dried varnish with a sticky layer;
- smooth the pieces with your finger or gently with an orange stick;
- remove the film by pulling the edge slowly, do not make sudden movements;
- fix the manicure with a finish and dry in a lamp.
If the gel polish does not have a sticky layer, then you will need a special glue, which is often included. The nails are covered with a base, color, finish, and the coating is degreased. Then apply glue to the entire plate or only some parts, apply sparkling pieces and smooth them out. After removal, you will have to re-fix everything with a top coat.
It is very important to glue the foil correctly onto the gel polish - the side with the shiny substance applied. Beginners often cannot determine the correct turn, but it is enough to scratch the film with a pusher. Where the coating has worn off, that side should be applied to the plate.
Manicure with transfer film looks impressive, and does not take much time. In terms of durability, when done correctly, this coating outperforms other types, since it does not wear off or peel off. It is permissible to diversify the design with a pattern, matte top, or rhinestones.
Thermofoil
Thermal stickers cover the entire nail, so there is no point in applying a colored layer first. The base is dried in a lamp, after which the design begins. The stickers are usually plate shaped, you just need to trim off the excess length. Remove the protective film from the sticker and heat it with a hairdryer, holding the sticker with tweezers. This takes a few seconds: as soon as it begins to curl around the edges, you can glue it to the nail.
Apply foil to the gel polish, starting from the base of the nail. You need to smooth out the unevenness well with an orange stick, and cut off the excess material on the free edge with a soft nail file. Be sure to secure the top with a top coat so that your manicure will last for a long time.
Thermofoil, like other types, is available in a variety of colors. Films with animal and plant prints, metallic or mirror effects are especially popular. There are plain stickers in all the colors of the rainbow, as well as lace, moon manicure, French manicure, and cat eye. Shiny films have remained at the peak of fashion for many years.
Stickers and stripes
With stickers and strips everything is much simpler; they can even be glued to regular varnish. Stickers come in different shapes: flowers, monograms, drawings. The strips come in different widths and are used on already dried gel or regular varnish. Just choose the location of the design and stick the foil in the right place, cutting off the excess with scissors. You can apply foil to gel polish without glue, since this material already has an adhesive side. It is advisable to secure it on top with a top coat.
How to use nail foil?
Nail foil is very easy to use as a decorative element. You just need to know a few nuances:
- It is applied to the varnish coating, with the exception of minx thermal film and liquid foil.
- If there is no sticky layer on the foil film, you will need special glue: Jina, HONGYI, Rio Profi, Global Fashion. Or you can glue it to a sticky layer of gel polish. The result is approximately the same. Each girl chooses what is more convenient for her to work with.
- The transfer foil must be ironed for an even print, paying special attention to the areas on the sides and at the cuticle. For smoothing, use an orange stick, an ear stick or a pusher with a rubber tip.
- Fixation with glue is carried out after it dries a little and becomes transparent. Different companies have different drying times. On average they wait 2–3 minutes.
- After applying the foil, a finishing coat must be applied. Otherwise, the decor will wear out very quickly.
A high-quality “metal” design retains its presentable appearance for 14–17 days. The homemade version does not last as long - 3-5 days. If you want to prolong its existence, you need to do household chores with gloves. You can also cover your nails with a fixative on the 3-4th day.
When using transfer foil, wait a while before applying the finishing layer, otherwise it may shrink and crack. It also cracks when pressed repeatedly, for example, when they try to print the spray several times. You need to work with the material carefully.
Fixation with glue
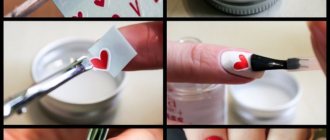
Before using the glue, the nails are covered with the main color of the varnish. You need to wait until the base is completely dry. Only then is the adhesive composition applied in a thin layer to the surface of the nail plate. The foil is glued at the moment when the glue changes its color.
How to properly glue transfer foil:
- Get your nails done. Use a nail file to give each nail the desired shape.
- Polish the nail plates with a buff with an abrasive level of 300 grit.
- Use a degreaser and then apply the base.
- Place your nails under a lamp to dry the gel polish.
- Remove the sticky layer from the gel polish with a special napkin.
- Apply a base color coat.
- Dry the gel polish and remove the sticky layer.
- Apply a thin layer of glue to your nails. Apply it to the entire surface or to individual areas, depending on what design you plan.
- Wait a few minutes until the glue becomes clear.
- Place the foil with the matte side on the nail and smooth it with a rubber pusher or a cotton swab.
- After 15-20 seconds, quickly remove the foil.
- After 2-3 minutes, apply the topcoat.
When using sheet foil, decorative elements are first prepared. To create the “broken glass” effect, the foil film is randomly cut, and then the “shards” are laid out with tweezers on the nail surface coated with glue.
Some types of glue are dried under a lamp. HONGYI glue is suitable for use without a lamp. It holds not only foil, but also rhinestones perfectly. Dries within 5 minutes.
Foil for gel polish without glue
If you don’t have glue on hand or don’t want to spend extra money on it, you can make a beautiful design with adhesive-based foil. It is glued to the dried gel polish with the sticky layer removed. Sheet and transfer films, on the other hand, are applied to an adhesive layer.
How to properly use transfer foil without glue?
- Get a manicure and then buff and degrease your nails.
- Apply base and dry.
- Cover your nails with the main color of gel polish and place under the lamp for 2 minutes.
- You need to apply the foil to your nails immediately, without removing the sticky layer.
- Level the film with an orange or cotton swab.
- Remove it quickly.
- After waiting 2 minutes, apply the finish.
- Dry your nails under the lamp and remove the sticky layer.
Foil always adheres well to special glue. But you need to get used to using it without glue. It may print poorly and fall off. Dense and textured layers are not glued to gel polish.
Fixation with regular varnish
To make a manicure with foil, you don’t need to have a lamp - you can glue it to regular nail polish. Sliders and adhesive tapes are torn off from the protective layer, glued to already dry nails and immediately covered with a fixative. You can also use transfer foil, but you need to take into account that it is difficult to print the entire design on regular varnish. But chaotic prints and patterns come out quite well.
How to use transfer foil?
- Get your nails done.
- Polish the nail plate and degrease.
- Apply nail polish and wait until it hardens but is still sticky.
- Place the matte side of the foil on the varnish and straighten it out.
- Remove it by moving away from the nail bed.
- After 5-10 minutes, cover your nails with 1-2 coats of clear sealer.
Experts advise choosing a type of foil with “gasoline” stains for home application. It is translucent, shimmers in different colors, and thanks to this, defects are not noticeable.
Manicure with regular polishes
The wearing time of simple varnishes, as a rule, is no more than 4-6 days, when using a fixative - up to 10 days. It is much easier to print foil onto gel polish, since there is a sticky layer, but how to foil a regular coating? It is advisable to paint your nails in 2 layers and wait until dry, only then proceed with the design.
Drop a little glue on top, wait a couple of minutes and apply tear-off film. It needs to be smoothed out and then removed - a beautiful metal coating will remain on the plate. The manicure is secured with a protective or transparent varnish. There is no need to worry that the glue will change the color or structure of the varnish. High-quality materials do not leave any marks on the coating after drying.
For non-tearable material (stickers, strips, decals), it is permissible not to use glue, however, decorative elements will not adhere as well. First, colored varnish is applied and dried well. Next you need to use a transparent one and lay out the prepared pieces. Material with an adhesive side can be applied immediately after the color coating has dried. It is precisely because of the long drying process that it is recommended to apply foil to the gel.
Foil for nail design
Today we’ll look at everything about nail design with foil. This design is considered basic, does not require additional sealing like sliders and always looks impressive.
Let's look at 5 ways to print foil:
- on a sticky layer of colored gel polish
- on a sticky base layer
- on a sticky layer of top
- on the stickiness of acid-free primer
- on a special adhesive gel for foil
As you probably already understood, you don’t need to have any special skills to make a design with foil. Just print the foil on the stickiness of one of the proposed coating options. But all these coatings have varying degrees of stickiness and, accordingly, the ability to seal foil. There is also no need to secure the foil on top, you just need to cover it with any type.
The first method: print foil onto a sticky layer of gel polish. To do this, prepare the nail as usual. Cover with colored gel polish and dry. On white gel polish we use black matte foil.
You need to print with the matte side facing the nail, and the glossy side of the foil will be on top. Take a piece of foil and transfer it to gel polish.
A mark remains in the place where the foil was imprinted. There is no need to print the foil a second time in a place where there is already a mark - it simply will not print. The more tightly you press the foil to the nail, the brighter and more distinct the mark will be. This way you can make a less noticeable design if you barely touch the nail with the foil.
But what to do if, after all, you have stained the drawing a little or you just don’t like a piece of this drawing? Simply wipe with a cloth moistened with liquid to remove the sticky layer.
Just do it carefully so as not to destroy part of the drawing. This way you can adjust while the design is not covered with a top coat.
Second method: on a sticky base layer. Dried color, cover with any base, in a thin layer without adding excess volume. We dry the base, then take matte foil. The system is the same: glossy side up, matte side towards the nail, and print the foil.
When using this method, in order to get a clearer and larger piece of the design, you need to press the foil harder against the nail and keep it pressed longer. The next layer is to cover the tips with black foil with a glossy topcoat, and the tips with white foil with a matte topcoat.
This is what matte foil looks like under glossy and matte topcoats. Both options are worth considering.
Third method: on a sticky layer of top. On black gel polish, cover it with a top coat with a sticky layer. There are three colors of glossy foil for this design. After we have dried the top, we print foil onto this top.
The foil is very easy to catch, prints without much effort, and you can easily alternate different colors of foil in different orders. Let's cover this tip with a glossy top coat. This design does not add volume and additional leveling when covering with topcoat is not necessary, so cover as usual.
After drying, we wipe off the sticky layer and we have such a bright design.
Fourth method: use an acid-free primer. As we know very well, an acid-free primer is double-sided tape and it leaves a sticky layer on the nail. Accordingly, we can print foil onto this sticky layer. Let's also take three colors of glossy foil. Apply primer to the dried color, brushing it once over one place with a semi-dry brush. There should be no layering of the primer on top of each other and literally 10-15 seconds after applying the primer we print the foil onto it.
The foil also prints very well. This method is superior to others in terms of time, because nothing additional needs to be dried, and the primer will be an additional factor for better wear of the foil. We will cover this design with a matte top coat, dry it, remove the sticky layer and here is the finished design.
This is what glossy foil looks like under a matte top.
Fifth method: using a special glue-gel. Cover the colored gel polish with glue gel and dry it. We print glossy foil.
Then we cover it with a glossy topcoat without a sticky layer and dry it.
This is what glossy foil looks like under a matte and glossy topcoat.
In this article we tried to make different versions of foil under different tops so that you can see how it looks.
We hope you enjoyed it.
Common Mistakes
Despite their efforts, some beginners are unable to print foil onto the gel beautifully. Sometimes girls even refuse films with a metallic or mirror effect due to lack of experience. The most likely reason is poor quality of the material. It may turn out to be defective: it does not leave fingerprints on the plate, wrinkles upon contact with the gel, and does not adhere well to the surface.
Another mistake that prevents the foil from being transferred to gel polish is that the glue was not applied to the entire area, leaving the area near the side rollers unpainted. In some cases, it does not have time to dry, and the master is already tearing off the film. It is recommended to smooth the foil with an orange stick, applying a little force. Simply pressing the film with your finger may not be enough. If the coating begins to peel off after 2-3 days, then you need to choose a good base and fixer. If the technology is followed, the manicure lasts 2-4 weeks, including with any decor.
A few secrets for perfect results
Before starting a manicure, it is advisable to think through the design; you should not hope that the idea will come in the process. Thorough preparation is already half the success. You need to cut out pieces of suitable size, select a palette of colors so that they are in harmony with the varnish and other decorative elements.
For gluing, you cannot use PVA or Moment glue; only a special tool is needed. Otherwise, the condition of the nail plates will noticeably deteriorate. It is also not recommended to glue shiny pieces onto the old coating - this is a transfer of material, because with this approach the manicure will last no more than two to three days.
Don't be afraid to experiment - foil can be combined with both bright and pastel colors. Top trends include marble and imitation stone, space motifs, and broken glass. Pictures on nails are often complemented by horizontal or vertical stripes. Craftsmen can create interesting geometric designs with ribbons. The combination of white, black, pink varnishes with gold or silver foil is already considered a classic. A few photos and videos will help you get inspired to create a unique design at home.
Nowadays nails are an important element of a woman’s image, which few people can do without. It is often supplemented with multi-colored film with a mirror effect. Correctly applying foil to gel polish is one of the skills that helps you achieve perfect coverage. However, it is also important to select materials, varnishes and follow technology.