Moon manicure - a fashion trend or an echo of the past? Read the article on how to make a stylish moon manicure.
The fashion world does not stand still, but is rapidly moving forward in big and small steps. Fashion for clothes, hairstyles, and hair coloring is changing rapidly. Even manicure fashion changes almost every day.
Unusual fashionable manicure
Today an elegant French manicure is in fashion, tomorrow a contrasting gradient on nails is in fashion, the day after tomorrow something else will be in fashion. And these trends need to be taken into account not only by manicurists, but also by their clients. Firstly, in order not to look old-fashioned, and secondly, it’s always nice to be one of the first to try something new.
A very unusual manicure is a fashion trend
What is a manicure with a hole called?
In fact, a lunar manicure or a manicure with holes is some kind of alternative version of the familiar French manicure (French). French is when the top of the nail is highlighted with a different color of polish from the main color of the nail.
The traditional version uses flesh-colored varnish, white and transparent.
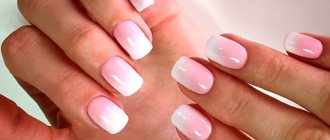
Traditional French manicure
A more modern option involves the presence of more contrasting colors, additional patterns, gradients, rhinestones, and sparkles.
French manicure with rhinestones
French jacket with glitter and patterns, asymmetrical
Manicure with holes - highlighting the hole of the nail from below with a different color, rhinestones, sparkles, whatever.
So, the main difference between a real French manicure and a lunar manicure is that a French manicure involves highlighting the nail from above, and a lunar manicure from below.
traditional moon manicure
Moon manicure with additional elements
Sometimes masters use not semicircular holes, but triangular ones. The manicure turns out stylish and unusual.
Manicure with triangular holes
Some masters, at the request of clients, can combine moon manicure and French manicure. Then a very beautiful, fashionable, combined manicure is born. You can add rhinestones, patterns and sparkles to this manicure. But you need to know when to stop, since the abundance of small details greatly distracts attention.
Combined moon manicure and French manicure
Features of lunar manicure
This type of manicure, unlike others, visually shortens the nails very much, so it is suitable for those with nails at least 6 millimeters long. Moon manicure looks perfect only on hands with ideal skin condition. The cuticles and nails are carefully prepared, because even the smallest flaw will immediately catch your eye.
A classic lunar manicure does not involve the use of both matte and pearlescent varnish, but the rapid change in fashion trends has led to the fact that this dogma is increasingly being neglected. By the way, the combination of matte varnishes with metallic ones fits well into the basics of the classics of this type of manicure.
If you want to make a fairly bold combination of contrasting bright colors, then keep in mind that they should “echo” the colors of the outfit. Such a manicure would be appropriate for evening events, but classic combinations of shades and textures are more suitable for everyday life.
Traditionally, for a lunar manicure, the nail plate is given a square shape with rounded corners. Although ovals in different variations are sometimes allowed. To design a lunula, the most often chosen shape is a semicircle or an arc, but there are also options with triangles, and with multiple contours, and also double crescents.
How to do a moon manicure at home: step-by-step instructions
Making a lunar manicure “like on the cover of a magazine” is not at all difficult. But such a manicure will require some accuracy and understanding of the basic principles of creating a spectacular manicure.
Even if you are a complete beginner, creating such a manicure will not be difficult if you follow all the tips below.
So, what is needed to create a manicure with holes?
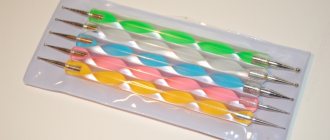
- nail file
- several cotton sponges
- orange nail stick
- nail polish remover
- a product to treat your finger before a manicure or something greasy so that the polish can be easily wiped off your finger
- two colored varnishes and a clear varnish to fix the work
- special stencil (circle with a hole inside)
- patience
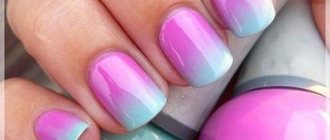
If you do everything correctly, you will end up with a manicure like this.
Blue manicure with holes
Now the technology for creating a blue moon manicure:
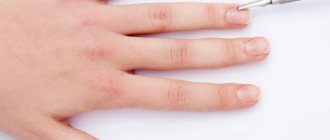
- Treat the nail. Using a nail file, make the perfect shape of your nail, and using an orange stick, push back the cuticle, degrease the nail plate and apply a base coat. Treat the finger itself near the nail with a special mixture so that any varnish that accidentally gets on the skin can be easily removed
- Apply an even layer of base varnish to the prepared nail. In our case it is white varnish
- Now you need to apply a stencil, slightly extending beyond the base of the nail, to create a crescent
- Apply a varnish of a different color (in our case, blue) to the remaining part of the nail without a stencil.
- Secure the resulting manicure with a layer of colorless varnish.
Advice! Apply a new coat of varnish only after the previous layer of varnish has completely dried. Otherwise, the varnish will become covered with bubbles or simply will not dry, and your efforts will be in vain.
This is the simplest version of the moon manicure. If desired, you can use other colors of varnish.
Lunar manicure in pastel colors
Red moon manicure
Lunar manicure with blue polish
How to evenly draw holes on nails with gel polish or shellac?
Drawing an even pattern on nails is an entire art that requires maximum concentration from the artist. The exception is if a stencil is used. There's enough precision there.
But the hole on the nails must have an ideal shape, otherwise the manicure will look cheap and sloppy. If you don't need this effect, arm yourself with a brush, gel polish and a lamp and go!
To ensure that a manicure with holes using gel polish and shellac comes out “as it should”, prepare:
- two gel polishes, contrasting in color
- base for gel polish
- thin brush
- UV lamp
- stencils for French manicure
Lunar manicure on nails with gel polish
Now the most interesting thing is - what are the ways to draw the perfect hole on the nail?
Method 1:
- Apply the outline of the future hole with a very thin brush.
- Paint the hole in 2 layers, drying each layer for 2-3 minutes.
- Then apply a colored coating above the hole, reaching the border with it, and do the same with it
- Finish the manicure with gel polish and seal the coating.
Method 2:
- Apply colored gel polish to the entire nail and dry well.
- Draw a hole on the dried layer of gel polish with a brush, fill the boundaries of the hole at the base with a varnish of a different color, dry
- Finish the manicure with gel polish and seal the coating.
Method 3:
- Mark the location for the future hole
- Apply colored gel polish to the entire nail and let it dry. It is advisable to do two layers
- Apply varnish of a different color into the hole and dry. Make two layers
- Finish the manicure with gel polish and seal the coating.
Bright manicure with gel polish with holes
These were the main ways to create a perfectly smooth hole using gel polish and shellac. Above was a method for creating a lunar manicure using a stencil. This method is also suitable for any type of varnish, not just regular one.
Moon manicure on video
Learning how to do a beautiful moon manicure is not difficult at all. One of the main rules of this procedure is that the transition line should be as clear as possible , and the advantage is that it looks great on both long and short nails. However, to create a lunar manicure, it is better to use bright shades on long nails, and light or pastel colors on short nails, since dark colors visually shorten the length of the nail.
In addition, do not forget that rhinestones and sparkles are always relevant and do not lose popularity, allowing you to present a beautiful manicure in a more favorable light. To begin with, I want to offer you a video, after watching which you can choose the method of creating a moon manicure that suits you.
Three ways to do a moon manicure with gel polish at home:
Next, let's complicate the task: we additionally use decor.
Lunar matte manicure at home:
How to evenly draw a hole on your nails with acrylic paint?
The technique of applying a hole with acrylic paints is no different from the technique of applying a pattern with gel polish or regular varnish.
To bring the idea of creating a lunar acrylic manicure to life, prepare:
- brush
- base varnish, varnish base, clear varnish
- dots (or a regular needle), perhaps a toothpick
- cotton pads
- nail polish remover
- acrylic paints
Moon manicure with additional elements using acrylic paints
To make a moon manicure with acrylic paints, follow the instructions:
- Prepare your nails: shape them, push back the cuticles, degrease the nail plate.
- Apply a coat of base coat and base color and let it dry.
- Now, using a thin brush, pick up acrylic paint of the desired color, mark the boundaries of the future hole, and fill the hole with paint.
- Now an optional step: using a dot or a needle, you can make absolutely any design on your nails, in addition to the holes - monograms, flowers, butterflies.
- After the paint has dried, apply a coat of clear varnish to seal the work. This step is required.
Fashionable moon manicure using acrylic paints
That's all. Manicure with holes using acrylic paints is ready! This manicure won't last as long as gel polish, but it's still worth a try.
How to evenly paint a moon manicure with regular varnish?
The easiest way to draw holes using regular varnish is a stencil. This method was described in detail above, so there is no point in writing about it again.
Advice! If you don't have a special French manicure stencil, you can make your own from cardboard and tape, or use regular duct tape, masking tape, or plastic-coated adhesive tape.
Creating a lunar manicure using a special stencil for a French manicure.
Lunar manicure using homemade stickers with regular varnish.
Lunar manicure with regular red varnish
Moon manicure step by step
Stencils-stickers
When using special stencils, the manicure turns out to be very neat. If you don’t have stickers for the jacket, then you can replace them with regular tape by carefully cutting out the shape.
- 1. So, first we need to tidy up our nails - make the nails the same shape and remove the cuticles.
- 2. Choose two polishes of different colors that you want to cover your nails with.
- 3. Now apply the color of shellac on the nail that will be the hole.
- 4. After the main gel polish has dried, we paste the stencils on the base of the nails (near the lunula). Moreover, the stickers can be either moon-shaped or sharp.
- 5. Apply the second shade of gel polish to the nail plate, let it dry, and then remove the stencil.
- 6. The last step is a sealer to even out the shellac and give the manicure an even shine.
The moon jacket can also be made in color, in various bright shades. This type of manicure is perfect for summer and spring, when everything around is blooming and the sun is shining brightly.
Lunar manicure with shellac using a stencil
Shellac is a type of gel polish that combines the properties of gel and regular polish. Shellac is as easy to apply and remove as regular polish.
Shellac moon manicure idea
Unfortunately, there are no special secrets or mysteries for creating a lunar manicure with shellac. There is a proven scheme for applying shellac, which you need to take as a basis and stick to it throughout the entire creation of a manicure with holes.
- Give the nail the required shape, prepare it for applying shellac, having previously degreased it
- Apply shellac to the nail plate
- Apply a layer of shellac
- Manicure is ready
In just 5 steps you can create a moon manicure with shellac. This is much faster than using gel polish, because the latter needs to be dried after each applied layer. Shellac does not require such an attitude.
A stencil method for creating a manicure with holes using shellac
How to do a manicure with triangular holes?
A manicure with triangular holes is done slightly differently than a manicure with crescent-shaped holes. Nevertheless, even in this design, lunar manicure is quite simple and almost anyone can do it.
Stylish moon triangular manicure
So, to create a lunar triangular manicure you will need:
- Two varnishes of different colors and one clear varnish
- Nail polish remover, cotton swab
- Two strips of adhesive tape, adhesive tape, adhesive tape, electrical tape (optional)
- File and orange stick to shape the nail
- Time and patience
Step-by-step description of the process itself:
- Prepare the nail for applying polish: treat the nail plate with a nail file, remove or push back the cuticle using an orange or cotton swab for this procedure, degrease the nail using a primer or regular nail polish remover.
- Apply a base coat of the color you would like to see in the socket area.
- Now cut out thin strips of adhesive tape and glue them in a triangle, as shown in the diagram below
- Paint over the part of the nail that is not covered with stripes with a different color of varnish. Let the varnish dry. After this, remove the adhesive tape.
- Secure the manicure with a small layer of clear varnish.
Creating a manicure with triangular holes step by step
What is a moon manicure?
It is believed that lunar manicure, which has taken a strong position in the field of beauty, is a type of French manicure, or French . Due to the fact that short nails are in fashion this year, lunar manicure has become especially popular, although it takes its origins back to the 30s of the last century. This fact once again confirms that worthwhile things do not go away forever, but are only forgotten for a short time. Those who hear the name of this manicure for the first time think that it is something unearthly or mysterious. To some extent this is true. The origin of the name moon manicure has 2 theories . On the one hand, it is believed that it has something in common with the crescent , which, as is known, is the moon. On the other hand, this manicure focuses on that part of the nail that is popularly the lunula or hole And this manicure has such a name only in our country, since abroad it is most often called Hollywood French. Although this manicure is a variation of the French manicure, in addition to the inverted shape, it has another important difference - a commitment to the use of contrasting varnishes . It is possible to combine both a moon manicure and a classic French manicure on the same hand, when there are crescents at the top and bottom of the nail plate.
How to evenly draw a moon manicure with a transparent hole on short nails?
The very first version of the lunar manicure was with a transparent hole. Later, women began to come up with ways to make holes of different colors, because it looked new.
Let's return to the very first option - a lunar manicure with a colorless (transparent) hole. To create such a perfectly even manicure, you will need:
- stencil
- nail polish remover, cotton wool or cotton pads
- clear varnish and colored varnish (one bottle each)
- nail file and orange stick
Process:
- Prepare your nails: shape them, degrease and remove cuticles.
- Apply a coat of clear varnish and let it dry completely.
- Now attach a stencil to the base of the nail; this is the future hole. Paint over everything above the stencil with colored varnish. Let the varnish dry completely.
- Now apply another layer of clear varnish.
- Ready! A classic moon manicure with a transparent hole will delight you for a long time!
Moon manicure with a transparent hole
Another interesting idea for a lunar manicure with a transparent hole
Making a moon manicure with gel polish
Lunar nail art made with gel polish not only lasts longer on the nails, but also looks especially solemn and elegant.
The following combinations are considered the most successful: black and gold, burgundy with black, cream with black.
The latter option is perfect for office everyday life and business meetings. A colored manicure looks interesting, creating a spring mood on your nails.
To work you will need:
- UV lamp with a power of at least 36 watts;
- set of varnishes: base, finishing and 2 color;
- smooth napkins: there is no need to use cotton wool, as it will leave lint on the nails;
- degreaser;
- nail polish remover;
- stencils for making holes;
- additional decors: rhinestones, sparkles, colored dust, foil.
How to make a moon manicure with gel polish:
- Get a hygienic manicure. To do this, push back the cuticle with an orange stick and remove the skin around the cuticle.
- File your nails with a file, giving them the desired shape. For lunar nail art, an oval is most suitable. An important point: do not file wet nails, as this can lead to their delamination.
- Degrease the natural nail plate. This is necessary for strong adhesion of the decorative coating to natural fabrics.
- Apply a transparent base gel polish to the prepared surface and dry under the lamp for about 30 seconds.
- Top coat the nails with the main color in one layer and dry.
- Apply a second coat of the base color and dry again for 1.5 minutes.
- Stick stencils on your nails and apply a second decorative coating to the hole. Dry your fingers under the lamp for 2 minutes.
- Apply a finishing coat to the platinum and dry again.
- Decorate your nails with decorative elements along the junction of two varnishes.
- Remove the sticky layer with a napkin.
- Treat the cuticle with moisturizing oil.
- Manicure is ready!
There is another interesting method of highlighting a hole by gluing foil. To do this, semicircular elements are cut out of this material and glued to the base of the nail using special glue. In this case, the base coat should already be present on the nails.
There is another technology for lunar manicure using transfer foil:
- Prepare pieces of foil for the hole so that they match the shape of natural nails. A “smile” can be either concave or inverted. It depends on the client's wishes.
- Carefully apply manicure glue to the “smile” area and let it dry until it becomes transparent.
- Place a piece of foil on the area of the nail treated with glue and smooth the application with a spatula.
- Carefully remove the foil: it will leave the desired color in the shape of a hole on the surface.
- If textured foil was used, then you don’t have to cover your nails with the finishing layer.
The biggest advantage of gel polish is its durability. For at least 2 weeks he will delight his owner with his pristine, bright appearance.
How to draw double holes in a moon manicure with a transparent stripe?
A lunar manicure with a transparent strip is a closer option to the classic of all existing types of lunar manicure.
This manicure will require significantly more time than a standard one, because the hole will have to be drawn as many as two times.
Lunar manicure with a transparent strip and double holes
The set of materials you will need to create a moon manicure with a transparent stripe includes:
- orange stick, cotton pad, nail file
- nail polish remover, sponge
- two colored varnishes and one clear varnish
- stencils for French manicure with thin internal borders, the more stencils the better
Now about how to create a manicure with transparent holes:
- Give the nail plate the desired shape using a nail file and remove the cuticle.
- Now degrease the nail using a special product or nail polish remover.
- Apply clear polish to the entire nail and let it dry.
- Now place the stencil so that it ends where the hole will begin.
- Paint the top area (where the edge of the nail) with the first colored polish.
- Paint the hole area with the second varnish (you can use just one varnish if desired).
- Now let each varnish dry and seal the finish with a thin layer of clear varnish.
Moon manicure with a transparent stripe
Take note! Very often there are manicure options in which a transparent strip is filled with rhinestones or sparkles. In such a case, it is not necessary to use the method just described above. You can do a regular manicure with holes, and apply rhinestones or sparkles to the border of the hole.
Stencils for lunar design
Since the only limitation in the design of a lunar French manicure is the combination of colors, there are many options for its execution. It all depends on your sense of taste and imagination. At the same time, not only bright colors are popular in lunar manicure, but also combinations of light, flesh tones.
In addition, as in the classic French manicure, moon manicure often uses a transparent base with a bright coloring of the smile. The individual nail style of girls, done at home, is replete with the use of various decor in lunar manicure. It is worth mentioning such a fashionable design as outlining a quarter of the moon or even the entire nail with a thin line along the cuticle.
Moon manicure design options:
- A manicure with a red varnish base is a timeless classic. It is not surprising that a lunar manicure with this color is a very popular solution in nail design. In this combination, a white or flesh-colored hole is used;
- A 50/50 combination of two bright colors in the base with a flesh-colored hole looks very original and juicy in a moon manicure. In this case, the hole is not additionally painted, and after applying the primary colors, an additional transparent fixer is simply coated over the entire nail plate;
- Invariably popular in lunar manicure is the nude style - an inverted French manicure. In this version, you do the same as in the French version of the manicure, only with an inverted hole;
- In addition to the usual semicircular smile, lunar manicures with shellac use a triangular design of the cuticle and socket. This design is done using a special manicure brush. A very popular combination is a white base and a bright triangle running from the upper semicircle to the center of the nail. Do not try to draw such a pattern with a regular brush - use only a special, thin one;
- if you decide to do a lunar manicure at home using varnishes with sparkles, for example, gold, the sequence of their application should be different. First, the base is painted and dried, and then a smile is carefully drawn. It is recommended to use smile stencils in this case.
There are a huge number of options for making such a design; each master tries to surprise his client and experiments. You can design it using various add-ons:
- Rhinestones;
- Patterns;
- Sharp lines;
- Broths, etc.
At the peak of popularity now is a lunar manicure made using:
- Stencils;
- Strips for French manicure;
- Drawing a harrier with a contrasting color;
- Lay out using foil.
All of the above options look original and not at all provocative.
This design can be made using absolutely any material at hand. Sometimes, when using bright colors, it is enough to highlight just one or two nails with a smile. This will greatly tone down the bright colors and add a touch of sophistication to any design, regardless of nail length.
Moon manicure for long nails with glitter
The technique is exactly the same as for regular drawing. But there are additional materials here:
- Nails glue;
- Foil (gold or silver looks very nice).
So, using this material you need to slightly change the sequence and meet important conditions. Namely, we glue the foil with the matte side immediately after applying the base.
- After applying the base coat and the main color of the varnish, carefully use a thin brush to draw the shape of the hole with glue and glue our decorative element (do not forget to dry the gel layers);
- Then carefully level it, wait a minute for the glue to dry;
- Gently tear off the foil.
Attention! It does not always apply perfectly in one layer, so several applications may be required, following exactly the same pattern.
- After the ideal shade is obtained, we cover everything with the finishing coat.
This type of manicure is more suitable for evening events; in everyday life, glitter does not always look appropriate, especially if at work you have to adhere to a strict corporate style.
Moon manicure with foil
Using stencils, you can create not only a classic lunar manicure with a transparent nail hole, but also a contrasting one, using two colors or a decorative shiny coating. In the first case, you need to apply only one layer of base under the varnish, and then apply a layer of colored varnish to the entire nail - this is the color that the hole will be. After gluing the stencil, apply two layers of contrasting varnish and cover with a fixative.
Another option is to use a brush, but this requires some experience. Manicurists in beauty salons use this method exclusively - it is faster and more convenient than gluing stencils. After covering the nail with the base, take a colored varnish, and with a thin brush draw the border of the hole, after which the entire nail from it to the end is covered with varnish with a wide brush.
Lunar manicure can be performed not only with regular polishes, but also with gel polishes. Here, of course, you will need an ultraviolet lamp to polymerize the coating. The execution technology will be the same, but after applying each layer of base, color and fixer, you must let the nails dry in a UV lamp until completely dry (depending on the model and lamp power - from about 30 seconds to 2 minutes).
The first thing you need before doing a moon manicure is to get your hands in order. If your nails need treatment, use the classic or European manicure procedure. You can try care using the Brazilian system. Have you ever done a moon design on your nails before? Use round stencils for beginners, which are sold at a nail store. The technique is very simple.
- Apply base coat. Then paint your nails with decorative varnish and wait until the coating dries completely.
- Place the sticker on the lunula (base of the nail) as shown in the photo. Paint the part of the nail from the stencil to the free edge with a darker color of polish.
- Peel off the sticker and wait until the top layer dries.
- Apply top coat to your nail art. Take a look at the following step by step image, it's really simple.
The following stencils are available:
- Round stickers with an internal hole. Outwardly, they somewhat resemble a car tire or a donut. These round pieces are attached to the nail plate on top of the base or after applying a colored layer. Then a contrasting color coating is applied, and the lunula, thanks to the stencil, remains painted with the first layer.
- For fairly long nails, use triangular stencils. They are fixed at the base of the lunula, leaving this area unpainted or lighter. An excellent addition to this elegant design will be rhinestones, sparkles or elegant patterns.
- Stencils in the form of curved lines or ticks are used to create a jacket. With their help, you can draw several outlines of the moon, placed at different distances from each other.
We suggest you read: How to quickly remove wrinkles on the forehead at home
You can buy stencils in special stores. Skilled needlewomen can make them themselves. When decorating short nails, glue the stencils closer to the base of the nail.
Lunar manicure ideas: photos
The article does not describe all options for lunar manicure, but only the simplest ones. More complex manicure options with holes are shown below.
Black and gold are a great holiday or weekend combination. The black color is strict, it is perfectly complemented by the golden tints of sparkles.
Reverse moon manicure with glitter
A few years ago, a trend emerged - a combination of matte varnish with metallic elements, which were used as foil or a special varnish with a metallic effect.
Matte varnish with metallic holes
Black nails with colored holes are still in fashion.
Black nails with blue holes
Black nails with gold holes
Black nails with white holes
Original black jacket
A gentle moon manicure with sparkles or a reverse French manicure is a solution for a manicure for every day.
Reverse French with gold glitter
Delicate moon manicure
If you definitely want variety, pay attention to the moon manicure with polka dots.
Stylish moon manicure with polka dots
Lunar manicure with polka dots and bows
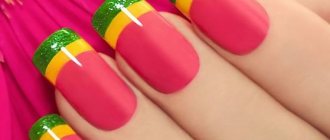
A bright solution - a manicure with holes in blue, pink, green and yellow colors will definitely attract attention to you.
Bright blue moon manicure
Reverse moon manicure with turquoise polish
Bright pink moon manicure
Green moon manicure
Yellow moon manicure
A very unusual and stylish moon manicure
Classic moon manicure colors
The favorite colors of nail art masters for lunar manicure are red, black and white. They are standard and quite universal. However, now gel polish manufacturers have such a variety of shades of UV coatings for nails that it would be a shame not to take advantage of this, especially in the spring-summer season, when you want to see bright colors in literally everything, even on the tips of your nails. Nowadays, bright blue colors, beige and green shades are very popular. One of the current nail trends is considered to be a combined design, combining different colors, textures and decorative elements.
White moon manicure
[pro_ad_display_adzone id=”9403"]
A white manicure is often done for a wedding, additionally decorating it with rhinestones, appliqués or pearls. When choosing a white UV coating for nails, give preference to high-quality gel polishes, since cheap ones, as a rule, turn out to be of a liquid consistency and cover the nails unevenly, leaving gaps and smudges. This rule applies to the entire basic and light palette. Usually, you can save money without losing quality on colored and darker shades. Almost all manufacturers have them thicker.
Black moon manicure
Black manicure has not gone out of fashion for several years. It is always relevant. Black manicure can be done in a variety of styles: classic, gothic, grunge and others. Black moon manicure is very popular among young girls. It is best to apply a rub on black gel polish, with which you can create a beautiful and fashionable mirror finish. Black goes with any shade of polish and nail decoration, be it rhinestones, foil, mosaic, etc., so you can come up with many design ideas based on it.
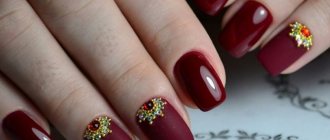
Red moon manicure
A sort of classic of the genre. Red color in manicure is considered basic and goes with any clothes and makeup. Red manicure is especially popular in autumn; this color is often combined with gold, rhinestones and kamifubuki. In lunar design, the fashionable combination of black and red is very popular. If you do not want to do a very bright manicure, then give preference to cherry, darker wine shade or marsala color. There are beautiful cherry-colored shellacs in the CND palette, if you need an evening option, then the line of the ENTITY and MASURA brands contains deep burgundy shades with microglitters, and almost every manufacturer has a classic red, the OPI brand even released the original red “Coca-Cola”. Among the magnetic gel polishes, we can highlight a beautiful raspberry-red shade with a golden shimmer from the MASURA collection, which is called “Raspberry Cat”, as well as a light burgundy shade of TNL “Magnet lux”.
Lunar red manicure
Fashionable blue gel polish
Blue is the color of the fall-winter 2021 season, and any variation of it: from light shades and bright blue to deep dark color. The trend is smoky blue and a combination of blue and gray in nail designs. The blue “cat's eye” does not lose its relevance, which can be given even greater expressiveness with the help of an additional layer of transparent stained glass varnish. In general, the combination of magnetic and stained glass shellac is now very popular; a similar design option can be supplemented with rhinestones or mosaics. Well, don’t forget about the classic New Year’s lunar blue manicure with iridescent snowflakes sprinkled with shimmering acrylic sand.
Beige lunar nude design
Beige manicure is a wonderful everyday option for nail design. Powdery shades are very popular now. This spring, the TNL brand released an amazing universal collection of base colors for creating French manicures, nude manicures and other types of nail designs, called Color Base. The same brand also has another collection that has pretty golden beige shades. It's called Morocco. There are interesting beige tones in the OPI “Soft Shades” and “Infinite Shine” lines, as well as the IRISK brand in the NUDE collection, etc.
Now let’s see what can be painted on nails using beige gel polish.
In pink
Pink, just like beige, is a universal color for everyday manicure. It is indispensable for designing short nails, because... Light shades visually lengthen nails. Pink is the color of spring and summer. It goes well with floral patterns and monograms. If you wish, you can also make a geometric pattern, for example, line it with “broken glass” foil; it looks very stylish on pink gel polish.