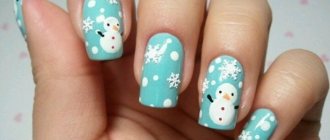
Winter has come - falling fluffy snow flakes, swirling in a round dance, remind us of the approaching New Year and Christmas holidays. It's time to get a winter manicure by decorating your nails with unusual or classic patterns.
Manicure with snowflakes on the eve of the New Year is becoming especially relevant and popular among the fair sex. From year to year, it does not lose its attractiveness and does not go out of fashion - new ideas for decorating snow patterns on nails, various methods and options for decorating them appear.
Manicure design options with snowflakes
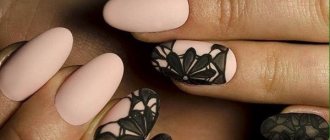
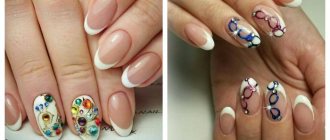
There are many incredibly beautiful and interesting options for nail designs using snowflakes - many of them are so naturalistic that when you look at them you immediately find yourself in a magical winter fairy tale. The color palette of snowflakes is not limited - in addition to classic white, you can use any other colors and shades, the main thing is that they look harmonious with the main varnish coating. Very beautiful and festive, nails with painted silver or gold snowflakes look chic.
This year, voluminous matte patterns are in trend - they are decorated in the same color as the main coating, decorated with sparkles or rhinestones.
The most common snow manicure design options:
- French manicure with winter pattern;
- lunar;
- using manicure sand;
- using sparkles and rhinestones;
- combination of matte and glossy varnish;
- white matte with white three-dimensional pattern;
- matte with contrasting pattern;
- a combination of a bright red base and white snowflakes;
- using the ombre technique - a white-blue gradient with a silver snowflake;
- snowstorm - white mother-of-pearl with a scattering of small sparkles;
- frost - a combination of transparent (base) and white (pattern around the edges) varnishes will create the impression of frosty patterns on the window.
Nail design 2021 with snowflakes
A charming winter nail design with snowflakes has not lost its relevance for many years. On the eve of the New Year holidays, this nail art is always in high demand, since it fits perfectly into the atmosphere of preparation for the most magical night of the year and at the same time is very laconic. The 2019 season was no exception - this year beautiful and exquisite snow crystals became one of the main trends in the world of manicure art.
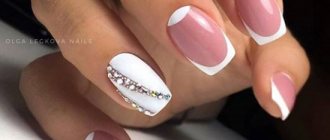
These wonderful patterns can be painted on a light or dark background, however, preference this season should be given to a blue, blue or red color coating. In addition, snow crystals are often complemented by various types of manicure, which are popular among modern representatives of the fair sex. So, the white French design with snowflakes looks very interesting, which with the advent of these snow-white designs begins to play with completely new colors. No less bright and original is the design, which combines winter motifs and a matte top.
Design with snowflakes for short nails
In 2021, stylists recommend that young ladies do not extend long nail plates, but give preference to neat short nails, because this season maximum naturalness and naturalness is at the top of popularity. Short nail design with snowflakes fully satisfies fashion trends that are extremely relevant in the world of manicure art - it looks very simple, cute and laconic, emphasizing the natural beauty and feminine charm of its owner.
For short claw lengths, small designs that do not occupy even half the area of the nail plate are suitable. In rare cases, a young lady can choose large images, however, they can be located only on 1-2 accent fingers. In addition, when creating a design for short nails, you should not get carried away with volumetric elements - it is much better to paint snow crystals using acrylic paint, and then carefully sprinkle with velvet sand or powder.
Design with snowflakes for long nails
Owners of long nail plates, which can be either natural or extended, can create any nail design with snowflakes. If you have enough surface area, you can draw designs of any size, highlight the area of the hole or smile line, combine up to 5 different color shades in one nail art, and much more. An ombre manicure in which the main surface of the claws is painted using a gradient technique looks very stylish and interesting.
An incredibly trendy nail design for 2021 is a French manicure with snowflakes, which can be made in traditional color combinations or using bright and unusual combinations of tones. In addition, such nail art can be supplemented with a variety of decorative elements, for example:
- rhinestones and broths;
- foil ribbons;
- "knitted" elements;
- sparkles and glitter;
- acrylic powder and velvet sand;
- rubbing;
- matte top.
How to make snowflakes
Of course, not everyone can be an artist, and not every girl can draw a pattern with a brush. This method requires a certain skill and experience - all lines must be clear, thin and neat.
Therefore, to create this beauty, you can use both special manicure devices and improvised means - a toothpick or a needle. Simple methods also include stickers and decorative strips for manicure.
Using stencils
You can purchase a stencil in the cosmetics department of any store or make it yourself from tape - cut the desired pattern on a small piece with a blade.
After covering the nail plate with the desired color and drying the varnish, the homemade stencil is pasted onto the nail, and the slots in the design are painted over with varnish of the selected shade using a brush or sponge.
Carefully, trying not to smudge the drawing, remove the stencil. If you want to make not one element, but several, each subsequent one needs to be decorated only after the previous one has dried.
Finally, cover the resulting pattern with a transparent topcoat. Using this decor will save a lot of time, quickly enliven any manicure and give your nails a festive look.
Needles
With the help of a sewing needle or toothpick, after several trial attempts, you can create a winter composition or a simple snow pattern no worse than with a professional brush. The appearance of the design depends on what layer of varnish the pattern is drawn on - if you let the varnish dry, it will be thin and neat, but if you draw on something that has not dried, the contours will become more blurry.
In order to draw a snowflake on your nails with a needle, you need to put a dot with varnish of the chosen color and quickly, before the varnish has time to dry, stretch it in different directions with the thin end of the needle.
Dots
This is a double-sided thin stick with tips made of balls of various diameters. With this tool you can easily and simply place neat dots of different sizes, thus creating, for example, snowfall, individual elements of a large snowflake or any other pattern.
Dots are also useful for gluing and fixing rhinestones. To obtain even and neat dots, the dots should be held strictly perpendicular to the nail plate.
Benefits of drawing snowflakes on nails
Perhaps the main advantage of using snowflakes as a pattern for nail design is the almost unlimited number of design options. For each nail, you can choose or come up with your own snowflake shape, thereby showing yourself as a creative, bright personality and avoiding the situation of repeating the pattern of someone around you.
Also among the advantages of drawing snowflakes on nails are:
- Simplicity. Snowflakes are very easy to draw. Even the most basic cross-shaped patterns will look gentle and cute.
- Freedom of creativity. Each snowflake is unique: you will not find two frozen droplets of the same shape and pattern. Therefore, using snowflakes in nail design eliminates the need to monitor the symmetry of the design or try to make it look the same on all nails.
- Variety of decor. Snowflakes can form a wide variety of patterns. Be big and small, simple and complex. But the most important thing is that they can and should be supplemented with a variety of decorative items: sparkles, rhinestones, etc.
- Ability to arrange patterns. Thanks to their diversity, snowflakes “get along” well with other New Year-themed ornaments.
- Unpretentiousness to colors. Despite the fact that, for obvious reasons, it is customary to paint snowflakes with white/silver paint, and the background for them is blue or dark blue, modern nail art expands the boundaries. Now, nail design masters paint both snowflakes and the “base” for them in any color that the client likes, which significantly expands the decorative function of manicure as a full-fledged part of any image.
A variety of snowflakes will help decorate any nail design
If your holiday manicure involves the use of bright colors (red, blue, green, etc.), be sure to use a white base and/or white polish as a “base” for it. This will help preserve the richness of the colors.
Manicure with snowflakes on nails at home
Not everyone has the opportunity or simply free time to go to a nail salon to see a master, but this does not at all negate the desire to show off the fashionable and stylish design of your nails. There is nothing wrong with this - you can achieve an interesting and effective result at home, even without having absolutely any artistic or professional skills. You just need to strictly follow the instructions or video tutorials - then everything will definitely work out.
Snowflake is one of the simplest patterns that can be made at home. There are quite a lot of execution options. Using various stencils you can easily create a beautiful pattern, and use a brush to draw an original snowflake. It can vary in the number of “rays” and in the degree of complexity. For those who do not yet have sufficient experience in designing nail designs, it is better to try simpler, classic options first - for example, a white pattern on a blue, black or red background polish.
Technique for creating a manicure with regular polishes
Those who cannot or do not want to use gel polish should not be upset - a beautiful snow pattern can be created with regular varnish.
To do this you will need:
- base varnish;
- colored (for example, blue or black) and white varnishes;
- finishing coating;
- dot brush;
- a small piece of foil.
Execution sequence:
- Prepare the nail plates: shape, polish.
- Cover with base varnish and let dry.
- Apply dark color and dry.
- Apply a drop of white polish onto the foil and dip the tip of a dotting brush into the drop.
- Carefully, trying to make the lines thin, draw a snowflake. You can complement it with any pattern - it will look even more interesting.
- After drying, apply topcoat.
The base coat is best applied to the nails in two layers, choosing varnishes with a dense texture.
Snowflake on a red background
The bright, colorful combination of red and white has been and remains one of the most popular nail designs. White snowflakes on a red background will inevitably attract attention with their contrast. Red manicure with snowflakes can be done in various versions and in different colors, but white patterns made in the Scandinavian style look especially interesting on a bright red background.
You will need:
- gel polish;
- white gel paint;
- Ultraviolet lamp;
- brush;
- transparent top.
Sequencing:
- Apply a layer of base coat to prepared nails and dry in a lamp.
- Coat with red varnish in two layers and dry.
- Apply a transparent top, dry, remove the sticky layer with a cotton swab.
- Use a brush (you can use a stencil) to draw a snowflake made of diamonds with gel paint, complete the pattern with dots, zigzag, and stripes. Dry.
If gel polish or acrylic paint is used instead of gel paint, then the drawing must be done before covering with a transparent topcoat.
Stamping in 5 minutes
Using this technique really takes a minimum amount of time and greatly simplifies the process of drawing a picture, which does not at all affect its quality and beauty. For this nail design you will need reusable metal stencils of the desired theme, a scraper and a silicone stamp. The stamping plates available for sale are distinguished by a wide variety of patterns - you can choose a pattern in accordance with your own desires and preferences.
For stamping you will need:
- stamping kit;
- gel polishes in two colors (base and pattern);
- base and top coat;
- cuticle protectant;
- Ultraviolet lamp;
- a product for removing the sticky layer and degreasing nails.
Application instructions:
- Prepare your nails: shape, polish, degrease.
- Apply base coat and dry in a lamp.
- Cover the nails with two layers of varnish of the main color and dry.
- Apply a protective agent to the cuticle.
- Apply white varnish to the stamping plate and remove excess using a scraper. Transfer the pattern to the stamp by attaching it to the plate.
- Transfer the design to the nail, remove the protective film from the cuticle. Dry.
- Apply topcoat, dry, remove sticky layer.
This method allows you to create a whole snowfall if you use different combinations of stencils.
In blue and light blue colors
These shades are traditionally associated with the cold winter season, reminiscent of ice and snowdrifts, especially in combination with snowflakes. Combinations of these colors depend only on your own imagination - you can combine them with each other as an everyday option or with white - more festive, but quite simple to implement.
A blue-blue manicure made using the ombre technique with a snowy pattern is a chic option for long nails. A smooth transition of color from dark to light with a painted or pasted pattern will look great at a holiday, captivating with the play of shades and highlights. You can decorate it using airbrush, brush or sponge.
You will need:
- blue and light blue varnishes;
- white acrylic paint;
- top;
- brush;
- stencil;
- sponge;
- rhinestones.
Execution sequence:
- Apply stripes of blue and light blue varnish to a porous foam rubber stamp (sponge).
- Treat the cuticle with a protective film.
- Gently apply the stamp to the nail plate several times. The appearance of the manicure as a whole depends on what color is at the tip of the nail - blue or light blue.
- Using a brush, smooth out the transition from light to dark, making it smoother.
- Decorate the snowflake with white varnish or acrylic paint. You can glue rhinestones in the middle and decorate with small sparkles.
- Apply topcoat.
This design can be done with either gel polish or regular polish. The main thing is to monitor the smoothness of the color transition and accuracy of execution.
French with snowflakes
This manicure can be either everyday for the winter or for New Year’s.
The color of the varnish for the tips of the nails is chosen at your own discretion, as well as the background coating, which can be made colored or transparent.
If the French style is supposed to be bright, then it is better to do it only on one or two nails. The location and number of snowflakes depends on the length of the nails and personal preferences.
How to apply:
- Apply base to prepared nails and dry in a UV lamp.
- Cover your nails with the main color (or leave them transparent), and decorate your nails with a stencil or brush. Dry.
- Draw or stick a pattern and send it to dry.
- Finish the job with a finishing coat.
Sand manicure
Beautiful, voluminous and very impressive snowflakes are obtained by using velvet sand or acrylic powder of various shades to create them. But, of course, silver sand looks the most realistic - you get the feeling that there is real snow on your hands. This delicate manicure is perfect for any length and shape of nails.
To work you will need:
- gel polish;
- Ultraviolet lamp;
- brush;
- manicure sand;
- rhinestones;
- transparent and matte top.
Sequencing:
- Cover your nails with varnish of the chosen color and dry in a lamp.
- Using a brush (or any other method), draw one or more snowflakes.
- Cover with a matte top coat and dry.
- Place a rhinestone in the center of the picture.
- Using a transparent top without a sticky layer, draw snowflakes again to give it volume.
- Sprinkle with sand and dry in a lamp for double the time.
- Use a brush or brush to brush off any remaining sand.
With sparkles and rhinestones
This manicure looks truly festive. Shiny and iridescent rhinestones or sequins will look charming and very impressive on New Year's Eve, completing the festive look.
It is quite possible to create a whole pattern from rhinestones or use them as an addition to a snow pattern painted with varnish - a small shiny stone will add brightness and originality to it.
You can create a snowstorm from small sparkles by simply scattering them on the nail plate in a chaotic manner, and from large ones, for example, diamond-shaped ones, in combination with white varnish, you get snowflakes that anyone, even someone far from artistic talent, can easily draw.
Instructions:
- Apply base to prepared and treated nails and dry in a UV lamp.
- Cover the nails with the main color (preferably dark).
- Without drying, lay out a snowflake out of glitter. Send your hand into the lamp.
- Using white varnish or acrylic paint using a thin brush, draw neat lines from the center of the snowflakes directly along the sparkles. In between, add small thin lines to “thicken” the pattern. Use dots to place neat dots on all the rays and between them. Dry.
- Apply topcoat. Send your hands into the lamp.
Rhinestones are attached to the nail plate using special glue or to the gel polish itself. In the second case, you first need to apply several layers of coating to your nails, then, without allowing them to dry, attach rhinestones. After this, the nails are dried, a finish is applied, and they are dried in a UV lamp again.
Pink and red manicure
Delicate pink or bright red are traditional, classic colors that never go out of style. On the eve of the holidays, you shouldn’t be afraid of rich colors and clear contrasts - it’s better to surrender to the will of your own imagination and start creating.
White snowflakes on a red or pink background, especially with sparkles or rhinestones, will look great and complement any holiday outfit.
This manicure can be:
- matte;
- glossy;
- decorated with regular or gel polish;
- on all nails or on several;
- with one large snowflake or several small ones;
- with rhinestones or sparkles.
New Year's manicure on short nails
New Year's design for short nails is not much different from its counterparts for long nails. The difference lies in the size of the chosen pattern - if you take a large, large pattern, then a short nail will look even shorter. Therefore, you should choose smaller background patterns or small dotted ones, not for the entire nail.
Since drawing out small details is a rather painstaking task and requires accuracy, you can use a stencil, stamping or slider.
Instructions for creating a manicure using a slider:
- Cut the slider to the desired size (according to the nail plate), moisten it with water.
- Apply gel polish to treated nails and dry without removing the sticky layer.
- Apply the slider to the sticky surface of the nail and smooth out any unevenness with a brush. Fix in a lamp.
- Cover with top coat, “sealing” the end of the nail, and dry in a UV lamp.
Also, on short nails, a white pearlescent polish with lots of small sparkles will look great - a snowstorm or a white jacket with small snowflakes.
Winter time and the approaching New Year's Eve remind us of ourselves more and more often with intricate patterns on women's nails. There is no need to be afraid of bright colors and shine of jewelry - create your own unique nail art, armed with a palette of colors and imagination.
Red New Year's manicure: 95+ winter and Christmas ideas!
New Year is a great reason to please yourself. New hairstyle? Or maybe a manicure? We’ll probably stop there today. Here are the most delicate and creative red manicure ideas.
Red is a fiery color and is said to attract love. For girls who have not yet found their soulmate, it is especially important to take note of this. Well, for everyone else, it’s just a good way to cheer up yourself and those around you.
@_mejzi
How about a symbolic manicure? Snowflakes are one of the most popular ways to create a New Year's atmosphere. Note the striped design. Surely it reminds me of something from my childhood.
@_mejzi @_mejzi
New Year is the time to shine. Take note of shimmering manicure ideas. Drawings of cartoon characters will add originality, such as a deer - one of the main characters of Christmas and New Year.
@_mejzi
@_mejzi
@anna_yudasova_nail_art
@_mejzi
@agnesnails.stylizacjapaznokci
@justnails.pl
@ewuleek
On long nails you can create almost any design: stars, New Year's toys, snowflakes and much more. Large rhinestones will be an excellent addition.
@evelena_nails
Red color just goes perfectly with white. This contrast allows you to add even more originality and create entire masterpieces on your nails.
@ewuleek
To make your manicure more attractive, you can use bows and even display the main New Year's symbol - the Christmas tree.
@nailmastergalia
@nail_krasa @naturelle_nails
Patterns of different years are also welcome. With their help you can create a rather delicate manicure.
@yuliya_frolovanails
@usti_na
@so_nailicious
Imitating snow is an unusual, very interesting and original idea.
@prof_nogti
These are the kind of funny designs an experienced nail artist can create on your nails.
@prof_nogti
@prof_nogti
@puro.nails @puro.nails
@salon_om_
@sbelkina2212
Want even more extraordinary ideas? Images of Father Frost or Santa will be the best helpers.
@nailsbyjema @nailsbyjema @nailsbyjema
@nailsbyjema
Take a look at the following ideas to choose the best option.
@nailsbyjema
@nastia.zhdanova.94
@novogodnie_nogti
@patabloguje
@nailsbyjema
@nailsbyjema
@nailsbyjema
@nailmastergalia
@nailsbyjema
@matuszewsk.a.
@mashapatrakova05
@makarova___kristina
@kp_beautyroom @kseniya_rei.nail
@ksusha_perwushina @luxio_nailstudio
@luxio_nailstudio
@makarova___kristina
@indigonails
@ib_nails
@exclusive_nailart_spb @ewuleek
@constantlypolished
@chikibriki_nails
@asnail72
@arnail_studio
@arcobalenonail
@annushka_nailsodessa
@altukhova_nails @agnesnails.stylizacjapaznokci
@agnesnails.stylizacjapaznokci
@agnesnails.stylizacjapaznokci @ykorsakova
@_mejzi
@_mejzi
@anna_yudasova_nail_art
@ewuleek
@ewuleek
@justnails
@lidiya_wownails
@lobastova_nails
@puro.nails
@slowianka_nails
@tania_rovno @vse.nailart.project @yuliya_frolovanails
@yuliya_frolovanails
@yulya.nails
@zazerkalie_nails
@agnesnails.stylizacjapaznokci
@darya_kamenskih
@arnail_studio @daily_nail_room @_mejzi
@_mejzi
@justnails.pl
@slowianka_nails
@indigonails
With a new red manicure, you will be the center of attention.
Watch, enjoy and implement the most interesting ideas!
If you liked the article, save it and share with your friends!
Join us on our channels in Yandex.Zen: Beauty, Your stylish home, Ideas of stylish people, Manicure★nail art, Geniuses and outsiders
How to make snowflakes on your nails yourself?
Many fashionistas who want to emphasize their winter look have a logical question: how to make snowflakes on their nails without the help of a professional stylist. The answer to this is clear: as simple as shelling pears! Moreover, today there are a great variety of techniques for making patterns.
Among them:
- Classic brush drawing . To apply a snowflake design using this technique, you will need varnish with a thin brush, a little patience and skill. The complexity of the work will depend on the complexity of the snowflake pattern itself. But, in most cases, it all starts with drawing the letter “X”, through the center of which a vertical and horizontal line is then drawn. It is this cross-shaped pattern that serves as the basis for further creative developments, the limit of which is only your imagination.
Scheme for drawing a complex snowflake based on a simple cross-shaped pattern
Don't forget to use a base coat and topcoat. The first remedy will help prevent the penetration of harmful substances and pigments from the varnish into the nail plate, and the second will extend the “life” of your nail masterpiece.
- Snowflakes made of rhinestones . With the development of the beauty industry and the stunning progress of nail design, rhinestones, sparkles and beads have become an integral part of not only festive, but also everyday manicure. Of course, making a design in the form of a snowflake with rhinestones alone will not be easy (although with perseverance, rich imagination and great desire, a three-dimensional pattern of rhinestones with bugles in the shape of a snowflake is quite possible). But shiny pebbles will make an excellent match for a traditional hand-drawn ornament.
Drawn snowflakes are an ideal pair for sparkles and rhinestones
- Stencil drawing . For those who lack the skills, calmness, time or desire to paint snowflakes on their nails in the classic way, there is an option to use a stencil. A template for nail art can be purchased in specialized stores, or you can make it yourself by redrawing the pattern you like. The drawing is applied in the same way as when working with any other stencils: the template is applied to the nail and coated with varnish of the desired color.
Drawing with a stencil allows you to draw delicate, openwork snowflakes
If you prefer gel polish rather than ordinary decorative nail polish, the stencil is removed from the nail before the coating is completely dry.
- Stickers for nails. Finally, for the laziest, the beauty industry has invented nail stamping. Today in any beauty store you can buy nail stickers in the form of snowflakes of various sizes, shapes and colors. Gluing them is very easy: you just need to remove the protective coating from the back of the sticker, carefully apply it to the nail and smooth it out.
Convenient nail stickers for those who want to get the perfect pattern