If a celebration is just around the corner, and especially if it is a children's party, of course, there is a desire to brightly decorate the room where the celebration will take place. Of course, you can turn to professional decorators for help, but their services often cost a lot of money. And if the holiday is planned at home or at the dacha, then you will think about simple and affordable DIY decor. And there are probably a few days left before the event, so ideas for simple, but bright and fashionable decoration come in handy. In this article you will learn how to make paper pompoms, as well as practical tips for obtaining especially fluffy balls.
We make a pompom from corrugated paper with our own hands. Master Class
Hello everyone! Another master class on the ShkolaLa blog! Today we will make large paper balls, the same ones that are used as a festive design at various parties.
Come with us! Join our creative fraternity! And making pom-poms from corrugated paper with your own hands is not difficult and very interesting. For your convenience, here are step-by-step photos.
Corrugated paper applique – Natalia Vadimovna Dubrovskaya | Buy a book with delivery | My-shop.ru
So look what we got.
It all starts with preparation.
To make a pompom we will need:
- a roll of corrugated paper, also called crepe paper;
- scissors;
- pencil;
- ruler.
Standard size paper. Its width is 50 cm and its length is 2.5 meters.
We take a roll and use a ruler to determine where its middle is. Draw a line in this place with a pencil.
Without unwinding the roll, use scissors to cut it into two equal parts. There was one long roll, but now there are two short ones.
Then the rolls still need to be unrolled and cut into identical rectangles. You can make rectangles measuring 25cm X 50cm, then each roll will produce 5 rectangles. We made 25 X 40, and we got 6 pieces each.
The larger the rectangles, the more voluminous the pompom will be.
Then the rectangles need to be folded in a neat stack, on top of each other.
Since our paper always wanted to curl back into tubes, we pressed it with scissors on one side and a ruler on the other to take a photo. And, if you noticed, a ball of thread appeared in the photo! It should have been mentioned at the very beginning, during the preparation process. But we remembered that it is needed only now and immediately declare it. Instead of threads, you can take a beautiful ribbon. But we didn’t have it and we made do with threads.
Then we turn the stack of sheets on one of the short sides towards us and begin to fold the sheets into an accordion.
It should look something like this.
Using a ruler, we determine where the middle of our corrugated accordion is and make a mark with a pencil.
We take a thread and tightly tie our accordion in the middle. One end of the thread should remain long.
Now let's start decorating the ends of our pompom. We will trim them a little and round them off so that the pompom looks like a flower. The photo shows which trajectory we will use to cut.
First, cut off one corner.
Then another. Well, we've sorted out one end. We do the same with others.
And we get this figure) The most important steps follow. Let's open the pompom.
First, we unfold one side in the form of a fan.
Very carefully, so as not to tear, grab the first layer of paper and lift it.
Well, then the third, fourth, fifth and sixth too. It's already beautiful!
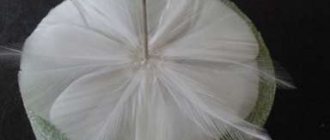
We turn our “fan” over to the other side and fluff out the remaining six layers of paper. Only at the same time we try not to crush those that have already been issued.
It turns out like this. Very similar to a bridal bouquet. If you make half a pom-pom out of white paper and decorate the handle in green, it will look exactly the same. But now we have a different task, we are making not a white bouquet, but a pink pom-pom. Therefore, using the same principle, we fluff the other end of our accordion.
Flowers made of corrugated paper - Sherstyuk Yulia Valerievna | Buy a book with delivery | My-shop.ru
And we get such beauty! We adjusted it a little with our hands so that the pompom took the shape of a ball. Then we decided to experiment and make another smaller pompom from the remnants of yellow corrugated paper that Tema found in the closet with all sorts of creative things. That’s what we call it – a creative locker. We have paints there, plasticine, glue and colored paper too. In principle, it worked.
And now we know that it is possible to make a small pompom, but it is much more difficult than a large one. And in this little yellow ball, we got not 12 layers of paper, like in the big one, but only 8, and that’s where the paper ended.
We hung these two pompoms on the chandelier in the children's room. And it immediately became more fun there! Well, holidays are coming soon in our family. First it’s my birthday, then our beloved grandmother’s. And now we know exactly how to decorate the premises so that it is elegant and beautiful.
But if we had a lot more of this paper, we would try to make the same beautiful flower as in the video below. Very beautiful! And the manufacturing principle is similar to pompoms.
We also already know how to make pompoms from threads and we know what can be made from these pompoms, we told you about it here.
Friends, you can leave your opinions about our master class in the comments. We will also be very grateful if you share the link to the article on social networks.
Thank you for your attention!
Always yours, Alexandra, Artem and Evgenia Klimkovich.
How to make pompoms from crepe paper
All paper pompoms are made according to the same principle. Let's look at this method in more detail. We will need corrugated or crepe paper. Today, crumpled paper is actively used to create crafts, although previously its purpose was somewhat different - corrugated paper was used to line hat linings. Crepe is a type of corrugated material with a finer degree of compression. Crepe paper pompoms are soft and airy, while corrugated products hold their shape better. Previously, crumpled paper was used to make children's crafts and elements for carnival costumes, but today they are used mainly to create stylish decorative items: flowers, garlands, interior toys.
Making paper pompoms with your own hands is very simple, because in addition to the crepe or corrugated paper itself, you only need scissors and thread. If you are going to hang finished paper balls to decorate a wall or ceiling, replace the threads with ribbon or long cord. Remember that for work you choose durable, evenly colored and bright crumpled paper that does not leave colored streaks on your hands.
Lush paper pompoms: detailed instructions
So, if all the materials at hand are ready, let's begin the creative part of the process. To create an original and eye-catching decorative element, it is best to use multi-colored sheets of paper, first placing them one on top of the other. Although some masters claim that plain pom-poms look much more impressive, so choose colors based on your personal beliefs.
First, decide on the size of the finished product. The more magnificent the pom-pom seems to you, the larger the sheets of corrugated paper. At the same time, take note that the width of the paper sheet should approximately correspond to the diameter of the finished ball. Next, paper pompoms are assembled step by step like this:
- Fold the sheets of paper collected in a stack into a transverse “accordion”;
- tie the paper folded several times firmly strictly in the middle with threads or the dressing material that you have prepared (wire or tape, for example);
- Now the most creative part of the process is the design of the edges of the paper package. Use scissors to shape them as you wish: round the edges, make them wavy or jagged, cut them into fringes;
- let's move on to the most interesting part - let's “dissolve” our paper bud. First, we folded sheets of crumpled paper in layers. Now carefully remove one layer at a time, crumple it a little and pull it towards the core tied with thread. Admire your creation!
Take your time and make several of these pompoms at once. One paper ball is, of course, good, but it will not be able to produce the amazing effect that several copies can. Ready-made paper pompoms can be easily assembled into a garland, hung from the ceiling one at a time, or used to decorate an entire wall.
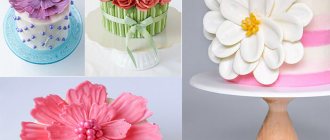
Experienced paper craftsmen went further. Look what wonderful flower-shaped pom-poms you can make from crumpled paper!
Materials
To make pompoms we will need:
- corrugated paper (we have 50 cm * 200 cm);
- scissors;
- ruler;
- thread or ribbon.
Pompoms can be made not only from corrugated paper; tissue paper will also work. Pompoms made from corrugated paper are denser and hold their shape well, while from tissue paper they are lighter and airier.
How to make paper pompoms in silence
To create lush holiday pom-poms, silk paper is used as often as corrugated paper. Unlike classic crinkled paper, quiet paper is a very delicate material. This is a thin, weightless and surprisingly airy paper, which, according to the masters, is a pleasure to deal with. The material is chosen when you want to decorate a room with very lush and large paper pompoms.
So, to make a beautiful three-dimensional ball, we will prepare the following materials:
- quiet paper (about 15 - 19 sheets for a large product, about 7 - 8 sheets for a small pom-pom);
- scissors;
- strong thread or thin wire;
- satin or other fancy ribbon to hang the finished product.
By completing this step-by-step master class, you will get incredibly beautiful pom-poms made from paper in quiet:
- Fold the sheets of paper into an even stack. If you plan to get a voluminous pompom, take more sheets. However, keep in mind that the thicker the stack of paper, the more difficult it is to work with the future product. Fold the paper in half and cut neatly along the edge;
- wrap the paper in “steps” of 2–3 cm to the end;
- fold the paper parcel in half;
- Use wire or thread to tie a paper “fan” exactly in the middle. In the same place, tie a ribbon, with which you can then hang the pompom;
- decorate the edges of the “fan” - give them a round, trapezoidal or pointed shape;
- To make a pompom, begin to carefully separate the paper petals from the edge to the center. Gently straighten layer by layer;
- when 5 - 6 layers of your pompom are straightened, turn it over and separate the same number of layers on the other side;
- when there are very few unstraightened layers left, turn the product sideways and open the last petals;
- This is what a fluffy and cute decoration you will get when all 16 layers are straightened.
When hanging pompoms, don't limit yourself to one color and the same length of ribbon.
Method 2
Pompom with rounded edges
Required materials and tools:
- 8-9 sheets of plain or multi-colored corrugated paper;
- sharp scissors;
- thin wire;
- lace or skein of thick thread.
Cut the paper into equal rectangles or squares. The diameter of the finished product depends on the width of the sheet.
Gather the sheets together and fold them like an accordion. The fold width is 1.5-2 centimeters.
Finish the edges of the accordion. Depending on what shape you want to make the ball, its edges can be jagged, torn, sharp, it all depends on your imagination. Our ball will have rounded edges. To do this, you need to trim the corners of the accordion with scissors, giving them a rounded shape.
Take the wire and bend it in half.
Wrap the accordion in the center with wire and tighten. The edges of the wire should be twisted into a loop; you can later hang the craft from it.
Unfold the paper accordion. Carefully separate each sheet and straighten it first on one side, then on the other, forming a fluffy pompom.
Pompom with sharp edges
Please note, this is the same master class, but the pompom has pointed edges
How to make a bouquet of kinder surprises yourself https://woman-l.ru/buket-iz-kinder-syurprizov/
How to make a paper pompom in the shape of a hemisphere: detailed instructions
If you wish, you can make an unusual pom-pom that can be used to decorate any surface. For better stability, the paper product is created not round, but in the shape of a hemisphere.
For work, you can choose paper napkins, but we will opt for paper muffin tins. The latter have become the object of close attention of craftswomen due to their corrugated edges, which gives the decorative element additional volume. The work plan is as follows:
- Fold the cake pan in multiple layers to create an acute angle of approximately 45 degrees. Do the same with all forms. This is how we will make petals for a decorative pompom flower.
- Now collect all the petals together: alternately place the edge of one petal on the edge of the other, making sure that the sharp corners of the petals converge at one point, and that they themselves do not completely overlap each other.
- Using a hairpin or single thread with a needle, fasten the petals.
- To make the fluffy hemisphere very voluminous, fill the finished circle with several more rows of petals. Remember that all elements must be strung on a thread (hairpin).
Interior decoration with paper pompoms
When your workplace is hidden by the foam of finished paper pompoms, it’s time to decide what to do next with your unusual creation. For example, paper balloons are a worthy replacement for ordinary balloons, because they can be secured in many places without worrying that the balloon will burst due to careless movement.
Paper pompoms are attached to walls, ceiling beams, chandeliers, and chairs. Medium-sized pompoms decorate bow-type gifts, while mini pompoms will be the perfect addition to large fluffy balloons. We offer you some more interesting options for decorating a room using paper pompoms:
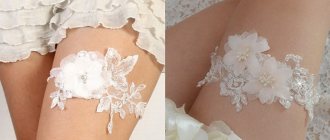
- As decorative elements, white pompoms of different sizes will be appropriate at a wedding celebration. Such products are best made from tracing paper. They will look elegant both outdoors and indoors.
- When relatives and friends are preparing to welcome a new family member home from the maternity hospital, multi-colored pom-poms are also indispensable. Classic balloons burst, which often spoil the overall picture of the holiday, so it is best to “dress” the room with pink, lilac, blue, lemon and mint pom-poms.
- Using paper pompoms you can decorate a party in honor of a child's birthday. Homemade products will become even cuter if you decorate them with the faces of cartoon characters.
- Thematic parties are often decorated with paper balloons: blue, dark blue, white and turquoise pompoms would be appropriate for a maritime festival; against the backdrop of brown and green paper balloons you can celebrate Earth Day, and red and black pompoms are suitable for a gangster “gathering”.
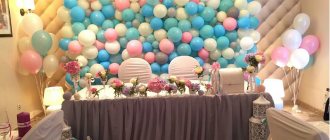
- Photos for memory will be unusually positive and bright if paper pompoms are included in the frame. So that everyone can take an original selfie against the backdrop of paper decor, a special photo zone is decorated with pom-poms.
Everyone can figure out what to do with handmade paper balls. We offer you a selection of photos of paper pompoms for inspiration:
When the holiday is over, don't rush to throw away your paper pompoms. These products can be easily folded into an accordion again and hidden until the next celebration.
Father Frost
It’s hard to imagine the New Year without a Christmas tree and sweets. Santa Claus is an important character who comes to kids. You can make a small figurine from pompoms.
The child must be involved in the process. He will be happy to wrap the workpiece with threads.
Santa Claus is made from two white pompoms. Then the hat and fur coat are cut separately. If you don’t want to sew clothes, then the bottom pompom is made from red yarn.
It is worth worrying about the bag of gifts that is behind Santa Claus.
The kid will be interested in receiving other figures: a snowman, a deer, a snow maiden. All of them will become heroes of a real New Year's fairy tale.