When and where is beaded manicure appropriate?
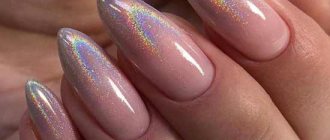
Despite the catchiness, such a design, with the right decor and selection of colors, will be appropriate even for participation in official, festive events, where you need, as they say, to shine in an evening dress.
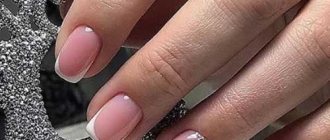
Caviar manicure is most suitable for women and girls with an elongated nail plate and a short free edge. The fact is that this design focuses attention on the nails, so if you have round nails, plump fingers or a poorly done hygienic manicure, this will immediately become noticeable. And if you have long, grown or extended nails, the beads will visually weigh down your hands, especially if you make the design from a larger material.
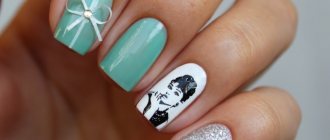
If you think that such a design will not fit the dress code, you can use it to highlight 1-2 nails or individual parts of the design.
Caviar manicure will fit perfectly into your look in winter and summer if you choose the right colors. But the main thing is to do everything carefully and beautifully, since any voluminous decor always requires special scrupulousness.
Caviar 3d manicure: step-by-step execution
- Shape the nail plate. Before applying varnish, remove the cuticle.
- Degrease the plate and coat the nail with a thin layer of base varnish.
- Wait for the base to dry.
- Apply colored polish to the nail.
- After the first layer has dried, coat the plate a second time.
- Immediately after application, without waiting for it to dry, sprinkle the entire surface of the nail with granules. Do this over a deep plate or cup so that the balls do not scatter and can be used a second time.
- Press the balls with your fingertips so that they stick to the nail.
- It is necessary to fan the excess granules from time to time using a fan brush.
- If there is a need to correct the work, you can use an orange stick. Align the granules along the edge of the nail.
- Wait until it dries.
- Apply clear sealer on top. Under a layer of top coat, the manicure does not look so bright. How to fix the granules without depriving your manicure of shine? You can cover only the tip of the nail, since this is where the granules fly off the fastest.
Procedure at home
If you prefer to use regular varnishes, then in order to do your own caviar manicure at home, you will need:
- Base for manicure.
- Pigmented varnish. It is better to cover the nails with varnish in the color of the broths. This, firstly, will make possible holes invisible, that is, places where the beads do not stick or fly off, and secondly, it will make the caviar manicure itself more durable.
- Fixative.
- Broths.
- Use a soft, large brush to brush away excess caviar.
After a thorough hygienic manicure, cover your nails with a base, then with colored varnish in 2 layers. Without waiting for the pH to dry, dip your finger into a container with beads, remove and press the beads to the nail. Remove unnecessary parts. After 5 minutes, cover the nail with 2 layers of sealer or clear varnish. You can adjust the design with a thin needle or toothpick. Before starting any homework or other activities, wait until the coating is completely dry; the final result depends on this. Your unusual caviar manicure is ready.
Caviar manicure. Your unique image
Modern beautiful fashionistas and lovebirds go to such lengths to try to look original, bright, stylish and glamorous! One of the most effective tools for creating a memorable image is manicure. But various kinds of French nails, extended gel and acrylic nails with sophisticated designs and prints can already be considered yesterday.
Manicure “with caviar”
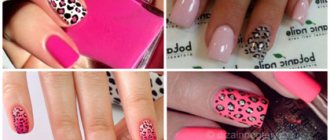
The know-how that is now being offered by leading stylists in the West and which is spreading like a tornado in our country can be described in two words: caviar manicure. In this case, in addition to the usual base coats and varnishes, special small beads are applied to the nails. They actually look like eggs. These beads are available in different colors. And the caviar manicure itself can be done either in a single color or in all rainbow shades at the same time. The combination of beads and lipstick of the same tones looks especially interesting and impressive.
At the same time, the nails themselves seem to be sprinkled with caviar balls. Impressive! But the advantages of the new way of decorating nails do not end there. This design also protects ladies’ nails well from damage and unexpected breakages. Covered with beads, they seem to be encased in armor. This is such a wonderful caviar manicure!
Application technique
On the positive side, everything is clear. It's time to take action and try to apply the know-how on yourself. You can go to a salon, or you can try to cope on your own. So, how to give yourself a caviar manicure?
First you need to buy beads. Small round beads are suitable. The English company that developed the new trend has released pearl-shining balls in black, silver and other shades. You can purchase a specific color or a mix. You will also need a base base, any nail polish that suits you, and a clear varnish or sealer. By the way, this manicure is also done with gel polish. Let's get started? The beginning is traditional: clean your nails of old manicure and make hand baths.
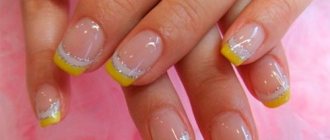
Treat cuticles, correct the shape of nails, polish the surface. Then apply the base in two layers, and after it any opaque varnish. It is needed to completely hide all the flaws of the nail plates. In addition, the varnish serves as a kind of illumination for the beads. Therefore, advice: for light “eggs”, choose either light shades of varnish (can be the same color as beads), which will emphasize the delicacy of the manicure, or contrasting ones – this will enhance the visual effect.
Spread a soft cloth on the table in advance. Once your nails are painted, pour beads from the bottle onto them, trying to cover the surface completely. After this, with a clean, dry finger of your free hand, tap the beads on each finger so that they stick well. Wait about 20 minutes. Now take a clear polish or sealer and carefully paint over your freshly baked nails. Better twice. Wait for the varnish to dry. Done, you can proceed to the second hand. Can't decide what color polish to use for your manicure? The photo gallery in the article will help you make a choice. Good luck, be beautiful!
Manicure using gel polish
If you want to wear a similar design on your nails longer—about 2 weeks—use gel polish to create it. You will need:
- UV lamp for home use
- Base coat
- Top coating
- Gel polish in the color of your beads
Apply base to prepared nails and dry for 2 minutes in a lamp. Apply colored gel polish, dry the first layer, and sprinkle beads on the second. Apply topcoat in 2 layers, letting them dry.
Another advantage of this manicure with gel polish is that until you put your hand in the lamp, the polish will not begin to dry out. Therefore, you can slowly adjust the surface of the beads, make it more uniform, fill it, or implement the design you like.
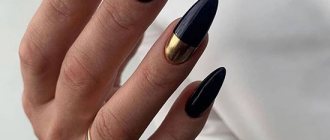
It should be clarified that if your caviar manicure involves the presence of contrast, then you can quite deliberately use gel polish of a radically different color as a base. More on this below.
How to do a caviar manicure at home
It's no secret that unusual nail designs have been trending lately. You can choose one suitable for any shape and length. There are also universal techniques that will suit different images. This design includes the popular and rather unusual caviar manicure.
Set for nail design
This style was invented by Charlotte Knight, after whom the British campaign released a set of the same name, Caviar Manicure, which is still on sale, but costs a lot of money. It is easier to select the necessary items separately. You can buy them at any professional store, and a set of tools for complete design will cost much less.
Broths for nail decoration.
To decorate your nails you will need:
- hand bath;
- tweezers, orange stick, scissors, buff, nail file;
- cuticle oil;
- degreaser (nail polish remover).
To cover with eggs:
- balls, beads, broths, beads - to choose from;
- colorless varnish for base and fixing/top/base;
- container for beads;
- colored varnish;
- wide brush;
- napkin;
- cotton pad;
- tweezers/toothpick;
- UV lamp for gel polish;
- table cover.
Although the main attributes are clear and colored varnishes and the chosen material for decorating the eggs. The remaining tools are more for convenience, so they are purchased at will.
The smaller the beads, the more interesting the manicure looks.
Preparation for coating
The caviar look requires careful preparation of nails for further coating. This is a classic edged or unedged manicure, which is performed as follows:
- Fill the bath with moderately hot water with a special solution or soap in the absence of a professional one.
- Immerse your brushes in the bath for 15-20 minutes.
- Push back the cuticle with an orange stick and trim with tweezers if necessary.
- Give the nail the desired shape using a buff/file.
- Lubricate the cuticles with oil or nail cream.
- Degrease the nail plate with any available product.
Broths for gel polish
To get a manicure with gel polish and apply a design in the form of bouillons, you don’t have to contact a specialist. This original manicure is easy to do at home.
Step-by-step instruction:
- Perform a manicure: give the desired shape, remove the cuticle.
- Use a buff to remove shine from the nail and degrease it.
- Apply base to nails and dry in an ultraviolet lamp.
- Apply colored varnish as many times as necessary to achieve the desired brightness of the shade.
- Cover the nail with topcoat and apply the broth to the nail using an orange stick. Place in the lamp for 2 minutes. How to use a wooden stick: press it against the broth, it will “stick” to the stick, transfer it to the nail and press a little so that the beads remain on the nail plate.
- Apply the top varnish with a thin brush, trying to go between the broths, but not covering them on top. Dry in a lamp.
- Remove the sticky layer with a special liquid.
On gel polish, the broth lasts much longer than on regular polish and looks more stylish.
IMPORTANT TO KNOW: Unusual nail design: the most stylish and rated ideas
You should also remember that metal material is more difficult to apply than plastic, but the result will be gorgeous.
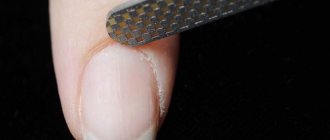
How to choose the right broths?
Bouillons are small glass beads, similar in size to sand. The diameter of the beads varies from 1 to 4 mm. They are very inexpensive and have a huge variety of colors. What to look for when choosing broths:
- the shape of the beads must be the same and neat, the size cannot differ;
- if you need steel beads, you can check their material with a magnet (check through the packaging);
- if possible, you need to put a few beads on a cotton pad and drip degreaser on them. If after a few seconds the broths leave a mark on the cotton wool, it means their quality is low.
IMPORTANT TO KNOW: What tools are needed for manicure: all the necessary tools and selection rules