The essence of design
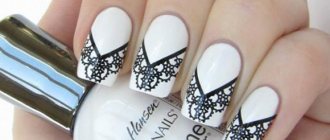
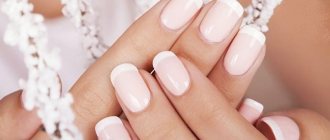
Looking at the photo of the lunar manicure, you can understand that the design feature is the highlighting of the lower zone of the nail surface in a tone that contrasts with the main color. Sometimes it can be done with a clear varnish or gel.
The shape of the design resembles a crescent moon, which became the basis for the name. In Europe, this design is usually called Hollywood French.
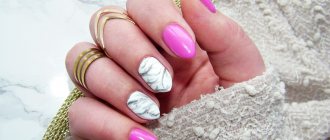
Lunar manicure is popular among people who design their nails with gel polishes. Thanks to this, your hands retain a well-groomed appearance longer.
Features of lunar manicure
When choosing this design, you should start from the length and shape of the nails. So, when doing a moon manicure on short nails, you should give preference to a thin strip at the base. If you make it wider, it will emphasize the short length of the nails.
The crescent moon is closely associated with smooth lines. Therefore, it does not fit well with a square shape. A more harmonious combination would be a moon manicure with oval, almond-shaped, square nails with rounded edges.
Moon stripes also have several shapes:
- smooth, curved;
- triangular;
- curved double.
The first option is suitable for a classic design. It is preferable for business women. The rest are more associated with youth style.
Polish colors for moon manicure
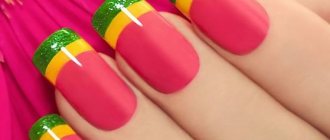
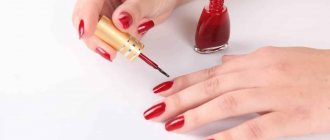
The main color that gives emphasis to the nails should be some dark shade, while the lunula of the nail should acquire a light shade. Some of the most beautiful and fashionable combinations are black and yellow, blue and silver, purple and white.
The mint shade looks great with white. Gothic fans will be interested in red and black.
Color combinations
It is believed that for a classic Hollywood French, the lunula area should be lighter than the rest of the nail. Therefore, transparent, beige, white, and soft pink tones are often used at the base. Often the moon area is done in black, gold or silver.
The rest of the nail is done in a brighter color that harmonizes with the base. The overall design style also matches the season.
So, a New Year's lunar manicure will look optimal in red or blue tones. Rhinestones or snowflakes can be used as decoration.
Technology of using conventional varnishes
This method is considered the most accessible at home. To make a moon manicure with varnishes, work is done in the following sequence:
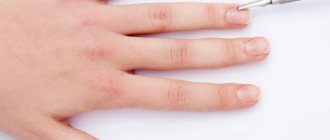
- First, the nails are prepared. The old layer of varnish is removed, the cuticle is steamed and trimmed. Then the length and shape are adjusted. The final step is polishing the surface.
- Then you should apply the base.
- First of all, the lunula area is decorated. Before this, if necessary, stencils are attached. After drying, the polish is applied to the rest of the nail. For a more saturated tone, it is recommended to use 2 layers.
After working with color, if desired, you can move on to design. Finally, a layer of clear varnish is applied. This will allow the design to last longer.
We recommend reading:
Acrylic manicure: photo ideas and video master class on how to make a beautiful nail design- Minimalist manicure: 145 photos of top ideas for fashionable and beautiful manicure designs
Shellac manicure: design options, design features and application technology (140 photos)
Moon manicure with a transparent stripe
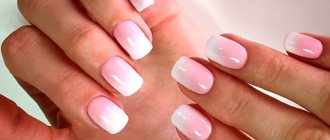
Talented nail artist and beauty blogger Nastya Art Simple Nail today will show us how to make a moon manicure with gel polish at home. Yes, not a simple one, but a super-fashionable option, already so beloved by many girls, with a transparent stripe or, as it is also called, with negative space.
To create a lunar manicure you will need: a base, white and pink gel polish (colors can be chosen to suit your taste), a cleanser or nail polish remover without acetone to remove the sticky layer and a top coat. In the video tutorial, Nastya uses products from Kodi Professional.
Instructions:
- First, prepare your nails for coating. Do an unedged or edged soak-on manicure. Try to carefully remove all the subcutaneous skin near the cuticle to prevent peeling of the varnish in the future. Then wipe your nails with a cotton pad soaked in nail polish remover without acetone. This will help remove remaining polish, moisture and degrease the nail plate. Next, use a natural nail polisher (220/280 grit) to sand the plates to remove shine and apply a dehydrator to remove any residual moisture from the nails.
- Apply the base and remove the sticky layer.
- Add light pink gel polish to the foil. Using a thin brush, draw a semicircle and paint the sides of the nail plate. Then use a gel polish brush to paint over the remaining space.
- Using white varnish and a thin brush, draw a hole, leaving a transparent strip between it and the pink varnish.
- When you have painted all the nails, send them to dry in the lamp.
- After this, apply a second layer of pink and white gel polish. Dry in a lamp.
- Finally, apply the Kodi topcoat. Dry in a lamp and remove the sticky layer. A special product will help you with this - a cleanser, preferably from the same manufacturer as all the products. If you don’t have it on hand, then you can use nail polish remover without acetone or a homemade product consisting of alcohol and water in the ratio: 30% alcohol and 70% water.
A gentle moon manicure with gel polish with a transparent stripe is ready! Watch also the video tutorial.
Lunar manicure with gel polish
This kind of work is often done in salons, as it requires more skill. However, the money spent pays for itself due to the long-term preservation of the result. In addition, using the gel, you can lengthen your nails and strengthen the plates, reducing their fragility.
Dry manicure is used to prepare nails. The old layer is cut off. Afterwards the cuticle is cut, the length of the nails is adjusted and polished. To perform most of the work, craftsmen can use a special device.
Then a degreaser, a transparent gel, is applied to the nail plate. When working with gel polishes, first the color is applied to the entire surface, and then the moon area is drawn.
Most often, craftsmen perform this work with a brush, without using stencils. Each layer is thoroughly dried under a lamp.
If the lunula area should remain transparent, then the colored gel is applied only to the top of the nail. After drying the main layers, you can begin to add additional design elements.
At the final stage, a transparent gel is applied to the nails and dried. Then all that remains is to remove the sticky layer. The skin around the nail plate is treated with nourishing oils.
Let's summarize: in order for a lunar manicure to look beautiful on your nails, you should select a design according to the length, shape of your nails, age and lifestyle.
The outline of the moon at the base of the nail can be drawn with a brush or created using stencils. You can create the design using different varnishes at home. Or contact a professional.
How to do a moon manicure yourself
The most basic technique for performing a Moon manicure is to apply the color of the hole, and then carefully apply a second color, leaving a convex or concave line. This requires precise movements and some experience. A thin brush will help the job - they draw an arc with it and then carefully draw the surrounding part, the rest can be applied with a regular brush.
https://www.youtube.com/watch?v=RP76pz1T9jo
Another option: we use only one color, the hole will be the natural color of the nail. Apply polish to the entire surface of the nail, let it dry a little and make holes with a flat brush dipped in nail polish remover.
Photo of moon manicure
Please repost
0