- September 24, 2018
- Nail care
- Tatiana Pekha
A new trend that has captured the attention of all manicurists is marble nail design. Naturalness is always in trend, so natural themes continue to adorn the nails of fashionistas. Nail industry professionals are developing proprietary techniques for obtaining the effect of natural stone on nails and actively sharing their ideas. Thanks to this, it became possible to perform such a manicure even at home. How to create a marble effect on nails and what materials are needed for this? You will get the answer to this question after reading this article.
Definition
Marble manicure is unusual stains on the nail plate that are formed by combining several colors of varnish. How to do a marble manicure at home without special preparation? First you need to study the techniques for creating this nail art and only then decide which one to use.
The marble effect is created using:
- water;
- cling film;
- special varnish with marble effect;
- gel polish;
- acrylic paints.
Next we will describe all these techniques in more detail. Each of them requires different aids, and the final manicure results may vary slightly.
How to make marble on nails with gel polish, learning application methods
To create a marble effect on your nails, you can use several application options. Moreover, it is worth considering that such methods are used not only at home, but also by nail service professionals in beauty salons. Therefore, you can not be afraid and start designing in the “Marble” style, because each of the methods has already been tested more than one hundred times.
Application methods:
- water technique (as the name implies, it is necessary to use water when performing it);
- using a brush;
- using a plastic bag or cling film;
- We use special gel polishes.
Now you can move on to studying each technique separately.
Shiny marble
How to make a marble manicure with a special shine? Just add rhinestones, bouillons, ribbon or kamifibuki. Marble nails themselves look like a masterpiece of nail art, so it’s easy to “overload” it, remember this when adding glitter to the design. For a successful color combination, you need to mix varnishes that are similar in shade. Contrasting colors when mixed can give off unnecessary shades, so it is better to dilute them with a neutral color: beige, white or gray.
Recommendations for choosing colors for marble manicure
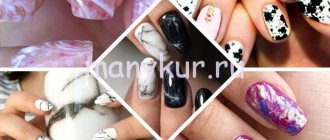
The very name of this design speaks of the image of a natural stone on the nails, but it does not have to be marble (blue, white, black or red stone with veins). You can also imitate other semi-precious or precious gems: lapis lazuli, opal, ruby, turquoise, jade, malachite, etc. When mixing colors, you get eye-catching pebble nails, each finger is decorated individually and uniquely, because it is impossible to draw identical stones.
To obtain such stains and patterns, use the trend colors of 2021: blue and light blue, gold and green, beige and white, white and lilac, as well as combinations of three colors (black, white and blue). How to make a “malachite” marble manicure? It is enough to mix different shades of emerald color on the nail.
An extravagant solution for manicure would be a mixture of rich and bright shades. In order to get a marble manicure, like in a salon, you can try using varnishes with different textures: metallic, pearl, matte, holographic, rainbow.
What is marble design?
You may be interested in: How to do a lunar manicure: tips and design secrets, step-by-step instructional instructions, photos
As you can easily guess, the design got its name due to its resemblance to the natural pattern of marble. The execution technique is also suitable for simulating other noble minerals: agate, turquoise, granite, malachite.
The pattern is based on a beautiful combination of stripes, spots and veins of various shades.
Pebble nails using water
Using water you can get an interesting stone structure, which is very simple and easy to make. Let's look at how to make a marble manicure in the turquoise style using this technique. We will need: a container with water, a toothpick, three colors of varnish (black, gold and turquoise shades) and finish. The polish dries quickly, so open the bottles in advance and act quickly. So let's get started:
- cover the nails with the main color;
- drop a drop of turquoise varnish into the center of the container with water;
- wait until the drop spreads evenly over the surface of the water and a circle forms;
- add a drop of black varnish to the center of the turquoise;
- again we wait for the colors to spread completely;
- drop gold varnish into the center of the resulting circles and wait;
- carefully mix all three colors with a toothpick;
- the color mixing technique can be changed each time and you can get different patterns;
- one by one, lower each nail into a container of water;
- hold the nail parallel to the water surface and try to ensure that the varnish completely envelops the nail plate;
- take your fingers out of the water and remove the varnish from the skin, but you need to act quickly before it dries;
- repeat the procedure with the remaining nails;
- Finally, the nails need to be coated with a finishing agent.
How to make a marble manicure with varnish so that it does not dry out prematurely? In this technique, you need to use only warm water, otherwise the varnish film on the surface of the water will harden too quickly.
Technique for performing marble manicure at home
Regardless of the chosen method of creating a marble pattern, first all nails are treated with a degreaser and covered with a base top.
Water
To perform a marble pattern using aquatics, in addition to the traditional shellac manicure kit, you need:
- warm water (to should not exceed 400C);
- cotton swabs and toothpicks;
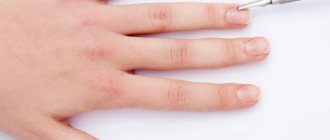
- narrow tape and nail scissors.
Execution process:
- Apply the main color of gel polish and dry under a lamp.
- Protect the skin of your hands from staining with pieces of tape glued around the nail.
- In water, create a marble print from the selected shades: drop all the colors of gel polishes one by one and create streaks with a toothpick.
- Dip your nails one by one into the resulting mixture for 20-30 seconds, remove excess varnish with a cotton swab and polish thoroughly.
- Apply finish and dry.
PE film
For this method of creating a marble pattern, in addition to gel polishes, you will also need a small piece of a plastic bag.
The process of creating a drawing:
- Cover your nails with your chosen base color.
- Cover your nails with the second shade of polish and, without waiting for the new layer to dry, create a stone pattern by dabbing the gel polish with a crumpled piece of the bag.
- Dry and coat with finish.
Oilcloth
Using a piece of thick transparent oilcloth you can create unique stains on your nails.
Stages of creating a marble design:
- The background coating of the nails is painted and dried well.
- Drops of gel polishes of different shades are randomly applied to the resulting colored base.
- A piece of oilcloth is pressed tightly to the nail, and drops of varnish spread under pressure, creating a bizarre color pattern. Remove excess nail polish from the skin of your hands with a cotton swab dipped in nail polish remover.
- The resulting pattern is dried well and covered with a finishing topcoat.
When using this method, it is recommended to repeat steps 2-3 for each nail separately.
Sponge
This method of creating stone nails is similar to creating a marble design using oilcloth, only instead of it a piece of sponge is used for washing dishes, and drops of varnish are applied not to the nail, but to any other surface (most often, experienced craftsmen use foil).
Drops of gel polish are dipped onto the foil with a sponge and then, with light touches, transferred to the nail plate. To avoid large spots, it is important not to press too hard. The resulting drawing is dried.
Brush
This method of creating marble nail art requires drawing skills. To create it, in addition to gel polishes of selected shades, you will need acrylic paints and thin brushes.
Creation stages:
- After the base background is applied to the nail, curved lines are drawn with a brush and small strokes, imitating the veins of natural stone.
- The resulting pattern dries well and, if desired, is duplicated with a darker shade of paint or shiny gel polish.
- The finished design is coated with a finish.
Toothpick
The technique of drawing on nails with a toothpick is reminiscent of the process of painting with a brush:
- First, a thin background layer is applied.
- The repeated layer does not dry; drops of additional varnishes are distributed on it.
- Use a toothpick to draw out the details of the pattern to resemble natural stone.
- The design is dried and covered with topcoat.
Using cling film to create marble on your nails
Regular cling film will help you create marble nails. As with the previous technique, you will need few tools and materials, just enough cling film, contrasting varnish colors and a finishing agent. Let's consider the steps in order:
- first, cut a piece of film and remember it well in your hands;
- Apply the base color of nail polish to your nails and let it dry completely;
- Paint the entire nail plate with a contrasting color and, without waiting for it to dry, quickly blot the top layer of varnish with a soft piece of film.
The film will remove a small amount of nail polish, leaving small streaks of color. The procedure should be quick, until the varnish seizes in lumps and dries. For beautiful streaks and veins, you need to choose thick varnishes so that the color does not show through. If the result meets your expectations, then dry it and, as usual, secure the design with a finishing coat.
Palette for marble manicure
View this post on Instagram
Publication from Milky Beauty Studio Network? (@milky_club) January 5, 2020 at 1:10 PST
Imagine what processed marble looks like. This is the palette for marble manicure that is considered classic. We will need white and black colors if we want to create something similar to natural stone. But in spring you want more bright colors, variety and unusual designs. If such a desire arises, use different shades in your manicure. For example, the nail plate itself may be white, but the veins on it may be purple. Or you can change places: make the pattern on the nails light, and the background bright and saturated.
Special varnish for marble effect
Regular polishes and gel polishes have a similar effect. No special skills are required in this case. How to do a marble manicure without unnecessary materials? It is enough to buy a special polish of the desired shade (white interspersed with black shimmer or turquoise with the addition of colored chips) and paint your nails with it. To make the marble effect more intense, you need to cover your nails in two layers. To secure the design well, do not forget to use a topcoat. If you use a finishing agent with a metallic sheen, you will get an original design that combines shine and stone structure. Use rubs with different shades to make the shimmer of the stones look more unusual.
What shades of varnish to choose for marble manicure
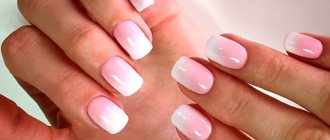
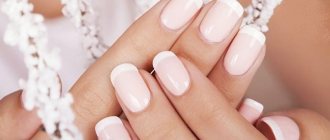
- Pink marble manicure is popular among young fashionistas. Use white and pink polish or two or three shades of pink - from pastel to fuchsia.
- A marbled manicure in blue and gray tones suits girls with cool skin tones.
- Marble manicure in nude tones is for those with warm beige and peach skin.
- Red marble manicure is for brave ladies. The gothic look will be complemented by black and red stains on the nails, and use red and white or red and blue to support the marine style.
- Shades of green and turquoise are suitable for simulating malachite and turquoise. For this manicure, wear rings with matching gemstones.
Marble design using gel polish
Transforming nails with a gel-based composition is a little more complicated. First you need to prepare everything you need: an ultraviolet or LED lamp (preferably with high power so that the gel polish dries faster), a thin brush, files and buffs, a high-quality set of gel polishes (2-3 colors, base and finish). Let's get started with marble manicure:
- Use a soft buff to file down the glossy layer of the nail, achieving a matte and smooth surface.
- We degrease and coat the nails with a base product that protects the nail plate from the influence of chemicals.
- We seal the ends of the nails with the base.
- Dry your hands one by one in a UV lamp (or Led) for about 1-2 minutes.
- Apply the base color of the varnish and also seal the ends.
- Dry your nails for 1-2 minutes.
- All that remains is to paint your nails with marble. To do this, use a brush and a contrasting color of gel polish.
- The stains can be made in several shades, for example, on a white background of gel polish, draw gray veins of marble, then use a thin brush to paint in black. This way the design will look like it has a 3-D effect.
You can paint your nails with acrylic paints; we’ll look at the technique below.
How to make a marble manicure with gel polish
And let men smile disdainfully when they hear about the agony of choosing the right shade of varnish, but girls well understand the depth of the problem. When you sit down in the master’s chair, all the ideas and smart thoughts disappear somewhere, and the “saved files” on your phone are little inspiring and inspiring. Covering your nails with simple varnish or sprinkling them with pearlescent pollen is already boring, and choosing between lunar or French decoration is impossible to get boring. Well, it's time to pay attention to the new nail art trend - marble nails. They combine effectively with all styles of clothing and are relevant not only for romantic girls, but also for pragmatic women, equally winning the hearts of both the former and the latter.
We decided to find out all the pros and cons of this design before you put your delicate hands in the hands of an enterprising craftsman.
| Advantages | Flaws |
| Variability of color combinations, which together always give excellent results | The design is soiled, since usually white, beige or any other light shellac is used as a base for marble lines |
| The external effectiveness of the design and its relevance in all seasons | If the technique is not strictly followed, the result may not be what you expect. |
| Availability of materials for creating trendy decor | It is important to choose only high-quality varnishes with a medium or thick consistency in order to avoid spreading |
| High durability of the coating and relative accuracy during regrowth | A huge amount of varnish is spent on all layers, which is why many salons refuse such a low-budget method of decoration. |
| This manicure is easy to do at home using only available products. |
Of course, even despite external conservatism, girls love to try something new and unusual. And a “stone”, somewhat stoic manicure is a great way to diversify the usual French or lunar design. Moreover, turning an idea into reality does not take time and does not require significant effort, even for a beginner in nail art. You will learn how to create a stone effect using water and a couple of varnishes by delving into our master class.
- first, perform the usual hygiene rituals: file your nails, adjusting their shape and length, remove or push back the cuticles, and then sand the plates with a soft polishing buff;
- Now is the time to apply an acid-free primer or immediately a strengthening transparent base, drying it in a UF or LED lamp;
- now paint each nail with the main color, drying it under the lamp;
- decide on several contrasting but well-combined pigment colors;
- Fill the container 90% with water and drop your chosen varnishes into it one by one, forming circles on the water;
- mix the paints with a needle and toothpick with quick, intermittent movements;
- and now let’s begin the most exciting process: it’s time to dip the marigolds in the mixture for about 20 seconds, waiting for a fancy pattern imitating the veins of a stone to “stick” to them;
- Remove excess varnish with a cotton swab, and carefully polymerize the result of your efforts under a lamp.
The second, but not least, method involves the use of cling film. At the same time, you can even reproduce the treasured marble pattern with a package using ordinary varnish:
- We carry out the usual preparatory procedures: correct the shape and length, polish the nails with a buff and remove the overgrown skin;
- Next, we apply an acid-free primer, let it absorb a little and then cover the nails with a base, polymerizing it in ultraviolet rays;
- the next stage is covering the nails with the substrate of your choice, drying the layers;
- make a few drops of colored varnishes that harmoniously combine with each other, and then randomly smear the pigment with a lump of cling film, creating a trendy marble texture;
- Cover the finished manicure with a layer of glossy or matte topcoat and after drying, remove the sticky layer.
Well, if the water method and the technique using film have not won you over, then all your hope lies in your artistic abilities and high-quality tools. More advanced users understand that creating the perfect texture can only be done with a brush, carefully working out every turn, every curve. Fortunately, ProstoNail’s faithful assistant will tell you how to do marble manicure step by step:
- After basic preparation of your nails, apply an acid-free primer to them and let it absorb a little;
- the next layer will be the base, which will improve the adhesion of the gel and at the same time prevent dryness of the nail plates;
- the third step is painting the entire surface with gel, colored or plain - the choice is yours;
- Take your favorite thin synthetic nail art brush, preferably with long, elastic bristles. Drop some acrylic paints onto the palette, dip the tool into it and draw a few uneven, broken lines, imitating a stone pattern;
- After drying the design under ultraviolet light, secure the results of your efforts with a layer of transparent topcoat, removing its sticky layer with a specialized remover upon completion of polymerization.
If any difficulties arise, do not get upset and do not quit what you started. Our tips and lifehacks will help you eliminate minor problems and correct imperfections for the best effect in the final:
- If you prefer the “wet” technique, then remember that the water for design should be at room temperature and moderately warm. Cold liquid will cause the film to harden too quickly;
- for the same reason, you should choose a cheaper, but at the same time slow-drying varnish. As a rule, expensive gels dry in a record amount of time, so the film does not have time to “set”;
- Many ladies don’t like marble manicure because it stains the skin around the nails and the cuticle itself. A simple trick with tape will help you avoid this - just wrap the free space around your nails with adhesive tape, and remove it when you complete your beauty manipulations;
- Do you want the stone veins to acquire a luxurious, delicate shimmer? This is quite easy to implement using the foil technique. It is described in more detail in our article Foil for nails;
- remember that the last color of varnish that you drip onto the water surface will become the leading shade of the entire pattern.
We are sure that by following our advice, you will be able to create a real masterpiece of nail art that will adequately decorate your composition on Instagram and will gather a lot of likes from your favorite followers.
Marble painting with acrylic paints
The technique for performing this design is not particularly different from the “water” method, it’s just that acrylic paints are a little thicker than regular varnish, so it’s easier to work with them. Paints can be mixed with each other; use a palette made from a small piece of foil for this, and a toothpick will do instead of a brush. Next, use a container of water and drop the desired color of paint into the center of the liquid. Dip your nails into the smeared circles of colored paint and then wipe off the excess. Cover the result with two layers of topcoat. The chic design is ready, don’t be afraid to experiment and be inspired by the surrounding nature.
Current palettes
Today you can turn any idea into reality. One of your wishes, and not only imitation marble, but also turquoise, lapis lazuli, malachite, jade or opal may appear on the plates. If you are the happy owner of a large collection of gel polishes, allow yourself bright combinations that differ from natural minerals, as if beautiful stones with shiny veins were created by the hands of an artist.
Don't be afraid to experiment! The following colors and combinations are considered the most trendy in 2021: blue and blue, white and purple, emerald and gold, etc. To leave a malachite coating on your handles, use different variations of the green palette. For an evening makeover before going to a nightclub, you can experiment with fuchsia, burgundy, marsala and other rich shades.
The same should be said for texture. The texture of the coating is very different - there is holography, and gloss, and matte, and mother-of-pearl, and metallic, and iridescent shellacs. Compositions with 3D coatings look especially stylish and extravagant.
Advice!
To ensure that your manicure lasts as long as possible, do not forget to degrease your work surfaces at the initial stage. Don't have a special tool at hand? Use nail polish remover.