Home page » Beauty » Nails
Author of the article
Svetlana Pavlikhina
Reading time: 6 minutes
AA
There are many ideas for creating a beautiful and original manicure. But bringing them to life turns out to be problematic. A special nail tape can make the task easier. The main thing is to figure out how to use this simple accessory and choose the most suitable option.
Varieties
Tapes vary in thickness and color. This allows you to create an interesting manicure and make the image original.
The products have the following characteristics:
- presence of textured rough coating;
- transparent;
- rainbow tints;
- flexible options.
Decorative adhesive tape is supplied in reels.
Liquid tapes are commercially available. They are not used to create a nail design, but as an auxiliary material that protects the periungual tissues from varnish. This product is sold in bottles equipped with a brush.
Recommendations for selection
Recommendations to follow when choosing a product:
- buy products with a maximum thickness of 1 mm;
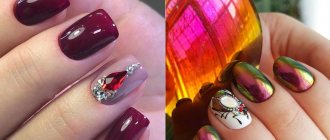
- if you want to combine ribbons with rhinestones, buy tiny stones, otherwise they will look pretentious;
- take into account the shape and length: for almond-shaped nails, medium or thin options are selected; if the nail plate is square, semicircular, then a shiny but very thin ribbon is used;
- thick options are designed for making large patterns, while thin ones allow you to apply small strokes.
Terms of use
Gluing tape at home is quite simple. The main thing is to properly prepare the nail plates, after which you can start doing the manicure.
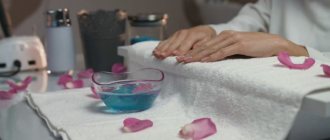
Preparatory work
At the preparatory stage, the following manipulations are performed:
- The surface is cleaned of old coating.
- The nails are given the desired length and shape.
- Using an orange stick, cuticles are pushed back.
- Nourishing cream is applied to the hands.
- The surface of the plates is degreased. For this purpose, nail polish remover, alcohol or a special degreaser are used.
Gluing rules
When your nails are prepared, you can apply the tape:
- A base layer of varnish is applied to the surface.
- The coating is dried.
- A ribbon is glued on top according to the selected pattern, and the desired design is created.
- A layer of varnish of a different shade is applied on top.
- The manicure tape is removed.
- The coating is drying.
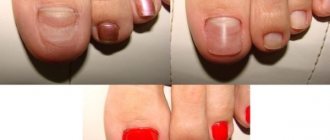
What are the benefits of liquid tape?
With the advent of a new manicure product, many nail art lovers breathed a sigh of relief and immediately rushed to purchase the new product. What is this amazing invention? Liquid tape for manicure is a wonderful product that comes in the same bottles with brushes as nail polishes.
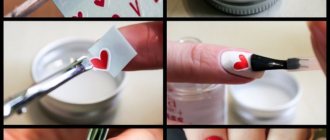
They need to cover the skin around the nail and the cuticle. The product dries quickly, so you can begin manicure almost immediately after applying it. To remove it, you need to slightly pry up the film and remove it, similar to cleansing face masks. The liquid manicure tape is completely removed, and the skin underneath remains beautiful and clean.
Previously, craftsmen had to diligently put their hands in order after applying varnish, and doing this on their own was even more difficult. Now it is enough to simply remove the film after painting is completed. And you don't have to worry about ruining your just-done manicure by wiping the skin around each nail with nail polish remover. Now there is no need to achieve extreme precision when applying colored stripes so as not to go beyond the edge of the nail. Liquid tape is also convenient to use for those who do manicures using the stamping technique.
Tape gluing technology depending on surface type
The ribbon can be attached to regular varnish and shellac.
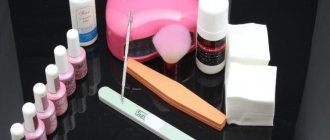
To carry out these manipulations you need a minimum of materials and tools:
- varnish coating;
- ribbon;
- scissors;
- tweezers;
- tweezers.
Gluing onto a natural nail
Working with natural nails does not cause any difficulties. The following actions are performed:
- The nail surface is prepared.
- A coating of the desired color is applied to the surface.
- The varnish is dried.
- Using tweezers and tweezers, peel off the required amount of tape. To make it easier to glue, it is recommended to measure with a small margin.
- A tape is glued to the plate in accordance with the selected design.
- The material is pressed along the edges with a manicure stick or finger.
- The excess is trimmed off.
- To consolidate the result, a top coat is applied on top.
For gel polish
The technology is in many ways similar to that used on natural nails:
- The surface is prepared for the procedure.
- The base coat is applied.
- The surface is dried under an LED or UV lamp.
- Apply shellac in the shade you like and dry it under a lamp.
- The top is applied.
- After the coating has dried, the tape is glued.
- At the final stage, the nails are covered with a finishing coat.
How to properly do a manicure with ribbons
Having familiarized yourself with all the features of a manicure and decided to perform it at home, keep in mind the fact that for the procedure, in addition to high-quality tapes, you will need:
- Good base coat.
- A varnish that serves as the basis for the formation of an exquisite color.
- Tools for manipulating the main decorative element. They may be ordinary tweezers.
- Ultraviolet glow lamp. Necessary if you plan to use gel polishes.
- Top coating. As in the Broken Glass manicure, the final finishing touch will be the application of a top coat. It will protect decorative elements from various external negative influences.
Once you have all the necessary consumables at your disposal, you can begin designing your nail plates. Next, we’ll look at two ways to use ribbons for nail art.
As decoration
To use ribbon as a decorative element, follow these steps:
- Get a classic manicure. Remove excess skin from the surface of the plates and provide a decent appearance to the cuticles. Next, give your nails the desired stylistic design by choosing the appropriate length and shape.
- Cover the nail with base coat and let it dry.
- Next, apply a single color base coat. It is advisable to do this in 2 layers.
- Cut off a small amount of the decorative element necessary to realize the pattern you have in mind.
- Apply the decorative element to the dry coating, not forgetting to step back a little from the edges of the nail plate.
- Having positioned the nail art item in accordance with the intended design, carefully apply 2 layers of topcoat.
As a stencil
This option for using tapes is also very popular. Its implementation involves the following important steps:
- Get a classic manicure.
- Apply base.
- Apply two coats of the base color.
- Stick several strips in the direction you need.
- Apply another coat of varnish of a different color.
- Let the varnish dry and carefully remove the tapes.
- Apply final clear coat.
The nuances of using tapes
In addition to the main stages of applying a tape manicure, there are a number of nuances that every representative of the fair sex should take into account before using the technique at home. It is advisable to perform tape nail art on a nail plate that has been previously treated with a buffer. The smoother the nail is, the smoother the decorative element will lie.
At the time of application, it is necessary to cut the tape with a small gap of 0.5-1 mm. This gap will help you to properly seal the nail plate when applying top coat. If you use gel polishes, then after each applied layer, be sure to place the handles under the lamp. Dry your nails as responsibly as possible, because the presence of a sticky base will not allow you to manipulate the shape of the decorative product at the time of its use.
Important! Make sure to indent from the edges. The tape should be a couple of millimeters further from the cuticle and other contours of the nail plate. This will prevent the tape from snagging during everyday wear.
Why the tape peels off and how to avoid it
Tape manicures often fade quickly. Such problems are observed when nail design rules are not followed. It is quite simple to glue the tape so that it does not come off.
To do this, you need to adhere to the following recommendations:
- You should first go over the nail plates with a buff. This creates roughness for reliable grip.
- Apply the ribbon with light tension. First, you should fix it on the most convex area, then press the edges with your finger or a manicure stick.
- Cut the tape so that there is a small gap (maximum 0.5 mm). Due to this, it can be securely fixed with the help of a finishing coating and prevent premature peeling.
- It is recommended to cut the product from the coil and along the edges of the nail using tweezers. When using scissors there is a risk of raising the edge.
- Apply top coat. Thanks to this, the manicure will be as durable as possible.
- Apply the tape only to a dry surface.
Manicure with tapes on gel polish - step by step instructions
To work you will need:
- nail scissors,
- tweezers,
- scotch tape,
- base and top coat,
- primer
- color gel polish,
- UV or LED lamp.
How to glue tape to gel polish
Procedure:
- We prepare the nails for applying gel polish - remove or push back the cuticle, give the nails the desired shape, remove the shiny layer of the nail. Cover with primer.
- Apply the base and dry it in a lamp.
- We apply colored gel polish and also dry it, then apply a second layer and dry it in a lamp (for a UV lamp, 2 minutes for each layer).
- Using tweezers, separate part of the tape from the roll and cut it off with a margin.
- Using a manicure stick or finger, press the decorative tape firmly onto the nail. We pay special attention to the edges so that the tape does not come off. Cut off the excess with nail scissors.
- There can be any options for placing stripes - you don’t have to be afraid and feel free to experiment. If you want to visually make the nail plate narrower and longer, place two horizontal strips just above the middle of the nail and two vertical strips along the edges of the side ridges (you need to retreat 1.5-2 mm from the edge of the nail).
- We apply a top coat to fix the resulting design and dry it thoroughly under a lamp.
Pros and cons of self-adhesive tape
With the help of nail design you can give an original look to even the simplest manicure. Decorative tapes are in no way inferior to other types of coating. Their use creates a vibrant design.
The material has advantages and disadvantages.
Among the positive aspects, the following stand out:
- Easy to use. Even a beginner can handle a manicure. It is not necessary to have special equipment for this. The work can be easily done at home.
- Easy to glue, reliable fixation. High-quality material will last a long time both on regular varnish and on shellac.
- Rich assortment. On sale you can find ribbons of various widths and shades. They can be combined to come up with new designs.
- Safety. No negative effects on nails were detected.
- Low price. Every fashionista can afford such material.
Decorative ribbons have no disadvantages . But it is worth remembering that when applying to a regular varnish coating, you should wait for it to dry completely, otherwise, if you need to re-glue the tape, there is a risk that it will come off along with the varnish.
French manicure
Manicure with tape
The use of tape in this type of design is probably clear to anyone who has done such a manicure with tape at least once in their life. The tape here acts as a stencil. A template of the desired shape is cut out of it, that is, the smile line you want to get in the end. Thus, adhesive tape can not only replace strips for a French manicure if they are missing, but also help you perform a manicure using adhesive tape, turning your ideas into reality without being limited to stencils of the existing shape.
Manicure using tape
Insulating tape is not suitable for this design, since its sticky base sticks quite strongly, in addition, the composition is applied to it in a very large amount, and therefore, after peeling off, it will remain on the plates. It is much easier to use tape for French nail design, both for painting and for stationery. Their adhesive base is not as sticky and will separate from the nail without leaving any marks. However, if you decide to make a very complex stencil, then it is better to use masking tape, as in the video. Firstly, when cut, it does not spread in different directions, like stationery, and secondly, you can draw on it with pencils or pens, which will give you the opportunity to design the template in more detail.
What can be replaced
One replacement option is regular stationery tape, but only as a stencil. It makes it possible to draw even stripes and perform a moon or French manicure. Figures are cut out of it, for example, hearts, stars.
Foil is also used. When using it, you need to take into account that the absence of a sticky layer leads to difficulties when performing nail design.
Liquid tapes can be replaced with PVA glue. Simply spread it around the nail and wait until it dries completely. In this case, a film is formed that protects the skin from contamination that is inevitable when performing a manicure.
Upon completion of the procedure, the dried glue is removed with tweezers.
Another replacement option is Vaseline. However, when lubricating the periungual tissues, the protection is not very reliable, and getting the product on the nails leads to poor fixation of the varnish coating.
Nail design options with ribbon
Manicure with ribbons will be fashionable in 2021. So lovers of this design can rub their hands with pleasure. They will be in trend.
A manicure with design tape can be done in a variety of ways. Read below to learn how you can use this detail.
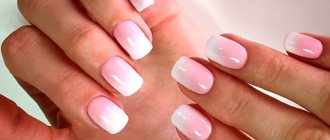
French manicure
This design is familiar to everyone. To do it, you need to create a white, even strip at the top of the nail plate. It is very difficult to draw her beautifully. But with adhesive tape everything is very easy.
French manicure can be done not only with white color, but also with others. There are many options for adhesive tapes for this.
This manicure is suitable for both everyday wear and for events. If you decorate it with rhinestones, you will get a good wedding option.
See photos of French manicure with design tape.
French
This type of design does not lose its popularity. It is relevant in any situation, which is why many people like it. Using adhesive tapes of different thicknesses, it couldn't be easier. Most often, pastel-colored varnishes and very bright ribbon are used for this design. The emphasis will be on the colored stripe. This is what your clothes should match with. This manicure with stripes and ribbons suits both short and long nails. Look at the photo of nail designs with ribbons, how varied it can be!
Striped manicure
This design looks very bright. It can be made original with the help of stripes of various colors. They are glued horizontally, vertically and even diagonally. Use ribbons of different colors and thicknesses.
Don't forget that moderation is best in everything. Don’t be too zealous with the decor, because the main thing is not the number of stripes, but how organically they are placed.
Matte manicure with tape
Bright stripes look especially impressive against a calm matte background. The colors can be combined in a variety of ways. Golden lines look especially good against a dark background.
One option is to divide the nail plate exactly in half with tape. For this design, you can use either one color of background varnish or two different ones.
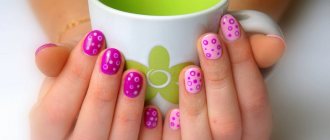
Design with geometric patterns
With adhesive strips, even a non-professional can do it. A manicure with a geometric pattern is perfect for everyday wear. It can be matched with clothes of any color. The main thing is to guess the shades.
True, there are exceptions. A manicure with geometric patterns will not go well with clothes with floral prints.
You can make a manicure with triangular patterns. True, it will be difficult to implement such an idea with your own hands. To do this, use several strips. Try to use them to get triangles of the same size.
Sometimes options with geometric shapes of different sizes also look good. They can be placed in a chaotic order. But at the same time, think carefully about what you will wear so that there is no dissonance in styles.
See what a manicure with ribbon stripes can look like in the photo.
When creating a manicure design with ribbons, be guided by both ready-made patterns and your imagination. Perhaps you will come up with something that has not been done before.
Differences between liquid tape and self-adhesive tape
There are significant differences between these materials:
- The liquid version is designed to protect the skin from pollution. It is applied around the nail plates before performing nail design and removed immediately after completion of the procedure.
- Duct tape serves a different function. It is intended for decoration. Thanks to her, she is able to create the perfect manicure without any professional skills and give her nails a sophisticated look.