04/03/2019 Vyacheslav Lisitsina Fashion and style
The actively developing areas of activity of nail service masters amaze with their rapid spread and favorable adaptation in the arena of the modern nail industry. Needless to say, nowadays there are so many different manicure techniques, so many different decoration techniques and so many different ideas for creating an original design that you never get bored. Today, every girl can choose a decor for her nails that can reflect her mood, match a special occasion, and fit into everyday life. Today's contemporaries are experimenting with the selection of nail designs for a specific suit, a specific outfit, a specific occasion and a specific place of pastime.
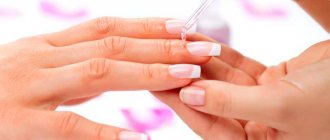
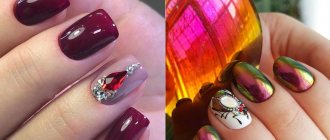
One of the relatively new decorative solutions in modern manicure services is the use of sliders: these are multi-colored, different-sized and diverse water stickers on gel polish. How to correctly apply this kind of nail decoration element to the nail base? What are the secrets of step-by-step nail design using these slides?
Peculiarities
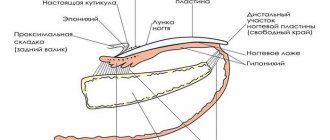
There’s probably no need to explain what an ordinary sticker is. Since childhood, we have all been familiar with the features of this kind of application, which has different directions in its intended purpose. A sticker is a piece of paper (sizes vary) coated with a sticky layer on one side and decorated with a decorative image, illustration, design or photographic print on the other. The idea is that stickers are glued to various surfaces for the purpose of decoration, aesthetic transformation, or hiding any defects on these surfaces. Stickers can be of various formats, quality, density, and purpose. They differ from each other in appearance, fragments of artistic aesthetics depicted on them, and scope of application.
Recently, developers of nail decoration elements have proposed the use of all kinds of sliders as designs for nails. Stickers for gel polish have spread the scope of their application and are loved by many representatives of the fair half of humanity so quickly that almost every modern fashionista has already become familiar with their amazing features and aesthetic superiority. According to nail technicians and amateur girls, using this kind of decoration has a lot of significant advantages and an almost complete absence of disadvantages. But first things first.
Pros of use
Before you resort to using sliders for nails, you need to understand how to properly apply stickers to gel polish. Water slides or adhesive-based applications differ somewhat from each other in the technique of application to the nail plate. But in general, the instructions for decorating them on the surface of the nails are simple. That is why this method of decorating nails is used not only in nail salons by experienced and qualified nail technicians, but also by amateur girls at home when creating an original design with their own hands.
What are the fundamental advantages of using this element of nail design?
- Comfortable application - there is nothing easier than transferring the sticker from the substrate to the surface of the nail bed. It is clear that attentiveness and accuracy in actions will be required in order to apply the material to the nail plate correctly, but this, in general, is not particularly difficult even for beginners in this matter, not to mention highly qualified specialists in their field.
- Instant adhesion and almost instant drying - creating slides on nails is not only surprisingly easy, but also amazingly fast. After the first seconds of fixation on the nail, the wet surface of the film begins to dry out. In a minute or two, the nail will be ready for the top coat.
- Practicality - you can wear this manicure for up to three weeks, taking into account, of course, the fact that the technique of applying stickers to a manicure with gel polish was performed correctly and correctly.
- Possibility of self-use - the option with stickers is incredibly popular with girls because it can be used without the help of a manicurist. Personalized design modeling with slides at home is now as accessible as doing your own makeup, which, you see, is quite convenient. At the same time, there is no need to spend money on providing professional services of a nail technician. This leads to another advantage – cost savings.
- A chic aesthetic look - achieving amazing beauty on your nails with the help of correctly selected color schemes and successful artistic illustrations on stickers will not be difficult even for beginners. Moreover, in order to get a drawing worthy of admiration, it is not at all necessary to have even the basics of artistic skill, because amazing drawings already prepared on substrates can be transferred to the nail in an instant without any little skill in using a brush with paints.
How to stick a slider design onto gel polish
Before your manicure, cut out the sticker you are going to use. If the design will cover the entire nail, outline the shapes of your nail plates on paper, cut them out, and then cut out the stickers using the resulting stencils. This can be done faster; Place the slider on the surface of the nail, outline the contours and cut along them.
If you are using water sliders, set them aside on a damp cloth. What is it for? For designs with regular varnish, we dip the film in water for 30-50 minutes to release the adhesive layer from the base. When working with gel polish, we don't need excess water. In addition, in the process of fishing it out of the water, we risk bending or denting the sticker. While it was lying on a damp napkin, the substrate became wet, but the film itself remained dry and even.
Step-by-step instructions on how to attach sliders to gel polish:
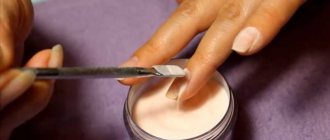
- Prepare the plate as for a regular manicure - remove the remnants of old coatings, push back the cuticle.
- Use the standard gel polish technique - remove the shine from the nail, degrease, apply a base, coat with color once or twice.
- Secure with a topcoat with a sticky layer. You can dry it, but do not remove the stickiness. The second option is not to dry it, so that it is easier to adjust the position of the slider on the nail without tearing or stretching it.
- Transfer the slider to the nail and slide it, separating it from the base.
- Carefully level the film over the plate from the middle to the edges with tweezers, a soft pusher or an orange stick. You can help with a dry cloth. If individual folds cannot be smoothed out, make a slight cut and they will smooth out without difficulty. Press the sticker firmly to avoid any air bubbles.
- Having put the film in place, see if it protrudes beyond the free edge. If there is such a thing, wait half a minute so that it sticks more securely, and carefully remove the excess with a glass file.
- Cover the attached picture with a topcoat in 2 layers (required!) - put a small dot near the cuticle, move the brush up, moving it to the area near the side rollers, move to the free edge, paint over it. A little secret: if there are bumps or uneven spots on the sticker, cover it first with the base and then with the top. This way they will become almost invisible. Let it dry for the required time.
Another way to make stickers on gel polish. The basis for the sticker will not be the top, but the undried base applied to the gel polish coating. We level the film and send the nail to dry in the lamp. After drying the base, remove excess edges with a file, apply two layers of topcoat, and dry.
If you did a manicure with gel polish, and after a few days you wanted to change the design, the third method of gluing sliders will suit you. In order not to create additional thickness of the coating, we apply an acid-free primer, which is used for extensions. It has a sticky layer and the slider design sticks easily to it. We level the film, fix it with a base and finish or 2 layers of finish, and dry it in a lamp.
Designs with stickers will last up to 3 weeks. If they don't stick well, you may have:
- the manicure chips and peels off due to severe delamination of the nails. In this case, you need to temporarily stop using gel polish and start restoring them;
- the film was applied carelessly, air bubbles got under it;
- the base layer is not completely dry before applying the sliders;
- the design is not covered with finish;
- there is no habit of using gloves for housework, which harms not only the design, but also your hands.
The basic rules of slider design when working with gel polish are to stick it on a non-dried surface or on a sticky layer, level it well and press it to the nail plate, seal the free edge and sides, secure with 2 layers of finish or finish and base.
Negative sides
Despite the fact that there are quite a lot of advantages to this element of manicure decoration, sometimes girls still note some nuances that are somewhat disappointing in their presence. What are these nuances?
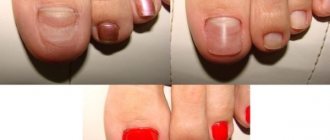
- Fragility - if we talk about ordinary manicure varnish, then the slide on it can last no more than three to four days. Subsequently, it begins to peel off or fall off in pieces. But since modern girls mostly use gel polish as the base for their manicure, this drawback disappears by itself - under the finish layer, the sticker is not able to deform.
- Difficulty in removing from the nail plate - since the sticker or slide acts as an ordinary film with a pattern, it is quite difficult to remove it using ordinary nail polish remover. You have to resort to additional manicure tools in order to scrape off the film that is firmly glued to the nail bed, which means additional time and effort.
- Difficulties with correct straightening on the surface of the nail - in order for the sticker to lie as evenly as possible on the nail (especially in cases where it is solid), you need to practice a little. The first times may still result in damage to some slides and the need to apply new blanks to the nail. But this is only a matter of short-term experience and acquisition of the appropriate skill.
In short, we can note the fact that the number of advantages of using slides is almost twice as many as the disadvantages of this procedure. It follows from this that the game is worth the candle - which is why most girls at this stage of the formation and development of the manicure service are using this method of decorating their nails in practice more and more often.
Types of stickers
The choice of nail stickers is so large that it is impossible to fit them into a small section of the article. Let's look at the main types that are popular:
- Transparent film with a pattern. Represents patterns, ornaments or designs with high pigmentation. They are translucent, and therefore are always applied to a colored base. Typically in a contrasting color.
- Continuous film (photo printing). Features a high density pattern. These stickers are designed to cover the entire nail plate. Usually they are used to accentuate a manicure and are glued to 1-2 nails. For greater clarity and brightness of the design, experienced craftsmen advise choosing a white varnish or base as a base.
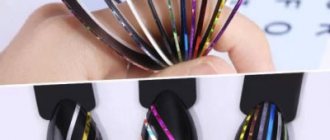
- Applications and stickers with a given shape. Sliders can be small patterns, stripes, lace. Some of them are designed for a specific manicure: French, moonlit, etc. With others, you can “play around” and place it in the corner of the nail, at the base, in the center, or try a combination of several applications.
- Volume sliders. They are distinguished by their pronounced relief. Such stickers are difficult to distinguish from artistic paintings if they are applied correctly. To ensure that the designs remain voluminous, almost the entire top is removed from the relief with a brush.
Some stickers require soaking in hot water (about 50 degrees). They begin to stretch, which makes them fit better to the nail plate and do not form folds.
Instructions
Like any other nail design technique, the use of slides is characterized by a sequence of coordinated actions. Whether it is a nail art studio or a home environment, the meaning of the procedure is that all manipulations, step by step, are performed in a clear sequence according to established instructions. But what is the procedure for performing the procedure? How to apply stickers on gel polish?
The step-by-step instructions provide for step-by-step work, which consists of the following actions:
- preparation for gluing slides;
- main part;
- completion of the procedure.
To perform each of them you need a list of appropriate tools.
Tools
To understand how to apply stickers under gel polish or how to apply them to the surface of a natural nail coated with regular varnish, you first need to familiarize yourself with the appropriate design tools. What do you need to prepare before applying stickers to your nails?
- The slides themselves.
- Saucer with warm water (for water stickers).
- Nail scissors (for cutting solid slides according to the shape of your nails).
- File (for giving nails shape and removing sticker residue from the end of the nail).
- Buff (to eliminate the shiny layer of natural nails).
- Primer (to ensure tighter adhesion of the material to the nail, optional).
- Orange stick (for convenient straightening of the sticker over the surface of the nail).
- Antiseptic (for disinfecting hands, nails and instruments).
- Degreaser (to remove the sticky layer from nails).
- Tweezers (for conveniently separating the film with a pattern from the paper base).
- UV lamp (for polymerization of the gel composition on nails).
Benefits of nail stickers
Stickers are now quite common, especially when doing manicures or pedicures at home, since a girl can independently diversify the usual color coating by fixing several designs on it.
There are three types of nail stickers, which determine the difficulty of fixing them:
- Thermal. They are applied to the nail and secured with a stream of hot air, for which a hair dryer or a special manicure iron is used.
- Aquatic. The fragment is immersed in warm water, the white base is separated from it, and then it is fixed on the plate with tweezers. Excess moisture is removed with a cotton pad.
- Adhesive. The simplest design option, since they are initially attached to self-adhesive paper. The girl only needs to separate them from her and attach them to the nail bed.
Most often, self-adhesive stickers are now used because they are convenient to use, and when secured with transparent gel polish, the result is preserved until they are artificially removed.
Stickers have quite a lot of positive aspects:
- The ability to diversify any color coating by applying several unusual fragments to it;
- Versatility. They can be used on any coating - gel polish, gel or regular polish;
- Safety. Since they are glued to a decorative coating, such designs do not pose a danger to the natural plate;
- Ease of use. The girl can attach them herself, even if she has not previously had such experience;
- Fast fixation. Fixing one particle takes up to a minute because they do not need time to harden;
- Low price. A set of 100 stickers will cost a girl up to a hundred rubles, so designing in this way is the most budget-friendly option.
A similar design can replace a classic French manicure or designs on nails, since not every master can do them, which is why the likelihood of a positive outcome is reduced.
Preparatory stage
Any work with nails involves the implementation of a list of manipulations with the hands, which are aimed at cleansing them of dirt and keratinized areas of the skin that can interfere with the quality of the work, and are also aimed at eliminating all kinds of obstacles in the form of remnants of the old design, gel detachments, and so on. How to apply stickers on gel polish? By performing step by step step by step and being extremely attentive and careful, you can achieve a decent result without making any supernatural efforts in the process of performing manicure work.
So, what actions mark the preparatory stage?
- Step 1: eliminating the remnants of the previous manicure, removing the varnish using a liquid that does not contain acetone with a strong odor.
- Step 2: taking a hand bath to soften cuticle growths and gently cleanse the nails of excess skin.
- Step 3: disinfect hands and nails with an antiseptic.
- Step 4: preliminary disinfection of working tools.
- Step 5: carrying out the cuticle removal procedure to prepare the nail for applying gel polish, and then slides.
- Step 6: shaping the nails and removing the top shiny layer using a buff; if the nails are not natural, but have already been strengthened with gel, then it is necessary to adjust their thickness with a file of a more severe abrasiveness.
- Step 7: after applying a primer that ensures good adhesion of the gel polish to the surface of the natural nail (optional), you need to apply a top coat to the nails, taking into account that the background color of the sticker should not “compromise” with it.
Having finished with the preparation process, you can quickly move on to the actual design of the marigolds using slides.
Main stage
The key point in designing with stickers is the high-quality transfer of the slide from the substrate to the plate. How to apply stickers on gel polish? How to glue the blanks so that they do not bulge, crumple, or stick their free edges together?
A leisurely, systematic implementation of the following sequential steps will be sufficient.
- Step 1: preparing stickers for work. If they are water based, you need to dip them in a saucer of water. If the slides are made on an adhesive basis, you need to cut out pieces of the photo design that best fit the shape of your nails using nail scissors.
- Step 2: successively transfer the stickers from the blank to the nail. The important point here is to separate the adhesive part from the base as delicately as possible, so that the sticker does not bend, its ends stick together, or become crowded. In this case, it would be more correct to use thin tweezers to maintain the adhesive part of the slide.
- Step 3: Selecting the correct location on the plate. If the sticker is partial, then the correct placement of the artistic element in an aesthetically correct part of the nail plays an important role, especially if the nails are long. Often girls choose the corner root zone or the corner area along the cut line. If the sticker is solid, it is necessary to apply it continuously over the entire surface of the plate.
- Step 4: smoothing out the smallest lumps of film. The thinnest texture of the sticker tends to shrink, curl and bend when pressure is applied to it. Therefore, here you need to be extremely careful and not overdo it with pressure on its surface. If, nevertheless, the sticker has moved off the nail and is too wrinkled, it is better not to regret it and use a new sample. The skill of clearly drawing slides also comes with some experience.
- Step 5: Dry the wet surface of the sticker. This mostly applies to water-based slides. How to apply water-based stickers to gel polish? You need to achieve perfect straightening of the sticker on the surface of the nail, and then dry it with a dry cotton pad or swab.
Rules for working with stickers
Many representatives of the fairer sex prefer to do manicures at home. With the help of sliders you can create a real masterpiece. Moreover, it is almost impossible to distinguish an exquisite brush-painted image from a sticker.
In order for the sliders to lay flat, last a long time and become a real decoration, you need to know how to apply water stickers on your nails. There are several rules:
- First you need to remove the remaining varnish coating and treat the nail plate.
- Carefully trim or push back the cuticles, buff the surface of the nail and shape it into the desired shape.
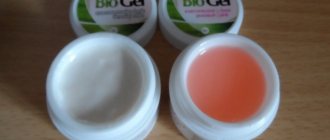
- Depending on the type of sticker used, select the base. It can be colored or transparent.
- Be sure to fix the stickers on top with a fixing varnish.
Now let's take a closer look at the instructions for nail art with stickers:
- After we have completed all the preparatory steps, we proceed directly to the nail art.
- Apply the varnish of the selected color to the entire surface of the nail plate in an even layer. Don't forget that it should be harmoniously combined with the pattern.
- We wait until the applied varnish layer is completely dry.
- Now let's prepare the sticker. We cut out one slider from the general template.
- Pour some water into a bowl and place a sticker in it.
- After a few seconds, use a stick or tweezers to remove it.
- Place the slider on a paper napkin and blot it slightly.
- Carefully move part of the base of the sticker and apply it to the nail plate.
- Using a sliding motion, remove the base completely and straighten the sticker with your fingers.
- We fix it on top with a transparent fixing varnish.
Final stage
After the direct transfer and fixation of the sticker on the nails has been carried out, final manipulations are carried out to bring the nails to an aesthetically presentable appearance. How do they manifest themselves?
- Step 1: Secure the slide with a finishing coat. After making sure that the sticker has dried from water, it is necessary to cover it with a layer of transparent gel as a fixative for the resulting composition. This will ensure the comparative durability of such a manicure design.
- Step 2: drying in a UV lamp. Ultraviolet rays ensure the polymerization of gel polish and accelerate its drying.
- Step 9: degreasing. To remove the top sticky layer of gel polish, you need to walk over it with a cotton swab previously soaked in a degreasing liquid.
That's all. By following these simple steps, you can achieve the desired result without much difficulty at home. Now the marigolds are ready for display and release.
How to apply stickers on nails
There are no particular subtleties or difficulties in performing the procedure using stickers, so the manufacturer does not standardly include instructions for their correct attachment.
If a girl doesn’t know how to properly perform a manicure, she can watch video tutorials on the Internet, since creating an unusual design does not require any skill.
Preparatory stage
In order for the stickers to last on your nails for a long time, you first need to pay attention to preparing the nail plate for work. Be careful - neglecting any stage can lead to premature deterioration in the quality of the manicure.
Preparation for attaching self-adhesives is carried out as before any design:
- A manicure machine or remover removes the previous decorative coating from the nails.
- The shape of the free edge is adjusted with a file.
- The cuticle is being processed.
- A buff is used to polish the surface.
- A dehydrator is applied to the coating to help degrease the nail.
- A base layer of gel polish is applied to the nails, which is dried in an ultraviolet or LED lamp for 1-2 minutes.
After finishing the rough processing of the nails, it is recommended to prepare all consumables and tools. This will make it easier to perform the technique and prevent inaccurate fastening of fragments.
Girls often ignore the use of dehydrate, but the composition has the function of a degreaser, preventing premature removal of the decorative coating. If you have thin nails, you can first use gel and acrylic powder to strengthen them. When creating an even coating, this will not affect the quality of fixation of the stickers.
Additionally, it is recommended to think about the composition that you plan to perform on your nails. You should not attach designs to each nail, as this will look sloppy. As a standard, they are glued to 1-2 plates of each hand. This way the work will look feminine and minimalistic.
Gel polish application technology
Most often, girls use the technique of fixing stickers on the nail, and then covering them with transparent or translucent gel polish. This way they will usually last longer and match the entire manicure.
The technique is quite simple:
- The base layer is applied and completely dried in a lamp.
- The color coating is applied in one or two layers (depending on the saturation of the gel polish), each of which is dried in a lamp for a minute.
- The fragment is removed from the adhesive paper (self-adhesive options are most often used) and applied to the nail. For convenience, you can use tweezers.
- After fixing the pattern, the final topcoat is applied. As a standard, a transparent gel polish is used, which is then dried in a lamp.
- If necessary, remove the sticky layer.
Attaching the sticker in this way usually does not take more than two minutes per nail, especially if self-adhesive models were used.
Keep in mind that the finishing coat needs attention. It should not be too thin, since the varnish should completely level the nail, eliminating differences in the height of the design. After drying the last layer, the nail turns out completely smooth.
Shellac stickers
If you want to fix designs on shellac, it is recommended to choose water-based options, since they will stick stronger, and you also have the opportunity to carefully correct their position before final fixing, which cannot be done with adhesive paper.
The technology is carried out after processing the nail plate:
- A base layer is applied and dried in a lamp.
- Shellac is applied and dried for one and a half minutes.
- The sticky layer is removed.
- The fragment is applied to the nail and fixed on it.
- The work is secured with a topcoat, and then it is dried.
If the procedure is performed correctly, the result of the work remains in the same state until subsequent correction. The attached fragment does not move away from the nail spontaneously, but gradually grows back along with the entire nail.
Varieties
Being already aware of how to properly apply stickers to gel polish, you can pay attention to some of their special varieties. We talked about the most popular and popular elements of nail design, but besides them, there are many more interpretations of such decorative equipment. For general development, we will talk about each separately.
- Water stickers are the most current type of slides, which are considered the most popular today due to the ease of transfer to the surface of the nail plate. The idea is that to activate the adhesive layer, the stickers must be immersed in slightly warmed water.
- Adhesive-based slides – provide a denser film texture and are characterized by simple separation of the adhesive part from the paper blank.
- Photo design – represented by stickers with realistic images of phenomena, objects, texts. Such slides are pre-cut along the contour of the nail and subsequently straightened on its surface using an orange stick.
- Volumetric stickers are convex figures, being separate fragments of an artistic composition. It can be a voluminous butterfly, a voluminous flower, a voluminous heart. Such slides create the impression of a 3D picture and have the effect of a three-dimensional realistic dimension.
- Partial - involve filling only part of the nail space and act as symbols, silhouettes and objects with a clear outline.
- Solid - assumes 100% coverage of the surface with a clear, pronounced print.
- Mirror - characterized by the use of foil slides. How to glue stickers on or under gel polish if their base is metallized? The technique for performing this design is identical to the above-described method of applying stickers to nails, except that straightening along the nail bed must be done more carefully to achieve a better final result.
Features of gluing to different surfaces
The procedure directly depends on what surface the sticker will be glued to. Depending on this, the steps to perform a manicure differ.
On natural nails
Even a beginner can handle the technique of applying stickers to regular varnish. No special skills are required. To do this, it is enough to prepare the surface. Perform the following actions:
- Apply two layers of base coat, waiting until they dry completely.
- The sticker is soaked in water.
- Transfer it to the surface.
- Remove excess moisture and smooth with a cotton swab.
- When the surface is completely dry, a transparent coating is applied on top to secure the decorative elements.
For gel polish
Manicure using gel polish is more reliable and durable.
Execution technology:
- Nails are prepared according to the standard scheme.
The shiny layer is removed with a nail file.- The plate is given the desired shape.
- The surface is treated with a degreaser.
- A layer of gel polish is applied.
- The marigolds are dried under a UV lamp.
- The slider is placed in water.
- After 30 seconds, it is removed with tweezers and transferred to the surface.
- Wait until completely dry.
- Apply a finishing coat of varnish.
- Nails are dried under a lamp.
Additional Tips
Step-by-step instructions with a detailed description of how to apply stickers to gel polish and how to apply adhesive film to nails correctly can be supplemented with a couple of simple but important tips.
- To prevent the sticker from shrinking when separating it from the paper base, you need to use tweezers as a film holder and help yourself with an orange stick, holding the paper base fidgeting on the saucer with its tip.
- To make the foil sticker lay more softly and evenly, slightly heat it up on the matte side - it is important not to confuse this side with the glossy side, otherwise the mirror effect will not be achieved.
- It is better to blot off excess water on the nail with a cotton pad, otherwise the slide will slide over the nail even when trying to apply the finishing coat.
Source: fb.ru
Photo design
An interesting option for manicure is photo design. The material is art stickers in the form of a thin film with a rough texture. The adhesive on the back of the sticker helps you apply stickers to your nails.
Photo printing allows you to create a unique design with a volume effect
The difference from the slider design is clearer and higher quality images on film. Art stickers are used for a complete manicure, as they provide complete coverage of the nail plates. How to glue stickers:
- Cut out pieces of stickers according to the shape of your nails.
- Apply a base layer - simple varnish, gel, acrylic.
- Release the sticker from the paper backing with tweezers.
- Carefully transfer the photo fragment to the entire nail.
To ensure that the coating adheres well and tightly, you can make small cuts along the edges of the sticker.
The manicure is smoothed with a wooden stick and fixed by applying top coat, gel or varnish. The part of the sticker that protrudes beyond the nail is folded over the edge of the plate and filed off - the file should not be held at an angle, but perpendicular to the edge. Photo design has impeccable image quality, but lasts on average three days.