Rating: 5/5 (3)
The beauty industry attracts not only its masterpieces; many are captivated by the very process of creating a well-groomed female image. Girls, wanting to join the flow of the beauty industry, most often start with manicure . Some people plan to provide manicure services to others, while others may want to master the procedure exclusively for themselves. It doesn’t matter which way, but many girls come to the desire to learn how to do their own nails.
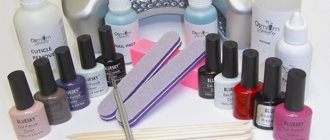
What tools and materials are needed for nail extensions (basic list)
To begin with, let’s outline what is needed for any nail extension (list of materials for beginners):
- a set of brushes for different stages of work;
- a set of files with different abrasiveness;
- disinfectant liquids;
- lint-free wipes;
- a brush for brushing sawdust off your fingers;
- a set of tips or forms to give sufficient length to nails;
- liquid special glue for manicure repair.
Where to buy and how much do materials for manicure and extensions cost?
Everything you need to do nail extensions at home can be purchased at one time at any cosmetic store. It’s better to make a list so you don’t forget to buy the entire list of tools. Another convenient option is to order materials on the website by looking at photographs, product descriptions and reviews from other customers. This way you can save a lot by issuing a discount coupon or participating in a promotion. Prices for materials vary depending on the brand and quality:
- A UV lamp can be bought for 900-1900 rubles;
- a drug called primer costs 180-300 rubles;
- overhead forms for extensions will cost 250-500 rubles. depending on the material made;
- prices for ready-made sets range from 2 to 6 thousand rubles;
- tips cost only 250-300 rubles;
- brushes sell for 40-280 rubles, and glue for 180 rubles;
- odorless nail polish remover and antiseptic can be bought for 450-600 rubles;
- a set of manicure tools will cost 700-1200 rubles;
- a buff or file sells for 40-80 rubles;
- varnishes cost from 250 to 500 rubles. for one bottle.
What you need to purchase to work with nails, depending on the type of coating
Gel extensions add rigidity and durability to nails in any life challenges. The transparent gel polymerizes without penetrating the surface of the nail and therefore does not affect its structure. But the process itself is longer, and the damaged coating cannot be repaired.
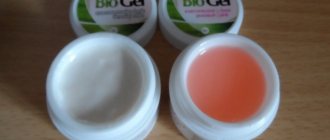
Equipment and materials exclusively for gel extensions
- UV lamp or LED lamp for drying the coating;
- transparent gel base, which is used to prepare the base for the coating;
- transparent gel finish, which protects the design from possible injuries;
- thick colored gels to match the color of the nail plate (pink, peach or white);
- thick camouflage gel, as close as possible to the natural color of the nail;
- a dehydrator, which acts as a degreaser;
- primer to improve the adhesion between your nail and the gel coating.
Working with acrylic is more harmful in itself, but the material for working is more beneficial and pliable. In addition, a chipped nail can be corrected at any time.
Other components of the acrylic extension process
- acrylic transparent powder;
- acrylic camouflage powder;
- colored acrylic powder (white, peach or pink);
- acrylic transparent monomer is the most important component in the nail formation procedure;
- dehydrator-degreaser;
- primer primer for the first layer of acrylic.
For beginners at the start of their training, it is best to purchase professional materials for nail extensions. All components for the procedure must be from the same line of a trusted manufacturer. The most profitable option is to buy a ready-made set that contains everything you need to do nail extensions for beginners.
What is better gel polish or nail extensions?
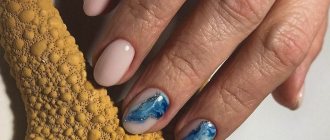
There is no definite answer to this question - everything depends on an individual basis. If you don't know which is better, gel polish or nail extensions, look at your nails. If your nails are long and beautiful, then you can simply coat them with gel polish and make a beautiful design.
In addition, the extension process can slightly damage the nail plate - it will become thinner until you remove the artificial nails. After this, your natural nails need to rest for two or three months.
If by nature you are not given the luxury of beautiful nails and they constantly break, then you need extensions.
IMPORTANT: For short and brittle nails, it is recommended to apply extensions.
How to choose all the necessary equipment for nail extensions
The first thing you should decide on at the start is what kind of lamp you need for nail extensions. New LED lamps are more expensive, but the drying process is noticeably reduced (from 3 minutes in a UV lamp to 30-45 seconds in an LED lamp - and this is for one nail). The lamp must be equipped with a timer .
The second question that needs to be resolved is how you will increase the length of the nail - using tips or forms.
To apply nail extensions with tips, you need to choose the size of the tip, which (and this is important) will fit perfectly with the curve of your own nail. Tips are easy to use, but one set may not contain all the sizes you need . Professionals buy large packages with different numbers of plastic nails.
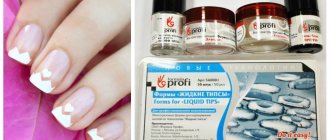
What you definitely need to purchase for nail extensions on forms is special foil in rolls . Extensions on forms give a thinner and more perfect nail, but the process itself will take some practice.
What and where else should you buy for nail extensions? All other tools for the process should also be selected with special attention. brushes for gel or acrylic , of the highest quality . Any lint from the brush will give the coating a visible defect. Buy files with a reserve and check each time before work to see if the abrasive layer is clogged. You can't get a good manicure with an old nail file. All other auxiliary materials can be purchased in specialized stores.
Which is better: gel or acrylic nail extensions?
This question often arises among women who want to make their nails long and attractive. So, which is better: gel or acrylic nail extensions? The gel base is a liquid mixture that is easily distributed over the nail plate and hardens under the influence of UV rays.
IMPORTANT: The gel does not have a specific odor and this is its main advantage.
Acrylic is a powder mixture that is mixed with liquid before being applied to the nail, as it hardens quickly. If you are using acrylic for extensions, you must apply quickly before it hardens.
IMPORTANT: The disadvantage of this material is the strong smell of the liquid.
In addition, acrylic nails turn yellow in the sun and when interacting with sea water, so in the summer it is better to give preference to a gel base. At first, the masters used acrylic and only after that they began to use gel to lengthen nails. Therefore, gel is a more modern material used for this procedure.
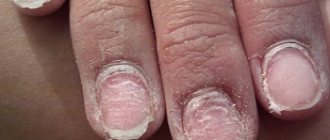
What to do before getting nail extensions
- Get your hands in order. For extended nails, the cuticle is not cut. It is carefully moved with a wooden stick.
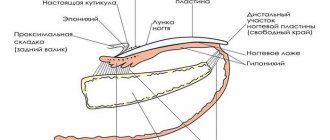
- Determine what length of nails is needed for extensions . It is impossible to increase the length of your own nail by more than 3 mm using the gel itself. You can even stick tips on a nail that has been cut at the root, after which they need to be shortened. On the forms, the nail is immediately made to the required size, only then it is lightly filed, but in this design your nail must be at least 2 mm.
- Decide what extension material you will practice with , gel or acrylic. As a rule, craftsmen work with one material all the time.
There is ongoing debate about whether constantly wearing artificially created nails is harmful. There are women who have been carrying out this procedure for more than ten years without a break and are not going to give up a beautiful and vital manicure. The work of a good, proven master will never harm your hands, but it all depends on the condition of your own nails. Whether you need to give your nails a break from extensions is up to you to decide.
Which gel is best for nail extensions? Firms
Masters in salons use professional gels. They are of good quality and their prices are about the same. Which gel is best for nail extensions? Firms should be selected based on experience.
IMPORTANT: Each master chooses what he likes. He works with materials that have already been tested by time and his experience.
The most popular companies whose gels are most often used for nail extensions include the following manufacturers:
- IBD
- Madelon
- Sagitta
- Soak off from IBD
- Alex Beauty Concept
Step-by-step instructions for the extension process
Gel extensions on tips
- Disinfect prepared nails with spray.
- Carefully file off the top glossy layer of the nail . Do not move the file randomly, only along the nail growth line, lightly scraping the top layer of the nail. Brush the dust off your nail.
- Choose a suitable tip size .
- Apply nail glue to the edge of the tip and immediately apply to your nail. Hold in the desired position for about 10 seconds until the polymer sets. Do this procedure with all nails.
- Form desired nail length, use a nail file to level the small step at the junction.
- Apply base primer to your nail.
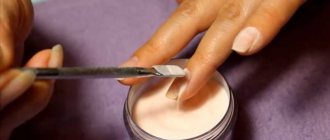
- Apply pfirst layer of more liquid gelI. Dry in a lamp. Remove the sticky layer with a napkin.
- Use thick gel to form the shape of the nail . Pay attention to the smooth transition from the middle of the nail to the tip and to the cuticle. Dry in a lamp, remove the sticky layer.
- Using a polishing buffer, remove any possible irregularities from the surface of the almost finished nail. Once again adjust the shape and length.
- Cover with a protective gel finish. Dry, remove the sticky layer.
- Lubricate the cuticle with fragrant oil.
Acrylic extensions on tips
The procedure for preparing the nail and attaching the tips (steps 1-6) is the same as for gel extensions. The differences begin at the coating formation stage.
- So, the required length has been formed, let's get to work.
- Dip the brush into acrylic liquid then immediately into pink acrylic powder, forming a small pearl. Immediately transfer it to the nail and distribute it over the surface. Periodically, to smooth, dip the brush into the monomer. To shape the entire nail in one go, you need to practice beforehand.
- Dipping the brush into monomer and into transparent powder and form a transparent surface of the entire nail. The border near the cuticle should be made in the form of a smooth transition to a very thin layer at the edge of the nail.
- While the acrylic is still slightly plastic, use tweezers or your nails to gently press the nail on both sides along the growth line so that get a beautiful “arched” end.
- After the acrylic has dried and completely hardened , we file down the edge of the nail, forming the length and side sections.
- Polish the entire surface of the nail with a buff.
- Covering the nail transparent finish to give your manicure a special shine and prevent various types of damage
- Lubricate the cuticle with aromatic oil.
How to do extensions on the form can be seen in the photo.
Which lamp is best for gel nail extensions?
To dry the gel base during extensions, two types of lamps are used - LED and ultraviolet. If you choose the first type, then pay attention to power.
IMPORTANT: The higher the power, the faster the material on the nails will dry.
When the need arises to purchase such a device, the question always arises: which lamp is better for gel nail extensions?
LED lamps are more modern, but they do not have the disinfecting effect of lamps with ultraviolet rays. Therefore, if you purchase an LED lamp for the process, then you will have to buy a special device for disinfection. Otherwise, in terms of functionality, these lamps have identical characteristics - instant drying and high-quality fixation of the helium layer.
Video tutorial on how to do nail extensions at home
The video shows a master class on all stages of working with acrylic nail extensions and reveals the secrets of creating a perfect smile using a French manicure. As the work progresses, the master additionally explains what materials and tools make nail extension exemplary. Manicure is performed on forms.
The video shows a real master class on resurrecting an injured nail. The master talks about what you need to do gel nail extensions at home and explains why you need a primer for nail extensions . Length restoration is done using tips.
Share your experience in nail extensions. What type of extensions do you prefer, acrylic or gel? We will be grateful for your feedback.